All you need to know to get started with the NgRx Signal Store
 Stefanos Lignos
- Modified Fr Aug, 2025

Introduction
When the Angular team introduced the signals API, I started thinking about what a nice solution for the state management of signals would look like. I had the hope that the emerging solution would be a thin layer on top of Angular signals, providing the necessary tools for working with them in a structured and scalable way while minimizing boilerplate. Having worked withPinia in the past, the official state management solution for Vue.js, I really liked its simplicity and modularity. Pinia has only a few core concepts and a very compact API which makes it super easy to start working with.
So, I was positively surprised when I saw theNgRx SignalStore RFC from the NgRx team. It strongly resembled the simplicity, scalability, and structure of a Pinia store. The NgRx team has already released two stable versions of the NgRx Signal Store package. In the following sections, I aim to provide you with all the necessary knowledge to start working and experimenting with this library.
Overview of the NgRx Signal Store
The new NgRx Signal Store is an all-in-one functional state management solution for Angular Signals. As you can see in the following diagram, the API for the Signal Store is quite compact. You can create a store using thesignalStore function. You can handle simple pieces of state using thesignalState. You can extend the core functionality with custom features using thesignalStoreFeature. You can integrate RxJS using therxMethod and you can manage entities using thewithEntities feature. That’s it. If you need additional functionality it’s super simple to extend it with custom features (which we will explore in one of the next sections).

The simplest example of creating a store is:
import {signalStore,withState }from '@ngrx/signals';export const HelloStore = signalStore( withState({firstName:'John',lastName:'Doe' }),);and this can be used in the components like this:
import {ChangeDetectionStrategy,Component,inject }from '@angular/core';import {HelloStore }from './hello.store';@Component({ selector:'app-hello', standalone:true, template:` <h1>Hello {{ helloStore.firstName() }}!</h1> `, providers: [HelloStore], changeDetection:ChangeDetectionStrategy.OnPush,})export default class HelloComponent { readonly helloStore = inject(HelloStore);}After considering this example, you might be wondering why the NgRx team decided to adopt a more functional approach in comparison to the class-based approach used in the ComponentStore, for instance. Some time ago, in the NgRx repository, there was anRFC discussing a new method to create custom NgRx ComponentStore without using a “class-based” approach but instead using a function. I believe this also explains their decision to embrace a functional approach for the new NgRx Signal Store. Their arguments in favor of the more functional approach, outlined in that RFC, were as follows:
There are several community ComponentStore plugins - ImmerComponentStore, EntityComponentStore, etc. However, in JS/TS, a class can only extend one class by default and without additional hacks. What if we want to create a ComponentStore that reuses entity features but also has immer updaters? With the createComponentStore function, I see the possibility of combining reusable features in a more flexible way.
Easier scaling into multiple functions if needed.
With the “class-based” approach, ComponentStores that use onStoreInit and/or onStateInit hooks must be provided by using the provideComponentStore function. This won’t be necessary with the createComponentStore function.
Indeed, as we will see in the next sections, it’s super easy to extend the functionality of the new NgRx Signal Store with custom features, to compose features and to split the code. Also, something not mentioned in the above RFC is that the code becomes more tree-shakeable.
How the NgRx Signal Store works
signalStore
Conceptually thesignalStore function is similar to the RxJSpipe function. Thepipe function takes pipeable operators as arguments, it first performs the logic of the first pipeable operator and then uses that value to execute the logic of the next pipeable operator, and so on. In this way, we define the behavior of a stream. Similarly, thesignalStore function takesstore feature functions (such aswithState,withComputed,withHooks,withProps, etc.) as input arguments. It will first perform the logic of the firststore feature function and then uses that value to execute the logic of the next feature function and so on. In this way, we define the intended behavior of our store.
import {computed }from '@angular/core';import {signalStore,withComputed,withState }from '@ngrx/signals';export const HelloStore = signalStore( withState({firstName:'John',lastName:'Doe' }), withComputed(({firstName,lastName })=> ({ name:computed(()=> `${firstName()} ${lastName()}`), })),);Let’s explore what happens internally when we call thesignalStore function. The first thing that happens is that aninjectable service will be created. This service is what thesignalStore function returns. Depending on the configuration we have provided, Angular will provide the service in the root injector making it available throughout the application (global state) or we will need to provide it in a specific component (local state).

In the constructor of the created class, thestore features we have provided will start executing one by one in the specified order. The sequence of features depends on the functionality you desire, progressing from the previous feature to the next. For instance, if you wish to utilize a method declared in thewithMethods feature within thewithHooks method, you must includewithMethods first in the order.

Signal Store core features
There are 5 core features provided to us from NgRx. Let’s explore what each one of them does:
withState
We use thewithState feature to define the shape and the value of our state in the store. For example we could define the value of aUserStore like this:
export const UserStore = signalStore( {providedIn:'root' }, withState({ user: { firstName:'John', lastName:'Doe', age:25, address: { id:1, country:'UK', }, }, settings: { allowAutoSync:false, }, }),);ThewithState function will create a nested signal for us. This means that we can access any property of the state, regardless of its depth, in our components or in our code, just as we would for any other signal. For example, with the above store, we can display the user’s country like this:
import {ChangeDetectionStrategy,Component,inject }from '@angular/core';import {UserStore }from './user.store';@Component({ selector:'app-user', standalone:true, template:` <h1>Country: {{ userStore.user.address.country() }}!</h1> `, changeDetection:ChangeDetectionStrategy.OnPush,})export default class UserComponent { readonly userStore = inject(UserStore);}Because internally thewithState feature function uses aProxy to create the nested signal, the signal for every property (which, in reality, is acomputed) will be created lazily, only when we try to access the propery. This improves the overall performance in cases where we only need to observe a small subset of the state properties (for instance, if we have stored the result of an HTTP call in the store, and we only need to read specific properties). Additionally, if the nested signal has already been accessed(created), it won’t be created again when we try to access it for a second time.
As mentioned earlier, the features are executed in the order we have specified when calling the signalStore function. Each of them is a factory which returns a function which internally will be executed with the store as an argument as it is defined up to the point of its execution. This means that if the store already contains a method or a state slice or a computed entry with the same key as the keys of the state we define with thewithState feature, the latter will override previously defined state slices, computed, and methods with the same name. This is illustrated in the following diagram.

Because unintentional overriding can lead to issues that are difficult to detect, the NgRx team has introduced a warning (visible in development mode) whenever a user attempts to override previously defined Signal Store members.
withMethods
The withMethods feature enable us to add methods in our store. This can be the public API of our store. Inside these methods, we can update our state using thepatchState utility function or we can integrate RxJS using therxMethod, or you can add any other logic you want to perform in this method. Similarly to thewithState, it will override previously defined state slices and computed properties with the same name.
Examples ofwithMethods usage:
export const HelloStore = signalStore( withState({firstName:'John',lastName:'Doe' }), withMethods((store)=> ({ changeFirstName(firstName:string) { patchState(store, {firstName }); }, })),);export const ArticleStore = signalStore( {providedIn:'root' }, withState<ArticleState>(articleInitialState), withMethods( ( store, articlesService = inject(ArticlesService), actionsService = inject(ActionsService), router = inject(Router), )=> ({ getArticle:rxMethod<string>( pipe( switchMap((slug)=> articlesService.getArticle(slug).pipe( tapResponse({ next: ({article })=> { patchState(store, {data:article }); }, error: ()=> { patchState(store, {data:articleInitialState.data }); }, }), ), ), ), ), ... ...You can find the full implementation of the above storehere
withProps
In the code snippet above, you can see how we pass the dependencies we want to use in thewithMethods as parameters to the method. But what if we wanted to use the same dependencies later in another method (e.g., withHooks)? In that case, we would need to duplicate the code to include these dependencies.
We can avoid this issue by using the new core methodwithProps, introduced in version 19 of the NgRx Store. The main responsibility of this new method is to share properties that are not computed state, methods, or state itself (i.e., properties that cannot be added using any of the other core methods) with the rest of the store.
The example above could be rewritten like this:
export const ArticleStore = signalStore( {providedIn:'root' }, withState<ArticleState>(articleInitialState), withProps(()=> ({ _articlesService:inject(ArticlesService), _actionsService:inject(ActionsService), _router:inject(Router), })), withMethods((store)=> ({ getArticle:rxMethod<string>( pipe( switchMap((slug)=> // ↓ the ArticlesService is shared here and in withHooks store._articlesService.getArticle(slug).pipe( ... ), ), ... withHooks((store)=> { return { onInit() { // ↓ ArticlesService can be used here as well store._articlesService.getArticle(...) }, }; }),Apart from the dependencies inwithProps, we can expose signals as Observables, so we don’t have to transform them into Observables each time they are consumed by the store.
export const HelloStore = signalStore( {providedIn:'root' }, withState({firstName:'John',lastName:'Doe',phone:'616321828' }), withComputed(({firstName,lastName,phone })=> ({ nameAndPhone:computed(()=> `${firstName()} ${lastName()} ${phone()}`), })), withProps(({nameAndPhone })=> ({ nameAndPhone$:toObservable(nameAndPhone), })),);Or we can define Angular Resources
export const ArticleStore = signalStore( {providedIn:'root' }, withState<ArticleState>(articleInitialState), withProps(()=> ({ _articlesService:inject(ArticlesService), })), withProps((store)=> ({ articleResource:rxResource({ request: ()=> store.articleId(), loader: ({request:id })=> store._articlesService.getArticle(id), }).asReadonly(), })), ... ...I would strongly advise avoiding the use of the resource or rxResource APIs inyour NgRx Stores right now. Apart from the obvious fact that they areexperimental features, they currently represent an incomplete implementation.While you can use resource to fetch data, the full capabilities of thisfeature—such as handling PUT, POST, and DELETE requests—are not yet available.Because of this limitation, you would need to mix resource with rxMethod,introduce loading/error states just for some of the requests, while for therest you would have these states provided by the resource. All these factorswould increase the complexity of your store.
withComputed
By utilizing thewithComputed feature, we can define derived state within our store—state calculated based on one or more slices of our existing state. Similarly to thewithState and thewithMethods features, it will override previously defined state slices and methods with the same name.
Examples ofwithComputed usage:
export const HelloStore = signalStore( {providedIn:'root' }, withState({firstName:'John',lastName:'Doe' }), withComputed(({firstName },articlesService = inject(AddressStore))=> ({ name:computed(()=> firstName().toUpperCase()), nameAndAddress:computed( ()=> `${firstName().toUpperCase()} ${articlesService.address()}` ), })), ... ...withHooks
In case we want to perform specific actions when the store is created or destroyed like calling one of the methods we have defined previously in thewithMethods feature or performing some clean-up logic, we can use thewithHooks feature.
Example ofwithHooks usage:
export const HelloStore = signalStore( withState({firstName:'John',lastName:'Doe' }), withComputed(({firstName },articlesService = inject(AddressStore))=> ({ name:computed(()=> firstName().toUpperCase()), nameAndAddress:computed( ()=> `${firstName().toUpperCase()} ${articlesService.address()}`, ), })), withMethods((store)=> ({ changeFirstName(firstName:string) { patchState(store, {firstName }); }, })), withHooks(({firstName,changeFirstName })=> { return { onInit() { changeFirstName('Nick'); }, onDestroy() { console.log('firstName on destroy',firstName()); }, }; }),);Signal Store standalone methods
patchState
The patchState utility function provides a type-safe way to perform immutable updates on pieces of state. Due to a recent change to the default equality check function in signals in Angular 17.0.0-next.8 release, it is important to make sure that we update the values of the nested signals of our state in an immutable way. That’s because in the new default equality check of the Angular signals, objects are checked by reference. Therefore, if you return the same object, just mutated, your signal will not send a notification indicating that it has been updated. ThepatchState function helps us with this.
By default, it’s not possible to modify the state of a Signal Store externally (e.g from a component). However, if for some reason you need to modify the state outside the Store, you need to set{ protectedState: false } when creating the Signal Store. This is not recommended though.
import {signalStore,withState }from '@ngrx/signals';export const HelloStore = signalStore( {protectedState:false }, withState({firstName:'John',lastName:'Doe' }),);RxMethod
Even when working with signals, integrating RxJS into our code can give us extra powers. TherxMethod is a standalone factory function that helps us create reactive methods. It returns a function that accepts a static value, signal, or observable as an input argument. If a static value is provided as input, the returned method will be executed only once. If a signal is provided, then it will be re-executed every time the signal notifies that it changed, and when an observable is provided, it will be re-executed every time the observable emits a value.
Example:
withMethods((store)=> ({ logIntervals:rxMethod( pipe( filter((num)=> num % 2 === 0), tap((val)=> console.log(`Even number:${val}`)) ) ),})),In the following component, a new message will be logged every time themyNumberSignal signal changes.
export class ExampleComponent { readonly helloStore = inject(HelloStore); readonly myNumberSignal = signal(0); constructor() { interval(1000).subscribe((value)=> this.number.set(value)); this.helloStore.logIntervals(this.number); }}Customs features
One of the biggest strengths of the new NgRx Signal Store is its extensibility. In addition to utilizing the core features provided by the library (withEntities, withState, withMethods, withHooks, withComputed), you can easily create your own custom features to enhance the library’s capabilities and functionality based on your specific needs. Of course, this gives also the chance to the community to start creating custom features that can be seamlessly integrated alongside the core features. One of the best examples so far is thengrx-toolkit library which provides already a lot of useful custom features likewithDevtools,withRedux,withDataService,withCallState,withUndoRedo, etc. In the next sections we’re going to create our own custom feature (withClipboard).
The NgRx Signal Store can be fully extended. Here is a list of things you can do with a custom feature:
- Add new properties to stores
- Add new methods to stores
- Add new computed to stores
- Specify which properties a store should contain in order to be possible to use them in a store.
- Re-use the same functionality accross different stores
You can create a custom feature using thesignalStoreFeature function. Similarly to thesignalStore function, it takes one or more core or custom features as input argument(s). It will first execute the logic of the first provided feature and then use that value to execute the logic of the next feature function and so on. One of the simplest examples of a custom feature is the followingwithClipboard feature. It enables you to copy text to the clipboard and saves the copied text in the store.
...import {Clipboard }from '@angular/cdk/clipboard';export interface ClipboardState { text:string; copied:boolean;}export interface ClipboardOptions { resetCopiedStateAfter?:number;}export function withClipboard(options?:ClipboardOptions) { return signalStoreFeature( withState<ClipboardState>({text:'',copied:false }), withMethods((store,clipboard = inject(Clipboard))=> ({ copy(value:string) { clipboard.copy(value); if (options?.resetCopiedStateAfter) { setTimeout( ()=> patchState(store, {copied:false }), options?.resetCopiedStateAfter ); } patchState(store, {text:value,copied:true }); }, })) );}Now this custom feature can be used from any store in our application like this:
export const HelloStore = signalStore( {providedIn:'root' }, withState({firstName:'John',lastName:'Doe',phone:'616321828' }), withComputed(({firstName,lastName,phone })=> ({ nameAndPhone:computed(()=> `${firstName} ${lastName} ${phone}`), })), withClipboard({resetCopiedStateAfter:1500 }),);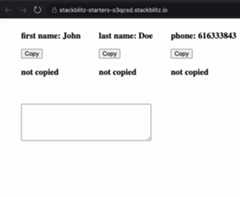
You can find the example here:Stackblitz
Most likely you have already understood the problem with the above custom feature. If I want to save thecopied status for more than one elements in the page in the same store, it’s not possible with the current implementation of the feature. When you start working with the NgRx Signal Store and with the custom features, one of the first problems you will encounter is how you can use the same custom feature multiple times in the same store. The solution for this is very nicely explained in anarticle from Manfred Steyer. In the next paragraph I will show how we can re-implement the above custom feature so it can be used many times in the same store so we can save the status of different elements in the page. What we need to implement is a custom feature with dynamic properties.
In the end, we should be able to prefix the slices of the custom feature’s state with a dynamic property. This way, we can avoid naming collisions in the state slices. For the same reason, we also want to prefix the methods.
To do this, we need to inform the type system about our intention to return prefixed slices and methods in the customSignalStoreFeature. We do this by providing the following types:
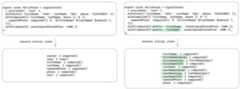
export interface ClipboardOptions<Prop> { prefix:Prop; resetCopiedStateAfter?:number;}export type PrefixedClipboardState<Prop extends string>= { [K in Prop as `${K}Text`]:string;} & { [K in Prop as `${K}Copied`]:boolean;};export type PrefixedClipboardMethods<Prop extends string>= { [K in Prop as `${K}Copy`]: (value:string)=> {};};export function withClipboard<Prop extends string>( options:ClipboardOptions<Prop>,):SignalStoreFeature< {state: {};signals: {};methods: {} }, { state:PrefixedClipboardState<Prop>; signals: {}; methods:PrefixedClipboardMethods<Prop>; }>;And the actual implementation of thewithClipboard feature should include the prefixed slices and methods:
export function withClipboard<Prop extends string>( options:ClipboardOptions<Prop>,):SignalStoreFeature { const {textKey,copiedKey }= getClipboardStateKeys(options.prefix); const {copyKey }= getClipboardMethodsKeys(options.prefix); return signalStoreFeature( withState({ [textKey]:'', [copiedKey]:false }), withMethods((store,clipboard = inject(Clipboard))=> ({ [copyKey](value:string) { clipboard.copy(value); if (options?.resetCopiedStateAfter) { setTimeout( ()=> patchState(store, { [copiedKey]:false }), options?.resetCopiedStateAfter, ); } patchState(store, { [textKey]:value, [copiedKey]:true }); }, })), );}And this is how we can use it in the store:
export const HelloStore = signalStore( {providedIn:'root' }, withState({firstName:'John',lastName:'Doe',phone:'616321828' }), withComputed(({firstName,lastName,phone })=> ({ nameAndPhone:computed(()=> `${firstName} ${lastName} ${phone}`), })), withClipboard({prefix:'firstName',resetCopiedStateAfter:1500 }), withClipboard({prefix:'lastName',resetCopiedStateAfter:1500 }), withClipboard({prefix:'phone',resetCopiedStateAfter:1500 }),);Now we can see that each element in the page has its own slice in the store.

You can find the full implementation here:Stackblitz
Conclusion
If you already use NgRx in a project, I would suggest starting to work with the NgRx Signal Store for introducing new stores. You can easily combine the NgRx Store and the NgRx Signal Store. For a new project, I would strongly suggest starting to work directly with the NgRx Signal Store for state management. This is because it can dramatically reduce boilerplate and, of course, has full support for working with Angular Signals in a structured way.
Useful links - examples
- Example app using NgRx Signal Store
- Stackblitz custom feature - withClipboard
- Stackblitz custom feature dynamic properties - withClipboard
- Other custom features - NgRx toolkit library
Bibliography
[1]:RFC: NgRx SignalStorehttps://github.com/ngrx/platform/discussions/3796
[2]:Signal Store docshttps://ngrx.io/guide/signals/signal-store
[3]:RFC: Add createComponentStore Functionhttps://github.com/ngrx/platform/discussions/3769