- Notifications
You must be signed in to change notification settings - Fork2
TTBaseUIKit is a framework that helps you build iOS applications in the fastest and most efficient way, by providing base views written in both UIKit Programmatically and SwiftUI.
License
tqtuan1201/TTBaseUIKit
Folders and files
| Name | Name | Last commit message | Last commit date | |
|---|---|---|---|---|
Repository files navigation
TTBaseUIKit is a framework that helps you build iOS applications in the fastest and most efficient way, by providing base views written in both UIKit Programmatically and SwiftUI. The current release of TTBaseUIKit supports all versions of iOS and OS X since the introduction of Auto Layout on each platform, in Swift language with a single codebase.
In this update, I have included a Base Project called TTBaseUIKitExample, which provides comprehensive examples of Base classes such as BaseUIViewController, BaseUITableViewController, BaseCollectionViewController, and more in UIKit, as well as BaseView, BaseButton, BaseText, BaseStack, and others in SwiftUI. The simplest and most straightforward way to understand this is to download the example and run it. Hands-on practice is the easiest way to understand it well.
You can see more details in here:TTBaseUIKit - TTBaseUIKitExample
- File > Swift Packages > Add Package Dependency
- Addhttps://github.com/tqtuan1201/TTBaseUIKit.git
- Select "Up to Next Major" with "2.1.0" or higher
Once you have your Swift package set up, adding Alamofire as a dependency is as easy as adding it to thedependencies value of yourPackage.swift.
dependencies: [ .package(url: "https://github.com/tqtuan1201/TTBaseUIKit.git", .upToNextMajor(from: "2.1.0"))]or dependencies: [ .package(url: "https://github.com/tqtuan1201/TTBaseUIKit.git", branch: "master"),]If you encounter any problem or have a question on adding the package to an Xcode project, I suggest reading the Adding Package Dependencies to Your App guide article from Apple.
CocoaPods is a dependency manager for Cocoa projects.Add the following line to your Podfile:
pod'TTBaseUIKit'
Add the following line to your Cartfile:
github"tqtuan1201/TTBaseUIKit"
- Put TTBaseUIKit repo somewhere in your project directory.
- In Xcode, add
TTBaseUIKit.xcodeprojto your project. - On your app's target, add the TTBaseUIKit framework:
- as an embedded binary on the General tab.
- as a target dependency on the Build Phases tab.
When you use this framework. You have the ability to controlColor,FontSize,UI size. It helps you a lot when you applythemes, build apps ondifferent platforms and they are easy to change. Config setting inAppDelegate
letview:ViewConfig=ViewConfig()view.viewBgNavColor=UIColor.blueview.viewBgColor=UIColor.whiteview.buttonBgDef=UIColor.blueview.buttonBgWar=UIColor.redletsize:SizeConfig=SizeConfig()size.H_SEG=50.0size.H_BUTTON=44.0letfont:FontConfig=FontConfig()font.HEADER_H=16font.TITLE_H=14font.SUB_TITLE_H=12font.SUB_SUB_TITLE_H=10TTBaseUIKitConfig.withDefaultConfig(withFontConfig: font, frameSize: size, view: view)?.start(withViewLog:true)self.window=UIWindow(frame:UIScreen.main.bounds)self.window!.rootViewController=UINavigationController.init(rootViewController:YourViewController())self.window!.makeKeyAndVisible()
- With
ViewConfig, you can customize the most of colors forButton,Label,Background colors, ect. You can see all the config here:ViewConfig - With
SizeConfig, you can customize the most of size forButton,Label,Navigation,Conner radius,Icon,Textfield, ect. You can see all the config here:SizeConfig - With
FontConfig, you can customize the most of font size forTitle,SubTitle,Header, ect. You can see all the config here:FontConfig
Apply config by:
TTBaseUIKitConfig.withDefaultConfig(withFontConfig: font, frameSize: size, view: view)?.start(withViewLog: true)
TTBaseUIKit dramatically simplifies writing to build UI programmatically. Let's take a quick look at some examples, usingTTBaseUIKit from Swift.

letnoti:TTBaseNotificationViewConfig=TTBaseNotificationViewConfig(with: window)noti.setText(with:"WELCOME ^^", subTitle:"Just demo little element ui with write by programmatically swift")noti.type=.NOTIFICATION_VIEWnoti.touchType=.SWIPEnoti.notifiType=.SUCCESSnoti.onShow()

letpopupVC=TTPopupViewController(title:"SOMETHING LIKE THIS", subTitle:"Lorem Ipsum is simply dummy text of the printing and typesetting industry. Lorem Ipsum has b", isAllowTouchPanel:true)yourVC.present(popupVC, animated:true)
yourVC.tableView.setStaticBgNoData(title:"NO DATA", des:"Contrary to popular belief, Lorem Ipsum is not simply random text. It has roots in a piece of classical Latin literature from 45 BC, making"){print("Touch handle!!!!")}
This is aprotocol use to easily organize UI handling code. You can see all configs here:ViewCodable
func setupViewCodable(with views:[UIView])
This function calls all other functions in the correct order. You can use it in an UIViewController viewDidLoad method or in a view initializer, for example.
func setupStyles()
This function should be used to apply styles to your customs views.
func setupData()
This function should be used to set data
func setupConstraints()
This function should be used to add constraints to your customs views
func setupBaseDelegate()
This function should be used to set delegate for views
import TTBaseUIKitclassYourCustomView:TTBaseUIView{overridefunc updateBaseUIView(){ super.updateBaseUIView()}}extensionYourCustomView:TTViewCodable{func setupStyles(){}func setupCustomView(){}func setupConstraints(){}}
import TTBaseUIKitclassBaseUIViewController:TTBaseUIViewController<DarkBaseUIView>{varlgNavType:BaseUINavigationView.TYPE{get{return.DEFAULT}}varbackType:BaseUINavigationView.NAV_BACK=.BACK_POPoverridefunc viewWillAppear(_ animated:Bool){ super.viewWillAppear(true)self.updateForNav()}publicoverrideinit(){ super.init()self.navBar=BaseUINavigationView(withType:self.lgNavType)self.setDelegate()}publicconvenienceinit(backType:BaseUINavigationView.NAV_BACK){self.init()self.backType= backType}publicconvenienceinit(withTitleNav title:String, backType:BaseUINavigationView.NAV_BACK=.BACK_POP){self.init()self.backType= backTypeself.setTitleNav(title)}publicconvenienceinit(withNav nav:BaseUINavigationView, backType:BaseUINavigationView.NAV_BACK=.BACK_POP){self.init()self.backType= backTypeself.navBar= navself.setDelegate()}requiredinit?(coder aDecoder:NSCoder){fatalError("init(coder:) has not been implemented")}}// MARK: For private base funcsextensionBaseUIViewController{fileprivatefunc setDelegate(){iflet lgNav=self.navBaras?BaseUINavigationView{ lgNav.delegate=self}}fileprivatefunc updateForNav(){iflet lgNav=self.navBaras?BaseUINavigationView{ lgNav.setTitle(title:"TTBASEUIVIEW_KIT")}}}// MARK: For public base funcs//--NAVextensionBaseUIViewController{func setTitleNav(_ text:String){self.navBar.setTitle(title: text)}func setShowNav(){self.statusBar.isHidden=falseself.navBar.isHidden=false}func setHiddenNav(){self.statusBar.isHidden=trueself.navBar.isHidden=true}}extensionBaseUIViewController:BaseUINavigationViewDelegate{func navDidTouchUpBackButton(withNavView nav:BaseUINavigationView){ifself.backType==.BACK_POP{self.navigationController?.popViewController(animated:true)}elseifself.backType==.BACK_TO_ROOT{self.navigationController?.popToRootViewController(animated:true)}else{self.dismiss(animated:true, completion:nil)}}func navDidTouchUpRightButton(withNavView nav:BaseUINavigationView){}}
import TTBaseUIKitclassBaseUITableViewController:TTBaseUITableViewController{overridevarnavType:TTBaseUIViewController<TTBaseUIView>.NAV_STYLE{get{return.STATUS_NAV}}varlgNavType:BaseUINavigationView.TYPE{get{return.DEFAULT}}varbackType:BaseUINavigationView.NAV_BACK=.BACK_POPoverridefunc viewWillTransition(to size:CGSize, with coordinator:UIViewControllerTransitionCoordinator){ super.viewWillTransition(to: size, with: coordinator)DispatchQueue.main.async{[weak self]inguardlet strongSelf=selfelse{return}guardlet headerView= strongSelf.tableView.tableHeaderViewelse{return} headerView.layoutIfNeeded()letheader= strongSelf.tableView.tableHeaderView strongSelf.tableView.tableHeaderView= header}}overridefunc updateBaseUI(){ super.updateBaseUI()self.navBar=BaseUINavigationView(withType:self.lgNavType)self.setDelegate()}}//For Base private funcsextensionBaseUITableViewController:BaseUINavigationViewDelegate{fileprivatefunc setDelegate(){iflet lgNav=self.navBaras?BaseUINavigationView{ lgNav.delegate=self}}func navDidTouchUpBackButton(withNavView nav:BaseUINavigationView){self.navigationController?.popViewController(animated:true)}}
TTBaseUIKit to make easy Auto Layout. This framework provides some functions to setup and update constraints.
setLeadingAnchor: Set/Update value forcurrent view orsuper viewsetTrailingAnchor(_ view:UIView? = nil, isUpdate:Bool = false, constant:CGFloat, isApplySafeArea:Bool = false, priority:UILayoutPriority? = nil)setTopAnchor(_ view:UIView? = nil, isUpdate:Bool = false, constant:CGFloat, priority:UILayoutPriority? = nil)setBottomAnchor(_ view:UIView? = nil, isUpdate:Bool = false, constant:CGFloat,isMarginsGuide:Bool = false, priority:UILayoutPriority? = nil)setCenterXAnchor(_ view:UIView? = nil, isUpdate:Bool = false, constant:CGFloat)setcenterYAnchor(_ view:UIView? = nil, isUpdate:Bool = false, constant:CGFloat)
TTBaseUIKit provides common handling functions forString,Date,Json,Device,Language,VietNamLunar,Validation,NetworkSpeedTest
With SwiftUI, Apple offers developers a unified UI framework for building user interfaces on all types of Apple devices.
TTBaseSUISpacer
In SwiftUI, the Spacer view is primarily used for layout and spacing purposes, and it doesn’t have direct properties to change background color or set corner radius. However, we can create a customizing class to add some commonly used functions.

For more examples and usage, please refer to example projectTTBaseUIKitExample
TTBaseUIKitExample, which provides comprehensive examples of Base classes such as BaseUIViewController, BaseUITableViewController, BaseCollectionViewController, and more in UIKit, as well as BaseView, BaseButton, BaseText, BaseStack, and others in SwiftUI. The simplest and most straightforward way to understand this is to download the example and run it.
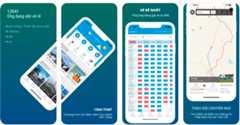
During my work, I have updated and used this framework in many projects. All my project usingUI programmatically instead of usingStoryboard. Here are some screenshoots of the apps:
12Bay iOS App
12Bay MacOS app
Aihealth iOS app
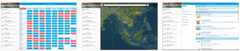

- TMS Mobile App
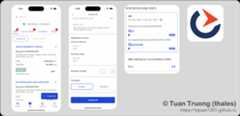
- AiDoctor

- WECARE 247

You can see all my projects here:Link
- Reusable codes
- Speed up your project
- Easy to use
- Mustbuild app to see UI,
SwiftUIsolved that problem I was thinking about.
Truong Quang Tuan –website – (email:truongquangtuanit@gmail.com)
Hi, I’m Tuan (short for Quang-Tuan Truong). I’m a mobile lead with years of professional experience building applications and leading teams in both large companies and small startups.
Feel free to get in touch if you have suggestions, issues, or anything else. You can reach me via email attruongquangtuanit@gmail.com or through my website:https://tqtuan1201.github.io/
If you have a great idea but don’t know how to start? Don't worry, simply click onMeet My Team and we can discuss your project over a cup of coffee'
We build high quality apps!Get in touch if you need help with a project.
About
TTBaseUIKit is a framework that helps you build iOS applications in the fastest and most efficient way, by providing base views written in both UIKit Programmatically and SwiftUI.
Topics
Resources
License
Uh oh!
There was an error while loading.Please reload this page.
Stars
Watchers
Forks
Packages0
Uh oh!
There was an error while loading.Please reload this page.