Project Title:Pollster (Voting System) web application using Django framework
Type of Application (Category): Web application.
Introduction: We will create a pollster (voting system) web application using Django. This application will conduct a series of questions along with many choices. A user will be allowed to vote for that question by selecting a choice. Based on the answer the total votes will be calculated and it will be displayed to the user. Users can also check the result of the total votes for specific questions on the website directly. We will also build the admin part of this project. Admin user will be allowed to add questions and manage questions in the application.
Pre-requisite: Knowledge of Python and basics of Django Framework. Python should be installed in the system. Visual studio code or any code editor to work on the application.
Technologies used in the project: Django framework and SQLite database which comes by default with Django.
Implementation of the Project
Creating Project
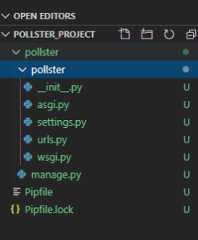
Step-1: Create an empty folderpollster_project in your directory.
Step-2: open your command prompt using window+r key
Step-3: Now switch to your folder using
cd pollster_project
step-4: and create a virtual environment in this folder using the following command.
pip install pipenv
pipenv shell
Step-3: APipfilewill be created in your folder from the above step. Now install Django in your folder using the following command.
pipenv install django
Step-4: Now we need to establish the Django project. Run the following command in your folder and initiate a Django project.
django-admin startproject pollster
A New Folder with namepollsterwill be created. Switch to the pollster folder using the following command.
cd pollster
The folder structure will look something like this.
Here you can start the server using the following command and check if the application running or not using yourhttp://127.0.0.1:8000/ in your browser.
python manage.py runserver
Step-5: Create an app 'polls' using the following command
python manage.py startapp polls
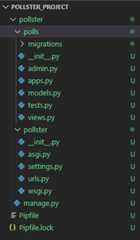
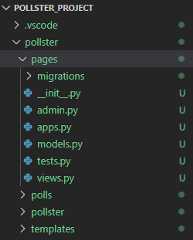
Below is the folder structure after creating ''polls' app in the project.
Create Models
Step-1: In yourmodels.py file write the code given below to create two tables in your database. One is 'Question' and the other one is 'Choice'. 'Question' will have two fields of 'question_text' and a 'pub_date'. Choice has three fields: 'question', 'choice_text', and 'votes'. Each Choice is associated with a Question.
Pythonfromdjango.dbimportmodels# Create your models here.classQuestion(models.Model):question_text=models.CharField(max_length=200)pub_date=models.DateTimeField('date published')def__str__(self):returnself.question_textclassChoice(models.Model):question=models.ForeignKey(Question,on_delete=models.CASCADE)choice_text=models.CharField(max_length=200)votes=models.IntegerField(default=0)def__str__(self):returnself.choice_textStep-2:Go to thesettings.py file and in the list, INSTALLED_APPS write down the code below to include the app in our project. This will refer to the polls -> apps.py -> PollsConfig class.
PythonINSTALLED_APPS=['polls.apps.PollsConfig','django.contrib.admin','django.contrib.auth','django.contrib.contenttypes','django.contrib.sessions','django.contrib.messages','django.contrib.staticfiles',]
Step-3: We have made changes in our database and created some tables but in order to reflect these changes we need to create migration here and then Django application will stores changes to our models. Run the following command given below to create migrations.
python manage.py makemigrations polls
Inside polls->migrations a file0001_initial.py will be created where you can find the database tables which we have created in our models.py file. Now to insert all the tables in our database run the command given below...
python manage.py migrate
Create an Admin User
Step-1: Run the command given below to create a user who can login to the admin site.
python manage.py createsuperuser
It will prompt username which we need to enter.
Username: geeks123
Now it will prompt an email address which again we need to enter here.
Email address: xyz@example.com
The final step is to enter the password. We need to enter the password twice, the second time as a confirmation of the first.
Password: ******
Password (again): ******
Superuser created successfully.
Now we can run the server using the same commandpython manage.py runserver and we can check our admin panel browsing the URLhttp://127.0.0.1:8000/admin.
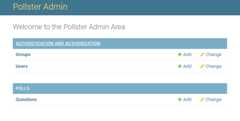
Step-2: In theadmin.py file we will write the code given below to map each question with choices to select. Also, we will write the code to change the site header, site title, and index_title. Once this is done we can add questions and choices for the question from the admin panel.
Pythonfromdjango.contribimportadmin# Register your models here.from.modelsimportQuestion,Choice# admin.site.register(Question)# admin.site.register(Choice)admin.site.site_header="Pollster Admin"admin.site.site_title="Pollster Admin Area"admin.site.index_title="Welcome to the Pollster Admin Area"classChoiceInLine(admin.TabularInline):model=Choiceextra=3classQuestionAdmin(admin.ModelAdmin):fieldsets=[(None,{'fields':['question_text']}),('Date Information',{'fields':['pub_date'],'classes':['collapse']}),]inlines=[ChoiceInLine]admin.site.register(Question,QuestionAdmin)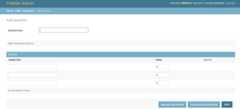
Note: We can test the application here by adding some questions and choices for those questions.
Create Views
Now we will create the view of our application that will fetch the data from our database and will render the data in the 'template' (we will create 'template' folder and the files inside this folder in the next section) of our application to display it to the user.
Step-1 Openviews.py file and write down the code given below.
Pythonfromdjango.templateimportloaderfromdjango.httpimportHttpResponse,HttpResponseRedirect,Http404fromdjango.shortcutsimportget_object_or_404,renderfromdjango.urlsimportreversefrom.modelsimportQuestion,Choice# Get questions and display themdefindex(request):latest_question_list=Question.objects.order_by('-pub_date')[:5]context={'latest_question_list':latest_question_list}returnrender(request,'polls/index.html',context)# Show specific question and choicesdefdetail(request,question_id):try:question=Question.objects.get(pk=question_id)exceptQuestion.DoesNotExist:raiseHttp404("Question does not exist")returnrender(request,'polls/detail.html',{'question':question})# Get question and display resultsdefresults(request,question_id):question=get_object_or_404(Question,pk=question_id)returnrender(request,'polls/results.html',{'question':question})# Vote for a question choicedefvote(request,question_id):question=get_object_or_404(Question,pk=question_id)try:selected_choice=question.choice_set.get(pk=request.POST['choice'])except(KeyError,Choice.DoesNotExist):# Redisplay the question voting form.returnrender(request,'polls/detail.html',{'question':question,'error_message':"You didn't select a choice.",})else:selected_choice.votes+=1selected_choice.save()# Always return an HttpResponseRedirect after successfully dealing# with POST data. This prevents data from being posted twice if a# user hits the Back button.returnHttpResponseRedirect(reverse('polls:results',args=(question.id,)))Step-2: Create a fileurls.py inside the pollster->polls folder to define the routing for all the methods we have implemented in views.py file (don't get confused with the file inside the pollster->pollster->urls.py file). Below is the code of urls.py file...
Pythonfromdjango.urlsimportpathfrom.importviewsapp_name='polls'urlpatterns=[path('',views.index,name='index'),path('<int:question_id>/',views.detail,name='detail'),path('<int:question_id>/results/',views.results,name='results'),path('<int:question_id>/vote/',views.vote,name='vote'),]Create Templates
Step-1: Follow the steps given below to create the front layout of the page.
- Create a folder 'templates' in top-level pollster folder (alongside of polls and pollster) i.e. pollster-> templates.
- Create 'base.html' file inside the template folder. We will define the head, body and navigation bar of our application in this file.
- In the 'templates' folder create another folder 'polls'. In 'polls' folder create three files 'index.html', 'results.html' and 'detail.html'.
The folder structure will look like the image given below (we have highlighted the files which we have created in 'create views i.e urls.py' and 'create template' section)...

Step-2: By default Django will search the 'template' inside the 'polls' app but we have created a global 'template' folder which is outside the polls app. So in order to make it work, we need to define the 'template' folder path inside the settings.py file. Opensettings.py file and add the code given below in the list 'TEMPLATES'. In order to make the given code work add "import os" in settings.py.
PythonTEMPLATES=[{# make changes in DIRS[].'BACKEND':'django.template.backends.django.DjangoTemplates','DIRS':[os.path.join(BASE_DIR,'templates')],'APP_DIRS':True,'OPTIONS':{'context_processors':['django.template.context_processors.debug','django.template.context_processors.request','django.contrib.auth.context_processors.auth','django.contrib.messages.context_processors.messages',],},},]Step-3: Openindex.html file and write the code given below. This file will display thelist of questions which are stored in our database. Also, two buttons will be displayed to the user. One for thevoting(we will create a detail.html file for voting) and the other one is to check theresults(we will create results.html file for results).
Python{%extends'base.html'%}{%blockcontent%}<h1class= "text-centermb-3" > Poll Questions < /h1 >{%iflatest_question_list%}{%forquestioninlatest_question_list%}<divclass= "card-mb-3" ><divclass= "card-body" ><pclass= "lead" > {{question.question_text}} < /p ><ahref="{% url 'polls:detail' question.id %}"class= "btnbtn-primarybtn-sm" > Vote Now < /a ><ahref="{% url 'polls:results' question.id %}"class= "btnbtn-secondarybtn-sm" > Results < /a ></div></div>{%endfor%}{%else%}<p>Nopollsavailable</p>{%endif%}{%endblock%}Step-4: Opendetail.html file and write the code given below. This file will be responsible for voting on specific questions. Whatever question a user will select for voting from the list of the question (index.html file), that specific question and the choices for the question will be displayed on this page. A user will be allowed to select one choice and give voting by clicking on the vote button.
Python{%extends'base.html'%}{%blockcontent%}<aclass= "btnbtn-secondarybtn-smmb-3" href = "{%url'polls:index'%}" > Back To Polls < /a ><h1class= "text-centermb-3" > {{question.question_text}} < /h1 >{%iferror_message%}<pclass= "alertalert-danger" ><strong>{{error_message}}</strong></p>{%endif%}<formaction="{% url 'polls:vote' question.id %}"method="post">{%csrf_token%}{%forchoiceinquestion.choice_set.all%}<divclass= "form-check" ><inputtype="radio"name="choice"class= "form-check-input" id = "choice{{forloop.counter}}"value="{{ choice.id }}"/><labelfor="choice{{ forloop.counter }}">{{choice.choice_text}}</label></div>{%endfor%}<inputtype="submit"value="Vote"class= "btnbtn-successbtn-lgbtn-blockmt-4" / ></form>{%endblock%}Step-5: Openresults.html file and write the code given below. This file will display the result of total votes on a specific question whatever question the user will select (from the index.html file) to check the result.
Python{%extends'base.html'%}{%blockcontent%}<h1class= "mb-5text-center" > {{question.question_text}} < /h1 ><ulclass= "list-groupmb-5" >{%forchoiceinquestion.choice_set.all%}<liclass= "list-group-item" >{{choice.choice_text}}<spanclass= "badgebadge-successfloat-right" > {{choice.votes}}vote{{choice.votes|pluralize}}</span></li>{%endfor%}</ul><aclass= "btnbtn-secondary" href = "{%url'polls:index'%}" > Back To Polls < /a ><aclass= "btnbtn-dark" href = "{%url'polls:detail'question.id%}" > Vote again?< /a >{%endblock%}Step-6: Let's create thenavigationbar for our application. Create a folder 'partials' inside the folder 'templates' and then create a file '_navbar.html' inside the 'partial' folder. File structure will be templates->partials->_navbar.html. Write the code given below in this file.
Python<navclass= "navbarnavbar-darkbg-primarymb-4" ><divclass= "container" ><aclass= "navbar-brand" href = "/" > Pollster < /a ></div></nav>
Step-7: We haven't included the head and body tag in every single HTML file we have created till now. We can write these codes in just one single filebase.html and we can give the layout to our page. We will also bring our navigation bar(_navbar.html file) on this page. So openbase.html file inside the 'template' folder and write down the code given below.
Python<!DOCTYPEhtml><htmllang="en"><head><linkrel="stylesheet"href="https://stackpath.bootstrapcdn.com/bootstrap/4.4.1/css/bootstrap.min.css"integrity="sha384-Vkoo8x4CGsO3+Hhxv8T/Q5PaXtkKtu6ug5TOeNV6gBiFeWPGFN9MuhOf23Q9Ifjh"crossorigin="anonymous"><title>Pollster{%blocktitle%}{%endblock%}</title></head><body><!--NavBar-->{%include'partials/_navbar.html'%}<divclass= "container" ><divclass= "row" ><divclass= ".col-md-6m-auto" >{%blockcontent%}{%endblock%}</div></div></div></body></html>Create Landing Page
The URLhttp://127.0.0.1:8000/ should display a landing page for our web application. So to create a landing page we will follow the step given below.
Step-1 Switch to the top-level pollster folder and run the command given below to create an app 'pages'.
python manage.py startapp pages
Below is the folder structure once the 'pages' app will be created.
Step-2 Open 'views.py' inside 'pages' folder i.e. pages->views.py. Write down the code given below to visit on landing page.
Pythonfromdjango.shortcutsimportrender# Create your views here.defindex(request):returnrender(request,'pages / index.html')
Step-3 Createurls.py file inside the 'pages' folder i.e. pages->urls.py. Write the code given below to define the routing of pages->index.html file (check step-1).
Pythonfromdjango.urlsimportpathfrom.importviewsurlpatterns=[path('',views.index,name='index'),]Step-4 Create a folder 'pages' inside 'template' folder. Now inside 'pages' folder create a fileindex.html. Write down the code given below to display the landing page to the users.
Python{%extends'base.html'%}{%blockcontent%}<divclass= "cardtext-center" ><divclass= "card-body" ><h1>WelcomeToPollster!</h1><p>ThisisanPollingWebApplicationbuiltwithDjango</p><aclass= "btnbtn-dark" href = "{%url'polls:index'%}" >ViewAvailablePolls</a></div></div>{%endblock%}Create routing inside the main urls.py file of the application
We have created two apps in our application 'polls' and 'pages'. We need to define the routing of these two apps inside the mainurls.py file which is pollster->pollster->urls.py file. So open the mainurls.py file inside the pollster folder and write down the code given below to define the routing of these two apps('polls' and 'pages').
Pythonfromdjango.contribimportadminfromdjango.urlsimportinclude,pathurlpatterns=[path('',include('pages.urls')),path('polls/',include('polls.urls')),path('admin/',admin.site.urls),]Testing of the Application
Admin Frontend
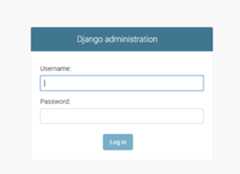
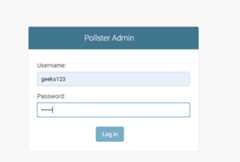
Step-1 Run the server using the commandpython manage.py runserver and browse the URLhttp://127.0.0.1:8000/admin/. Now enter the username and password to login into the system.
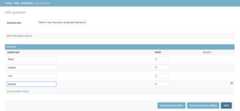
Step-2 Click on 'add' button next to the 'Questions'.
Step-2 Now add question and choices for those questions. Also, mention the date and time and then click on the 'save' button. You can add as many questions as you want. You will see a list of questions added in the database.
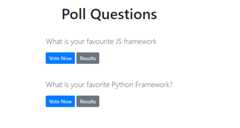
User Frontend
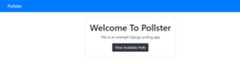
Step-1: Browse the URLhttp://127.0.0.1:8000/ and you will see the landing page of the application. Click on the "View Available Polls"
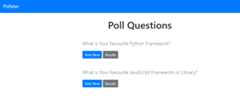
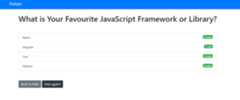
Step-2: You will see list of questions with two options 'Vote Now' and 'Results'. From here you need to select one question and click on the 'Vote Now' button.
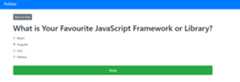
Step-3: Once this is done select any one choice and click on 'Vote' button. You can also go to the previous menu using the 'Back to Polls' button on the top.
You will see the total voting result for the question you have selected.
You can also check the total votes for any question using the option 'Results' from the 'Poll Questions' page.
Project Repository Link
https://github.com/anuupadhyay/pollster-django-crash