A framework is a code library that makes a developer's life easier when building web applications by providing reusable code for common operations. There are a number of frameworks forPython, including Flask, Tornado, Pyramid, andDjango. Flask is a lightweight web application framework. It is classified as a micro-framework because it does not require particular tools or libraries. Side tabs are used for single-page web applications or to display different contents.
Pre-requisite:
- Knowledge of Python,
- MySQL Workbench, and
- basics of Flask Framework.
Profile Application using Flask
Working with MySQL Workbench
Step-1: Install MySQL workbench. Link to install :https://dev.mysql.com/downloads/workbench/ Know more about it :https://www.mysql.com/products/workbench/
Step-2: Install 'mysqlbd' module in your venv.
pip install flask-mysqldb
Step 3: Open MySQL workbench.
Step 4: Write the following code. The above SQL statement will create our databasegeekprofile with the tableaccounts.
Step-5: Execute the query.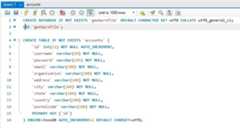
Creating Project
Step 1:Create an environment, andinstall Flask
Step 2:Create an empty folder'geeksprofile'.
Step 3: Now open your code editor and open this 'geeksprofile' folder.
Step 4: Create'app.py' folder and write the code given below.
Python# Store this code in 'app.py' filefromflaskimportFlask,render_template,request,redirect,url_for,sessionfromflask_mysqldbimportMySQLimportMySQLdb.cursorsimportreapp=Flask(__name__)app.secret_key='your secret key'app.config['MYSQL_HOST']='localhost'app.config['MYSQL_USER']='root'app.config['MYSQL_PASSWORD']='password'app.config['MYSQL_DB']='geekprofile'mysql=MySQL(app)@app.route('/')@app.route('/login',methods=['GET','POST'])deflogin():msg=''ifrequest.method=='POST'and'username'inrequest.formand'password'inrequest.form:username=request.form['username']password=request.form['password']cursor=mysql.connection.cursor(MySQLdb.cursors.DictCursor)cursor.execute('SELECT * FROM accounts WHERE username =% s\ AND password =% s',(username,password,))account=cursor.fetchone()ifaccount:session['loggedin']=Truesession['id']=account['id']session['username']=account['username']msg='Logged in successfully !'returnrender_template('index.html',msg=msg)else:msg='Incorrect username / password !'returnrender_template('login.html',msg=msg)@app.route('/logout')deflogout():session.pop('loggedin',None)session.pop('id',None)session.pop('username',None)returnredirect(url_for('login'))@app.route('/register',methods=['GET','POST'])defregister():msg=''ifrequest.method=='POST'and'username'inrequest.formand'password'inrequest.formand'email'inrequest.formand'address'inrequest.formand'city'inrequest.formand'country'inrequest.formand'postalcode'inrequest.formand'organisation'inrequest.form:username=request.form['username']password=request.form['password']email=request.form['email']organisation=request.form['organisation']address=request.form['address']city=request.form['city']state=request.form['state']country=request.form['country']postalcode=request.form['postalcode']cursor=mysql.connection.cursor(MySQLdb.cursors.DictCursor)cursor.execute('SELECT * FROM accounts WHERE username =% s',(username,))account=cursor.fetchone()ifaccount:msg='Account already exists !'elifnotre.match(r'[^@]+@[^@]+\.[^@]+',email):msg='Invalid email address !'elifnotre.match(r'[A-Za-z0-9]+',username):msg='name must contain only characters and numbers !'else:cursor.execute('INSERT INTO accounts VALUES\ (NULL,% s,% s,% s,% s,% s,% s,% s,% s,% s)',(username,password,email,organisation,address,city,state,country,postalcode,))mysql.connection.commit()msg='You have successfully registered !'elifrequest.method=='POST':msg='Please fill out the form !'returnrender_template('register.html',msg=msg)@app.route("/index")defindex():if'loggedin'insession:returnrender_template("index.html")returnredirect(url_for('login'))@app.route("/display")defdisplay():if'loggedin'insession:cursor=mysql.connection.cursor(MySQLdb.cursors.DictCursor)cursor.execute('SELECT * FROM accounts WHERE id =% s',(session['id'],))account=cursor.fetchone()returnrender_template("display.html",account=account)returnredirect(url_for('login'))@app.route("/update",methods=['GET','POST'])defupdate():msg=''if'loggedin'insession:ifrequest.method=='POST'and'username'inrequest.formand'password'inrequest.formand'email'inrequest.formand'address'inrequest.formand'city'inrequest.formand'country'inrequest.formand'postalcode'inrequest.formand'organisation'inrequest.form:username=request.form['username']password=request.form['password']email=request.form['email']organisation=request.form['organisation']address=request.form['address']city=request.form['city']state=request.form['state']country=request.form['country']postalcode=request.form['postalcode']cursor=mysql.connection.cursor(MySQLdb.cursors.DictCursor)cursor.execute('SELECT * FROM accounts WHERE username =% s',(username,))account=cursor.fetchone()ifaccount:msg='Account already exists !'elifnotre.match(r'[^@]+@[^@]+\.[^@]+',email):msg='Invalid email address !'elifnotre.match(r'[A-Za-z0-9]+',username):msg='name must contain only characters and numbers !'else:cursor.execute('UPDATE accounts SET username =% s,\ password =% s, email =% s, organisation =% s,\ address =% s, city =% s, state =% s,\ country =% s, postalcode =% s WHERE id =% s',(username,password,email,organisation,address,city,state,country,postalcode,(session['id'],),))mysql.connection.commit()msg='You have successfully updated !'elifrequest.method=='POST':msg='Please fill out the form !'returnrender_template("update.html",msg=msg)returnredirect(url_for('login'))if__name__=="__main__":app.run(host="localhost",port=int("5000"))Step 5: Create the folder'templates'. create the files 'index.html', 'display.html', 'update.html', 'login.html', and 'register.html' inside the 'templates' folder.
Step 6: Open the'login.html' file and write the code given below. In 'login.html', we have two fields i.e. username and password. When a user enters the correct username and password, it will route you to the index page otherwise 'Incorrect username/password' is displayed.
html<!--Store this code in 'login.html' file inside the 'templates' folder--><html><head><metacharset="UTF-8"><title> Login</title><linkrel="stylesheet"href="../static/style.css"></head><body><divclass="logincontent"align="center"><divclass="logintop"><h1>Login</h1></div></br></br></br></br><divclass="loginbottom"><formaction="{{ url_for('login')}}"method="post"autocomplete="off"><divclass="msg">{{ msg }}</div><inputtype="text"name="username"placeholder="Enter Your Username"class="textbox"id="username"required></br></br><inputtype="password"name="password"placeholder="Enter Your Password"class="textbox"id="password"required></br></br></br><inputtype="submit"class="btn"value="Login"></form></br></br><pclass="worddark">New to this page?<aclass="worddark"href="{{ url_for('register')}}">Register here</a></p></div></div></body></html>Step 7: Open'register.html' file and write the code given below. In 'register.html', we have nine fields i.e. username, password, email, organisation, address, city, state, country, postal code. When user enters all the information, it stored the data in the database and 'Registration successful' is displayed.
html<!--Store this code in 'register.html' file inside the 'templates' folder--><html><head><metacharset="UTF-8"><title> register</title><linkrel="stylesheet"href="../static/style.css"></head><body><divclass="registercontent"align="center"><divclass="registertop"><h1>Register</h1></div></br></br><divclass="registerbottom"><formaction="{{ url_for('register')}}"method="post"autocomplete="off"><divclass="msg">{{ msg }}</div><inputtype="text"name="username"placeholder="Enter Your Username"class="textbox"id="username"required></br></br><inputtype="password"name="password"placeholder="Enter Your Password"class="textbox"id="password"required></br></br><inputtype="email"name="email"placeholder="Enter Your Email ID"class="textbox"id="email"required></br></br><inputtype="text"name="organisation"placeholder="Enter Your Organisation"class="textbox"id="organisation"required></br></br><inputtype="text"name="address"placeholder="Enter Your Address"class="textbox"id="address"required></br></br><inputtype="text"name="city"placeholder="Enter Your City"class="textbox"id="city"required></br></br><inputtype="text"name="state"placeholder="Enter Your State"class="textbox"id="state"required></br></br><inputtype="text"name="country"placeholder="Enter Your Country"class="textbox"id="country"required></br></br><inputtype="text"name="postalcode"placeholder="Enter Your Postal Code"class="textbox"id="postalcode"required></br></br><inputtype="submit"class="btn"value="Register"></form><pclass="worddark">Already have account?<aclass="worddark"href="{{ url_for('login')}}">Login here</a></p></div></div></body></html>Step 8: Open'index.html' file and write the code given below. When a user logs in successfully, this page is displayed, and 'Logged in successful!' is displayed.
html<!--Store this code in 'index.html' file inside the 'templates' folder--><htmllang="en"><head><title>index</title><linkrel="stylesheet"href="../static/style.css"></head><bodybgcolor="#e6ffee"><divclass="one"><divclass="two"><h1>Side Bar</h1><ul><liclass="active"><ahref="{{url_for('index')}}">Index</a></li><li><ahref="{{url_for('display')}}">Display</a></li><li><ahref="{{url_for('update')}}">Update</a></li><li><ahref="{{url_for('logout')}}">Log out</a></li></ul></div><divclass="content"align="center"><divclass="topbar"><h2>Welcome!! You are in Index Page!!</h2></div></br></br><divclass="contentbar"><divclass="msg">{{ msg }}</div></div></div></div></body></html>Step 9: Open'display.html' file and write the code given below. Here, the user information stored in database are displayed.
html<!--Store this code in 'display.html' file inside the 'templates' folder--><htmllang="en"><head><title>display</title><linkrel="stylesheet"href="../static/style.css"></head><bodybgcolor="#e6ffee"><divclass="one"><divclass="two"><h1>Side Bar</h1><ul><li><ahref="{{url_for('index')}}">Index</a></li><liclass="active"><ahref="{{url_for('display')}}">Display</a></li><li><ahref="{{url_for('update')}}">Update</a></li><li><ahref="{{url_for('logout')}}">Log out</a></li></ul></div><divclass="content"align="center"><divclass="topbar"><h2>Welcome!! You are in Display Page!!</h2></div></br><divclass="contentbar"><h1>Your Details</h1></br> {% block content %}<divclass="border"><tableclass="worddark"></br></br></br></br><tr><td>Username:</td><td>{{ account['username'] }}</td></tr><tr><td>Password:</td><td>{{ account['password'] }}</td></tr><tr><td>Email ID:</td><td>{{ account['email'] }}</td></tr><tr><td>Organisation:</td><td>{{ account['organisation'] }}</td></tr><tr><td>Address:</td><td>{{ account['address'] }}</td></tr><tr><td>City:</td><td>{{ account['city'] }}</td></tr><tr><td>State:</td><td>{{ account['state'] }}</td></tr><tr><td>Country:</td><td>{{ account['country'] }}</td></tr><tr><td>Postal code:</td><td>{{ account['postalcode'] }}</td></tr></table></div> {% endblock %}</div></div></div></body></html>Step 10: Open'update.html' file and write the code given below. The user can update his/her data which also updates the database.
html<!--Store this code in 'update.html' file inside the 'templates' folder--><htmllang="en"><head><title>update</title><linkrel="stylesheet"href="../static/style.css"></head><bodybgcolor="#e6ffee"><divclass="one"><divclass="two"><h1>Side Bar</h1><ul><li><ahref="{{url_for('index')}}">Index</a></li><li><ahref="{{url_for('display')}}">Display</a></li><liclass="active"><ahref="{{url_for('update')}}">Update</a></li><li><ahref="{{url_for('logout')}}">Log out</a></li></ul></div><divclass="content"align="center"><divclass="topbar"><h2>Welcome!! You are in Update Page!!</h2></div></br></br><divclass="contentbar"><h1>Fill Your Details to Update</h1></br><formaction="{{ url_for('update') }}"method="post"autocomplete="off"><divclass="msg">{{ msg }}</div><inputtype="text"name="username"placeholder="Enter Your Username"class="textbox"id="username"required></br></br><inputtype="password"name="password"placeholder="Enter Your Password"class="textbox"id="password"required></br></br><inputtype="email"name="email"placeholder="Enter Your Email ID"class="textbox"id="email"required></br></br><inputtype="text"name="organisation"placeholder="Enter Your Organisation"class="textbox"id="organisation"required></br></br><inputtype="text"name="address"placeholder="Enter Your Address"class="textbox"id="address"required></br></br><inputtype="text"name="city"placeholder="Enter Your City"class="textbox"id="city"required></br></br><inputtype="text"name="state"placeholder="Enter Your State"class="textbox"id="state"required></br></br><inputtype="text"name="country"placeholder="Enter Your Country"class="textbox"id="country"required></br></br><inputtype="text"name="postalcode"placeholder="Enter Your Postal Code"class="textbox"id="postalcode"required></br></br><inputtype="submit"class="btn"value="Update"></form></div></div></div></body></html>Step 11: Create the folder'static'. create the file 'style.css' inside the 'static' folder and paste the given CSS code.
css/*Store this code in 'style.css' file inside the 'static' folder*/.logincontent{margin:0auto;height:500px;width:400px;background-color:#e6ffee;border-radius:10px;}.registercontent{margin:0auto;height:720px;width:400px;background-color:#e6ffee;border-radius:10px;}.logintop{height:60px;width:400px;background-color:#009933;color:#ffffff;}.registertop{height:60px;width:400px;background-color:#009933;color:#ffffff;}.textbox{padding:10px40px;background-color:#009933;border-radius:10px;}::placeholder{color:#FFFFFF;opacity:1;font-style:oblique;font-weight:bold;}.btn{padding:10px40px;background-color:#009933;color:#FFFFFF;font-style:oblique;font-weight:bold;border-radius:10px;}.worddark{color:#009933;font-style:oblique;font-weight:bold;}.wordlight{color:#FFFFFF;font-style:oblique;font-weight:bold;}*{margin:0;padding:0;box-sizing:border-box;list-style:none;text-decoration:none;font-family:'Josefin Sans',sans-serif;}.one{display:flex;position:relative;}.one.two{width:225px;height:100%;background:#009933;padding:30px0px;position:fixed;}.one.twoh1{color:#fff;text-transform:uppercase;text-align:center;margin-bottom:30px;font-style:oblique;font-weight:bold;}.one.twoh2{color:#fff;text-align:center;}.one.two.active{background:#0a8032;}.one.twoulli{text-align:center;padding:15px;border-bottom:0.1pxsolidwhite;border-top:0.1pxsolidwhite;}.one.twoullia{color:#ffffff;display:block;}.one.twoullia.side{width:25px;align:center;}.one.content{width:100%;margin-left:200px;}.one.content.topbar{text-align:center;padding:20px;background:#00b33c;color:white;}.one.content.contentbar{margin:auto;}.one.content.contentbarh1{color:#11a844;text-align:center;font-style:oblique;font-weight:bold;}Step 12: The project structure will look like this.

Run the Project
Step-1: Run the server.
Step-2: Browse the URL 'localhost:5000'.
Step-3: The output web page will be displayed.
Testing of the Application
Step-1: If you are new user, go to sign up page and fill the details.
Step-2: After registration, go to login page. Enter your username and password and sign in.
Step-3: If your login is successful, you will be moved to index page and your name will be displayed.
Step-4: You can view your profile details in display page and also you can update your details in update page.
Output:Login page:

Register page:

If login is successful, Index Page: Update Page:
 Before updation, Display page:
 After updation, Display page:
 Database - Before update:

Database - After update:

Explore
Python Fundamentals
Python Data Structures
Advanced Python
Data Science with Python
Web Development with Python
Python Practice