

Getting Started
- Introduction
- Workspaces
- Projects
Pipedream Connect
- Overview
- Quickstart
- Use Cases
- Managed Auth
- Tool Use
- MCP
- API Proxy
- Workflows
- API & SDK Reference
Workflows
- Overview
- Quickstart
- Building Workflows
- Data Management
- Event History
- Environment Variables
- GitHub Sync
- Custom Domains
- Virtual Private Clouds
- Limits
Platform
- Apps
- Components
- REST API
- CLI
- Pricing
- Account
- Security
- Troubleshooting
- Glossary Of Terms
Additional Resources
On this page
- Overview
- What is a component?
- Quickstarts
- Differences between sources and actions
- Getting Started with the CLI
- Example Components
- Component API
- Component Structure
- Props
- User Input Props
- Interface Props
- Timer
- Service Props
- App Props
- HTTP Request Prop
- Alert Prop
- Limits on props
- Methods
- Hooks
- Dedupe Strategies
- Run
- Sources
- Actions
- Environment variables
- Using npm packages
- Referencing a specific version of a package
- Managing Components
- Managing Sources
- CLI - Development Mode
- CLI - Deploy
- CLI - Update
- CLI - Delete
- UI - Deploy
- UI - Update
- UI - Delete
- API
- Managing Actions
- CLI - Publish
- Source Lifecycle
- Lifecycle hooks
- deploy
- activate
- deactivate
- States
- Saved Component
- Deployed Component
- Deleted Component
- Operations
- Deploy
- Update
- Delete
- Source Event Lifecycle
- Diagram
- Triggering Sources
- Emitting Events from Sources
- Consuming Events from Sources
- UI
- Workflows
- API
- CLI
Component API Reference
Our TypeScript component API is inbeta. If you’re interested in developing TypeScript components and providing feedback,see our TypeScript docs.
Overview
What is a component?
Components are Node.js modules that run on Pipedream’s serverless infrastructure.- Trigger Node.js code on HTTP requests, timers, cron schedules, or manually
- Emit data on each event to inspect it. Trigger Pipedream hosted workflows or access it outside of Pipedream via API
- Accept user input on deploy viaCLI,API, orUI
- Connect to2,700+ apps using Pipedream managed auth
- Use most npm packages with no
npm installorpackage.jsonrequired - Store and retrieve state using thebuilt-in key-value store
Quickstarts
To help you get started, we created a step-by-step walkthrough for developing bothsources andactions. We recommend starting with those docs and using the API reference below as you develop.Differences between sources and actions
Sources and actions share the same component API. However, certain features of the API only apply to one or the other:- Actions are defined with
type: action(see the docs on thetypeproperty). Sources require notypeproperty be set. Components without atypeare considered sources. - Sources emit eventsusing
this.$emit, which trigger linked workflows. Any features associated with emitting events (e.g.,dedupe strategies) can only be used with sources. Actionsreturn data usingreturnor$.export, which is made available to future steps of the associated workflow. - Sources have access tolifecycle hooks, which are often required to configure the source to listen for new events. Actions do not have access to these lifecycle hooks.
- Actions have access toa special
$variable, passed as a parameter to therunmethod. This variable exposes functions that allow you to send data to destinations, export data from the action, return HTTP responses, and more. - Sources can be developed iteratively using
pd dev. Actions currently cannot (please followthis issue to be notified of updates). - You use
pd deployto deploy sources to your account. You usepd publishto publish actions, making them available for use in workflows. - You can attachinterfaces (like HTTP endpoints, or timers) to sources. This defines how the source is invoked. Actions do not have interfaces, since they’re run step-by-step as a part of the associated workflow.
Getting Started with the CLI
Several examples below use the Pipedream CLI. To install it,follow the instructions for your OS / architecture.See theCLI reference for detailed usage and examples beyond those covered below.Example Components
You can find hundreds of example components in thecomponents/ directory of thePipedreamHQ/pipedream repo.Component API
Component Structure
Pipedream components export an object with the following properties:export default { name: "", key: "", type: "", version: "", description: "", props: {}, methods: {}, hooks: { async activate() {}, async deactivate() {}, async deploy() {}, }, dedupe: "", async run(event){ this.$emit(event); },};| Property | Type | Required? | Description |
|---|---|---|---|
name | string | required | The name of the component, a string which identifies components deployed to users’ accounts. This name will show up in the Pipedream UI, in CLI output (for example, frompd list commands), etc. It will also be converted to a unique slug on deploy to reference a specific component instance (it will be auto-incremented if not unique within a user account). |
key | string | recommended | Thekey uniquely identifies a component within a namespace. The default namespace for components is your account. When publishing components to the Pipedream registry, thekey must be unique across registry components and should follow the pattern:app_name_slug-slugified-component-name |
type | string | required | When publishing an action,type: "action" is required. When publishing a source, usetype: "source". |
version | string | required | The component version. There are no constraints on the version, butsemantic versioning is required for any components published to thePipedream registry. |
description | string | recommended | The description will appear in the Pipedream UI to aid in discovery and to contextualize instantiated components |
props | object | optional | Props are custom attributes you can register on a component. When a value is passed to a prop attribute, it becomes a property on that component instance. You can reference these properties in component code usingthis (e.g.,this.propName). |
methods | object | optional | Define component methods for the component instance. They can be referenced viathis (e.g.,this.methodName()). |
hooks | object | optional (sources only) | Hooks are functions that are executed when specific component lifecycle events occur. |
dedupe | string | optional (sources only) | You may specify adedupe strategy to be applied to emitted events |
run | method | required | Each time a component is invoked (for example, via HTTP request),itsrun method is called. The event that triggered the component is passed torun, so that you can access it within the method. Events are emitted usingthis.$emit(). |
Props
Props are custom attributes you can register on a component. When a value is passed to a prop attribute, it becomes a property on that component instance. You can reference these properties in component code usingthis (e.g.,this.propName).| Prop Type | Description |
|---|---|
| User Input | Enable components to accept input on deploy |
| Interface | Attaches a Pipedream interface to your component (e.g., an HTTP interface or timer) |
| Service | Attaches a Pipedream service to your component (e.g., a key-value database to maintain state) |
| App | Enables managed auth for a component |
| Data Store | Provides access to a Pipedreamdata store |
| HTTP Request | Enables components to execute HTTP requests based on user input |
| Alert | Renders an informational alert in the prop form to help users configure the source or action |
User Input Props
User input props allow components to accept input on deploy. When deploying a component, users will be prompted to enter values for these props, setting the behavior of the component accordingly.General
Definitionprops: { myPropName: { type:"", label:"", description:"", options: [],// OR async options() {} to return dynamic options optional:true || false, propDefinition: [], default:"", secret:true || false, min:<integer>, max:<integer>, disabled: true || false, hidden: true || false },},| Property | Type | Required? | Description |
|---|---|---|---|
type | string | required | Value must be set to a validPropType (see below). Suffix with[] (e.g.string[]) to denote array of that type (if supported). |
label | string | optional | A friendly label to show to user for this prop. If a label is not provided, thepropName is displayed to the user. |
description | string | optional | Displayed near the prop input. Typically used to contextualize the prop or provide instructions to help users input the correct value. Markdown is supported. |
options | string[] orobject[] ormethod | optional | Provide an array to display options to a user in a drop down menu.[] Basic usage Array of strings. E.g.,['option 1', 'option 2']object[] Define Label and Value[{ label: 'Label 1', value: 'label1'}, { label: 'Label 2', value: 'label2'}]method Dynamic Options You can generate options dynamically (e.g., based on real-time API requests with pagination). See configuration details below. |
useQuery | boolean | optional | Use in conjunction withDynamic Options. If set totrue, the prop accepts a real-time query that can be used by theoptions method to obtain results according to that query. |
optional | boolean | optional | Set totrue to make this prop optional. Defaults tofalse. |
propDefinition | [] | optional | Re-use a prop defined in an app file. When you include a prop definition, the prop will inherit values for all the properties listed here. However, you can override those values by redefining them for a given prop instance. SeepropDefinitions below for usage. |
default | string | optional | Define a default value if the field is not completed. Can only be defined for optional fields (required fields require explicit user input). |
secret | boolean | optional | If set totrue, this field will hide your input in the browser like a password field, and its value will be encrypted in Pipedream’s database. The value will be decrypted when the component is run inthe execution environment. Defaults tofalse. Only allowed forstring props. |
min | integer | optional | Minimum allowed integer value. Only allowed forinteger props.. |
max | integer | optional | Maximum allowed integer value . Only allowed forinteger props. |
disabled | boolean | optional | Set totrue to disable usage of this prop. Defaults tofalse. |
hidden | boolean | optional | Set totrue to hide this field. Defaults tofalse. |
| Prop Type | Array Supported | Supported in Sources? | Supported in Actions? | Custom properties |
|---|---|---|---|---|
app | ✓ | ✓ | SeeApp Props below | |
boolean | ✓ | ✓ | ✓ | |
integer | ✓ | ✓ | ✓ | -min (integer): Minimum allowed integer value. -max (integer): Maximum allowed integer value. |
string | ✓ | ✓ | ✓ | -secret (boolean): Whether to treat the value as a secret. |
object | ✓ | ✓ | ||
any | ✓ | |||
$.interface.http | ✓ | |||
$.interface.timer | ✓ | |||
$.service.db | ✓ | |||
data_store | ✓ | |||
http_request | ✓ | |||
alert | ✓ | ✓ | SeeAlert Prop below |
| Code | Description | Read Scope | Write Scope |
|---|---|---|---|
this.myPropName | Returns the configured value of the prop | run()hooksmethods | n/a (input props may only be modified on component deploy or update via UI, CLI or API) |
export default { name: "User Input Prop Example", version: "0.1", props: { msg: { type: "string", label: "Message", description: "Enter a message to `console.log()`", }, }, async run(){ this.$emit(this.msg); },};Advanced Configuration
Async Options (example)
Async options allow users to select prop values that can be programmatically-generated (e.g., based on a real-time API response).async options({ page, prevContext, query,}) {},| Property | Type | Required? | Description |
|---|---|---|---|
options() | method | optional | Typically returns an array of values matching the prop type (e.g.,string) or an array of object that define thelabel andvalue for each option. Thepage andprevContext input parameter names are reserved for pagination (see below). When usingprevContext for pagination, it must return an object with anoptions array and acontext object with anextPageToken key. E.g.,{ options, context: { nextPageToken }, } |
page | integer | optional | Returns a0 indexed page number. Use with APIs that accept a numeric page number for pagination. |
prevContext | string | optional | Returns a string representing the context for the previousoptions execution. Use with APIs that accept a token representing the last record for pagination. |
query | string | optional | Returns a string with the user input if the prop has theuseQuery property set totrue. Use with APIs that return items based on a query or search parameter. |
export default { name: "Async Options Example", version: "0.1", props: { msg: { type: "string", label: "Message", description: "Select a message to `console.log()`", async options() { // write any node code that returns a string[] or object[] (with label/value keys) return ["This is option 1","This is option 2"]; }, }, }, async run(){ this.$emit(this.msg); },};Prop Definitions (example)
Prop definitions enable you to reuse props that are defined in another object. A common use case is to enable re-use of props that are defined for a specific app.props: { myPropName: { propDefinition: [ app, "propDefinitionName", inputValues ] },},| Property | Type | Required? | Description |
|---|---|---|---|
propDefinition | array | optional | An array of options that define a reference to apropDefinitions within thepropDefinitions for anapp |
app | object | required | An app object |
propDefinitionName | string | required | The name of a specificpropDefinition defined in the correspondingapp object |
inputValues | object | optional | Values to pass into the prop definition. To reference values from previous props, use an arrow function. E.g.,:c => ({ variableName: c.previousPropName })See these docs for more information. |
propDefinitions.const rss = { type: "app", app: "rss", propDefinitions: { urlDef: { type: "string", label: "RSS URL", description: "Enter a URL for an RSS feed.", }, },};export default { name: "Prop Definition Example", description: `This component captures an RSS URL and logs it`, version: "0.1", props: { rss, url: {propDefinition: [rss,"urlDef"] }, }, async run(){ console.log(this.url); },};Referencing values from previous props
When you define a prop in an app file, and that prop depends on the value of another prop, you’ll need to pass the value of the previous props in a special way. Let’s review an example fromTrello, a task manager.You create Trelloboards for new projects. Boards containlists. For example, thisActive board contains two lists:
Trello board example

Trello board and lists props
board: { type:"string", label:"Board", async options(opts) { const boards = await this.getBoards(this.$auth.oauth_uid); const activeBoards = boards.filter((board)=> board.closed === false); return activeBoards.map((board)=> { return {label: board.name,value: board.id }; }); },},lists: { type:"string[]", label:"Lists", optional:true, async options(opts) { const lists = await this.getLists(opts.board); return lists.map((list)=> { return {label: list.name,value: list.id }; }); },}lists prop, notice howopts.board references the board. You can passopts to the prop’soptions method when you referencepropDefinitions in specific components:board: {propDefinition: [trello,"board"] },lists: { propDefinition: [ trello, "lists", (configuredProps)=> ({board: configuredProps.board }), ],},configuredProps contains the props the user previously configured (the board). This allows thelists prop to use it in theoptions method.Dynamic props
Some prop definitions must be computed dynamically, after the user configures another prop. We call thesedynamic props, since they are rendered on-the-fly. This technique is used inthe Google SheetsAdd Single Row action, which we’ll use as an example below.First, determine the prop whose selection should render dynamic props. In the Google Sheets example, we ask the user whether their sheet contains a header row. If it does, we display header fields as individual props:
Google Sheets Additional props example - header columns loading as props
reloadProps field set totrue:hasHeaders: { type:"string", label:"Does the first row of the sheet have headers?", description:"If the first row of your document has headers we'll retrieve them to make it easy to enter the value for each column.", options: [ "Yes", "No", ], reloadProps:true,},additionalProps component method to render props:async additionalProps() { const sheetId = this.sheetId?.value || this.sheetId; const props = {}; if (this.hasHeaders === "Yes") { const {values }= await this.googleSheets.getSpreadsheetValues(sheetId,`${this.sheetName}!1:1`); if (!values[0]?.length) { throw new ConfigurationError("Cound not find a header row. Please either add headers and click\"Refresh fields\" or adjust the action configuration to continue."); } for (let i = 0;i < values[0]?.length;i++) { props[`col_${i.toString().padStart(4,"0")}`]= { type: "string", label: values[0][i], optional: true, }; } }else if (this.hasHeaders === "No") { props.myColumnData = { type: "string[]", label: "Values", description: "Provide a value for each cell of the row. Google Sheets accepts strings, numbers and boolean values for each cell. To set a cell to an empty value, pass an empty string.", }; } return props;},async additionalProps(previousPropDefs)previousPropDefs are the full set of props (props merged with the previousadditionalProps). When the function is executed,this is bound similar to when therun function is called, where you can access the values of the props as currently configured, and call anymethods. The return value ofadditionalProps will replace any previous call, and that return value will be merged with props to define the final set of props.Following is an example that demonstrates how to useadditionalProps to dynamically change a prop’sdisabled andhidden properties:async additionalProps(previousPropDefs) { if (this.myCondition === "Yes") { previousPropDefs.myPropName.disabled = true; previousPropDefs.myPropName.hidden = true; }else { previousPropDefs.myPropName.disabled = false; previousPropDefs.myPropName.hidden = false; } return previousPropDefs;},appbooleanintegerstringobjectany$.interface.http$.interface.timerdata_storehttp_request
Interface Props
Interface props are infrastructure abstractions provided by the Pipedream platform. They declare how a source is invoked — via HTTP request, run on a schedule, etc. — and therefore define the shape of the events it processes.| Interface Type | Description |
|---|---|
| Timer | Invoke your source on an interval or based on a cron expression |
| HTTP | Invoke your source on HTTP requests |
Timer
To use the timer interface, declare a prop whose value is the string$.interface.timer:Definitionprops: { myPropName: { type:"$.interface.timer", default: {}, },}| Property | Type | Required? | Description |
|---|---|---|---|
type | string | required | Must be set to$.interface.timer |
default | object | optional | Define a default interval{ intervalSeconds: 60, },Define a default cron expression{ cron: "0 0 * * *", }, |
| Code | Description | Read Scope | Write Scope |
|---|---|---|---|
this.myPropName | Returns the type of interface configured (e.g.,{ type: '$.interface.timer' }) | run()hooksmethods | n/a (interface props may only be modified on component deploy or update via UI, CLI or API) |
event | Returns an object with the execution timestamp and interface configuration (e.g.,{ "timestamp": 1593937896, "interval_seconds": 3600 }) | run(event) | n/a (interface props may only be modified on source deploy or update via UI, CLI or API) |
$.interface.timer and has default defined as a cron expression.export default { name: "Cron Example", version: "0.1", props: { timer: { type: "$.interface.timer", default: { cron: "0 0 * * *",// Run job once a day }, }, }, async run(){ console.log("hello world!"); },};$.interface.timer and has adefault interval defined.export default { name: "Interval Example", version: "0.1", props: { timer: { type: "$.interface.timer", default: { intervalSeconds: 60 * 60 * 24,// Run job once a day }, }, }, async run(){ console.log("hello world!"); },};HTTP
To use the HTTP interface, declare a prop whose value is the string$.interface.http:props: { myPropName: { type:"$.interface.http", customResponse:true,// optional: defaults to false },}| Property | Type | Required? | Description |
|---|---|---|---|
type | string | required | Must be set to$.interface.http |
respond | method | required | The HTTP interface exposes arespond() method that lets your component issue HTTP responses to the client. |
| Code | Description | Read Scope | Write Scope |
|---|---|---|---|
this.myPropName | Returns an object with the unique endpoint URL generated by Pipedream (e.g.,{ endpoint: 'https://abcde.m.pipedream.net' }) | run()hooksmethods | n/a (interface props may only be modified on source deploy or update via UI, CLI or API) |
event | Returns an object representing the HTTP request (e.g.,{ method: 'POST', path: '/', query: {}, headers: {}, bodyRaw: '', body: {}, }) | run(event) | The shape ofevent corresponds with the the HTTP request you make to the endpoint generated by Pipedream for this interface |
this.myPropName.respond() | Returns an HTTP response to the client (e.g.,this.http.respond({status: 200})). | n/a | run() |
Responding to HTTP requests
The HTTP interface exposes arespond() method that lets your source issue HTTP responses. You may runthis.http.respond() to respond to the client from therun() method of a source. In this case you should also pass thecustomResponse: true parameter to the prop.| Property | Type | Required? | Description |
|---|---|---|---|
status | integer | required | An integer representing the HTTP status code. Return200 to indicate success. Standard status codes range from100 -599 |
headers | object | optional | Return custom key-value pairs in the HTTP response |
body | stringobjectbuffer | optional | Return a custom body in the HTTP response. This can be any string, object, or Buffer. |
HTTP Event Shape
Following is the shape of the event passed to therun() method of your source:{ method:'POST', path:'/', query: {}, headers: {}, bodyRaw:'', body:}$.interface.http and returns{ 'msg': 'hello world!' } in the HTTP response. On deploy, Pipedream will generate a unique URL for this source:export default { name: "HTTP Example", version: "0.0.1", props: { http: { type: "$.interface.http", customResponse: true, }, }, async run(event){ this.http.respond({ status: 200, body: { msg: "hello world!", }, headers: { "content-type": "application/json", }, }); console.log(event); },};Service Props
| Service | Description |
|---|---|
| DB | Provides access to a simple, component-specific key-value store to maintain state across executions. |
DB
Definitionprops: { myPropName:"$.service.db",}| Code | Description | Read Scope | Write Scope |
|---|---|---|---|
this.myPropName.get('key') | Method to get a previously set value for a key. Returnsundefined if a key does not exist. | run()hooksmethods | Use theset() method to write values |
this.myPropName.set('key', value) | Method to set a value for a key. Values must be JSON-serializable data. | Use theget() method to read values | run()hooksmethods |
App Props
App props are normally defined in anapp file, separate from individual components. Seethecomponents/ directory of the pipedream GitHub repo for example app files.Definitionprops: { myPropName: { type:"app", app:"", propDefinitions: {} methods: {}, },},| Property | Type | Required? | Description |
|---|---|---|---|
type | string | required | Value must beapp |
app | string | required | Value must be set to the name slug for an app registered on Pipedream.App files are programmatically generated for all integrated apps on Pipedream. To find your app’s slug, visit thecomponents directory ofthe Pipedream GitHub repo, find the app file (the file that ends with.app.mjs), and find theapp property at the root of that module. If you don’t see an app listed, pleaseopen an issue here. |
propDefinitions | object | optional | An object that contains objects with predefined user input props. See the section on User Input Props above to learn about the shapes that can be defined and how to reference in components using thepropDefinition property |
methods | object | optional | Define app-specific methods. Methods can be referenced within the app object context viathis (e.g.,this.methodName()) and within a component viathis.myAppPropName (e.g.,this.myAppPropName.methodName()). |
| Code | Description | Read Scope | Write Scope |
|---|---|---|---|
this.$auth | Provides access to OAuth tokens and API keys for Pipedream managed auth | App Object:methods | n/a |
this.myAppPropName.$auth | Provides access to OAuth tokens and API keys for Pipedream managed auth | Parent Component:run()hooksmethods | n/a |
this.methodName() | Execute a common method defined for an app within the app definition (e.g., from another method) | App Object:methods | n/a |
this.myAppPropName.methodName() | Execute a common method defined for an app from a component that includes the app as a prop | Parent Component:run()hooksmethods | n/a |
Note: The specific
$auth keys supported for each app will be published in the near future.HTTP Request Prop
Usage| Code | Description | Read Scope | Write Scope |
|---|---|---|---|
this.myPropName.execute() | Execute an HTTP request as configured | n/a | run()methods |
export default { name: "HTTP Request Example", version: "0.0.1", props: { httpRequest: { type: "http_request", label: "API Request", default: { method: "GET", url: "https://jsonplaceholder.typicode.com/posts", } }, }, async run(){ const {data }= await this.httpRequest.execute(); return data; },};Alert Prop
Sometimes you may need to surface contextual information to users within the prop form. This might be information that’s not directly related to a specific prop, so it doesn’t make sense to include in a prop description, but rather, it may be related to the overall configuration of the prop form.Usage| Property | Type | Required? | Description |
|---|---|---|---|
type | string | required | Set toalert |
alertType | string | required | Determines the color and UI presentation of the alert prop. Can be one ofinfo,neutral,warning,error. |
content | string | required | Determines the text that is rendered in the alert. Both plain text and markdown are supported. |
export default defineComponent({ props: { alert: { type: "alert", alertType: "info", content: "Admin rights on the repo are required in order to register webhooks. In order to continue setting up your source, configure a polling interval below to check for new events.", } },})pipedream repo for anexample implementation.
Info alert prop in GitHub source
Limits on props
When a user configures a prop with a value, it can hold at most data. Consider this when accepting large input in these fields (such as a base64 string).The limit applies only to static values entered as raw text. In workflows, users can pass expressions (referencing data in a prior step). In that case the prop value is simply the text of the expression, for example{{steps.nodejs.$return_value}}, well below the limit. The value of these expressions is evaluated at runtime, and are subject todifferent limits.Methods
You can define helper functions within themethods property of your component. You have access to these functions within therun method, or within other methods.Methods can be accessed usingthis.<method-name>. For example, arandom method:methods: { random() { return Math.random() },}const randomNum = this.random();Hooks
hooks: { async deploy() {}, async activate() {}, async deactivate() {},},| Property | Type | Required? | Description |
|---|---|---|---|
deploy | method | optional | Executed each time a component is deployed |
activate | method | optional | Executed each time a component is deployed or updated |
deactivate | method | optional | Executed each time a component is deactivated |
Dedupe Strategies
IMPORTANT: To use a dedupe strategy, you must emit anidas part of the event metadata (dedupe strategies are applied to the submittedid)
| Strategy | Description |
|---|---|
unique | Pipedream maintains a cache of 100 emittedid values. Events withid values that are not in the cache are emitted, and theid value is added to the cache. After 100 events,id values are purged from the cache based on the order received (first in, first out). A common use case for this strategy is an RSS feed which typically does not exceed 100 items |
greatest | Pipedream caches the largestid value (must be numeric). Only events with largerid values are emitted, and the cache is updated to match the new, largest value.. |
last | Pipedream caches the ID associated with the last emitted event. When new events are emitted, only events after the matchingid value will be emitted as events. If noid values match, then all events will be emitted. |
Run
Each time a component is invoked, itsrun method is called. Sources are invoked by theirinterface (for example, via HTTP request). Actions are run when their parent workflow is triggered.You can referencethis within therun method.this refers to the component, and provides access toprops,methods, and more.Sources
When a source is invoked, the event that triggered the source is passed torun, so that you can access it within the method:async run(event) { console.log(event)}$emit
this.$emit() is a method in scope for therun method of a sourcethis.$emit(event, { id, name, summary, ts,});| Property | Type | Required? | Description |
|---|---|---|---|
event | JSON serializable data | optional | The data to emit as the event |
id | string ornumber | Required if a dedupe strategy is applied | A value to uniquely identify this event. Commonid values may be a 3rd party ID, a timestamp, or a data hash |
name | string | optional | The name of the “channel” you’d like to emit the event to. By default, events are emitted to thedefault channel. If you set a different channel here, listening sources or workflows can subscribe to events on this channel, running the source or workflow only on events emitted to that channel. |
summary | string | optional | Define a summary to customize the data displayed in the events list to help differentiate events at a glance |
ts | integer | optional | Accepts an epoch timestamp inmilliseconds. If you submit a timestamp, events will automatically be ordered and emitted from oldest to newest. If using thelast dedupe strategy, the value cached as thelast event for an execution will correspond to the event with the newest timestamp. |
export default { name: "this.$emit() example", description: "Deploy and run this component manually via the Pipedream UI", async run(){ this.$emit({message: "hello world!" }); },};Logs
You can view logs produced by a source’srun method in theLogs section of thePipedream source UI, or using thepd logs CLI command:pd logs <deployed-component-name>Events
If therun method emits events usingthis.$emit, you can access the events in theEVENTS section of the Pipedream UI for the component, or using thepd events CLI command:pd events <deployed-component-name>Actions
When an action is run in a workflow, Pipedream passes an object with a$ variable that gives you access to special functions, outlined below:async run({$ }) { // You have access to $ within your action}Returning data from steps
By default, variables declared within an action are scoped to that action. To return data from a step, you have two options: 1) use thereturn keyword, or 2) use$.export to return a named export from a step.returnUsereturn to return data from an action:async run({$ }) { return "data"}steps.[STEP NAME].$return_value. For example, if you ran the code above in a step namednodejs, you’d reference the returned data usingsteps.nodejs.$return_value.$.exportYou can also use$.export to return named exports from an action.$.export takes the name of the export as the first argument, and the value to export as the second argument:async run({$ }) { $.export("name","value")}steps.[STEP NAME].[EXPORT NAME].Returning HTTP responses with$.respond
$.respond lets you issue HTTP responses from your workflow.See the full$.respond docs for more information.async run({$ }) { $.respond({ status: 200, body: "hello, world" })}Ending steps early withreturn $.flow.exit
return $.flow.exit terminates the entire workflow. It accepts a single argument: a string that tells the workflow why the workflow terminated, which is displayed in the Pipedream UI.async run({$ }) { return $.flow.exit("reason")}$.summary
$.summary is used to surface brief, user-friendly summaries about what happened when an action step succeeds. For example, whenadding items to a Spotify playlist:
Spotify example with $summary
const data = [1,2];const playlistName = "Cool jams";$.export( "$summary", `Successfully added${data.length} ${ data.length == 1 ? "item" : "items" } to "${playlistName}"`);$.send
$.send allows you to send data toPipedream destinations.$.send.httpSee the HTTP destination docs.$.send.emailSee the Email destination docs.$.send.s3See the S3 destination docs.$.send.emitSee the Emit destination docs.$.send.sseSee the SSE destination docs.$.context
$.context exposesthe same properties assteps.trigger.context, and more. Action authors can use it to get context about the calling workflow and the execution.All properties fromsteps.trigger.context are exposed, as well as:| Property | Description |
|---|---|
deadline | An epoch millisecond timestamp marking the point when the workflow is configured totimeout. |
JIT | Stands for “just in time” (environment).true if the user is testing the step,false if the step is running in production. |
run | An object containing metadata about the current run number. Seethe docs on$.flow.rerun for more detail. |
Environment variables
Environment variables are not accessible within sources or actions directly. Since components can be used by anyone, you cannot guarantee that a user will have a specific variable set in their environment.In sources, you can usesecret props to reference sensitive data.In actions, you’ll see a list of your environment variables in the object explorer when selecting a variable to pass to a step:Using npm packages
To use an npm package in a component, just require it. There is nopackage.json ornpm install required.import axios from "axios";Referencing a specific version of a package
This currently applies only to sources.If you’d like to use aspecific version of a package in a source, you can add that version in therequire string, for example:require("axios@0.19.2"). Moreover, you can pass the same version specifiers that npm and other tools allow to specify allowedsemantic version upgrades. For example:- To allow for future patch version upgrades, use
require("axios@~0.20.0") - To allow for patch and minor version upgrades, use
require("axios@^0.20.0")
Managing Components
Sources and actions are developed and deployed in different ways, given the different functions they serve in the product.Managing Sources
CLI - Development Mode
The easiest way to develop and test sources is with the
pd dev command.pd dev deploys a local file, attaches it to a component, and automatically updates the component on each local save. To deploy a new component withpd dev, run:pd dev <filename>pd dev --dc <existing-deployed-component-id> <file-or-name>CLI - Deploy
From Local Code
To deploy a source via CLI, use thepd deploy command.pd deploy <filename>pd deploy my-source.jsFrom Pipedream Github Repo
You can explore the components available to deploy inPipedream’s GitHub repo.pd deploy <source-key>pd deploy http-new-requestsFrom Any URL
pd deploy <url-to-raw-code>pd deploy https://raw.githubusercontent.com/PipedreamHQ/pipedream/master/components/http/sources/new-requests/new-requests.jsCLI - Update
View theCLI command reference.CLI - Delete
View theCLI command reference.UI - Deploy
You can find and deploy curated components athttps://pipedream.com/sources/new, or you can deploy code via the UI using following URL patterns.From Pipedream Github Repo
https://pipedream.com/sources?action=create&key=<source-key>https://pipedream.com/sources?action=create&key=http-new-requestsFrom Any URL
https://pipedream.com/sources?action=create&url=<url-encoded-url>https://pipedream.com/sources?action=create&url=https%3A%2F%2Fraw.githubusercontent.com%2FPipedreamHQ%2Fpipedream%2Fmaster%2Fcomponents%2Fhttp%2Fhttp.jsUI - Update
You can update the code and props for a component from theConfiguration tab for a source in the Pipedream UI.UI - Delete
You can delete a component via the UI athttps://pipedream.com/sources.API
See theREST API docs.Managing Actions
CLI - Publish
To publish an action, use thepd publish command.pd publish FILENAMEpd publish my-action.jsSource Lifecycle
Lifecycle hooks
Pipedream sources support the following hooks. The code for these hooks are defined within the component. Learn more about thecomponent structure andhook usage.deploy
Thedeploy() hook is automatically invoked by Pipedream when a source is deployed. A common use case for the deploy hook is to create webhook subscriptions when the source is deployed, but you can run any Node.js code within thedeploy hook. To learn more about thedeploy() hook, refer to theAPI documentation.activate
Theactivate() hook is automatically invoked by Pipedream when a source is deployed or updated. For example, this hook will be run when users update component props, so you can run code here that handles those changes. To learn more about defining a customactivate() hook, refer to theAPI documentation.deactivate
Thedeactivate() hook is automatically invoked by Pipedream when a source is updated or deleted. A common use case for the deactivate hook is to automatically delete a webhook subscription when a component is deleted, but you can run any Node.js code within thedeactivate hook. To learn more about thedeactivate() hook, refer to theAPI documentation.States
Saved Component
A saved component is non-instantiated component code that has previously been deployed to Pipedream. Each saved component has a unique saved component ID. Saved components cannot be invoked directly —they must first be deployed.Deployed Component
A deployed component is an instance of a saved component that can be invoked. Deployed components can be active or inactive. On deploy, Pipedream instantiates a saved component and invokes theactivate() hook.Deleted Component
On delete, Pipedream invokes thedeactivate() hook and then deletes the deployed component instance.Operations
Deploy
On deploy, Pipedream creates an instance of a saved component and invokes the optionaldeploy() andactivate() hooks. A unique deployed component ID is generated for the component.You can deploy a component via the CLI, UI or API.Update
On update, Pipedream, invokes the optionaldeactivate() hook, updates the code and props for a deployed component, and then invokes the optionalactivate() hook. The deployed component ID is not changed by an update operation.Delete
On delete, Pipedream invokes the optionaldeactivate() hook and deletes the component instance.Source Event Lifecycle
The event lifecycle applies to deployed sources. Learn about thesource lifecycle.Diagram
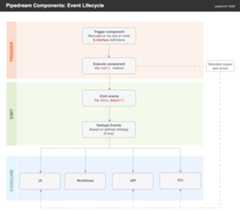
Pipedream Components Event Lifecycle Diagram
Triggering Sources
Sources are triggered when you manually run them (e.g., via theRUN NOW button in the UI) or when one of theirinterfaces is triggered. Pipedream sources currently supportHTTP andTimer interfaces.When a source is triggered, therun() method of the component is executed. Standard output and errors are surfaced in theLogs tab.Emitting Events from Sources
Sources can emit events viathis.$emit(). If you define adedupe strategy for a source, Pipedream automatically dedupes the events you emit.TIP: if you want to use a dedupe strategy, be sure to pass anid for each event. Pipedream uses this value for deduping purposes.Consuming Events from Sources
Pipedream makes it easy to consume events via:- The UI
- Workflows
- APIs
- CLI
UI
When you navigate to your sourcein the UI, you’ll be able to select and inspect the most recent 100 events (i.e., an event bin). For example, if you send requests to a simple HTTP source, you will be able to inspect the events (i.e., a request bin).Workflows
Trigger hosted Node.js workflows on each event. Integrate with 2,700+ apps including Google Sheets, Discord, Slack, AWS, and more!API
Events can be retrieved using theREST API orSSE stream tied to your component. This makes it easy to retrieve data processed by your component from another app. Typically, you’ll want to use theREST API to retrieve events in batch, and connect to theSSE stream to process them in real time.CLI
Use thepd events command to retrieve the last 10 events via the CLI:pd events -n 10 <source-name>Was this page helpful?