
Please consider🎗 sponsoring me 🎗 to keep writing articles like this.
A local development environment with Docker allows you to shrink-wrap the devops your project needs as config, making onboarding frictionless

Docker is a tool for containerizing your applications, which means that your application is shrink-wrapped with the environment that it needs to run.
This allows you to define the devops your application needs in order to run as config, which can then be easily replicated and reused.
While there are many uses for Docker, this article will focus on using Docker as a local environment for frontend web development.
AlthoughCraft
The Docker config used here is used in both thedevMode.fm GitHub repo, and in thenystudio
The Docker config on its own can be found atnystudio
The base images are allmulti-arch, so you folks using Apple Silicon
Link
If you’re doing frontend web development, you very likely already have some kind of a local development environment.
This is a very reasonable question to ask, because any kind of switch of tooling requires some upskilling, and some work.
I’ve long been usingHomestead—which is really just a customVagrant box with some extras — as my local dev environment as discussed in theLocal Development with Vagrant / Homestead article.
I’d chosen to use Homestead because I wanted a local dev environment that was deterministic, disposable, and separated my development environment from my actual computer.

Docker has all of these advantages, but also a much more lightweight approach. Here are the advantages of Docker for me:
- Each application has exactly the environment it needs to run, including specific versions of any of the plumbing needed to get it to work (
- Onboarding others becomes trivial, all they need to do isinstall Docker and typedocker-compose up and away they go
- Your development environment is entirely disposable; if something goes wrong, you just delete it and fire up a new one
- Your local computer is separate from your development environment, so switching computers is trivial, and you won’t run into issues where you hose your computer or are stuck with conflicting versions of devops services
- The cost of trying different versions of various services is low; just change a number in a.yaml file,docker-compose up, and away you go
There are other advantages as well, but these are the more important ones for me.
Additionally, containerizing your application in local development is a great first step to using a containerized deployment process, and running Docker in production as well.
A disadvantage with any kind of virtualization is performance, but that can be mitigated by having modern hardware, a bunch of memory, and optimizing Docker via thePerformance Tuning Docker for Mac article.
Link
This article is not a comprehensive tutorial on Docker, but I will attempt to explain some of the more important, broader concepts.
Docker has the notion of containers, each of which run one or more services. You can think of each container as a mini virtual machine (even though technically, they are not).
While you can run multiple services in a single Docker container, separating each service out into a separate container has many advantages.

If
If you decide you want to useNginx orPostgres instead, the decoupling into separate containers makes it easy!
Docker containers are built fromDocker images, which can be thought of as a recipe for building the container, with all of the files and code needed to make it happen.
Docker images almost always are layered on top of other existing images that they extendFROM. For instance, you might have a base image fromUbuntu orAlpine Linux which provide in the necessary operating system kernel layer for other processes like Nginx to run.
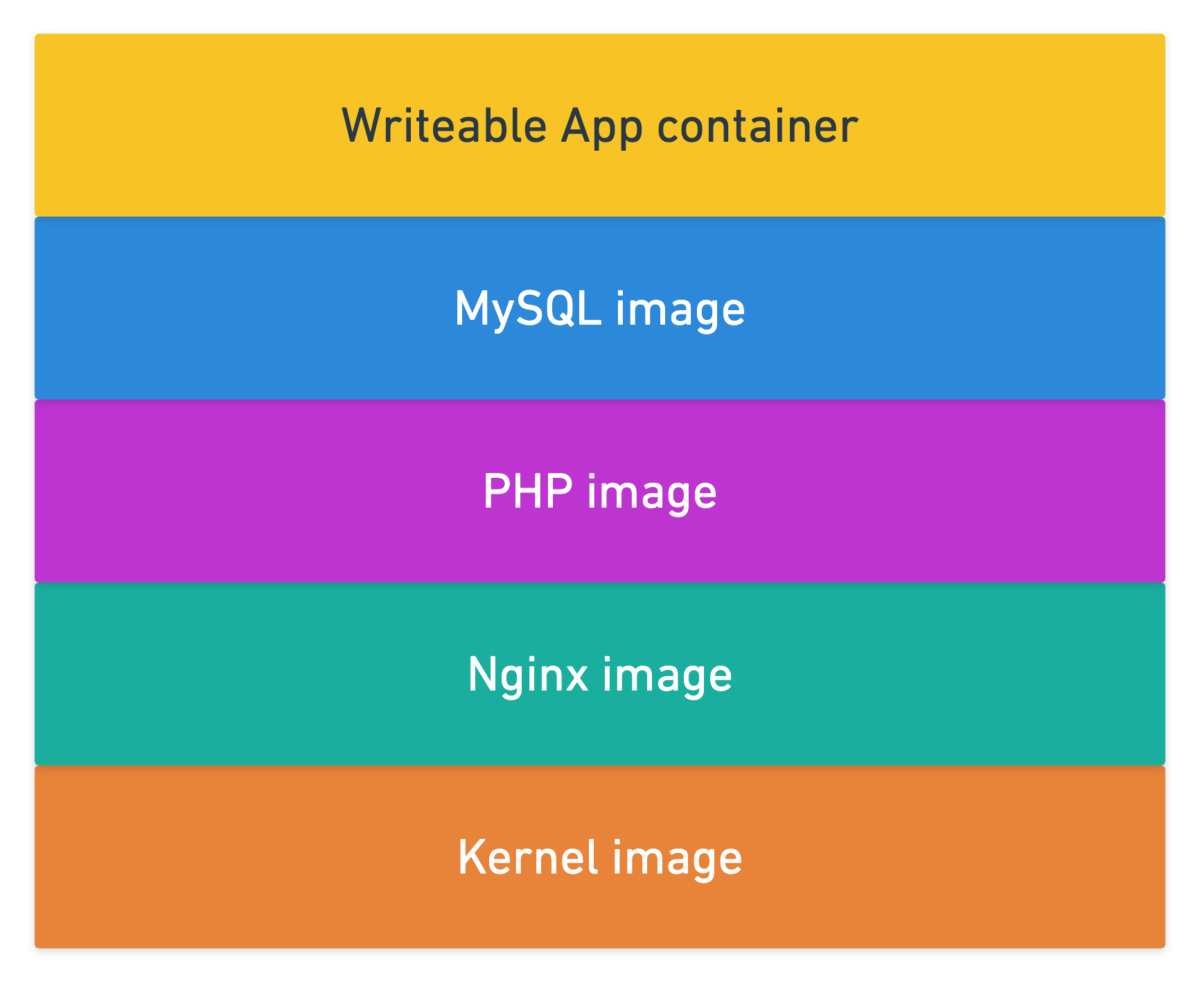
This layering works thanks to theUnion file system, which handles composing all the layers of the cake together for you.
We said earlier that Docker is more lightweight than running a full Vagrant
Fortunately, you don’t need to be concerned with any of this, but the performance implications do inform some of the decisions we’ve made in the Docker config presented here.
For more information on Docker, for that I’d highly recommend theDocker Mastery course (if it’s not on sale now, don’t worry, it will be at some point) and also the followingdevMode.fm episodes:
…and there are tons of other excellent educational resources on Docker out there such as Matt Gray’sCraft in Docker: Everything I’ve Learnt presentation, and his excellentA Craft
In our article, we will focus on annotating a real-world Docker config that’s used in production. We’ll discuss various Docker concepts as we go, but the primary goal here is documenting a working config.
I learn best by looking at a working example, and picking it apart. If you do, too, let’s get going!
Link
Before we delve into the Docker setup, a quick discussion onxdebug is in order.
Xdebug is a tool that allows you to debug your
Most of the time we don’t need xdebug, but the overhead ofmerely having xdebug installed can slow down frontend requests. There are ways you can disablexdebug via environment variable (and other methods), but they usually require rebuilding your container.
Additionally, just having xdebug installed adds overhead. I was researching this conundrum (whilst also re-evaluating my life) when I discovered the articleDeveloping at Full Speed with Xdebug.
Essentially what we do is just have two

What happens is a request comes in, Nginx looks to see if there’s anXDEBUG_SESSION orXDEBUG_PROFILE cookie set. If there’s no cookie, it routes the request to the regularphp container.
If however theXDEBUG_SESSION orXDEBUG_PROFILE cookie is set (with any value), it routes the request to thephp_xdebug container.
You can set this cookie with a browser extension, your
Here’s a video of it in action:
This elegant solution allows us to develop at full speed using Docker
🔥
Link
When I originally created my Docker setup, I used the default Ubuntu images, because I was familiar with Ubuntu, and I’d been told that I’d have fewer issues getting things up and running.
This was all true, but I decided to go in and refactor all of my images to be based off ofAlpine Linux, which is a version of Linux that stresses small image sizes, and efficiency. Here’s what it looks like converted over:

N.B.: the sizes above refer only to the space on disk, the images don’t use up this much memory when in use. On my laptop, I have

Havingsmaller Docker images means that they take less time to download, they take up less disk space, and are in general more efficient.
And they are more in line with the Docker
Link
This Docker setup uses a directory structure that looks like this (don’t worry, it’s not as complex as it seems, many of the Docker images here are for reference only, and are actually pre-built):
Craft CMS Docker Directory Structure
├── buddy.yml├── buildchain│ ├── package.json│ ├── package-lock.json│ ├── postcss.config.js│ ├── tailwind.config.js│ ├── webpack.common.js│ ├── webpack.dev.js│ ├── webpack.prod.js│ └── webpack.settings.js├── CHANGELOG.md├── cms│ ├── composer.json│ ├── composer.lock│ ├── config│ ├── craft│ ├── craft.bat│ ├── example.env│ ├── modules│ ├── storage│ ├── templates│ ├── vendor│ └── web├── db-seed│ ├── db_seed.sql├── docker-compose.yml├── docker-config│ ├── mariadb│ │ └── Dockerfile│ ├── nginx│ │ ├── default.conf│ │ └── Dockerfile│ ├── node-dev-base│ │ └── Dockerfile│ ├── node-dev-webpack│ │ └── Dockerfile│ ├── php-dev-base│ │ ├── Dockerfile│ │ ├── xdebug.ini│ │ └── zzz-docker.conf│ ├── php-dev-craft│ │ └── Dockerfile│ ├── php-prod-base│ │ ├── Dockerfile│ │ └── zzz-docker.conf│ ├── php-prod-craft│ │ ├── Dockerfile│ │ └── run_queue.sh│ ├── postgres│ │ └── Dockerfile│ └── redis│ └── Dockerfile├── migrations├── scripts│ ├── common│ ├── docker_prod_build.sh│ ├── docker_pull_db.sh│ ├── docker_restore_db.sh│ └── example.env.sh├── src│ ├── conf│ ├── css│ ├── img│ ├── js│ ├── php│ ├── templates -> ../cms/templates│ └── vue└── tsconfig.json Craft CMS Docker Directory Structure
Here’s an explanation of what the top-level directories are:
- cms — everything needed to run Craft
- docker-config — an individual directory for each service that the Docker setup uses, with a Dockerfile and other ancillary config files therein
- scripts — helper shell scripts that do things like pull a remote or local database into the running Docker container. These are derived from theCraft-Scripts shell scripts
- src — the frontend JavaScript,
Each service is referenced in thedocker-compose.yaml file, and defined in theDockerfile that is in the corresponding directory in thedocker-config/ directory.
It isn’t strictly necessary to have a separateDockerfile for each service, if they are just derived from a base image. But I like the consistency, and ease of future expansion should something custom be necessary down the road.
You’ll also notice that there arephp-dev-base andphp-dev-craft directories, as well asnode-dev-base andnode-dev-webpack directories, and might be wondering why they aren’t consolidated.
The reason is that there’s a whole lot of the base setup in both that just never changes, so instead of rebuilding that each time, we can build it once and publish the images up on DockerHub.com asnystudio
Then we can layer anything specific about our project on top of these base images in the respective-craft services. This saves us significant building time, while keeping flexibility.
Link
While a docker-compose.yaml file isn’t required when using Docker, from a practical point of view, you’ll almost always use it. Thedocker-compose.yaml file allows you to define multiple containers for running the services you need, and coordinate starting them up and shutting them down in unison.
Then all you need to do is rundocker-compose up via the terminal in a directory that has a docker-compose.yaml file, and Docker will start up all of your containers for you!
Here’s an example of what that might look like, starting up your Docker containers:

Let’s have a look at ourdocker-compose.yaml file:
docker-compose.yaml
version: '3.7'services: # nginx - web server nginx: build: context: ./docker-config/nginx dockerfile: ./Dockerfile env_file: &env - ./cms/.env init: true ports: - "8000:80" volumes: - cpresources:/var/www/project/cms/web/cpresources:delegated - ./cms/web:/var/www/project/cms/web:cached # php - run php-fpm php: build: &php-build context: ./docker-config/php-prod-craft dockerfile: ./Dockerfile depends_on: - "mariadb" - "redis" env_file: *env expose: - "9000" init: true volumes: &php-volumes - cpresources:/var/www/project/cms/web/cpresources:delegated - storage:/var/www/project/cms/storage:delegated - ./cms:/var/www/project/cms:cached # Specific directories that need to be bind-mounted - ./cms/storage/logs:/var/www/project/cms/storage/logs:delegated - ./cms/storage/runtime/compiled_templates:/var/www/project/cms/storage/runtime/compiled_templates:delegated - ./cms/storage/runtime/compiled_classes:/var/www/project/cms/storage/runtime/compiled_classes:delegated - ./cms/vendor:/var/www/project/cms/vendor:delegated # php - run php-fpm with xdebug php_xdebug: build: context: ./docker-config/php-dev-craft dockerfile: ./Dockerfile depends_on: - "php" env_file: *env expose: - "9000" init: true volumes: *php-volumes # queue - runs queue jobs via php craft queue/listen queue: build: *php-build command: /var/www/project/run_queue.sh depends_on: - "php" env_file: *env init: true volumes: *php-volumes # mariadb - database mariadb: build: context: ./docker-config/mariadb dockerfile: ./Dockerfile env_file: *env environment: MYSQL_ROOT_PASSWORD: secret MYSQL_DATABASE: project MYSQL_USER: project MYSQL_PASSWORD: project init: true ports: - "3306:3306" volumes: - db-data:/var/lib/mysql - ./db-seed/:/docker-entrypoint-initdb.d # redis - key/value database for caching & php sessions redis: build: context: ./docker-config/redis dockerfile: ./Dockerfile expose: - "6379" init: true # vite - frontend build system vite: build: context: ./docker-config/node-dev-vite dockerfile: ./Dockerfile env_file: *env init: true ports: - "3000:3000" volumes: - ./buildchain:/var/www/project/buildchain:cached - ./buildchain/node_modules:/var/www/project/buildchain/node_modules:delegated - ./cms/web:/var/www/project/cms/web:delegated - ./src:/var/www/project/src:cached - ./cms/templates:/var/www/project/cms/templates:cachedvolumes: db-data: cpresources: storage: docker-compose.yaml
This.yaml file has
- version — the version number of theDocker Compose file, which corresponds to different capabilities offered by different versions of theDocker Engine
- services — each service corresponds to a separate Docker container that is created using a separate Docker image
- volumes — named volumes that are mounted and can be shared amongst your Docker containers (but not your host computer), for storing persistent data
We’ll detail each service below, but there are a few interesting tidbits to cover first.
When you’re creating a Docker container, you can either base it on an existingimage (either a local image or one pulled down fromDockerHub.com), or you can build it locally via a Dockerfile.
As mentioned above, I chose the methodology that each service would be creating as a build from a Dockerfile (all of which extendFROM an image up onDockerHub.com) to keep things consistent.
This means that some of ourDockerfiles we use are nothing more than a single line, e.g.:FROM mariadb:10.3, but this setup does allow for expansion.
The two keys used forbuild are:
- context — this specifies where the working directory for the build should be, relative to thedocker-compose.yaml file. This is set to the root directory of each service
- dockerfile — this specifies a path to theDockerfile to use tobuild the service Docker container. Think of theDockerfile as a local Docker image
So the context is always the root directory of each service, with theDockerfile and any supporting files for each service are off in a separate directory. We do it this way so that we’renot passing down more than is needed when building the Docker images, which slows down the build process significantly (thanks to Mizux Seiha
This just lets you specify what other services this particular service depends on; this allows you to ensure that other containers are up and running before this container starts up.
Theenv_file setting specifies a path to your.env file for key/value pairs that will be injected into a Docker container.
Docker does not allow for quotes in its.env file, which is contrary to how.env files work almost everywhere else… so remove any quotes you have in your.env file.
You’ll notice that for the nginx service, there’s a strange&env value in theenv_file setting, and for the other services, the setting is*env. This is taking advantage of
Doing it this way also ensures that all of the .env environment variables are available in every container. For more on environment variables, check out theFlat Multi-Environment Config for Craft
Because it’s Docker that is injecting these.env environment variables, if you change your.env file, you’ll need to restart your Docker containers.
Settinginit: true for an image causessignals to be forwarded to the process, which allows them to terminate quickly when you halt them withControl-C.
This specifies the port that should be exposed outside of the container, followed by the port that the container uses internally. So for example, the nginx service has"8000:80", which means the externally accessible port for the Nginx webserver is8000, and the internal port the service runs on is80.
If this sounds confusing, understand thatDocker uses its own internal network to allow containers to talk to each other, as well as the outside world.
Docker containers run in their own little world, which is great for isolation purposes, but at some point you do need to share things from your
Docker volumes allow you to do this. You specify either a named volume or a path on your host, followed by the path where this volume should bebind mounted in the Docker container.
This is where performance problems can happen with Docker on the Mac and Windows. So we use some hints tohelp with performance:
- consistent — perfect consistency (host and container have an identical view of the mount at all times)
- cached — the host’s view is authoritative (permit delays before updates on the host appear in the container)
- delegated — the container’s view is authoritative (permit delays before updates on the container appear in the host)
So for things likenode_modules/ andvendor/ we mark them as :delegated because while we want them shared, the container is in control of modifying these volumes.
Some Docker setups I’ve seen put these directories into a named volume, which means they are visible only to the Docker containers.
But the problem is we lose out on our editor auto-completion, because our editor has nothing to index.
See theAuto-Complete Craft
Link
Nginx is the web server of choice for me, both in local dev and in production.
docker-config/nginx/Dockerfile
FROM nginx:1.19-alpineCOPY ./default.conf /etc/nginx/conf.d/default.conf docker-config/nginx/Dockerfile
We’ve based the container on thenginx image, tagged at version1.19
The only modification it makes isCOPYing ourdefault.conf file into place:
docker-config/nginx/default.conf
# default Docker DNS serverresolver 127.0.0.11;# If a cookie doesn't exist, it evaluates to an empty string, so if neither cookie exists, it'll match :# (empty string on either side of the :), but if either or both cookies are set, it won't match, and will hit the default rulemap $cookie_XDEBUG_SESSION:$cookie_XDEBUG_PROFILE $my_fastcgi_pass { default php_xdebug; ':' php;}server { listen 80; listen [::]:80; server_name _; root /var/www/project/cms/web; index index.html index.htm index.php; charset utf-8; gzip_static on; ssi on; client_max_body_size 0; error_page 404 /index.php?$query_string; access_log off; error_log /dev/stdout info; location = /favicon.ico { access_log off; log_not_found off; } location / { try_files $uri/index.html $uri $uri/ /index.php?$query_string; } location ~ [^/]\.php(/|$) { try_files $uri $uri/ /index.php?$query_string; fastcgi_split_path_info ^(.+\.php)(/.+)$; fastcgi_pass $my_fastcgi_pass:9000; fastcgi_index index.php; include fastcgi_params; fastcgi_param PATH_INFO $fastcgi_path_info; fastcgi_param SCRIPT_FILENAME $realpath_root$fastcgi_script_name; fastcgi_param DOCUMENT_ROOT $realpath_root; fastcgi_param HTTP_PROXY ""; add_header Last-Modified $date_gmt; add_header Cache-Control "no-store, no-cache, must-revalidate, proxy-revalidate, max-age=0"; if_modified_since off; expires off; etag off; fastcgi_intercept_errors off; fastcgi_buffer_size 16k; fastcgi_buffers 4 16k; fastcgi_connect_timeout 300; fastcgi_send_timeout 300; fastcgi_read_timeout 300; }} docker-config/nginx/default.conf
This is just a simple Nginx config that works well with Craft
The only real
# If a cookie doesn't exist, it evaluates to an empty string, so if neither cookie exists, it'll match :# (empty string on either side of the :), but if either or both cookies are set, it won't match, and will hit the default rulemap $cookie_XDEBUG_SESSION:$cookie_XDEBUG_PROFILE $my_fastcgi_pass { default php_xdebug; ':' php;}This just sets the$my_fastcgi_pass variable tophp if there is noXDEBUG_SESSION orXDEBUG_PROFILE cookie set, otherwise it sets it tophp_xdebug
We use this variable later on in the config file:
fastcgi_pass $my_fastcgi_pass:9000;This is what allows the routing of debug requests to the right container, for performance reasons.
Link
MariaDB is a drop-in replacement for MySQL that I tend to use instead of MySQL itself. It was written by the original author of MySQL, and is binary compatible with MySQL.
docker-config/mariadb/Dockerfile
FROM yobasystems/alpine-mariadb:10.4.15 docker-config/mariadb/Dockerfile
We’ve based the container on themariadb image, tagged at version10.4.15
There’s no modification at all to the source image.
When the container is started for the first time, it will execute files with extensions.sh,.sql and.sql.gz that are found in/docker-entrypoint-initdb.d so we can use this to seed the initial database. SeeInitializing a fresh instance.
Link
Postgres is a robust database that I am using more and more for Craft
Postgres is used in local dev and in production on thedevMode.fm GitHub repo, if you want to see it implemented.
docker-config/postgres/Dockerfile
FROM postgres:12.2 docker-config/postgres/Dockerfile
We’ve based the container on thepostgres image, tagged at version12.2
There’s no modification at all to the source image.
When the container is started for the first time, it will execute files with extensions.sh,.sql and.sql.gz that are found in/docker-entrypoint-initdb.d so we can use this to seed the initial database. SeeInitialization scripts.