I will be posting tutorials in this thread!
Kip E Cringedevil's 3-part rigging masterclass:
Part 1 (Basics) | Part 2 (Motion Parents & Physics) | Part 3 (upcoming)
Maxwellflyweight’s beginner's guide to RahiTuber:(BlueSky post)
RahiTuber works under WINE on Linux.
There is also a beta release built for linux ubuntu, but if that doesn't meet your needs, you can try this alternative setup.
Notes on Hotkeys (may be fixed now that I'm no longer using keyboard hooks to detect them):
The only problem is that hotkeys don't work while the window is out of focus, but this is due to a limitation in Wine.
In case any other Linux users come across this, It's possible to work around the problem by using a simplified version of the solution described here: https://www.howtogeek.com/125664/how-to-bind-global-hotkeys-to-a-wine-program-un...
Instead of creating separate script files, it works to just assign commands directly to the keyboard shortcuts in the Plasma system settings menu. Screenshot for reference: https://imgur.com/a/VJNefOO
Additional note for SAMMI users:
There was also the inverse issue of simulated button presses in SAMMI not being picked up. To work around that, put the xdotool command into a shell script and have SAMMI run that with a command: start /unix /bin/bash /home/foo/bar.sh
Here's a recent VOD with version 13.66, from a stream where I rig a multi-layered avatar with individual motion on the jaw to simulate volume-based talking.
This is an older VOD from my own stream where I set up a multi-layered avatar with physics and states. It's far surpassed by Kip's new series (in the top post) but I'll leave it here for variety's sake!
The most simple avatar can be created using only a single layer and two images.
Top tips:
A Layer Set is the format in which your avatar is saved. Think of it as a project file. It contains all the information about where your sprite images are located, along with the details about their movement, animations, and any States set up to modify them.
There are 3 options for the Layer Set interface, which can be chosen in the Advanced menu, under Appearance. Pick whichever suits you best!


With the default ("Buttons") Layer Set UI: Start by pressing the "New" button (first on the left).
You will be prompted for a save location and filename. I recommend keeping your XML files in the RahiTuber directory, but they should work anywhere.
With the "Menus" UI, press File > New, and you will be prompted for a save location as above.
If using the "Legacy" Layer set UI: Start by typing a name for your avatar in the “Layer Set” box. Press the Save button to create your file. When the file exists, the “Save” button will change to say “Overwrite”, so you’ll know if you’ve already used that name before.
Now you can create a layer. Do this with the "Add Layer" button.
The layer has more buttons on its header bar. From left to right:
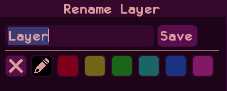
Visibility, Move Up, Move Down, Rename, Duplicate, and Delete.

You can rename your layer anything you like, and even pick a colour for it to keep things organised.
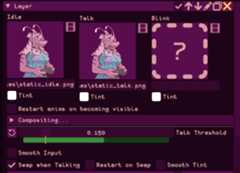
Click the layer header to expand it. Now you can add an image for your idle sprite. This will be visible while you’re not talking. I’ll use the files in the Demo_Sprites package available as an optional download from itch.io. The idle sprite is called “static_idle.png”. First, click the “?” box, then select the file you want.


Once you've added an image, you might want to change the composition settings. These define the way that the layer is blended onto the canvas - the most important one you might need is the "Scale Filter" option. The default is "Nearest Pixel", but if you have art with smooth lines and soft edges, you might want to go for "Linear" instead.
Next, add an image for your talking sprite. This one’s called “static_talk.png”.


While this is already a functional avatar, we can also add a “blink” sprite to give it a bit more life. That’s “static_blink.png”.
There are other options automatically enabled to give your character some motion. These are located in the "Individual Motion" section, under the Talk and Idle tabs.
The Idle motion is set up to move and scale your avatar to give the impression of breathing. By default, this will only occur while your character is not talking, but you can change that with the "Continue Whilst Talking" option.

The Talking motion is set up to move your sprites up and down while you speak. This can either be driven by the loudness of your voice, a constant regular bouncing motion, or just a single bounce each time you start talking.

For each layer, you can adjust the position using the "Transforms" section:

This is also where you can adjust the Pivot Point (the spot the layer rotates and scales around), and you can also enable Mouse Tracking here.
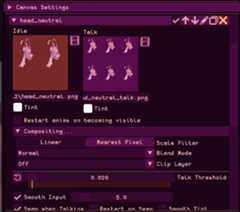
If you have a setup with more layers, you can adjust the position of all of them at once using the Canvas Settings section found above all the layers:

At the bottom of RahiTuber’s menu you will find the “Audio Input” section. Here you can select the microphone you want to use as input.
If you click the Audio Input title, some more options will become visible. You can use these to tweak the overall behaviour in response to your voice (below, you can see my preferred settings), but it’s best to leave these alone until you get a feel for how the avatar moves on the default settings.

On your avatar’s layer, check beneath the sprites.
You will see a “Talk Threshold” slider. When you speak into the microphone, the bar will light up to show your current speaking volume, and turn green when that volume passes the threshold set by the yellow bar. Speak normally into your microphone, and adjust the slider until the bar turns green for each syllable you speak, but goes red when you’re not talking.
If the green bar always goes past the end, or is always too low, then you may need to adjust the "Max Level" option in the audio settings. This describes the maximum volume that RahiTuber can expect to hear from your mic - so if you have a quiet microphone, it will need to be lower, and for a loud microphone, higher.
Press Esc or right-click to close the menu, and talk into your microphone - the avatar will now bounce and open its mouth while you’re talking!
Don't forget to Save your Layer Set once you're happy with it!
If you want to add a bit more motion to your avatar, you can use RahiTuber’s Sprite Sheet feature. We’ll start from the end of Tutorial 1.
Note - if you don't know how to create sprite sheets, there are a few methods. If you have all the still frames as separate images, you can stitch them together in an image manipulation software, or you can use a tool like this one: https://www.finalparsec.com/tools/sprite_sheet_maker (this is actually linked from within RahiTuber as well, in the Sprite Sheet menu).
If you want to convert a GIF into a spritesheet, you can use https://ezgif.com/gif-to-sprite. Try to keep the width, and preferably the height as well, to powers of 2 (e.g. 1024, 2048, 4096 ...). This will be the most efficient in your graphics memory.
In the main (only) layer, click the Idle sprite and browse to select “Demo_Sprites/Advanced_sprites/body_idle.png”. This is a sprite sheet - an animation of frames laid out in a grid, from first to last. This one only has 2 frames.

Before we do anything else, it will look strange - the idle sprite now appears twice on the screen (all frames appearing at once). To set up the sprite sheet properly, we need to open the “Sprite Sheet Setup” dialog by clicking the little film-clip icon next to the sprite.
We’ll see the following popup. This is how we tell RahiTuber to read the animation from the sheet. Our “body_idle” sheet has two columns and one row, so input the correct numbers in the first two boxes.
When this is done, the “Frame Count” will automatically adjust itself to match the maximum available from a grid of that size. If your sprite sheet doesn’t fill the whole grid, you’ll have to manually adjust this number.I’ll set the FPS to 7.
We’ll leave Frame Size as (-1,-1). This will be automatically calculated from the image dimensions and the number columns/rows. If you want to specify it manually, you can do that instead.When we click Save, the sprite will go back to its expected position and will be animated.
Do the same for the talk and blink sprites, replacing them with “body_talk.png” and “body_blink.png” respectively. For body_talk, the animation sheet has 3 columns and 2 rows.
Now we’re roughly where we started, except that the avatar is animated, and appears to be missing some parts. We’ll add those with new layers!
Let’s rename the existing layer to “Body”. Then we’ll add two more layers: One called “Chest” and another called “Arms”.Chest is easiest, so we’ll start there. For the idle sprite, add “Advanced_sprites/chest.png” and set the animation settings to show 2 columns, 1 row, and 7 FPS.
Now - the chest will not be talking or blinking, so we can turn off the “Swap when Talking” and the “Blinking” options.
To make sure the chest follows the body movement, we will set the “Motion Inherit” option to follow the Body layer.
And now we come to the reason the Chest layer is separate - physics! Don’t give me that look. We all know why VTubers got popular 😛
Expanding the Motion Inherit options gives us some numbers to play with. Feel free to tweak these and see what they do. I recommend the following setup in this situation:
For the Arms layer, we’ll turn off “Swap when Talking” as before, but this time we’ll keep the “Blinking” option and repurpose it. Set the “Talk Threshold” to maximum since we don’t need it.
The idle sprite (“arms_idle.png”) is also a 2 x 1 grid at 7 FPS, so we need to set up those animation options again. Then we’ll add our Blink sprite “arms_gaming.png”, which is 3 x 2.
We’ll set up the Blinking options so that the arms will start “gaming” at random intervals - A Duration of 5 seconds, a Delay of 10 seconds, and a Variation of 5 seconds. The Delay will be randomly changed up to the limit of Variation (i.e. Delay can be between 5 and 15 seconds here).
You may notice by now that the avatar doesn’t blink while you’re talking. On the Body Layer, let’s enable the “Blink While Talking” option. A new sprite will pop up:
We can load in “body_talkblink.png” and set it up as a 3 x 2, 7 FPS sprite sheet. The difference here is that the sprites have the eyes closed and the mouth open.
We now have an animated avatar with physics and gaming hands!
DISCLAIMER: THIS IS NOT A RAHITUBER FEATURE. IT'S A CREATIVE WAY OF USING SOME SOFTWARE ALONG WITH IT AND THERE ARE NO GUARANTEES THAT THIS WILL WORK FOR YOU.

Did you add mouse tracking to your RahiTuber model, but your favorite game loves to hold your mouse for itself and leave your character still as a... Well, a PNG?
Luckily, with the addition of Controller tracking, you can now useopentrackto get some basic head tracking (Yaw, Pitch and Roll).

This should also be possible on Linux, but I lack the knowledge to do so, so this tutorial will be focused on getting it working under Windows 10/11 (Windows 10 32-bit is not compatible).
The only hardware requirement is a webcam with at least 640x480 resolution at 30fps (lower resolutions/framerates might work, but at the cost of movement quality or delay).
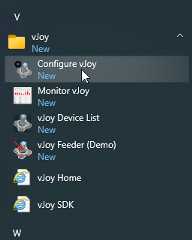
We will use three pieces of open source software:
Only the opentrack and vJoy versions linked above will make this setup work and we will have to follow some steps to make them work together.
I also made abasic demo model for you to test the setup and analyze how it works. Unzip it in your RahiTuber folder.


First, I will give you the basic settings you will need for this to work, and I will give you my personal recommendations for a smooth result later.

Here we need to set our Input (the head detection) and Output (the virtual controller). We can leave the Filter option by default for now, we'll talk about this later

For some reason, only 3 of the six axes work for our purpose: Yaw, X and Y (this is why we configured vJoy to only use those axes and prevent unwanted effects). We need to re-assign where they get their data from:
This will make the preview octopus placeholder move funny when it's running, but don't worry, that’s normal.
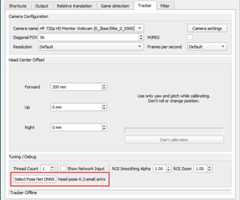
We could leave this tab untouched and it would work, but changing the model used for head tracking to the newer model will use less CPU and give a smoother result (try the big version if your camera is too noisy, but be advised that it is more CPU intensive):
You can now hit opentrack’s Start button, run RahiTuber and load the demo model to test it. If the smiley face imitates your head movements, congratulations! You've made it through the hardest part!
There are some settings that depend on your particular hardware/illumination/webcam and you'll need to fine-tune them. These are my suggested starting points, but don't feel afraid to try and find what suits you best!
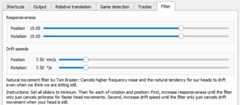
The default Accela filter can be a good starting point, but I personally recommend using the NaturalMovement one. Next we can click the hammer icon next to it (or go to the Options>Filter tab) and adjust its settings. I set both Responsiveness sliders to 15 and the Drift speeds to 7.50 as a starting point. If you like the result, you can leave it there, but if you need to fine-tune it, lowering the Responsiveness will reduce jerkiness and increasing Drift speeds will make it so you will need faster head movements for them to register. Try to find your sweet spot.

It's a good idea to set a keybind to Center, that way you can recalibrate your head position to neutral any time you want. Enable tray and Minimize to tray on startup are recommended for less screen clutter.
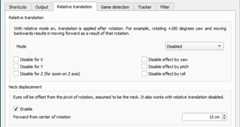
Enabling Neck displacement can make your movements register better. 15 cm is a good starting point for me, but increase or decrease it if you think your head is somewhat larger or smaller than standard.

If you add a program to this list, opentrack will auto-start tracking when you launch said program, so it's recommended to add RahiTuber's executable using the + button.
If you know your webcam's FOV, enter it here for more accurate calculations. If your camera uses MJPEG it may be a good idea to check the option to reduce CPU use.
In this window you can adjust the ranges of movement you need to do. As we routed the output axes, the tabs are now:
You can also modify the response curves if you need more control over it. Vertical axis is the "gamepad" output and Horizontal axis is the head detection input.
If you set up your motion tracked layers to use Controller -> Left axis they will follow your Yaw and Pitch.
Any layer you set to use the Right axis will register your Roll movements as an horizontal movement. You can get different effects by using only Rotation Limits or by combining it with Movement Limits, but only the horizontal field will have an effect.
Feel free to see how the demo model is set up to better understand it.
I’ve shown you a way to use this, but the real fun begins when you get creative with it. Does your character have wings, long ears or other appendages? Why not use “Roll” to make them move at will? And remember you can always mix mouse and controller tracking if you want to! Please, do share how you use it, I'd love to see it!
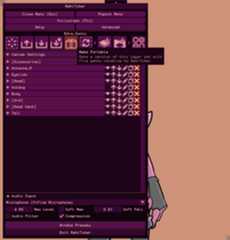
To share a Layer Set, you need all the image locations to work on both yours and the recipient's computer. To do this, you can use the "Make Portable" function.
First, with your desired layer set loaded, press the "Make Portable" button in the header bar. This is also available in the "Menus" UI option, but not in "Legacy".
Next, select the option that makes sense for your layer set. If all your layer set's image files are already stored within RahiTuber's directory, then you can pick "Create portable XML only". Otherwise, select "Copy files and create portable XML".

Now you'll be prompted to name the exported layer set. If you want to make the existing layer set portable, you can keep the same name, but I recommend adding "portable" to it so that you can keep both versions. The directory will be set to the location of RahiTuber.exe - don't change this.
Press "save" to continue.

RahiTuber's home directory will now contain an XML (and a folder, if you chose "copy files") with the name you just chose.
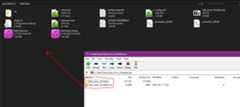
Select the XML and the folder containing your sprites, and right click. From the menu, choose "Send To..." -> "Compressed (zipped) Folder".

Now you can send this .zip file to whoever you like!
For the recipient to use it, all they need to do is double-click the .zip file to open it, and drag the two items into RahiTuber's home directory:
Then you can browse to that XML from within RahiTuber and open it!


