- Notifications
You must be signed in to change notification settings - Fork128
usage
You can install webpack via npm:
npm install webpack -gNote: We’re installing webpack globally for demonstration purposes. When you are building a real application, it’s more advisable to install webpack as a
devDependencyof your project.
First, we’ll learn the basics of webpack by using just webpack’s command-line interface.
Let’s create some modules in JavaScript, using the CommonJs syntax:
cats.js
var cats = ['dave', 'henry', 'martha'];module.exports = cats;app.js (Entry Point)
cats = require('./cats.js');console.log(cats);The "entry point" is where your application will start, and where webpack will start tracking dependencies between modules.
Give webpack the entry point (app.js) and specify an output file (app.bundle.js):
webpack ./app.js app.bundle.jswebpack will read and analyze the entry point and its dependencies (including transitive dependencies). Then it will bundle them all intoapp.bundle.js.

Now your bundle is ready to be run. Runnode app.bundle.js and marvel in your abundance of cats.
node app.bundle.js["dave", "henry", "martha"]You can also use the bundle in the browser.
webpack is a very flexible module bundler. It offers a lot of advanced features, but not all features are exposed via the command-line interface. To gain full access to webpack’s flexibility, we need to create a "configuration file".
In real-world webpack projects, we’ll separate the source files from the bundled files by organizing them in folders. For example, we’ll put the source files insrc, and bundled files inbin.
Our final project structure will look like this:
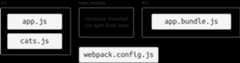
In the wild, there are many project structures. Some projects use
appinstead ofsrc. Some projects usedistorbuildinstead ofbin. Projects with tests usually usetest,tests,spec,specsor colocate the test files in the source folder.
Create the
binandsrcdirectory.mkdir binmkdir srcMove the original source files to the
srcfolder.mv app.js cats.js srcInitialize an npm project.
npm init # (answer the questions)Install webpack as a development dependency. This lets your project declare the version of webpack it is compatible with.
npm install --save-dev webpack
As your project grows and your configuration becomes more complex, it becomes unwieldy to configure webpack from the command line. Let’s create a configuration file instead.
Create
webpack.config.js:constpath=require('path');module.exports={entry:'./src/app.js',output:{path:path.resolve(__dirname,'bin'),filename:'app.bundle.js'}};
A webpack configuration file is a CommonJS-style module. So you can run any kind of code here, as long as a configuration object is exported out of this module.
With the configuration file in place, you can now simply run webpack like this:
webpackwebpack will read the configuration file, build the bundle, and save it as
bin/app.bundle.js. If you examine webpack's output you'll see that it included both source files.Run
bin/app.bundle.jsand you'll get your list of cats again.node bin/app.bundle.js["dave", "henry", "martha"]
You can also
require()modules installed via npm with no extra configuration.
webpack only supports JavaScript modules natively, but most people will be using a transpiler for ES2015, CoffeeScript, TypeScript, etc. They can be used in webpack by usingloaders.
Loaders are special modules webpack uses to 'load' other modules (written in another language) into JavaScript (that webpack understands). For example,babel-loader uses Babel to load ES2015 files.

json-loader loads JSON files (simply by prependingmodule.exports = to turn it into a CommonJs module).

Loaders can be chained, and sometimes you need to chain loaders together. For example,yaml-loader only converts YAML into JSON. Therefore, you need to chain it withjson-loader so that it can be used.

In this example, we're going to tell webpack to run our source files throughBabel so we can use ES2015 features.
Install Babel and the presets:
npm install --save-dev babel-core babel-preset-es2015Install
babel-loader:npm install --save-dev babel-loaderConfigure Babel to use these presets by adding
.babelrc{ "presets": [ "es2015" ] }Modify
webpack.config.jsto process all.jsfiles usingbabel-loader.constpath=require('path');module.exports={entry:'./src/app.js',output:{path:path.resolve(__dirname,'bin'),filename:'app.bundle.js',},module:{loaders:[{test:/\.js$/,exclude:/node_modules/,loader:'babel-loader'}]}}
We are excluding
node_moduleshere because otherwise all external libraries will also go through Babel, slowing down compilation.Install the libraries you want to use (in this example, jQuery):
npm install --save jquery babel-polyfillWe are using
--saveinstead of--save-devthis time, as these libraries will be used in runtime. We also usebabel-polyfillso that ES2015 APIs are available in older browsers.Edit
src/app.js:import'babel-polyfill';importcatsfrom'./cats';import$from'jquery';$('<h1>Cats</h1>').appendTo('body');constul=$('<ul></ul>').appendTo('body');for(constcatofcats){$('<li></li>').text(cat).appendTo(ul);}
Bundle the modules using webpack:
webpackAdd
index.htmlso this app can be run in browser:<!DOCTYPE html><html><head><metacharset="utf-8"></head><body><scriptsrc="bin/app.bundle.js"charset="utf-8"></script></body></html>
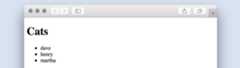
When you openindex.html, you should now see a list of cats!
There are a number ofdifferent loaders you can use to include files in your app bundle, including css and image loaders.
Usually you'll want to do some additional processing of the bundle in your workflow. An example would be minifying your file so that clients can load it faster. This can be done withplugins. We'll add the uglify plugin to our configuration:
const webpack = require('webpack');module.exports = {entry: './src/app.js',output: {path: './bin',filename: 'app.bundle.js',},module: {loaders: [{test: /\.js?$/,exclude: /node_modules/,loader: 'babel-loader',}]},plugins: [new webpack.optimize.UglifyJsPlugin({compress: {warnings: false,},output: {comments: false,},}),]}The Uglify plugin is included with webpack so you don't need to add additional modules, but this may not always be the case. You can write your owncustom plugins. For this build, the uglify plugin cut the bundle size from 1618 bytes to 308 bytes.
- seeCLI for the command line interface.
- seenode.js API for the node.js interface.
- seeConfiguration for the configuration options...
webpack 👍