Uh oh!
There was an error while loading.Please reload this page.
- Notifications
You must be signed in to change notification settings - Fork2k
Install Homebridge on Windows 10 Using Hyper V
This guide provides instructions for installing Homebridge on Windows 10/11 using Microsoft Hyper-V virtual machines.
We recommend using theHomebridge VM Image for the best experience on Windows with Hyper-V. This provides:
- Pre-configured Debian-based virtual machine
- Automatic updates for Homebridge, Node.js, and plugins
- Better performance and stability
- Simplified setup process
- Regular security updates
View Homebridge VM Image Installation Instructions →
The instructions below describe the legacy Docker-based installation method using a Boot2Docker ISO. This method is still functional but is no longer actively maintained.
Note: New users should prefer theHomebridge VM Image method above.
- Homebridge on Windows using Hyper-V
Before you get started, make sure you have the following:
- A computer running an up-to-date version of Windows 10/11 Enterprise, Pro, or Education (64-bit)
⚠️ Windows 10/11 Home Edition is NOT supported - it cannot run Hyper-V- VT-x / AMD-V capability enabled in your system BIOS
- An account with Administrator privileges
- A DHCP-enabled network
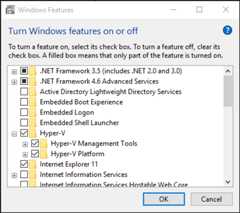
- Right-click on the Windows button and selectApps and Features
- SelectPrograms and Features on the right under related settings
- SelectTurn Windows Features on or off
- SelectHyper-V and clickOK
When the installation has completed, you will be prompted to restart your computer.
You need to create a virtual switch that allows the Homebridge virtual machine to connect to your local network.
- OpenHyper-V Manager (press the Windows key and type "Hyper-V Manager")
- Select the server in the left pane, or clickConnect to Server... in the right pane, then selectLocal Computer and clickOK
- In Hyper-V Manager, selectVirtual Switch Manager... from the Actions menu on the right
- Under the Virtual Switches section, selectNew virtual network switch
- Under "What type of virtual switch do you want to create?", selectExternal
- Select theCreate Virtual Switch button
- Under Virtual Switch Properties, give the new switch a name such asExternal VM Switch
- Under Connection Type, ensure thatExternal Network is selected andAllow management operating system to share this network adapter is checked
- Select the physical network card to be paired with the new virtual switch (your ethernet or WiFi adapter)
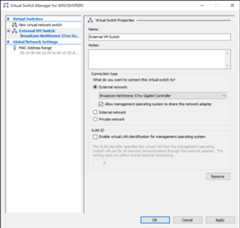
- SelectApply to create the virtual switch. You will likely see a warning message. ClickYes to continue.

- SelectOK to close the Virtual Switch Manager window
Download the legacy Homebridge VM ISO file:
Follow these steps to create your virtual machine:
- In Hyper-V Manager, selectNew thenVirtual Machine... from the Actions menu on the right
- On theBefore You Begin tab, clickNext
- On theSpecify Name and Location tab, give your virtual machine a name, such asHomebridge
- On theSpecify Generation tab, chooseGeneration 1
- On theAssign Memory tab, allocate at least 1024MB of RAM, andUNCHECK the "Use Dynamic Memory" checkbox
- On theConfigure Networking tab, set the Connection toExternal VM Switch (created in the previous step)
- On theConnect Virtual Hard Disk tab, set the hard disk size to 16GB or larger
- On theInstallation Options tab, select "Install an operating system from a bootable CD/DVD-ROM", then select "Image File" and choose thehomebridge-vm-image.iso file you downloaded
- On theSummary tab, clickFinish
Once created, double-click on the virtual machine in Hyper-V Manager, then clickStart.
The VM will boot and start Homebridge. You can manage Homebridge by navigating to the address displayed in the console.

TheHomebridge Config UI X web interface allows you to install, remove and update plugins, modify the Homebridge config.json, and manage other aspects of your Homebridge service.
Login to the web interface by navigating tohttp://<ip address of your server>:8581. You can access this from any device on your local network.
To find the IP address of your server, you can run:
hostname -I

Review theConfiguration Reference section below for important information about managing your installation.
You can safely close the Hyper-V Manager and Virtual Machine windows. The Homebridge virtual machine will continue to run in the background and will automatically start when your computer restarts.
You can access the console again at any time by opening the Hyper-V Manager app and double-clicking on the Homebridge virtual machine.
You can remove the Homebridge Hyper-V Virtual Machine using the Hyper-V Manager program. You will need to stop the VM before you can delete it.
To update Node.js to the latest LTS version, run the following command in the Homebridge terminal:
sudo hb-service update-node
This table contains important information about your setup. Use this as a reference when configuring or troubleshooting your environment.
| File Location / Command | |
|---|---|
| Config File Path (inside container) | /homebridge/config.json |
| Storage Path (inside container) | /homebridge |
| Restart Command | docker restart homebridge |
| Stop Command | docker stop homebridge |
| Start Command | docker start homebridge |
| View Logs Command | docker logs -f homebridge |
- For the recommended VM Image installation, see theHomebridge VM Image Wiki
- For general Homebridge help, visit theHomebridge Wiki
- Join theHomebridge Discord community
- Raspberry Pi
- Debian, Ubuntu
- CentOS, Fedora, Red Hat
- Arch, Manjaro
- Docker
- Virtual Machine ( Windows and MacOS)
- macOS
- Synology DSM 7
- Other Platforms
- Basic Troubleshooting
- Backup and Restore
- Child Bridges
- Config File
- Connect To HomeKit
- FFmpeg for Homebridge
- HomeKit Glossary of Terms
- iOS Homemanager App
- mDNS Options
- Remote Access
- Useful Links
- Basic Troubleshooting
- Config Options
- Enabling Accessory Control
- Enabling UI with Docker
- Homebridge Service Command
- Manual Configuration
- Reverse Proxy: Apache
- Reverse Proxy: Nginx and SSL
- Standalone Mode
- Swap From Standalone To Service Mode
- Developer Docs
- API Reference
- Plugin Templates
- Other Links (Internal)
- Other Links (External)