- Notifications
You must be signed in to change notification settings - Fork0
heroku-examples/heroku-agentforce-tutorial
Folders and files
| Name | Name | Last commit message | Last commit date | |
|---|---|---|---|---|
Repository files navigation
💡Heroku Integration Pilot Only:
This branch is only intended for developers who have joined theHeroku Integration Pilot. If you have are not part of the pilot please refer to the main branch of this repository for alternative instructions.
This tutorial will guide you through configuring an Agentforce Action deployed to Heroku within your Salesforce org. This allows Agentforce agents to access powerful custom-coded actions written in Python and other languages, leveraging Heroku's fully managed and elastic compute service. By the end, you will be able to generate your own badge as shown below!

This tutorial provides examples in Java and Python for coding a basic Agentforce action. Complete the standard Heroku deployment instructions in one of the following repositories before progressing to the next step.
| Language | GitHub Repository |
|---|---|
| Python | GitHub Repository |
| Java | GitHub Repository |
💡Salesforce Org Requirements:
Ensure you have access to Agentforce in your org by searching forAgentsin theSetupmenu. If not, you can create a temporary org by logging into Trailhead and creating a Playground per the instructionsat the top of this module (you do not need to complete the module). Once you have access to the org, locateEinstein Setupunder theSetupmenu and enable Einstein, which will also enable Agentforce.
From the directory you completed the above deployment in, run the following commands.
Add the Heroku Integration add-on to your application.
$ heroku addons:create heroku-integrationConnect your Heroku application to the org you intend to configure Agentforce within.
$ heroku salesforce:connect my-org --login-url "https://login.salesforce.com" --store-as-run-as-userAdd the Heroku Integration Service Mesh buildpack to ensure incoming calls from the Salesforce org are authenticated correctly.
$ heroku buildpacks:add https://github.com/heroku/heroku-buildpack-heroku-integration-service-meshImport your applications and its API specification into the connected org, for Python useapi-spec.json.
$ heroku salesforce:import api-spec.yaml --org-name my-org --client-name HerokuAgentActionLastly trigger a redeploy of the application to ensure the service mesh is running using the following commands .
$ git commit --allow-empty -m "empty commit"$ git push heroku heroku-integration-pilot:mainOnce complete check your application has been imported by searching forHeroku and thenApps under theSetup menu in your org.
The above process created aHerokuAgentAction permission set to control access to your application from within the org. Search forPermisison Sets underSetup, locate this permission set and clickManage Assignments to assign to your user.
At present to make your imported app accessable to Agentforce you must create a Flow wrapper. This requirement will be removed in the future.
Search for
FlowsunderSetupand clickNew Flow. ClickStart from Scratch, thenNext, and selectAutolaunched Flow (No Trigger). ClickCreateto open theFlow Builder.From the
Flow Builder, open theToolboxby clicking the sidebar icon near the top left of the screen. ClickNew Resourceand create the following variable resources.Resource Type: Variable
- API Name: AgentActionRequestName
- Data Type: Text
- Apex Class: Not Applicable
- Availability Outside the Flow: Available for Input
Resource Type: Variable
- API Name: AgentActionResponseMessage
- Data Type: Text
- Apex Class: Not Applicable
- Availability Outside the Flow: Available for Output
Resource Type: Variable
- API Name: AgentActionRequest
- Data Type: Apex Defined
- Apex Class: ExternalService__HerokuAgentAction_AgentRequest
- Availability Outside the Flow: None
Your
Flowshould look like this so far:
Click the
+icon in the middle of the canvas and selectAction. In theSearch Actionssidebar, search forHeroku, select thePost Processaction, and complete the fields as shown.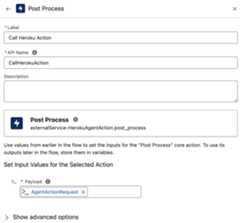
Click the
+iconbefore theCall Herokuelement on the canvas, selectAssignment, and complete as shown.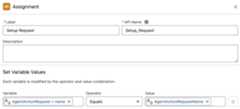
Click the
+iconafter theCall Herokuelement on the canvas, selectAssignment, and complete as shown.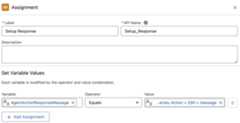
Tip: To complete the
Valuefield click into the field and use the popup to select theOutputs from the Call Heroku Actionresource, then click_200and finallymessage.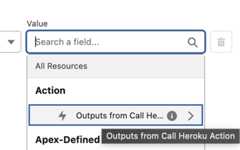
Finally, your
Flowshould look like this: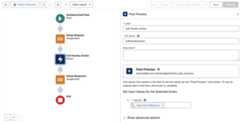
Click
Save, enterHeroku Agent Action, and clickSave, followed by clickingActivate.Search for
Agent Actionsunder theSetupmenu, and clickNew Agent Action, selectingFlowas theReference Action Type. In theReference Actionsearch field, search forHerokuso that you see the following: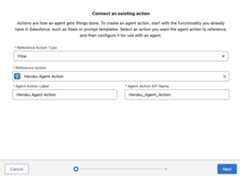
Complete defining the action as follows and click
Finish.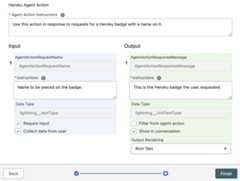
Field Text Agent Action InstructionsUse this action in response to requests for a Heroku badge with a name on it. AgentActionRequestName InstructionsName to be placed on the badge. AgentActionResponseMessage InstructionsThis is the Heroku badge the user requested.


Search for
AgentsunderSetupand be sure to toggle to enableEinstein Copilot for Salesforce.Click the
Einstein Copilotlink at the bottom of the page to find theOpen in Agent Builderbutton.Click the
Deactivatebutton in the top right of the screen if present.Click
Topicsand theGeneral CRMtopic. If theNew Versionbutton is shown, click it.Click the
Topic Configurationtab and append "Also including requests for badges." to the current contents of theClassification Descriptionfield.Click the
This Topic's Actionstab and selectAdd from Asset Libraryfrom theNewbutton dropdown.Complete the dialog as shown and click
Finish.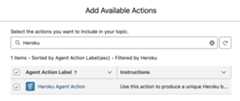
Finally, click the
Activatebutton in the top right of the screen.

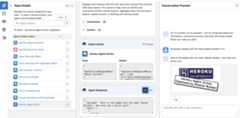
Open the
Agent BuilderforEinstein Copilot.In the
Conversation Preview, enterI would like a Heroku badge with the name Master Builder on it.You can, of course, change the name to your own and share your badge with your friends!

Congratulations on deploying your first Heroku-powered Agentforce Action!
The examples in this tutorial are intentionally simple, designed to give you a clear starting point for creating your own actions. We have also shared some fully developed action demos, and while their code is not compatible with the Heroku Integartion Pilot, you may want to checkout the video demonstrations and review the code for further inspiration.
| Example | Demo Video | Related Content | |
|---|---|---|---|
| TheArchive Agent action demonstrates using Heroku to access and perform complex computations over unstructured archived data. It uses AI to interpret natural language requests from users to perform a wider array of dynamic calculations on the data. | Link |  | BlogCode |
| With theCoral Cloud Collage Agent, we explore how Coral Cloud Resort invites its guests to browse and book unique experiences throughout their stay using Agentforce. With Heroku, we extend the agent's functionality to generate a personalized collage of each guest's adventures, showcasing how custom code deployed on Heroku can create dynamic digital media delivered directly within the Agentforce experience. | Link |   | Code |
About
Resources
Uh oh!
There was an error while loading.Please reload this page.
Stars
Watchers
Forks
Releases
Packages0
Uh oh!
There was an error while loading.Please reload this page.
Contributors2
Uh oh!
There was an error while loading.Please reload this page.