

Integrating CodeRabbit for Self-Managed GitLab
This page guides you through the process of integrating your Self-Managed GitLabwith CodeRabbit.
To initiate the integration, we require specific information. This is essentialfor the initial setup of CodeRabbit within your domain. Once this setup iscomplete, you can log in directly using the OAuth2 flow.
CodeRabbit supports GitLab16.x and above. Version15.x may experienceunexpected issues such as review comments not being posted or the sign-upprocess not working at all. While we won't block the integration, we recommendupgrading your GitLab instance to obtain the intended experience.
Step 1: Getting Started
Visit CodeRabbit: Visit ourLogin page andselect Self-Hosted GitLab

Step 2: Enter your Self-Managed GitLab URL
On this page, enter the URL of your self-managed GitLab instance and clicksubmit. Once, you submit, we check our database for a record of yourorganization and if we find an existing one, we are starting the login process.

If the self-managed GitLab instance is not found, we initiate the onboardingprocess, which can be either manual or automated.
Step 3: Onboarding Manual or Automated
1. Automated onboarding

Why do we need the Admin Access Token?
Admin access token is required to set up a new CodeRabbit bot user within yourself-managed instance. The token is needed only once during the initial setupprocess. Once the token is generated, you can set its minimum expiration period.This is the standard approach used by other products in this category. This isnot automatically installing the CodeRabbit app across all projects. You willadd CodeRabbit manually on the projects you wish, as the next step.
2. Manual onboarding
For the manual onboarding process we need to create theCodeRabbit user and theOAuth2 GitLab application.
Creating CodeRabbit user
This feature will work with any user from your organization, but we stronglysuggest creating a dedicated user calledCodeRabbitAI. This ensures clarifyabout which user is used for our application and allows for better fine-grainedaccess control.
To create users in GitLab, log in with an instance admin account and follow thesteps provided in theGitLab documentation.After the user is created, you can retrieve theUser ID from that user'sprofile and generate anaccess token.The access token is used to post reviews on merge requests.
We recommend using the CodeRabbitlogo as the profile picture to ensures easy recognition.
Creating OAuth2 application
For self-managed GitLab, we recommend creating an instance-wide applicationunless you want the reviews to be limited to a single group or user.
Please follow the steps outlined in theGitLab documentationfor creating the application.
Requirements:
- Scopes:
api read_user email openid - Callback URL:
https://app.coderabbit.ai/login
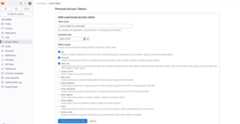
Generating Personal Access token
GitLab offers an option to generate a personal access token for adding a newuser and setting up the application in the self-managed instance. To generatethe token, please follow the process outlined below:
- Login to your self-hosted instance. Forautomated onboarding ensure you have admin rights.
- On the left sidebar, select your avatar.
- Select Edit profile.
- On the left sidebar, select Access Tokens.
- Select Add new token.
- Enter a name and expiry date for the token. We need this for the initialsetup, so the minimum expiry time is sufficient.
- If you do not enter an expiry date, the expiry date is automatically set to365 days later than the current date.
- Make sure, you select the scopes:
api read_api read_user - Select Create personal access token.
- Please note down this token as this will be visible one time only
Step 4: Paste the details and click submit
- Submit the form.
- We will handle the setup process for you.
- On subsequent visits, your setup will be automatically detected, allowing fordirect login.

Step 5: Whitelist CodeRabbit IP address
Use this CodeRabbit IP if your instance requires IP whitelisting35.222.179.152/32 and34.170.211.100/32.
VPN tunneling is available as an add-on package. Please reach out to us atsupport@coderabbit.ai if you are interested.