Making a Spaceship with Thrusters (Physics)
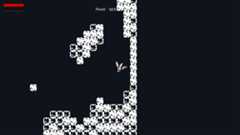
In this post, I am making a 2D spaceship with two thrusters. One on left and one on right. Our objective is to make a spaceship that is in zero gravity environment, and we have to control it only using the two thrusters. I used it in my Rocket Escape game. Some other elements from this game areprocedural cave generation, and2D shockwave shader.
This makes a really interesting mechanic that can add challenge in gameplay. So this was the idea.
Table of Contents
ToggleCreating Spaceship Scene
Create a folder named “Spaceship”, and a scene in it with same name. Scene root should beRigidBody2D. Under the root node, add aSprite2D (to visualize the spaceship), aCollisionShape2D (orCollisionPolygon2D, whatever you prefer) (required by theRigidBody2D).
Under the root, also add additional two nodes to represent the positions of the thrusters. Later physics forces will act on these positions. – Thus create twoMarker2D nodes, one on left and one on right. And (optionally) add anAnimatedSprite2D node as their child to visualize the thruster animation.

Now attach a script to the rootRigidBody2D node.
Script
In the script, first of all, create variables to hold the references of our nodes. I decorated these variables with@export keyword, so we will be able to assign their values from the editor:
extends RigidBody2D# Export variables for thrust markers@exportvarleft_nozzle_marker:Marker2D@exportvarright_nozzle_marker:Marker2D@exportvarleft_thrust_animation:AnimatedSprite2D@exportvarright_thrust_animation:AnimatedSprite2D@exportvarthrust_force:float =128.0@exportvarmax_health:float =100varhealth:float =max_health@exportvarmax_fuel:float =100varfuel:float =max_fuel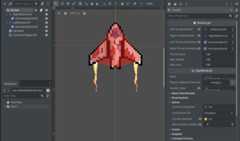
@export variables (see right-side panel). Assign them scene’s nodes.Now, we make the thrusters invisible since we only want them to be visible when user triggers the thruster. And, since my thruster animation is named “default” in theAnimatedSprite2D node, so I played it here with that name:
func_ready():add_to_group('players')# Hide the thrust animationsleft_thrust_animation.visible =falseright_thrust_animation.visible =falseleft_thrust_animation.play("default")right_thrust_animation.play("default")Also, I have this habit of adding all instances of all objects to their groups, so they can be accessible from anywhere. This is a useful hacky approach that works well for smaller projects.
Adding Movement System
func_physics_process(delta:float) ->void:# Hide the thrust animations before start of the loop# it will later be shown if thrusters are activeleft_thrust_animation.visible =falseright_thrust_animation.visible =falsevarleft_thruster =Input.is_action_pressed("ui_left")varright_thruster =Input.is_action_pressed("ui_right")ifleft_thrusterandnotright_thruster:varradius :=left_nozzle_marker.global_position.distance_to(self.global_position)apply_torque(thrust_force *radius)left_thrust_animation.visible =trueright_thrust_animation.visible =falsefuel -=deltaelifright_thrusterandnotleft_thruster:varradius :=left_nozzle_marker.global_position.distance_to(self.global_position)apply_torque(-thrust_force *radius)left_thrust_animation.visible =falseright_thrust_animation.visible =truefuel -=deltaifleft_thrusterandright_thruster:apply_central_force(Vector2.UP.rotated(self.rotation) *2.0 *thrust_force)# Since both thrusters are openleft_thrust_animation.visible =trueright_thrust_animation.visible =truefuel -=delta *2.0# var ui = get_tree().get_nodes_in_group("ui")[0]# ui.set_fuel(fuel)# ui.set_health(health)In above code, if left thruster key is pressed, then apply positive torque, and vice versa. But if both thruster keys are pressed, then apply a linear force (usingapply_central_force function).
Also, we decrease fuel every time the player presses thrusters. Pressing both thrusters consume 2x fuel.
Finally, if you have UI in your game, you may want to assign the fuel & health values to UITextureProgressBar. For now, I commented-out these lines at the end.
Making Damage System
Now we add damage system. We want spaceship to get more damage if it has higher linear or angular speed during collision. Higher change in speeds after impact means more damage.
If impact of collision is less than damage threshold, then do not damage at all. Impact is calculated by adding magnitudes of linear velocity with angular velocity (absolute values of angular velocity are used so we don’t get negative values in calculation, otherwise it will give higher damage for one direction and opposite damage for other direction).
Now, go to “Node” panel (right next to “Inspector”) and attach thebody_entered signal.
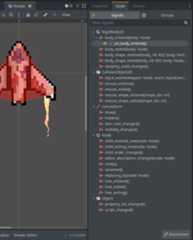
body_entered signal is attached by clicking on it and pressingConnect button on bottom.vardamage_threshold:float =5.0# Minimum velocity for damagevarimpact_damage_multiplier:float =0.25# Called when a collision occursfunc_on_body_entered(body:Node) ->void:varimpact =calculate_collision_impact()apply_impact_damage(impact)# Calculate the impact force based on both linear and angular velocityfunccalculate_collision_impact() ->float:# Get the magnitude of linear velocityvarlinear_impact =linear_velocity.length()# Get the magnitude of angular velocity (in radians/sec)varangular_impact =abs(angular_velocity)# Combine both impacts - you can adjust these weightsvartotal_impact = (linear_impact *0.8) + (angular_impact *0.2)# Return 0 if impact is below thresholdiftotal_impact <damage_threshold:return0.0returntotal_impact# Apply damage based on the impact forcefuncapply_impact_damage(impact:float) ->void:ifimpact <=0:return# Calculate damage based on impactvardamage =impact *impact_damage_multiplier# Reduce healthhealth =max(0,health -damage)# Check if rocket is destroyedifhealth <=0:destroy_rocket()# add custom destruction logic (an animation or simple queue_free())funcdestroy_rocket() ->void:passAnd do following configuration to make the signal work (explanation below the image):

Since you connectedbody_entered signal and mapped it to_on_body_entered function, you need to set thecontact_monitor tochecked, and setmax_contacts_reported to some value, such as8. This will allow the rigid body to detect collisions, otherwise the signal will never trigger. – This can be found under theSolver section ofInspector, while your rootRigidBody2D node is selected.
That’s all. To use this rocket, instantiate it in some other scene. Thank you for reading.
3 responses to “Making a Spaceship with Thrusters (Physics)”
Amazing post!
I’d love to see more advanced system like thisHey,
thanks for your tutorial!
I want to kindly ask you to publish the whole project on GitHub? I want to build in my computer to understand the nozzle marker radius movement.Greetings and thanks!