VR Puppetry, addon for Blender
A downloadable add-on for Blender
VR Puppetry
v1 -Early Adopter Edition
Note: VR Puppetry is free for students! If you're a student at a school or college, please feel free to email ormessage me for a free copy!
Animate objectsin Blenderusing VR Controllers! Works directly inside Blender 3.0+, does not require any additional software. Works with objects and bones.
Experiment with new styles of animations easily in Blender, like virtual puppetry, by attaching objects to VR Controllers and the VR headset. Or you can prototype your animation ideas quickly, by just moving the objects/bones around with your hands and recording them.
It records keyframes directly to the Blender animation timeline. So you can always rewind, edit and record different objects one by one.
Programmable Buttons!You can also program the buttons on the VR controllers to run custom actions, for e.g. you can make the "trigger" button control one shapekey, and the "A" button control a different shapekey etc. You can also make the buttons run custom Python functions written by you.
This is the first version of the plugin, meant for Early Adopters. I'd love to improve this based on your feedback. Please join our friendly Discord community to share your ideas or report issues -https://discord.gg/X6B4ZYEWSS
VR headsets supported:Oculus Rift / Oculus Quest (with Link or AirLink) / HTC Vive / Valve Index / HTC Vive Cosmos / HTC Vive Focus 3 / Windows MR / HP Reverb G2.
What is this useful for?
Hand Puppets

String Puppets

Animation Prototyping

Character Animation
Scroll down this page to see more creations made by users!
Installation
Please ensure that you have Blender 3.0 or newer. You can download Blender fromhttps://www.blender.org/download/
1. Please purchase and download the "VR Puppetry" addon (i.e. the page you're looking at)
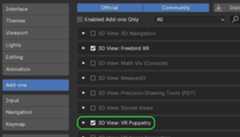
2. In Blender, openEdit > Preferences > Add-ons, and clickInstall... and select the downloaded zip file. Please enable the "VR Puppetry" addon.
For Reverb G2, Vive Focus and Vive Cosmos:
In Blender, open Edit > Preferences > Add-ons, and expand the"Freebird XR" entry. Then enable your headset in the"Experimental Headsets" section.
How to use?
1. Please open the "VR Puppetry" tab in Blender. It will be visible next to the colorful XYZ gizmo.
2. Open the section named "Step 1", and click "Set in VR". You will see the instructions for how to set your starting position and zoom-level in VR.

3. Next, open the "Step 2" section, and select a controller or headset. Then select the object or bone to attach to that device.

4. Finally, press the "Start VR Capture" button. To start/stop recording, please press the"A" button on therightcontroller.

You can rewind and play back the animation from Blender's Animation Timeline.
Tip:You can customize the attachment angle to make it easier to hold an object.
Custom Scripting
To run custom Python functions when controller buttons are pressed:
1. Please create a python file with your functions, for e.g. a file named "test.py" containing the following code:
def my_function1(event_name, event): print("called my_function1", event_name, event, event.value)2. Next, open the "Advanced Settings" panel, and choose your Python file.
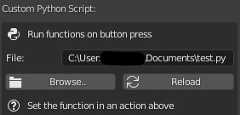
3. Finally, add a "Button Action" and choose "Custom Function" as the action type. And then select your function name from the drop-down.

Theeventobject contains the following fields:
- value-float- 0 or 1 (for push buttons), and a float between 0 and 1 (for trigger, squeeze and joystick buttons)
- position-Vector- world position of the controller
- rotation-Quaternion- world rotation of the controller
- hand-string- "main" or "alt". Main hand or the alternate hand. The value depends on the hand configuration in Freebird's settings
- button_name-string- the name of the button pressed. Possible values:
- "trigger_main"
- "trigger_alt"
- "trigger_both"
- "squeeze_main"
- "squeeze_alt"
- "squeeze_both"
- "button_a_main"
- "button_b_main"
- "button_a_alt"
- "button_b_alt"
- "joystick_x_main"
- "joystick_y_main"
- "joystick_x_alt"
- "joystick_y_alt"
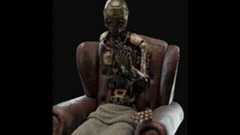
Creations made by users
Matt Estela (@cgwiki)
")
Watch the video athttps://x.com/thecgwiki/status/1794632509625598225
Design by Shafi Ahi
YONK (@yonkonline)

Watch the video athttps://x.com/yonkonline/status/1775199905029501295
Behind-the-scenes demo: https://x.com/yonkonline/status/1777739171420848268
Note:Please share any creations made by you, if you'd like them featured here! You can share them on ourDiscord server, or tag@freebirdxr on X (Twitter) or Instagram.
| Status | Released |
| Category | Tool |
| Rating | Rated 5.0 out of 5 stars (4 total ratings) |
| Author | Freebird XR |
| Tags | 3D,Animation,Blender,Modeling,Virtual Reality (VR) |
Purchase
In order to download this add-on for Blender you must purchase it at or above the minimum price of $15 USD. You will get access to the following files:
