
Build your first web app with ASP.NET Core using Blazor
Intro
Purpose
Build your first web app with ASP.NET Core using Blazor in Visual Studio Code.
Prerequisites
None.
macOS 12.0 or later versions.
Time to Complete
10-15 minutes + download/installation time
Scenario
Create, use, and modify a simple counter component.
Prefer Visual Studio or the CLI?
If you prefer, you can also get started with Blazor usingVisual Studio or the command-line interface.
Download and install
To build your first .NET application, you'll need to install the .NET SDK, Visual Studio Code, and C# Dev Kit.
What are the .NET SDK, Visual Studio Code, and C# Dev Kit?
The .NET SDK (Software Development Kit) is a free and open-source collection of tools and libraries you will need to build and run applications using C#. C# is the modern object-oriented programming language you will be using for this tutorial.
Visual Studio Code (VS Code) is the world's most popular lightweight, free, and open-source code editor. This is where you will write your C# code.
C# Dev Kit is a powerful set of VS Code extensions that makes C# development easier. It helps you write, test, and debug your code as you build apps.
The .NET WinGet Configuration file will install the .NET 9 SDK, VS Code, and C# Dev Kit for you. If you already have something installed, WinGet will skip that installation step.
To build your first .NET application with Visual Studio Code, set up your environment:
Download and install the .NET SDK:
Download .NET 9 SDK x64 (Intel)
Download .NET 9 SDK Arm64 (Apple Silicon)If you're on a Mac with an Apple M1 or M2 chip, you need to install the Arm64 version of the SDK.
Download and install VS Code:
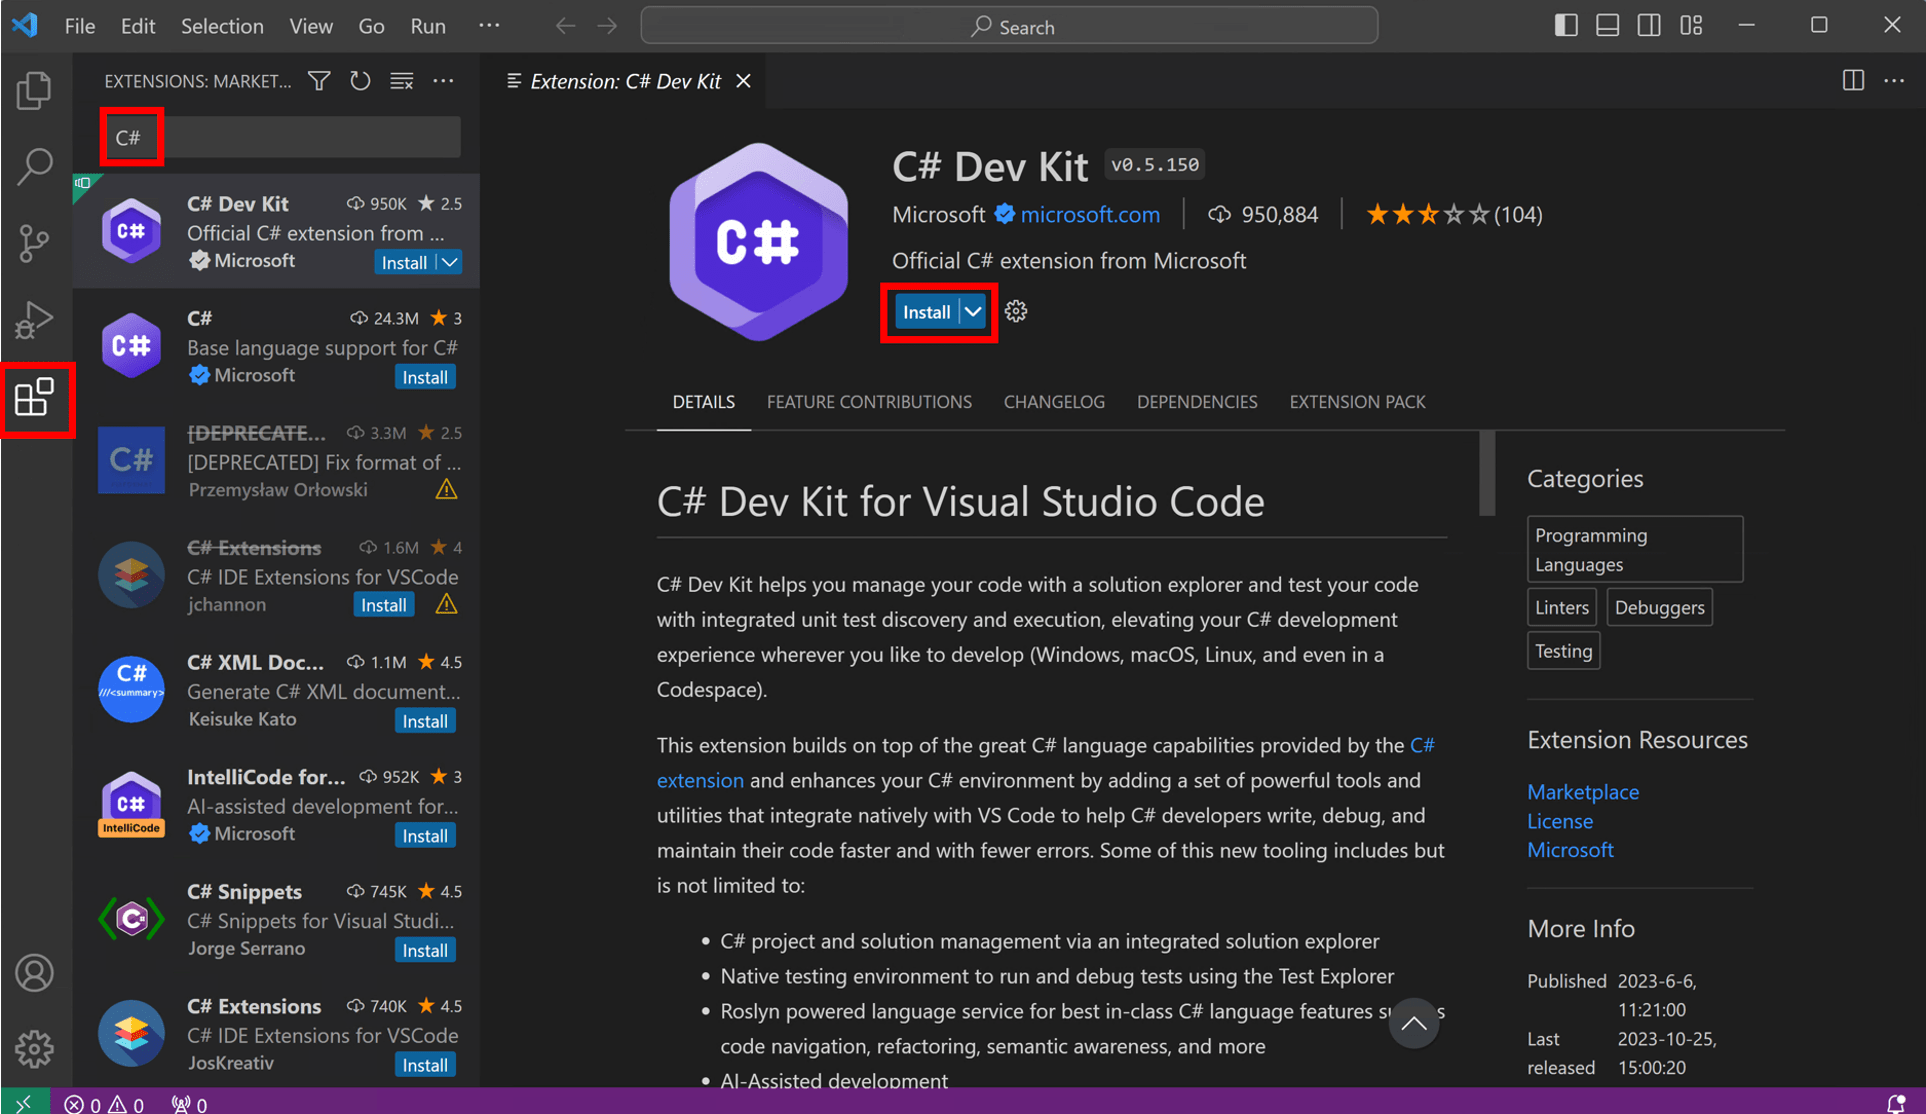
Open VS Code and select theExtensions button in VS Code's Activity Bar to the left. TypeC# in the search bar, select C# Dev Kit, and then select theInstall button on the C# Dev Kit extension page.
![VS Code's C# Dev Kit']()
Download and run the configuration file
Click the following link to download the WinGet file:
Open your downloads folder and double-click on the file to begin installation. If you're asked to select an application to run the file, selectWindows Package Manager Client.

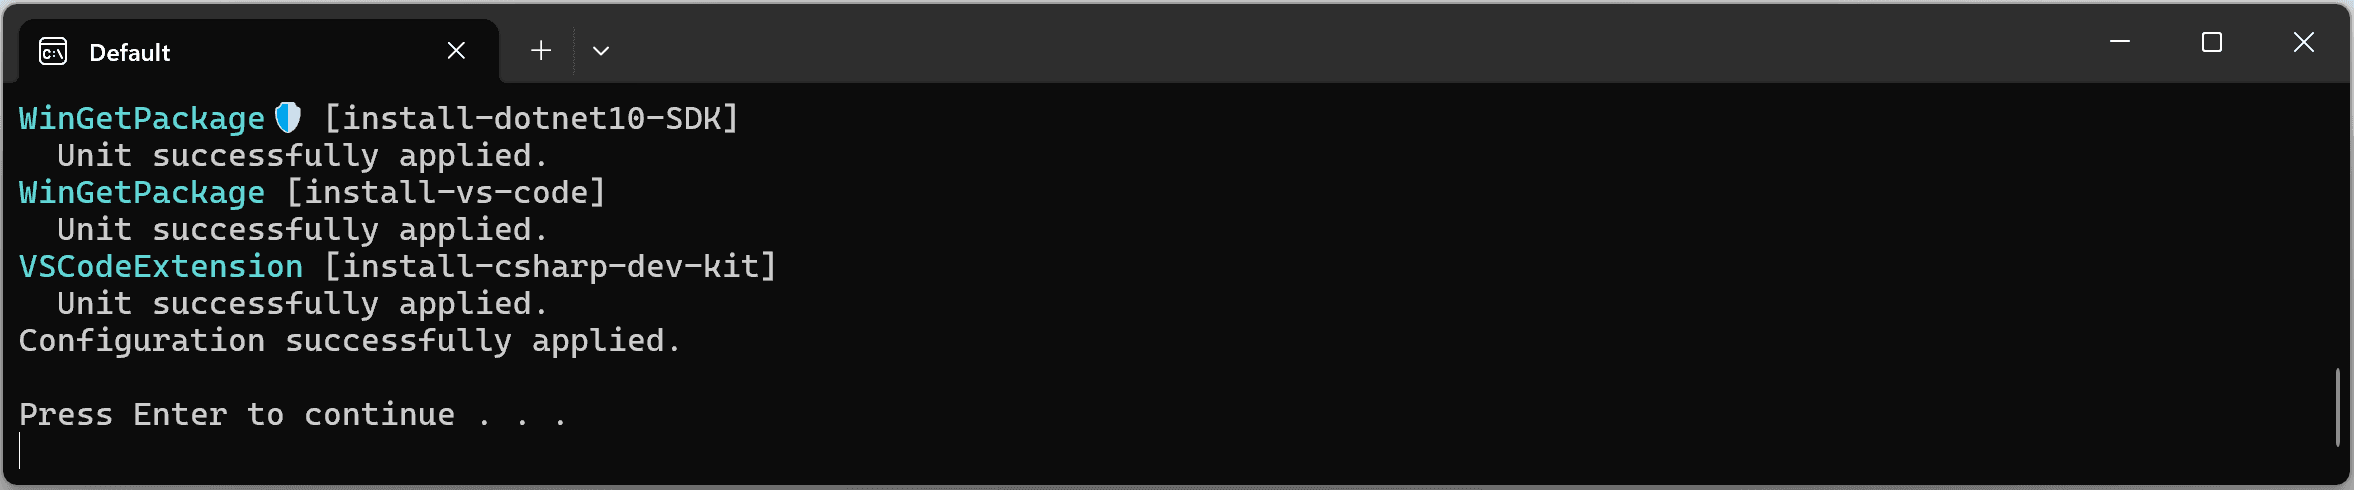
A terminal will open and you should see that the WinGet Configuration file is ready to install the .NET 9 SDK, VS Code if you do not have it, and C# Dev Kit.

Read the license agreement and agree to it by typing "y" in the terminal and pressing Enter.
Note: You are responsible for understanding the configuration settings you are choosing to execute. Microsoft is not responsible for the configuration file you have authored or imported. This configuration may change settings in Windows, install software, change software settings (including security settings), and accept user agreements to third-party packages and services on your behalf. By running this configuration file, you acknowledge that you understand and agree to these resources and settings. Any applications installed are licensed to you by their owners. Microsoft is not responsible for, nor does it grant any licenses to, third-party packages or services.

WinGet is now installing everything you need to get started! Install time will depend on your machine specifications, network speed, and more. It can take as little as 5 minutes but up to 15 minutes to complete.
Some install steps may require administrator-level permissions to install. Be on the lookout for flashing User Account Control (UAC) prompts in yourWindows Taskbar and click on that icon. To continue installation, you must selectYes if prompted.

When the installation is complete, you should see the output below in the terminal.
Check everything installed correctly
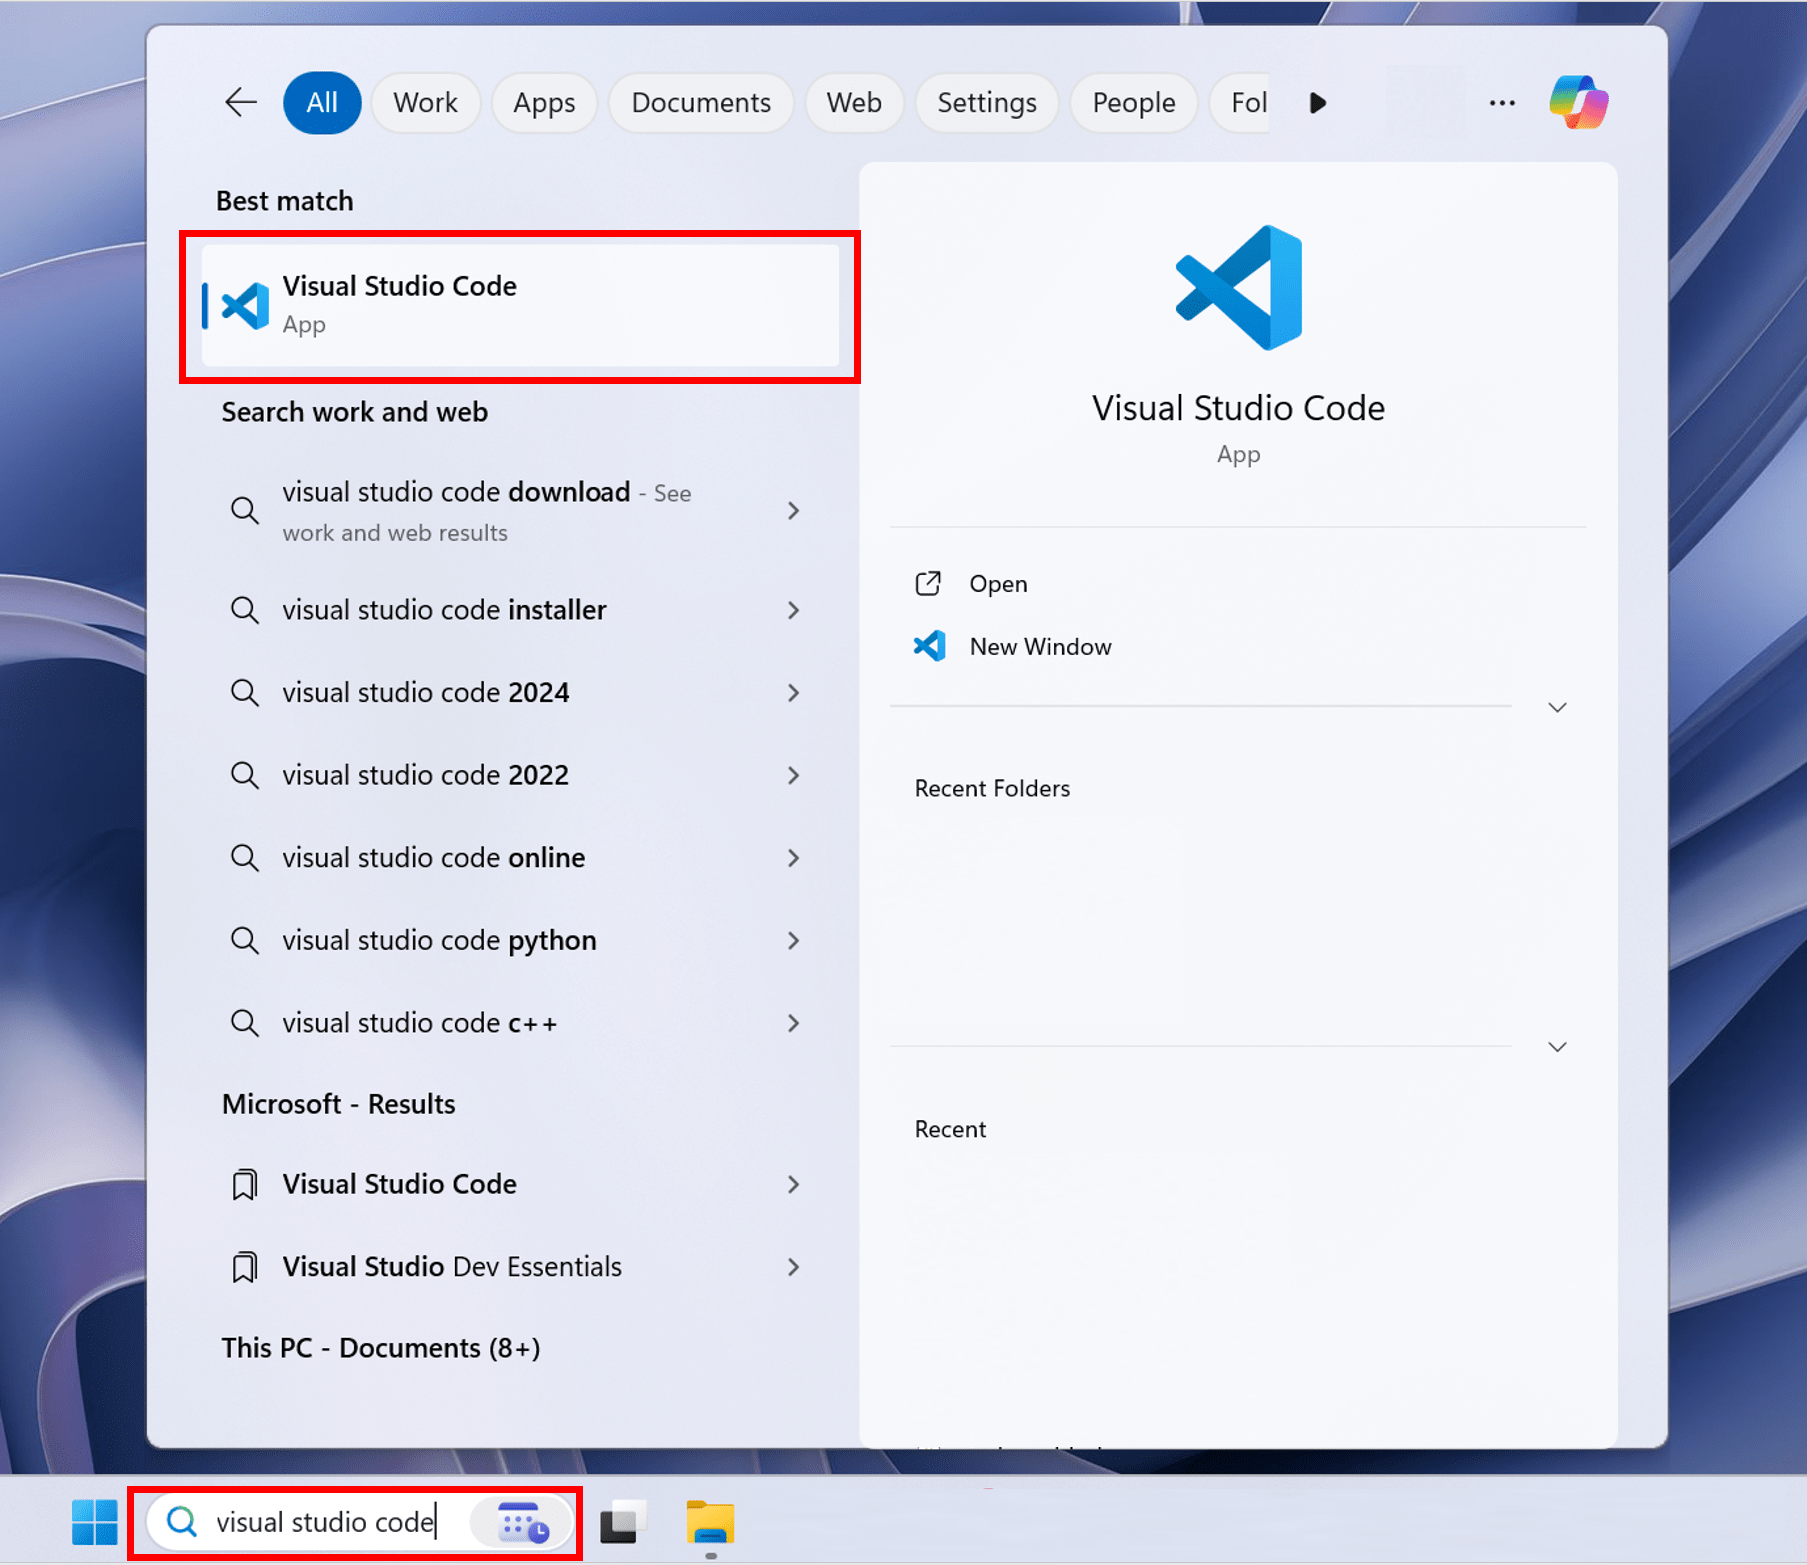
Now that your environment is set up, go to theSearch in yourWindows Taskbar, and typeVisual Studio Code. Click the application to openVS Code.
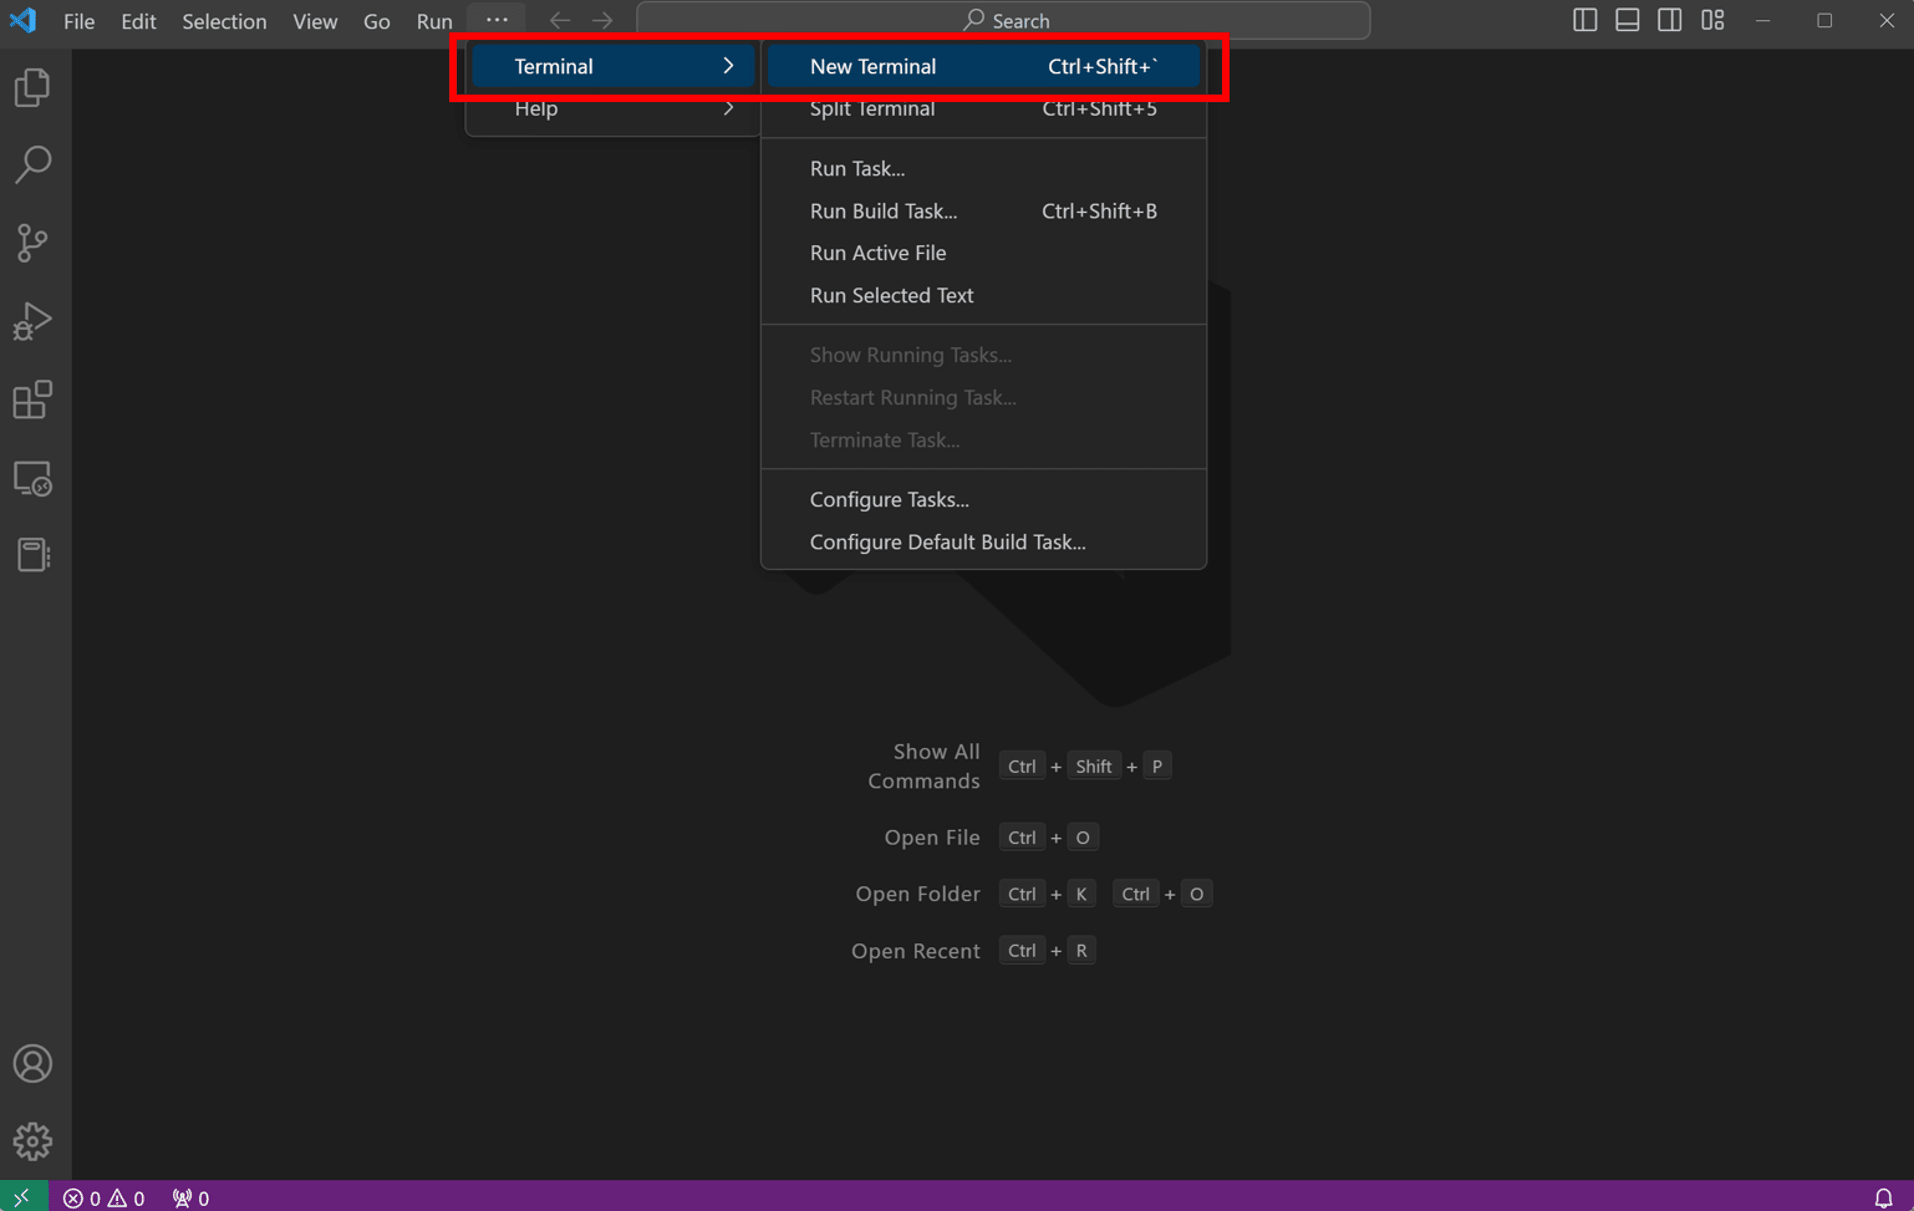
Once you've set up your environment, open a new VS Code terminal. In the toolbar, selectTerminal, thenNew Terminal.
Note: If you open VS Code through a terminal, you'll need to enableWorkspace Trust.
Now open a new terminal by going to the toolbar and selectingTerminal, thenNew Terminal.
In your terminal, run the following command to check your installation.
dotnet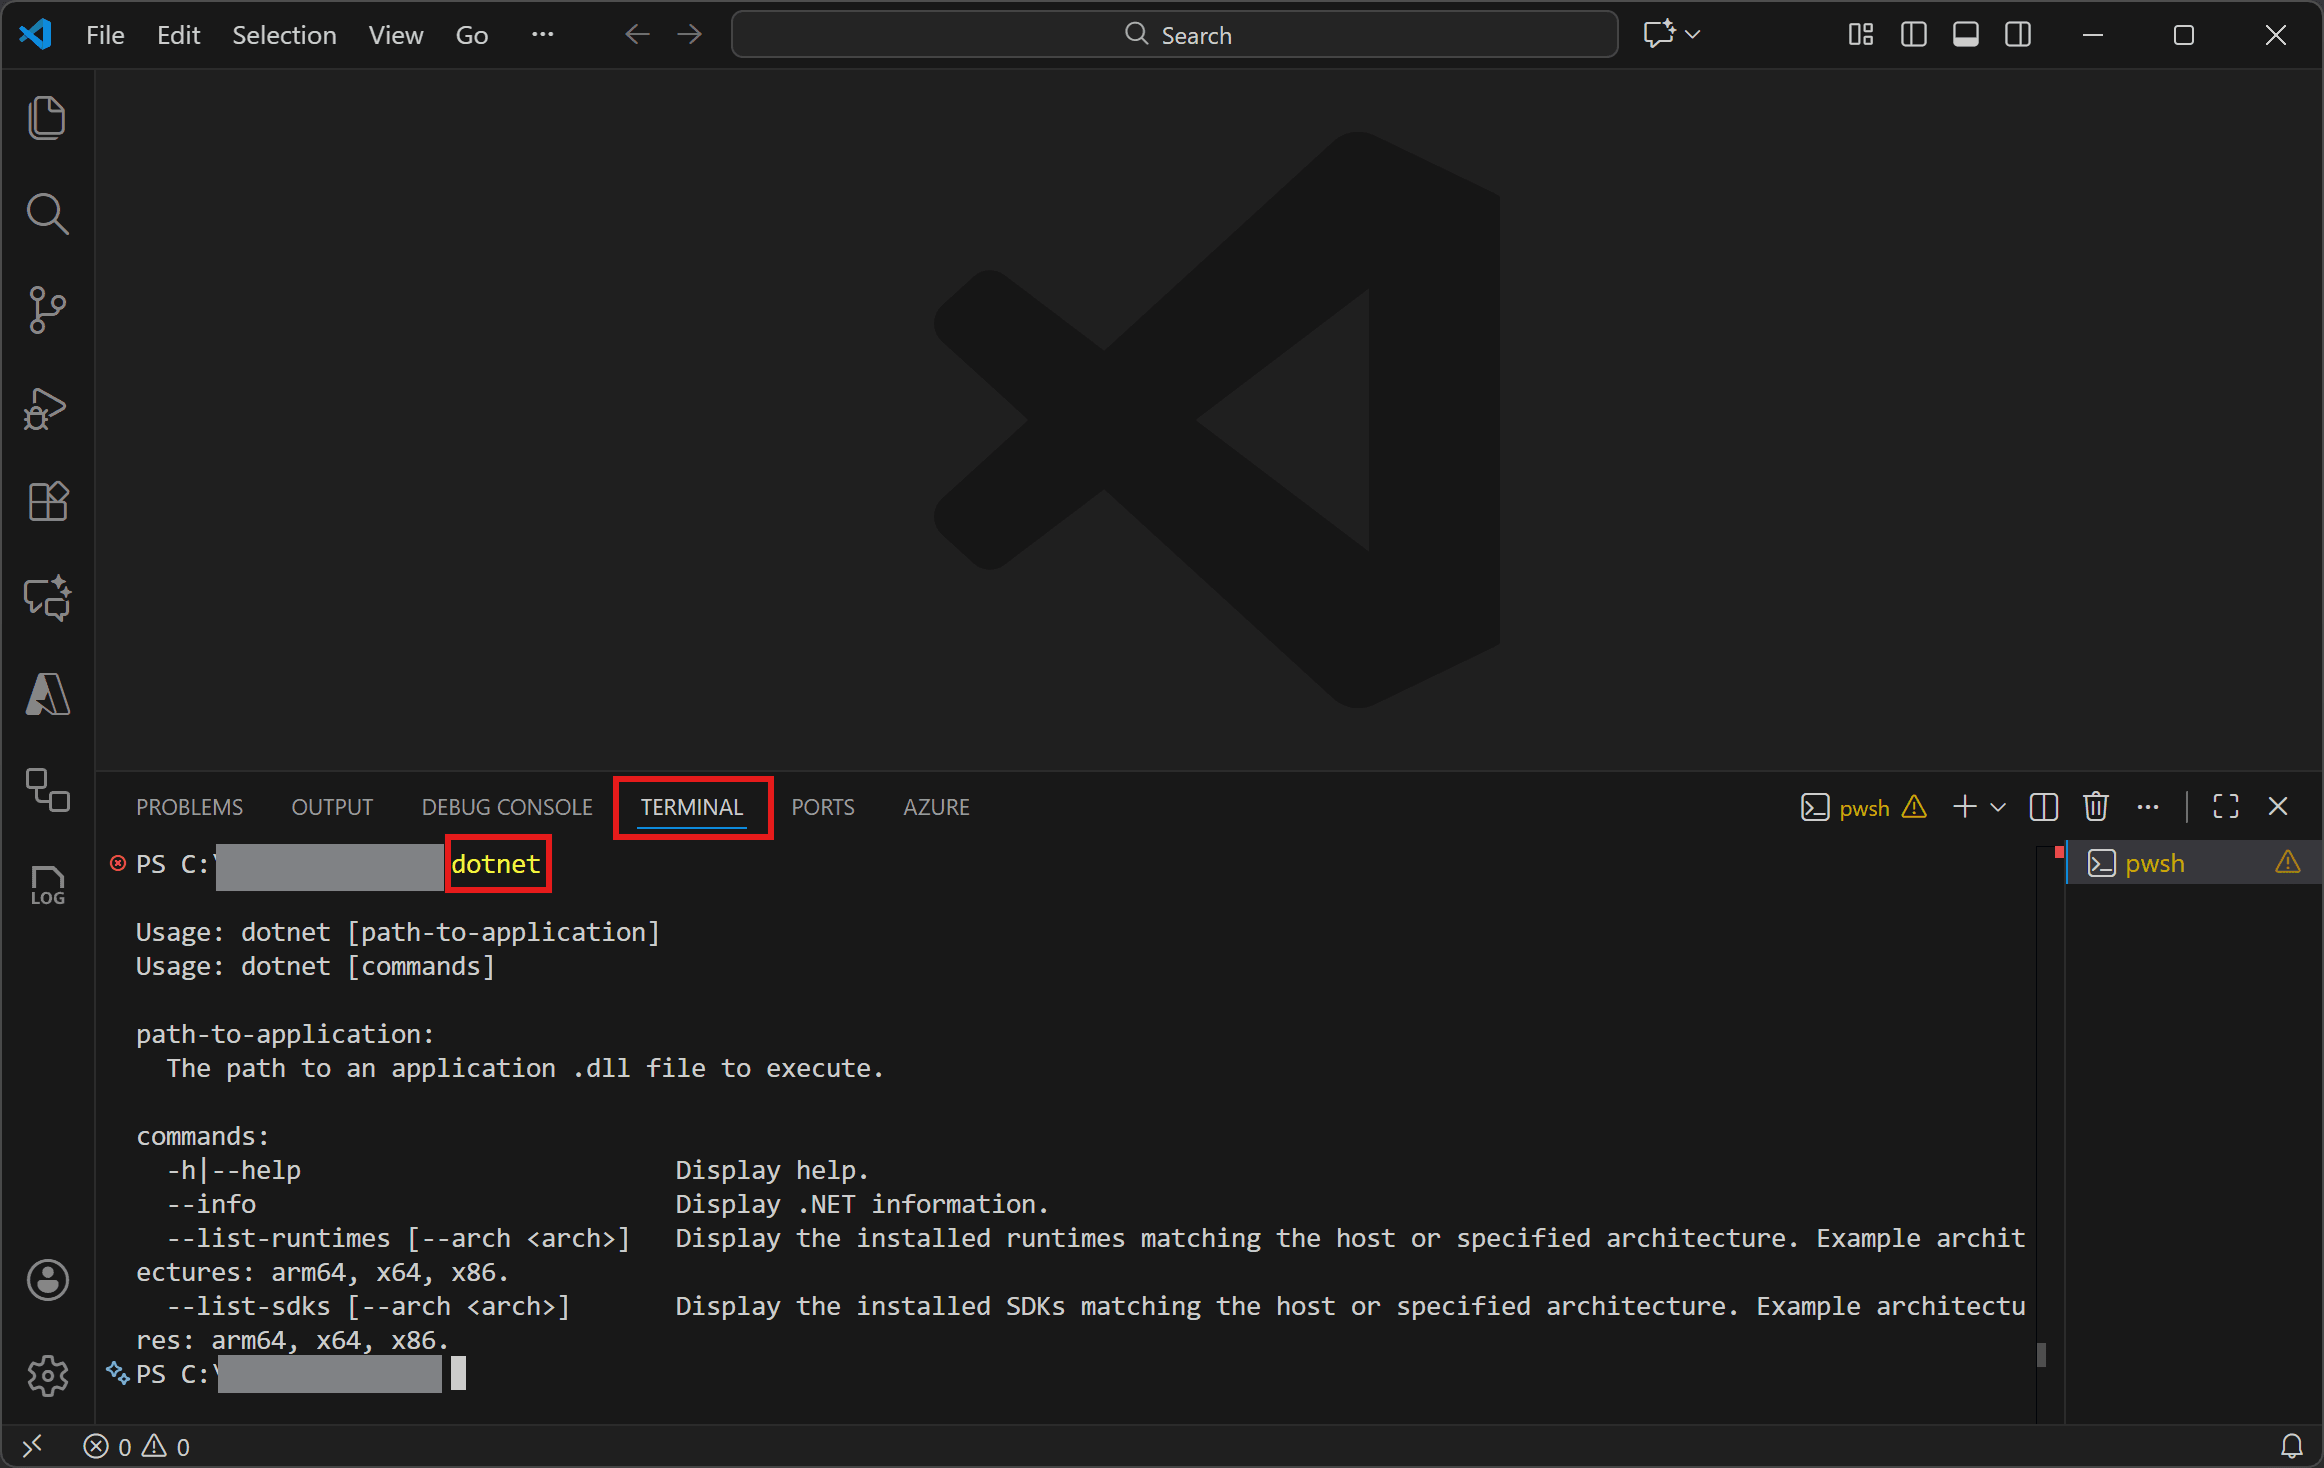
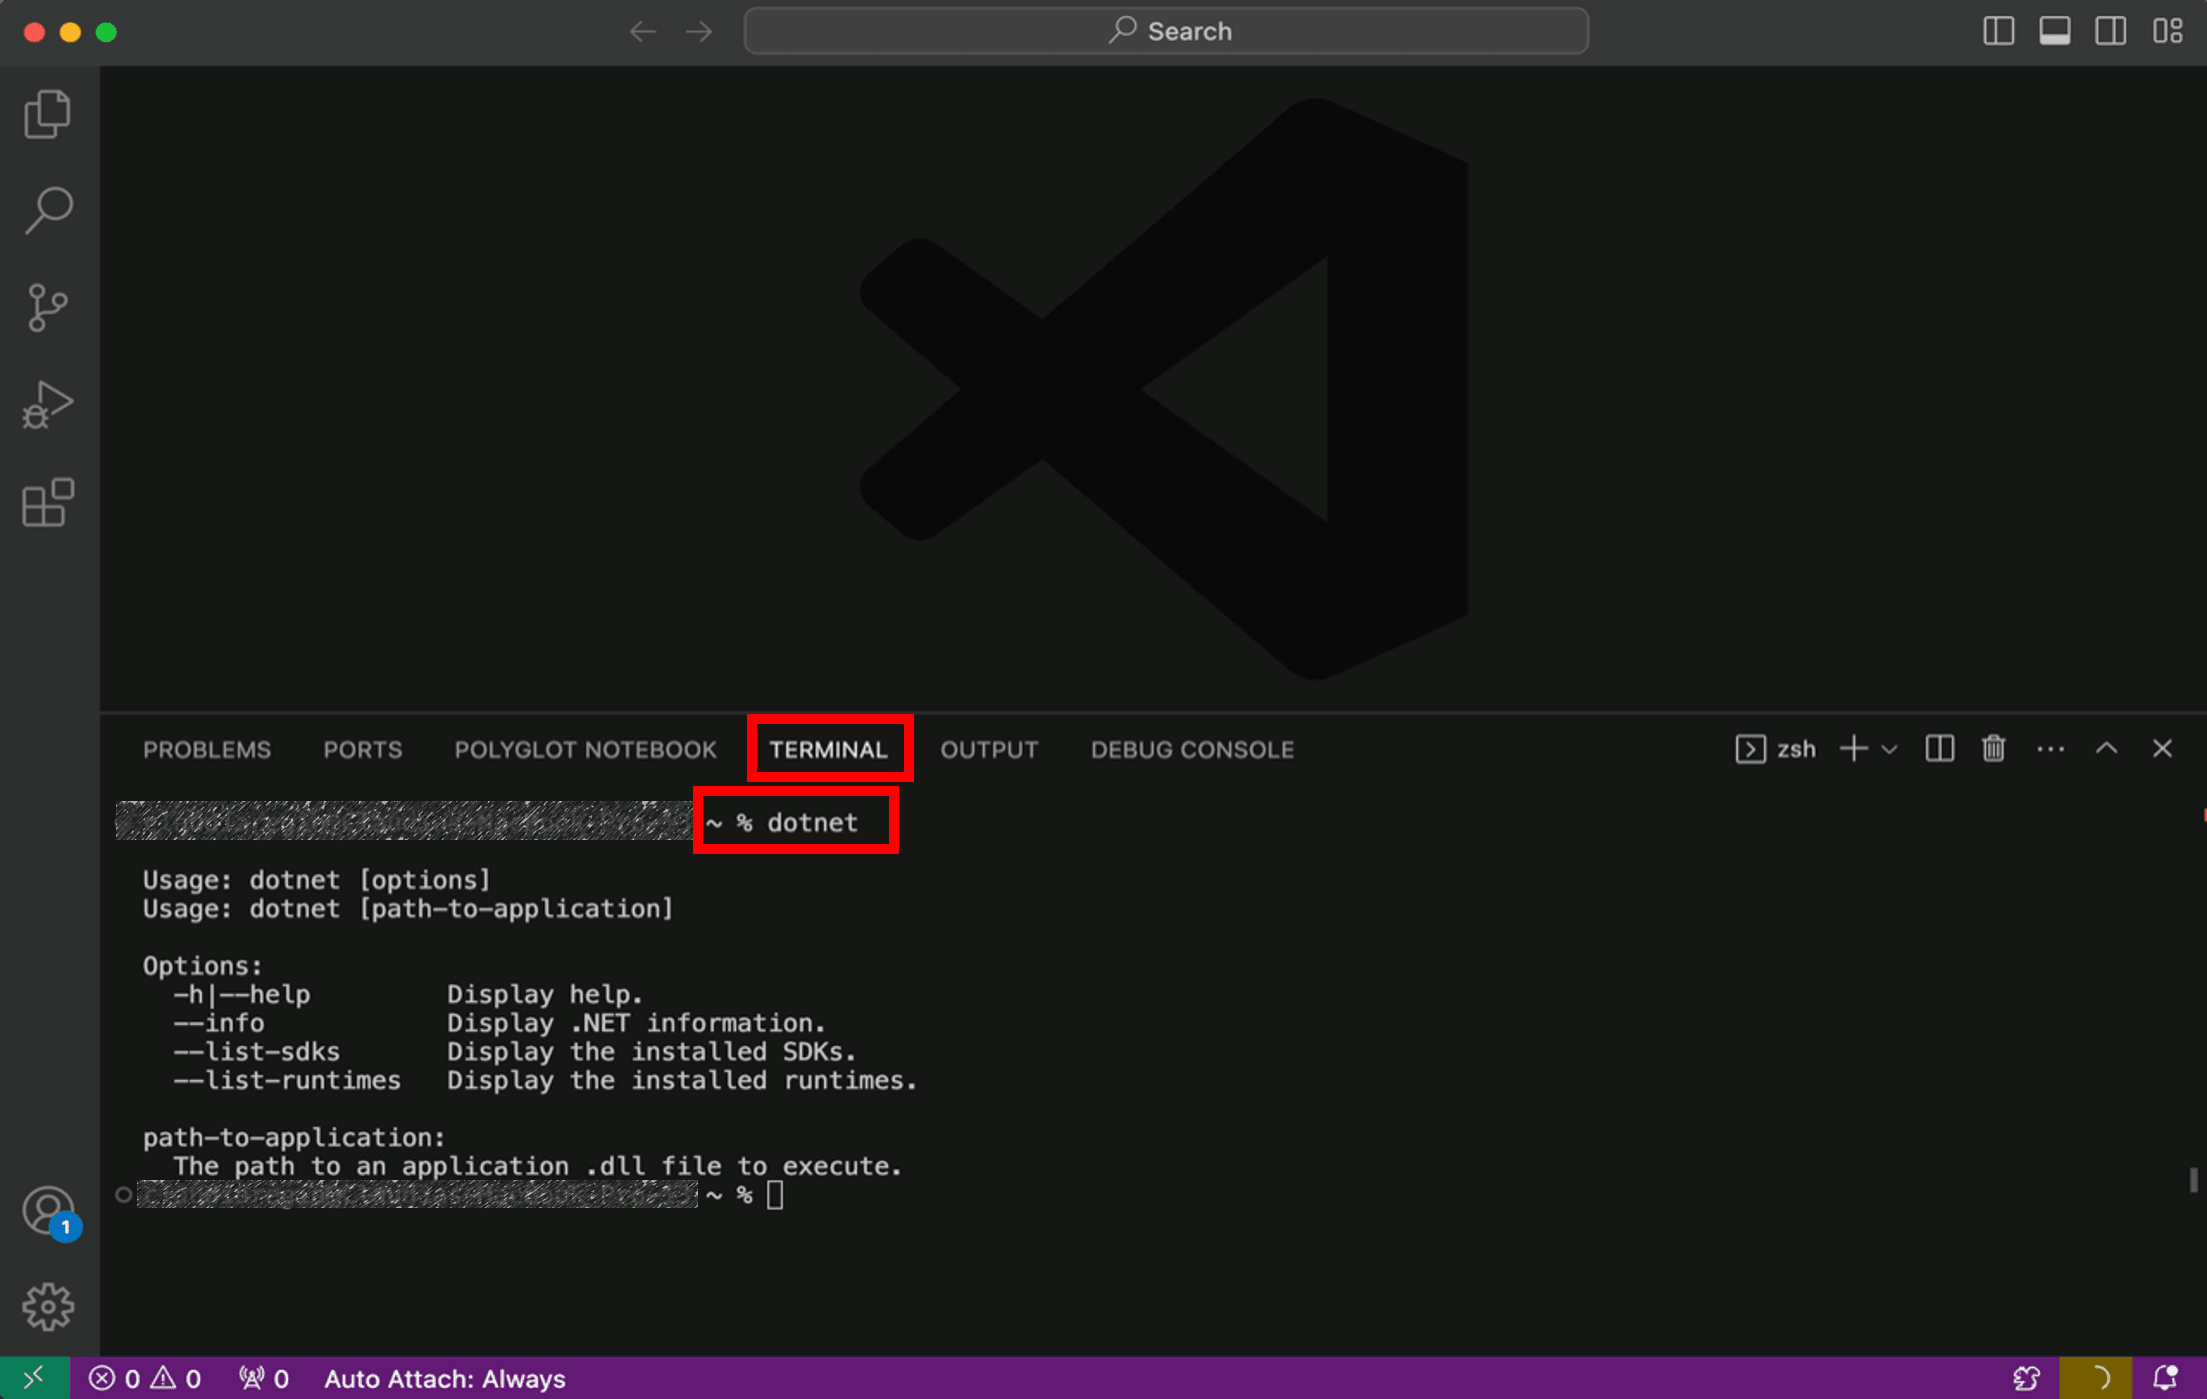
If the installation succeeded, you should see an output similar to the following:
Usage: dotnet [options]Usage: dotnet [path-to-application]Options:-h|--help Display help.--info Display .NET information.--list-sdks Display the installed SDKs.--list-runtimes Display the installed runtimes.path-to-application:The path to an application .dll file to execute.If everything looks good, select theContinue button below to go to the next step.
Got an error?
If you receive a'dotnet' is not recognized as an internal or external command error, make sure you opened anew VS Code terminal. Ifrestarting VS Code orrestarting your machine doesn't resolve the issue, use theI ran into an issue button to get help fixing the problem.
Create your app
- Open the command palette in VS Code by pressingCTRL+SHIFT+P.
- Open the command palette in VS Code by pressingCMD+SHIFT+P.
- Type.NET: to see the commands you can run with C# Dev Kit!
- Find and select.NET: New Project to create a new .NET project.
- Scroll down and selectBlazor Web App.
- Choose the folder location you'd like to save your project.
- Name the project
BlazorAppin the command palette when prompted. PressEnter to confirm.
Enable Workspace Trust by checking the box and selectingYes, I trust the authors.

If you have a Visual Studio Subscription, sign into your account. If you don't see a prompt pop up, click on theC# icon in VS Code's Status Bar towards the bottom right of your window.

In the Side Bar, make sure theVS Code Explorer is open. Here you will see theBlazorApp folder and theSolution Explorer.Follow along with the video below to: collapse theBlazorApp folder, open theSolution Explorer, open theBlazorApp project, and drag and drop theSolution Explorer higher.
- Collapse the
BlazorAppfolder in the VS Code Explorer. - Click on the chevron to the left of theSolution Explorer to expand it.
- Click on the chevron to the left of the
BlazorAppproject in theSolution Explorer to expand it. - Drag and drop theSolution Explorer belowBlazorApp.
Your project is created and loaded in Visual Studio Code. Take a look at the contents of your project usingSolution Explorer.
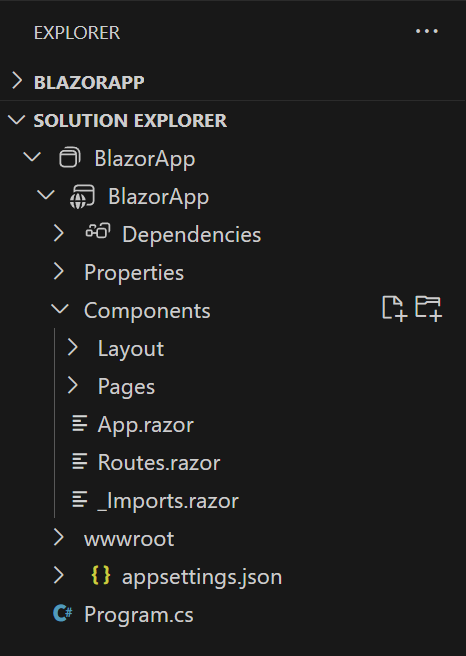
Several files were created to give you a simple Blazor app that is ready to run.
Program.csis the entry point for the app that starts the server and where you configure the app services and middleware.Inside the
Componentsdirectory:App.razoris the root component for the app.Routes.razorconfigures the Blazor router.- The
Pagesdirectory contains some example web pages for the app.
BlazorApp.csprojdefines the app project and its dependencies and can be viewed by double-clicking the BlazorApp project node in the Solution Explorer.- The
launchSettings.jsonfile inside thePropertiesdirectory defines different profile settings for the local development environment. A port number is automatically assigned at project creation and saved on this file.
If everything looks good, select theContinue button below to go to the next step.
Run your app
Select theRun and Debug icon in theActivity Bar on the left side of your workspace.

Select the blueRun and Debug button.
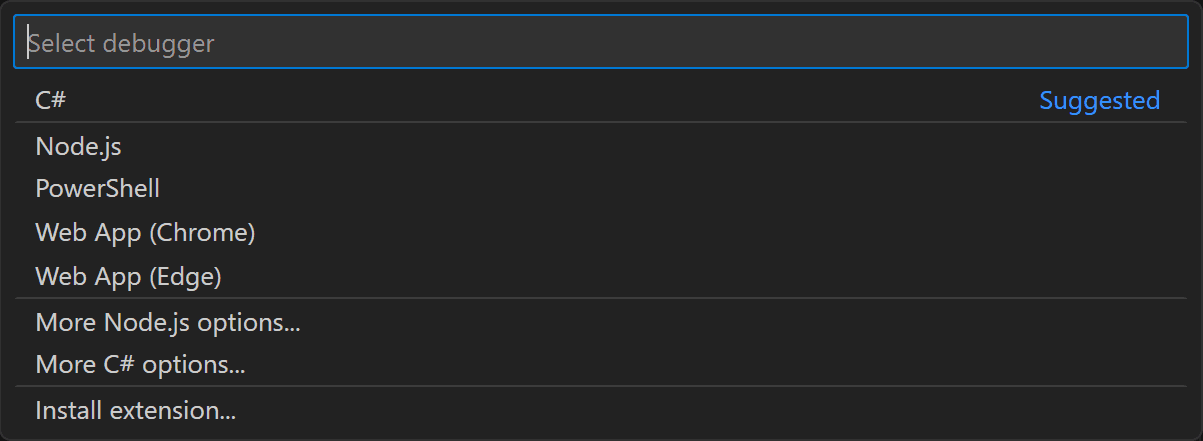
Visual Studio Code will open up a menu of launch configurations. SelectC#: BlazorApp [Default Configuration].

Then you need to select a debugger. SelectC#.
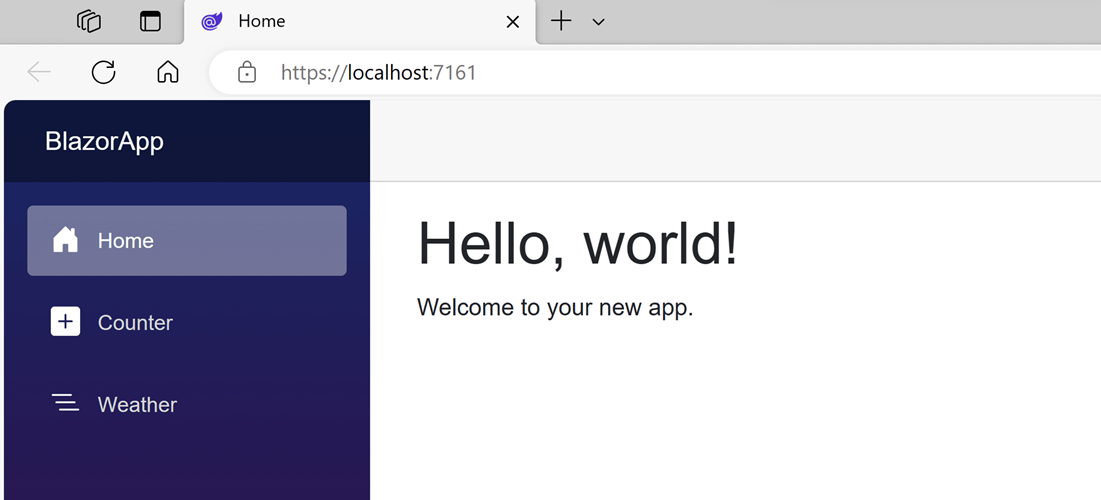
Wait for the app to launch in the browser. Once you get to the following page, you have successfully run your first Blazor app!
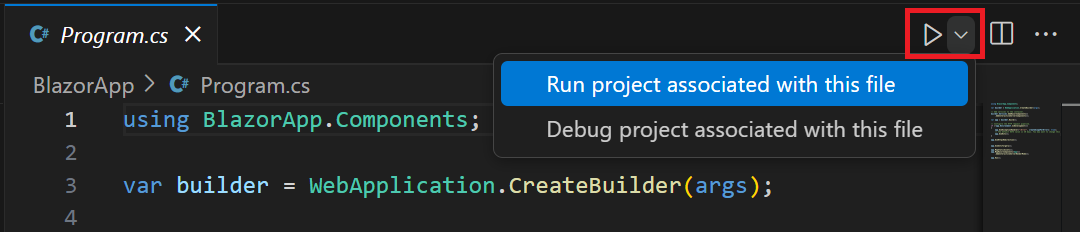
You can stop the app at any time by clicking on the stop button in the top toolbar.

To re-run your application, select the dropdown menu to the right of the run button in the top right, and selectRun project associated with this file.
The displayed page is defined by theHome.razor file located inside theComponents/Pages directory. This is what its contents look like:
@page "/"<PageTitle>Home</PageTitle><h1>Hello, world!</h1>Welcome to your new app.It already contains the code that sets it as the homepage and displays the textHello, world! andWelcome to your new app. ThePageTitle component sets the title for the current page so that it shows up in the browser tab.
Got an error?
If you receive an error message saying "Your connection is not private" with error code NET::ERR_CERT_INVALID, try to restart all browser windows so the new certificate can be picked up by the browser and run the application again.
If you can't resolve the issue you're having, select theI ran into an issue button below to get help fixing the problem.
Try the counter
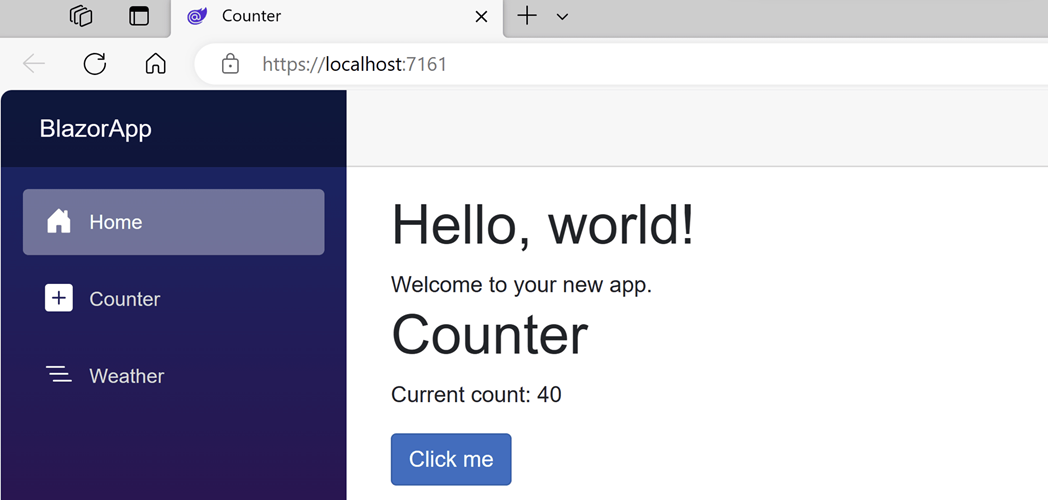
In the running app, navigate to the Counter page by clicking the Counter tab in the sidebar on the left. The following page should then be displayed:

Select theClick me button to increment the count without a page refresh. Incrementing a counter in a webpage normally requires writing JavaScript, but with Blazor you can use C#.
You can find the implementation of theCounter component atCounter.razor file located inside theComponents/Pages directory.
@page "/counter"@rendermode InteractiveServer<PageTitle>Counter</PageTitle><h1>Counter</h1><p role="status">Current count: @currentCount</p><button @onclick="IncrementCount">Click me</button>@code { private int currentCount = 0; private void IncrementCount() { currentCount++; }}A request for/counter in the browser, as specified by the@page directive at the top, causes theCounter component to render its content. The@rendermode directive enables interactive server rendering for the component, so that it can handle user interface events from the browser.
Each time theClick me button is selected:
- The
onclickevent is fired. - The
IncrementCountmethod is called. - The
currentCountis incremented. - The component is rendered to show the updated count.
Add a component
Each of the .razor files defines a UI component that can be reused.
Open theHome.razor file in Visual Studio. TheHome.razor file already exists, and it was created when you created the project. It's located in theComponents/Pages folder inside theBlazorApp directory that was created earlier.
Open theHome.razor file in a text editor of your choice. TheHome.razor file already exists, and it was created when you ran thedotnet new command. It's located in theComponents/Pages folder inside theBlazorApp directory that was created earlier.
Add aCounter component to the app's homepage by adding a<Counter /> element at the end of theHome.razor file.
@page "/"<PageTitle>Home</PageTitle><h1>Hello, world!</h1>Welcome to your new app.<Counter />Re-run the app to see the changes. TheCounter component will then show up on the home page.
Once this change is saved, thedotnet watch command will apply the change to the running app so that theCounter component shows up on the home page.

Modify a component
Component parameters are specified using attributes or child content, which allow you to set properties on the child component. Define a parameter on theCounter component for specifying how much it increments with every button click:
- Add a public property for
IncrementAmountwith a[Parameter]attribute. - Change the
IncrementCountmethod to use theIncrementAmountwhen incrementing the value ofcurrentCount.
The following code shows how to achieve that. The highlighted lines show the changes.
@page "/counter"@rendermode InteractiveServer<PageTitle>Counter</PageTitle><h1>Counter</h1><p role="status">Current count: @currentCount</p><button @onclick="IncrementCount">Click me</button>@code { private int currentCount = 0; [Parameter] public int IncrementAmount { get; set; } = 1; private void IncrementCount() { currentCount += IncrementAmount; }}InHome.razor, update the<Counter> element to add anIncrementAmount attribute that changes the increment amount to ten as shown by the highlighted line in the following code:
@page "/"<PageTitle>Home</PageTitle><h1>Hello, world!</h1>Welcome to your new app.<Counter IncrementAmount="10" />Apply the change to the app by clicking the Hot Reload button. TheHome component now has its own counter that increments by ten each time theClick me button is selected, as shown in the following image. TheCounter component (Counter.razor) at/counter continues to increment by one.
TheHome component now has its own counter that increments by ten each time theClick me button is selected, as shown in the following image. TheCounter component (Counter.razor) at/counter continues to increment by one.
Next steps
Congratulations, you've built and run your first Blazor app!
Keep learning
Now that you've got the basics, continue building your first Blazor app with Blazor self-guided learning module on Microsoft Learn where you will build a to-do list app.
Microsoft Learn: Build a Blazor todo list app
Blazor for Beginners
Learn how to build a full Blazor app from start to finish:
You might also be interested in...


