


Using the PyTorch C++ Frontend#
Created On: Jan 15, 2019 | Last Updated: Sep 22, 2025 | Last Verified: Nov 05, 2024
Author:Peter Goldsborough
How to build a C++ application that utilizes the PyTorch C++ frontend
How to define and train neural networks from C++ using PyTorch abstractions
PyTorch 1.5 or later
Basic understanding of C++ programming
Basic Ubuntu Linux environment with CMake >= 3.5; similar commands will work in a MacOS / Windows environment
(Optional) A CUDA-based GPU for the GPU training sections
The PyTorch C++ frontend is a pure C++ interface to the PyTorch machine learningframework. While the primary interface to PyTorch naturally is Python, thisPython API sits atop a substantial C++ codebase providing foundational datastructures and functionality such as tensors and automatic differentiation. TheC++ frontend exposes a pure C++17 API that extends this underlying C++ codebasewith tools required for machine learning training and inference. This includes abuilt-in collection of common components for neural network modeling; an API toextend this collection with custom modules; a library of popular optimizationalgorithms such as stochastic gradient descent; a parallel data loader with anAPI to define and load datasets; serialization routines and more.
This tutorial will walk you through an end-to-end example of training a modelwith the C++ frontend. Concretely, we will be training aDCGAN – a kind of generative model – togenerate images of MNIST digits. While conceptually a simple example, it shouldbe enough to give you a whirlwind overview of the PyTorch C++ frontend and wetyour appetite for training more complex models. We will begin with somemotivating words for why you would want to use the C++ frontend to begin with,and then dive straight into defining and training our model.
Tip
Watchthis lightning talk from CppCon 2018 for a quick (and humorous)presentation on the C++ frontend.
Tip
This note provides a sweepingoverview of the C++ frontend’s components and design philosophy.
Tip
Documentation for the PyTorch C++ ecosystem is available athttps://pytorch.org/cppdocs. There you can find high level descriptions aswell as API-level documentation.
Motivation#
Before we embark on our exciting journey of GANs and MNIST digits, let’s take astep back and discuss why you would want to use the C++ frontend instead of thePython one to begin with. We (the PyTorch team) created the C++ frontend toenable research in environments in which Python cannot be used, or is simply notthe right tool for the job. Examples for such environments include:
Low Latency Systems: You may want to do reinforcement learning research ina pure C++ game engine with high frames-per-second and low latencyrequirements. Using a pure C++ library is a much better fit to such anenvironment than a Python library. Python may not be tractable at all becauseof the slowness of the Python interpreter.
Highly Multithreaded Environments: Due to the Global Interpreter Lock(GIL), Python cannot run more than one system thread at a time.Multiprocessing is an alternative, but not as scalable and has significantshortcomings. C++ has no such constraints and threads are easy to use andcreate. Models requiring heavy parallelization, like those used inDeepNeuroevolution, can benefit fromthis.
Existing C++ Codebases: You may be the owner of an existing C++application doing anything from serving web pages in a backend server torendering 3D graphics in photo editing software, and wish to integratemachine learning methods into your system. The C++ frontend allows you toremain in C++ and spare yourself the hassle of binding back and forth betweenPython and C++, while retaining much of the flexibility and intuitiveness ofthe traditional PyTorch (Python) experience.
The C++ frontend is not intended to compete with the Python frontend. It ismeant to complement it. We know researchers and engineers alike love PyTorch forits simplicity, flexibility and intuitive API. Our goal is to make sure you cantake advantage of these core design principles in every possible environment,including the ones described above. If one of these scenarios describes your usecase well, or if you are simply interested or curious, follow along as weexplore the C++ frontend in detail in the following paragraphs.
Tip
The C++ frontend tries to provide an API as close as possible to that of thePython frontend. If you are experienced with the Python frontend and ever askyourself “how do I do X with the C++ frontend?”, write your code the way youwould in Python, and more often than not the same functions and methods willbe available in C++ as in Python (just remember to replace dots with doublecolons).
Writing a Basic Application#
Let’s begin by writing a minimal C++ application to verify that we’re on thesame page regarding our setup and build environment. First, you will need tograb a copy of theLibTorch distribution – our ready-built zip archive thatpackages all relevant headers, libraries and CMake build files required to usethe C++ frontend. The LibTorch distribution is available for download on thePyTorch website for Linux, MacOSand Windows. The rest of this tutorial will assume a basic Ubuntu Linuxenvironment, however you are free to follow along on MacOS or Windows too.
Tip
The note onInstalling C++ Distributions of PyTorch describes the following stepsin more detail.
Tip
On Windows, debug and release builds are not ABI-compatible. If you plan tobuild your project in debug mode, please try the debug version of LibTorch.Also, make sure you specify the correct configuration in thecmake--build.line below.
The first step is to download the LibTorch distribution locally, via the linkretrieved from the PyTorch website. For a vanilla Ubuntu Linux environment, thismeans running:
# If you need e.g. CUDA 9.0 support, please replace "cpu" with "cu90" in the URL below.wgethttps://download.pytorch.org/libtorch/nightly/cpu/libtorch-shared-with-deps-latest.zipunziplibtorch-shared-with-deps-latest.zipNext, let’s write a tiny C++ file calleddcgan.cpp that includestorch/torch.h and for now simply prints out a three by three identitymatrix:
#include<torch/torch.h>#include<iostream>intmain(){torch::Tensortensor=torch::eye(3);std::cout<<tensor<<std::endl;}
To build this tiny application as well as our full-fledged training script lateron we’ll use thisCMakeLists.txt file:
cmake_minimum_required(VERSION3.5FATAL_ERROR)project(dcgan)find_package(TorchREQUIRED)add_executable(dcgandcgan.cpp)target_link_libraries(dcgan"${TORCH_LIBRARIES}")set_property(TARGETdcganPROPERTYCXX_STANDARD17)
Note
While CMake is the recommended build system for LibTorch, it is not a hardrequirement. You can also use Visual Studio project files, QMake, plainMakefiles or any other build environment you feel comfortable with. However,we do not provide out-of-the-box support for this.
Make note of line 4 in the above CMake file:find_package(TorchREQUIRED).This instructs CMake to find the build configuration for the LibTorch library.In order for CMake to knowwhere to find these files, we must set theCMAKE_PREFIX_PATH when invokingcmake. Before we do this, let’s agree onthe following directory structure for ourdcgan application:
dcgan/CMakeLists.txtdcgan.cpp
Further, I will refer to the path to the unzipped LibTorch distribution as/path/to/libtorch. Note that thismust be an absolute path. Inparticular, settingCMAKE_PREFIX_PATH to something like../../libtorchwill break in unexpected ways. Instead, write$PWD/../../libtorch to get thecorresponding absolute path. Now, we are ready to build our application:
root@fa350df05ecf:/home#mkdirbuildroot@fa350df05ecf:/home#cdbuildroot@fa350df05ecf:/home/build#cmake-DCMAKE_PREFIX_PATH=/path/to/libtorch..--TheCcompileridentificationisGNU5.4.0--TheCXXcompileridentificationisGNU5.4.0--CheckforworkingCcompiler:/usr/bin/cc--CheckforworkingCcompiler:/usr/bin/cc--works--DetectingCcompilerABIinfo--DetectingCcompilerABIinfo-done--DetectingCcompilefeatures--DetectingCcompilefeatures-done--CheckforworkingCXXcompiler:/usr/bin/c++--CheckforworkingCXXcompiler:/usr/bin/c++--works--DetectingCXXcompilerABIinfo--DetectingCXXcompilerABIinfo-done--DetectingCXXcompilefeatures--DetectingCXXcompilefeatures-done--Lookingforpthread.h--Lookingforpthread.h-found--Lookingforpthread_create--Lookingforpthread_create-notfound--Lookingforpthread_createinpthreads--Lookingforpthread_createinpthreads-notfound--Lookingforpthread_createinpthread--Lookingforpthread_createinpthread-found--FoundThreads:TRUE--Foundtorch:/path/to/libtorch/lib/libtorch.so--Configuringdone--Generatingdone--Buildfileshavebeenwrittento:/home/buildroot@fa350df05ecf:/home/build#cmake--build.--configReleaseScanningdependenciesoftargetdcgan[50%]BuildingCXXobjectCMakeFiles/dcgan.dir/dcgan.cpp.o[100%]LinkingCXXexecutabledcgan[100%]Builttargetdcgan
Above, we first created abuild folder inside of ourdcgan directory,entered this folder, ran thecmake command to generate the necessary build(Make) files and finally compiled the project successfully by runningcmake--build.--configRelease. We are now all set to execute our minimal binaryand complete this section on basic project configuration:
root@fa350df05ecf:/home/build#./dcgan100010001[Variable[CPUFloatType]{3,3}]
Looks like an identity matrix to me!
Defining the Neural Network Models#
Now that we have our basic environment configured, we can dive into the muchmore interesting parts of this tutorial. First, we will discuss how to defineand interact with modules in the C++ frontend. We’ll begin with basic,small-scale example modules and then implement a full-fledged GAN using theextensive library of built-in modules provided by the C++ frontend.
Module API Basics#
In line with the Python interface, neural networks based on the C++ frontend arecomposed of reusable building blocks calledmodules. There is a base moduleclass from which all other modules are derived. In Python, this class istorch.nn.Module and in C++ it istorch::nn::Module. Besides aforward() method that implements the algorithm the module encapsulates, amodule usually contains any of three kinds of sub-objects: parameters, buffersand submodules.
Parameters and buffers store state in form of tensors. Parameters recordgradients, while buffers do not. Parameters are usually the trainable weights ofyour neural network. Examples of buffers include means and variances for batchnormalization. In order to re-use particular blocks of logic and state, thePyTorch API allows modules to be nested. A nested module is termed asubmodule.
Parameters, buffers and submodules must be explicitly registered. Onceregistered, methods likeparameters() orbuffers() can be used toretrieve a container of all parameters in the entire (nested) module hierarchy.Similarly, methods liketo(...), where e.g.to(torch::kCUDA) moves allparameters and buffers from CPU to CUDA memory, work on the entire modulehierarchy.
Defining a Module and Registering Parameters#
To put these words into code, let’s consider this simple module written in thePython interface:
importtorchclassNet(torch.nn.Module):def__init__(self,N,M):super(Net,self).__init__()self.W=torch.nn.Parameter(torch.randn(N,M))self.b=torch.nn.Parameter(torch.randn(M))defforward(self,input):returntorch.addmm(self.b,input,self.W)
In C++, it would look like this:
#include<torch/torch.h>structNet:torch::nn::Module{Net(int64_tN,int64_tM){W=register_parameter("W",torch::randn({N,M}));b=register_parameter("b",torch::randn(M));}torch::Tensorforward(torch::Tensorinput){returntorch::addmm(b,input,W);}torch::TensorW,b;};
Just like in Python, we define a class calledNet (for simplicity here astruct instead of aclass) and derive it from the module base class.Inside the constructor, we create tensors usingtorch::randn just like weusetorch.randn in Python. One interesting difference is how we register theparameters. In Python, we wrap the tensors with thetorch.nn.Parameterclass, while in C++ we have to pass the tensor through theregister_parameter method instead. The reason for this is that the PythonAPI can detect that an attribute is of typetorch.nn.Parameter andautomatically registers such tensors. In C++, reflection is very limited, so amore traditional (and less magical) approach is provided.
Registering Submodules and Traversing the Module Hierarchy#
In the same way we can register parameters, we can also register submodules. InPython, submodules are automatically detected and registered when they areassigned as an attribute of a module:
classNet(torch.nn.Module):def__init__(self,N,M):super(Net,self).__init__()# Registered as a submodule behind the scenesself.linear=torch.nn.Linear(N,M)self.another_bias=torch.nn.Parameter(torch.rand(M))defforward(self,input):returnself.linear(input)+self.another_bias
This allows, for example, to use theparameters() method to recursivelyaccess all parameters in our module hierarchy:
>>>net=Net(4,5)>>>print(list(net.parameters()))[Parameter containing:tensor([0.0808, 0.8613, 0.2017, 0.5206, 0.5353], requires_grad=True), Parameter containing:tensor([[-0.3740, -0.0976, -0.4786, -0.4928], [-0.1434, 0.4713, 0.1735, -0.3293], [-0.3467, -0.3858, 0.1980, 0.1986], [-0.1975, 0.4278, -0.1831, -0.2709], [ 0.3730, 0.4307, 0.3236, -0.0629]], requires_grad=True), Parameter containing:tensor([ 0.2038, 0.4638, -0.2023, 0.1230, -0.0516], requires_grad=True)]
To register submodules in C++, use the aptly namedregister_module() methodto register a module liketorch::nn::Linear:
structNet:torch::nn::Module{Net(int64_tN,int64_tM):linear(register_module("linear",torch::nn::Linear(N,M))){another_bias=register_parameter("b",torch::randn(M));}torch::Tensorforward(torch::Tensorinput){returnlinear(input)+another_bias;}torch::nn::Linearlinear;torch::Tensoranother_bias;};
Tip
You can find the full list of available built-in modules liketorch::nn::Linear,torch::nn::Dropout ortorch::nn::Conv2d in thedocumentation of thetorch::nn namespacehere.
One subtlety about the above code is why the submodule was created in theconstructor’s initializer list, while the parameter was created inside theconstructor body. There is a good reason for this, which we’ll touch upon thisin the section on the C++ frontend’sownership model further below. The endresult, however, is that we can recursively access our module tree’s parametersjust like in Python. Callingparameters() returns astd::vector<torch::Tensor>, which we can iterate over:
intmain(){Netnet(4,5);for(constauto&p:net.parameters()){std::cout<<p<<std::endl;}}
which prints:
root@fa350df05ecf:/home/build#./dcgan0.03451.4456-0.6313-0.3585-0.4008[Variable[CPUFloatType]{5}]-0.16470.28910.0527-0.03540.30840.20250.03430.1824-0.4630-0.28620.2500-0.04200.3679-0.1482-0.04600.19670.2132-0.19920.42570.0739[Variable[CPUFloatType]{5,4}]0.01*3.6861-10.1166-45.03337.9983-20.0705[Variable[CPUFloatType]{5}]
with three parameters just like in Python. To also see the names of theseparameters, the C++ API provides anamed_parameters() method which returnsanOrderedDict just like in Python:
Netnet(4,5);for(constauto&pair:net.named_parameters()){std::cout<<pair.key()<<": "<<pair.value()<<std::endl;}
which we can execute again to see the output:
root@fa350df05ecf:/home/build#make&&./dcgan11:13:48Scanningdependenciesoftargetdcgan[50%]BuildingCXXobjectCMakeFiles/dcgan.dir/dcgan.cpp.o[100%]LinkingCXXexecutabledcgan[100%]Builttargetdcganb:-0.1863-0.8611-0.12281.32690.9858[Variable[CPUFloatType]{5}]linear.weight:0.03390.24840.2035-0.2103-0.0715-0.2975-0.4350-0.1878-0.36160.1050-0.49820.0335-0.16050.49630.4099-0.28830.1818-0.3447-0.1501-0.0215[Variable[CPUFloatType]{5,4}]linear.bias:-0.02500.04080.3756-0.2149-0.3636[Variable[CPUFloatType]{5}]
Note
The documentationfortorch::nn::Module contains the full list of methods that operate onthe module hierarchy.
Running the Network in Forward Mode#
To execute the network in C++, we simply call theforward() method wedefined ourselves:
intmain(){Netnet(4,5);std::cout<<net.forward(torch::ones({2,4}))<<std::endl;}
which prints something like:
root@fa350df05ecf:/home/build#./dcgan0.85591.15722.1069-0.12470.80600.85591.15722.1069-0.12470.8060[Variable[CPUFloatType]{2,5}]
Module Ownership#
At this point, we know how to define a module in C++, register parameters,register submodules, traverse the module hierarchy via methods likeparameters() and finally run the module’sforward() method. While thereare many more methods, classes and topics to devour in the C++ API, I will referyou todocs forthe full menu. We’ll also touch upon some more concepts as we implement theDCGAN model and end-to-end training pipeline in just a second. Before we do so,let me briefly touch upon theownership model the C++ frontend provides forsubclasses oftorch::nn::Module.
For this discussion, the ownership model refers to the way modules are storedand passed around – which determines who or whatowns a particular moduleinstance. In Python, objects are always allocated dynamically (on the heap) andhave reference semantics. This is very easy to work with and straightforward tounderstand. In fact, in Python, you can largely forget about where objects liveand how they get referenced, and focus on getting things done.
C++, being a lower level language, provides more options in this realm. Thisincreases complexity and heavily influences the design and ergonomics of the C++frontend. In particular, for modules in the C++ frontend, we have the option ofusingeither value semanticsor reference semantics. The first case is thesimplest and was shown in the examples thus far: module objects are allocated onthe stack and when passed to a function, can be either copied, moved (withstd::move) or taken by reference or by pointer:
structNet:torch::nn::Module{};voida(Netnet){}voidb(Net&net){}voidc(Net*net){}intmain(){Netnet;a(net);a(std::move(net));b(net);c(&net);}
For the second case – reference semantics – we can usestd::shared_ptr.The advantage of reference semantics is that, like in Python, it reduces thecognitive overhead of thinking about how modules must be passed to functions andhow arguments must be declared (assuming you useshared_ptr everywhere).
structNet:torch::nn::Module{};voida(std::shared_ptr<Net>net){}intmain(){autonet=std::make_shared<Net>();a(net);}
In our experience, researchers coming from dynamic languages greatly preferreference semantics over value semantics, even though the latter is more“native” to C++. It is also important to note thattorch::nn::Module’sdesign, in order to stay close to the ergonomics of the Python API, relies onshared ownership. For example, take our earlier (here shortened) definition ofNet:
structNet:torch::nn::Module{Net(int64_tN,int64_tM):linear(register_module("linear",torch::nn::Linear(N,M))){}torch::nn::Linearlinear;};
In order to use thelinear submodule, we want to store it directly in ourclass. However, we also want the module base class to know about and have accessto this submodule. For this, it must store a reference to this submodule. Atthis point, we have already arrived at the need for shared ownership. Both thetorch::nn::Module class and concreteNet class require a reference tothe submodule. For this reason, the base class stores modules asshared_ptrs, and therefore the concrete class must too.
But wait! I don’t see any mention ofshared_ptr in the above code! Why isthat? Well, becausestd::shared_ptr<MyModule> is a hell of a lot to type. Tokeep our researchers productive, we came up with an elaborate scheme to hide themention ofshared_ptr – a benefit usually reserved for value semantics –while retaining reference semantics. To understand how this works, we can take alook at a simplified definition of thetorch::nn::Linear module in the corelibrary (the full definition ishere):
structLinearImpl:torch::nn::Module{LinearImpl(int64_tin,int64_tout);Tensorforward(constTensor&input);Tensorweight,bias;};TORCH_MODULE(Linear);
In brief: the module is not calledLinear, butLinearImpl. A macro,TORCH_MODULE then defines the actualLinear class. This “generated”class is effectively a wrapper over astd::shared_ptr<LinearImpl>. It is awrapper instead of a simple typedef so that, among other things, constructorsstill work as expected, i.e. you can still writetorch::nn::Linear(3,4)instead ofstd::make_shared<LinearImpl>(3,4). We call the class created bythe macro the moduleholder. Like with (shared) pointers, you access theunderlying object using the arrow operator (likemodel->forward(...)). Theend result is an ownership model that resembles that of the Python API quiteclosely. Reference semantics become the default, but without the extra typing ofstd::shared_ptr orstd::make_shared. For ourNet, using the moduleholder API looks like this:
structNetImpl:torch::nn::Module{};TORCH_MODULE(Net);voida(Netnet){}intmain(){Netnet;a(net);}
There is one subtle issue that deserves mention here. A default constructedstd::shared_ptr is “empty”, i.e. contains a null pointer. What is a defaultconstructedLinear orNet? Well, it’s a tricky choice. We could say itshould be an empty (null)std::shared_ptr<LinearImpl>. However, recall thatLinear(3,4) is the same asstd::make_shared<LinearImpl>(3,4). Thismeans that if we had decided thatLinearlinear; should be a null pointer,then there would be no way to construct a module that does not take anyconstructor arguments, or defaults all of them. For this reason, in the currentAPI, a default constructed module holder (likeLinear()) invokes thedefault constructor of the underlying module (LinearImpl()). If theunderlying module does not have a default constructor, you get a compiler error.To instead construct the empty holder, you can passnullptr to theconstructor of the holder.
In practice, this means you can use submodules either like shown earlier, wherethe module is registered and constructed in theinitializer list:
structNet:torch::nn::Module{Net(int64_tN,int64_tM):linear(register_module("linear",torch::nn::Linear(N,M))){}torch::nn::Linearlinear;};
or you can first construct the holder with a null pointer and then assign to itin the constructor (more familiar for Pythonistas):
structNet:torch::nn::Module{Net(int64_tN,int64_tM){linear=register_module("linear",torch::nn::Linear(N,M));}torch::nn::Linearlinear{nullptr};// construct an empty holder};
In conclusion: Which ownership model – which semantics – should you use? TheC++ frontend’s API best supports the ownership model provided by module holders.The only disadvantage of this mechanism is one extra line of boilerplate belowthe module declaration. That said, the simplest model is still the valuesemantics model shown in the introduction to C++ modules. For small, simplescripts, you may get away with it too. But you’ll find sooner or later that, fortechnical reasons, it is not always supported. For example, the serializationAPI (torch::save andtorch::load) only supports module holders (or plainshared_ptr). As such, the module holder API is the recommended way ofdefining modules with the C++ frontend, and we will use this API in thistutorial henceforth.
Defining the DCGAN Modules#
We now have the necessary background and introduction to define the modules forthe machine learning task we want to solve in this post. To recap: our task isto generate images of digits from theMNIST dataset. We want to use agenerative adversarialnetwork (GAN) to solvethis task. In particular, we’ll use aDCGAN architecture – one of the first and simplest of itskind, but entirely sufficient for this task.
Tip
You can find the full source code presented in this tutorialin thisrepository.
What was a GAN aGAN?#
A GAN consists of two distinct neural network models: agenerator and adiscriminator. The generator receives samples from a noise distribution, andits aim is to transform each noise sample into an image that resembles those ofa target distribution – in our case the MNIST dataset. The discriminator inturn receives eitherreal images from the MNIST dataset, orfake images fromthe generator. It is asked to emit a probability judging how real (closer to1) or fake (closer to0) a particular image is. Feedback from thediscriminator on how real the images produced by the generator are is used totrain the generator. Feedback on how good of an eye for authenticity thediscriminator has is used to optimize the discriminator. In theory, a delicatebalance between the generator and discriminator makes them improve in tandem,leading to the generator producing images indistinguishable from the targetdistribution, fooling the discriminator’s (by then) excellent eye into emittinga probability of0.5 for both real and fake images. For us, the end resultis a machine that receives noise as input and generates realistic images ofdigits as its output.
The Generator Module#
We begin by defining the generator module, which consists of a series oftransposed 2D convolutions, batch normalizations and ReLU activation units.We explicitly pass inputs (in a functional way) between modules in theforward() method of a module we define ourselves:
structDCGANGeneratorImpl:nn::Module{DCGANGeneratorImpl(intkNoiseSize):conv1(nn::ConvTranspose2dOptions(kNoiseSize,256,4).bias(false)),batch_norm1(256),conv2(nn::ConvTranspose2dOptions(256,128,3).stride(2).padding(1).bias(false)),batch_norm2(128),conv3(nn::ConvTranspose2dOptions(128,64,4).stride(2).padding(1).bias(false)),batch_norm3(64),conv4(nn::ConvTranspose2dOptions(64,1,4).stride(2).padding(1).bias(false)){// register_module() is needed if we want to use the parameters() method later onregister_module("conv1",conv1);register_module("conv2",conv2);register_module("conv3",conv3);register_module("conv4",conv4);register_module("batch_norm1",batch_norm1);register_module("batch_norm2",batch_norm2);register_module("batch_norm3",batch_norm3);}torch::Tensorforward(torch::Tensorx){x=torch::relu(batch_norm1(conv1(x)));x=torch::relu(batch_norm2(conv2(x)));x=torch::relu(batch_norm3(conv3(x)));x=torch::tanh(conv4(x));returnx;}nn::ConvTranspose2dconv1,conv2,conv3,conv4;nn::BatchNorm2dbatch_norm1,batch_norm2,batch_norm3;};TORCH_MODULE(DCGANGenerator);DCGANGeneratorgenerator(kNoiseSize);
We can now invokeforward() on theDCGANGenerator to map a noise sample to an image.
The particular modules chosen, likenn::ConvTranspose2d andnn::BatchNorm2d,follows the structure outlined earlier. ThekNoiseSize constant determinesthe size of the input noise vector and is set to100. Hyperparameters were,of course, found via grad student descent.
Attention
No grad students were harmed in the discovery of hyperparameters. They werefed Soylent regularly.
Note
A brief word on the way options are passed to built-in modules likeConv2din the C++ frontend: Every module has some required options, like the numberof features forBatchNorm2d. If you only need to configure the requiredoptions, you can pass them directly to the module’s constructor, likeBatchNorm2d(128) orDropout(0.5) orConv2d(8,4,2) (for inputchannel count, output channel count, and kernel size). If, however, you needto modify other options, which are normally defaulted, such asbiasforConv2d, you need to construct and pass anoptions object. Everymodule in the C++ frontend has an associated options struct, calledModuleOptions whereModule is the name of the module, likeLinearOptions forLinear. This is what we do for theConv2dmodules above.
The Discriminator Module#
The discriminator is similarly a sequence of convolutions, batch normalizationsand activations. However, the convolutions are now regular ones instead oftransposed, and we use a leaky ReLU with an alpha value of 0.2 instead of avanilla ReLU. Also, the final activation becomes a Sigmoid, which squashesvalues into a range between 0 and 1. We can then interpret these squashed valuesas the probabilities the discriminator assigns to images being real.
To build the discriminator, we will try something different: aSequential module.Like in Python, PyTorch here provides two APIs for model definition: a functional onewhere inputs are passed through successive functions (e.g. the generator module example),and a more object-oriented one where we build aSequential module containing theentire model as submodules. UsingSequential, the discriminator would look like:
nn::Sequentialdiscriminator(// Layer 1nn::Conv2d(nn::Conv2dOptions(1,64,4).stride(2).padding(1).bias(false)),nn::LeakyReLU(nn::LeakyReLUOptions().negative_slope(0.2)),// Layer 2nn::Conv2d(nn::Conv2dOptions(64,128,4).stride(2).padding(1).bias(false)),nn::BatchNorm2d(128),nn::LeakyReLU(nn::LeakyReLUOptions().negative_slope(0.2)),// Layer 3nn::Conv2d(nn::Conv2dOptions(128,256,4).stride(2).padding(1).bias(false)),nn::BatchNorm2d(256),nn::LeakyReLU(nn::LeakyReLUOptions().negative_slope(0.2)),// Layer 4nn::Conv2d(nn::Conv2dOptions(256,1,3).stride(1).padding(0).bias(false)),nn::Sigmoid());
Tip
ASequential module simply performs function composition. The output ofthe first submodule becomes the input of the second, the output of the thirdbecomes the input of the fourth and so on.
Loading Data#
Now that we have defined the generator and discriminator model, we need somedata we can train these models with. The C++ frontend, like the Python one,comes with a powerful parallel data loader. This data loader can read batches ofdata from a dataset (which you can define yourself) and provides manyconfiguration knobs.
Note
While the Python data loader uses multi-processing, the C++ data loader is trulymulti-threaded and does not launch any new processes.
The data loader is part of the C++ frontend’sdata api, contained in thetorch::data:: namespace. This API consists of a few different components:
The data loader class,
An API for defining datasets,
An API for definingtransforms, which can be applied to datasets,
An API for definingsamplers, which produce the indices with which datasets are indexed,
A library of existing datasets, transforms and samplers.
For this tutorial, we can use theMNIST dataset that comes with the C++frontend. Let’s instantiate atorch::data::datasets::MNIST for this, andapply two transformations: First, we normalize the images so that they are inthe range of-1 to+1 (from an original range of0 to1).Second, we apply theStackcollation, which takes a batch of tensors andstacks them into a single tensor along the first dimension:
autodataset=torch::data::datasets::MNIST("./mnist").map(torch::data::transforms::Normalize<>(0.5,0.5)).map(torch::data::transforms::Stack<>());
Note that the MNIST dataset should be located in the./mnist directoryrelative to wherever you execute the training binary from. You can usethisscriptto download the MNIST dataset.
Next, we create a data loader and pass it this dataset. To make a new dataloader, we usetorch::data::make_data_loader, which returns astd::unique_ptr of the correct type (which depends on the type of thedataset, the type of the sampler and some other implementation details):
autodata_loader=torch::data::make_data_loader(std::move(dataset));
The data loader does come with a lot of options. You can inspect the full sethere.For example, to speed up the data loading, we can increase the number ofworkers. The default number is zero, which means the main thread will be used.If we setworkers to2, two threads will be spawned that load dataconcurrently. We should also increase the batch size from its default of1to something more reasonable, like64 (the value ofkBatchSize). Solet’s create aDataLoaderOptions object and set the appropriate properties:
autodata_loader=torch::data::make_data_loader(std::move(dataset),torch::data::DataLoaderOptions().batch_size(kBatchSize).workers(2));
We can now write a loop to load batches of data, which we’ll only print to theconsole for now:
for(torch::data::Example<>&batch:*data_loader){std::cout<<"Batch size: "<<batch.data.size(0)<<" | Labels: ";for(int64_ti=0;i<batch.data.size(0);++i){std::cout<<batch.target[i].item<int64_t>()<<" ";}std::cout<<std::endl;}
The type returned by the data loader in this case is atorch::data::Example.This type is a simple struct with adata field for the data and atargetfield for the label. Because we applied theStack collation earlier, thedata loader returns only a single such example. If we had not applied thecollation, the data loader would yieldstd::vector<torch::data::Example<>>instead, with one element per example in the batch.
If you rebuild and run this code, you should see something like this:
root@fa350df05ecf:/home/build#makeScanningdependenciesoftargetdcgan[50%]BuildingCXXobjectCMakeFiles/dcgan.dir/dcgan.cpp.o[100%]LinkingCXXexecutabledcgan[100%]Builttargetdcganroot@fa350df05ecf:/home/build#make[100%]Builttargetdcganroot@fa350df05ecf:/home/build#./dcganBatchsize:64|Labels:5267216701623691840653304666408606924028633292014234829935800799Batchsize:64|Labels:2247128869022936138044888926471509754354128071961653441232350162Batchsize:64|Labels:4542148383615436225131508215324459728920674383588305808785561780Batchsize:64|Labels:3371416103640254042819651632892387459608300648254183780089672147Batchsize:64|Labels:3055983989595041277200548776107930632627633405889192194492462940Batchsize:64|Labels:9675359086678219881182071416751774032906634481286920312856485862Batchsize:64|Labels:9303651860199161774447886782604682539840993705824562825371918227Batchsize:64|Labels:9192726086877486116857913205173161086081054938584801262427737453Batchsize:64|Labels:8831864295802866709838716627745521795491031939885375368942012547Batchsize:64|Labels:9270844275006205959889357547305765716287632656127700590091783294Batchsize:64|Labels:7657752249948748945712698512367811398795085187265120974090460086...
Which means we are successfully able to load data from the MNIST dataset.
Writing the Training Loop#
Let’s now finish the algorithmic part of our example and implement the delicatedance between the generator and discriminator. First, we’ll create twooptimizers, one for the generator and one for the discriminator. The optimizerswe use implement theAdam algorithm:
torch::optim::Adamgenerator_optimizer(generator->parameters(),torch::optim::AdamOptions(2e-4).betas(std::make_tuple(0.5,0.5)));torch::optim::Adamdiscriminator_optimizer(discriminator->parameters(),torch::optim::AdamOptions(5e-4).betas(std::make_tuple(0.5,0.5)));
Note
As of this writing, the C++ frontend provides optimizers implementing Adagrad,Adam, LBFGS, RMSprop and SGD. Thedocs have theup-to-date list.
Next, we need to update our training loop. We’ll add an outer loop to exhaustthe data loader every epoch and then write the GAN training code:
for(int64_tepoch=1;epoch<=kNumberOfEpochs;++epoch){int64_tbatch_index=0;for(torch::data::Example<>&batch:*data_loader){// Train discriminator with real images.discriminator->zero_grad();torch::Tensorreal_images=batch.data;torch::Tensorreal_labels=torch::empty(batch.data.size(0)).uniform_(0.8,1.0);torch::Tensorreal_output=discriminator->forward(real_images).reshape(real_labels.sizes());torch::Tensord_loss_real=torch::binary_cross_entropy(real_output,real_labels);d_loss_real.backward();// Train discriminator with fake images.torch::Tensornoise=torch::randn({batch.data.size(0),kNoiseSize,1,1});torch::Tensorfake_images=generator->forward(noise);torch::Tensorfake_labels=torch::zeros(batch.data.size(0));torch::Tensorfake_output=discriminator->forward(fake_images.detach()).reshape(fake_labels.sizes());torch::Tensord_loss_fake=torch::binary_cross_entropy(fake_output,fake_labels);d_loss_fake.backward();torch::Tensord_loss=d_loss_real+d_loss_fake;discriminator_optimizer.step();// Train generator.generator->zero_grad();fake_labels.fill_(1);fake_output=discriminator->forward(fake_images).reshape(fake_labels.sizes());torch::Tensorg_loss=torch::binary_cross_entropy(fake_output,fake_labels);g_loss.backward();generator_optimizer.step();std::printf("\r[%2ld/%2ld][%3ld/%3ld] D_loss: %.4f | G_loss: %.4f",epoch,kNumberOfEpochs,++batch_index,batches_per_epoch,d_loss.item<float>(),g_loss.item<float>());}}
Above, we first evaluate the discriminator on real images, for which it shouldassign a high probability. For this, we usetorch::empty(batch.data.size(0)).uniform_(0.8,1.0) as the targetprobabilities.
Note
We pick random values uniformly distributed between 0.8 and 1.0 instead of 1.0everywhere in order to make the discriminator training more robust. This trickis calledlabel smoothing.
Before evaluating the discriminator, we zero out the gradients of itsparameters. After computing the loss, we back-propagate it through the network bycallingd_loss.backward() to compute new gradients. We repeat this spiel forthe fake images. Instead of using images from the dataset, we let the generatorcreate fake images for this by feeding it a batch of random noise. We thenforward those fake images to the discriminator. This time, we want thediscriminator to emit low probabilities, ideally all zeros. Once we havecomputed the discriminator loss for both the batch of real and the batch of fakeimages, we can progress the discriminator’s optimizer by one step in order toupdate its parameters.
To train the generator, we again first zero its gradients, and then re-evaluatethe discriminator on the fake images. However, this time we want thediscriminator to assign probabilities very close to one, which would indicatethat the generator can produce images that fool the discriminator into thinkingthey are actually real (from the dataset). For this, we fill thefake_labelstensor with all ones. We finally step the generator’s optimizer to also updateits parameters.
We should now be ready to train our model on the CPU. We don’t have any code yetto capture state or sample outputs, but we’ll add this in just a moment. Fornow, let’s just observe that our model is doingsomething – we’ll laterverify based on the generated images whether this something is meaningful.Re-building and running should print something like:
root@3c0711f20896:/home/build#make&&./dcganScanningdependenciesoftargetdcgan[50%]BuildingCXXobjectCMakeFiles/dcgan.dir/dcgan.cpp.o[100%]LinkingCXXexecutabledcgan[100%]Builttargetdcga[1/10][100/938]D_loss:0.6876|G_loss:4.1304[1/10][200/938]D_loss:0.3776|G_loss:4.3101[1/10][300/938]D_loss:0.3652|G_loss:4.6626[1/10][400/938]D_loss:0.8057|G_loss:2.2795[1/10][500/938]D_loss:0.3531|G_loss:4.4452[1/10][600/938]D_loss:0.3501|G_loss:5.0811[1/10][700/938]D_loss:0.3581|G_loss:4.5623[1/10][800/938]D_loss:0.6423|G_loss:1.7385[1/10][900/938]D_loss:0.3592|G_loss:4.7333[2/10][100/938]D_loss:0.4660|G_loss:2.5242[2/10][200/938]D_loss:0.6364|G_loss:2.0886[2/10][300/938]D_loss:0.3717|G_loss:3.8103[2/10][400/938]D_loss:1.0201|G_loss:1.3544[2/10][500/938]D_loss:0.4522|G_loss:2.6545...
Moving to the GPU#
While our current script can run just fine on the CPU, we all know convolutionsare a lot faster on GPU. Let’s quickly discuss how we can move our training ontothe GPU. We’ll need to do two things for this: pass a GPU device specificationto tensors we allocate ourselves, and explicitly copy any other tensors onto theGPU via theto() method all tensors and modules in the C++ frontend have.The simplest way to achieve both is to create an instance oftorch::Deviceat the top level of our training script, and then pass that device to tensorfactory functions liketorch::zeros as well as theto() method. We canstart by doing this with a CPU device:
// Place this somewhere at the top of your training script.torch::Devicedevice(torch::kCPU);
New tensor allocations like
torch::Tensorfake_labels=torch::zeros(batch.data.size(0));
should be updated to take thedevice as the last argument:
torch::Tensorfake_labels=torch::zeros(batch.data.size(0),device);
For tensors whose creation is not in our hands, like those coming from the MNISTdataset, we must insert explicitto() calls. This means
torch::Tensorreal_images=batch.data;
becomes
torch::Tensorreal_images=batch.data.to(device);
and also our model parameters should be moved to the correct device:
generator->to(device);discriminator->to(device);
Note
If a tensor already lives on the device supplied toto(), the call is ano-op. No extra copy is made.
At this point, we’ve just made our previous CPU-residing code more explicit.However, it is now also very easy to change the device to a CUDA device:
torch::Devicedevice(torch::kCUDA)
And now all tensors will live on the GPU, calling into fast CUDA kernels for alloperations, without us having to change any downstream code. If we wanted tospecify a particular device index, it could be passed as the second argument totheDevice constructor. If we wanted different tensors to live on differentdevices, we could pass separate device instances (for example one on CUDA device0 and the other on CUDA device 1). We can even do this configurationdynamically, which is often useful to make our training scripts more portable:
torch::Devicedevice=torch::kCPU;if(torch::cuda::is_available()){std::cout<<"CUDA is available! Training on GPU."<<std::endl;device=torch::kCUDA;}
or even
torch::Devicedevice(torch::cuda::is_available()?torch::kCUDA:torch::kCPU);
Checkpointing and Recovering the Training State#
The last augmentation we should make to our training script is to periodicallysave the state of our model parameters, the state of our optimizers as well as afew generated image samples. If our computer were to crash in the middle of thetraining procedure, the first two will allow us to restore the training state.For long-lasting training sessions, this is absolutely essential. Fortunately,the C++ frontend provides an API to serialize and deserialize both model andoptimizer state, as well as individual tensors.
The core API for this istorch::save(thing,filename) andtorch::load(thing,filename), wherething could be atorch::nn::Module subclass or an optimizer instance like theAdam objectwe have in our training script. Let’s update our training loop to checkpoint themodel and optimizer state at a certain interval:
if(batch_index%kCheckpointEvery==0){// Checkpoint the model and optimizer state.torch::save(generator,"generator-checkpoint.pt");torch::save(generator_optimizer,"generator-optimizer-checkpoint.pt");torch::save(discriminator,"discriminator-checkpoint.pt");torch::save(discriminator_optimizer,"discriminator-optimizer-checkpoint.pt");// Sample the generator and save the images.torch::Tensorsamples=generator->forward(torch::randn({8,kNoiseSize,1,1},device));torch::save((samples+1.0)/2.0,torch::str("dcgan-sample-",checkpoint_counter,".pt"));std::cout<<"\n-> checkpoint "<<++checkpoint_counter<<'\n';}
wherekCheckpointEvery is an integer set to something like100 tocheckpoint every100 batches, andcheckpoint_counter is a counter bumpedevery time we make a checkpoint.
To restore the training state, you can add lines like these after all models andoptimizers are created, but before the training loop:
torch::optim::Adamgenerator_optimizer(generator->parameters(),torch::optim::AdamOptions(2e-4).beta1(0.5));torch::optim::Adamdiscriminator_optimizer(discriminator->parameters(),torch::optim::AdamOptions(2e-4).beta1(0.5));if(kRestoreFromCheckpoint){torch::load(generator,"generator-checkpoint.pt");torch::load(generator_optimizer,"generator-optimizer-checkpoint.pt");torch::load(discriminator,"discriminator-checkpoint.pt");torch::load(discriminator_optimizer,"discriminator-optimizer-checkpoint.pt");}int64_tcheckpoint_counter=0;for(int64_tepoch=1;epoch<=kNumberOfEpochs;++epoch){int64_tbatch_index=0;for(torch::data::Example<>&batch:*data_loader){
Inspecting Generated Images#
Our training script is now complete. We are ready to train our GAN, whether onCPU or GPU. To inspect the intermediary output of our training procedure, forwhich we added code to periodically save image samples to the"dcgan-sample-xxx.pt" file, we can write a tiny Python script to load thetensors and display them with matplotlib:
importargparseimportmatplotlib.pyplotaspltimporttorchparser=argparse.ArgumentParser()parser.add_argument("-i","--sample-file",required=True)parser.add_argument("-o","--out-file",default="out.png")parser.add_argument("-d","--dimension",type=int,default=3)options=parser.parse_args()module=torch.jit.load(options.sample_file)images=list(module.parameters())[0]forindexinrange(options.dimension*options.dimension):image=images[index].detach().cpu().reshape(28,28).mul(255).to(torch.uint8)array=image.numpy()axis=plt.subplot(options.dimension,options.dimension,1+index)plt.imshow(array,cmap="gray")axis.get_xaxis().set_visible(False)axis.get_yaxis().set_visible(False)plt.savefig(options.out_file)print("Saved ",options.out_file)
Let’s now train our model for around 30 epochs:
root@3c0711f20896:/home/build#make&&./dcgan10:17:57Scanningdependenciesoftargetdcgan[50%]BuildingCXXobjectCMakeFiles/dcgan.dir/dcgan.cpp.o[100%]LinkingCXXexecutabledcgan[100%]BuilttargetdcganCUDAisavailable!TrainingonGPU.[1/30][200/938]D_loss:0.4953|G_loss:4.0195->checkpoint1[1/30][400/938]D_loss:0.3610|G_loss:4.8148->checkpoint2[1/30][600/938]D_loss:0.4072|G_loss:4.36760->checkpoint3[1/30][800/938]D_loss:0.4444|G_loss:4.0250->checkpoint4[2/30][200/938]D_loss:0.3761|G_loss:3.8790->checkpoint5[2/30][400/938]D_loss:0.3977|G_loss:3.3315...->checkpoint120[30/30][938/938]D_loss:0.3610|G_loss:3.8084
And display the images in a plot:
root@3c0711f20896:/home/build#pythondisplay.py-idcgan-sample-100.ptSavedout.png
Which should look something like this:
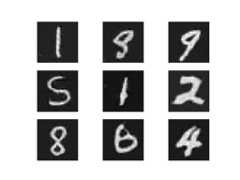
Digits! Hooray! Now the ball is in your court: can you improve the model to makethe digits look even better?
Conclusion#
This tutorial has hopefully given you a digestible digest of the PyTorch C++frontend. A machine learning library like PyTorch by necessity has a very broadand extensive API. As such, there are many concepts we did not have time orspace to discuss here. However, I encourage you to try out the API, and consultour documentation and in particular theLibrary API section whenyou get stuck. Also, remember that you can expect the C++ frontend to follow thedesign and semantics of the Python frontend whenever we could make thispossible, so you can leverage this fact to increase your learning rate.
Tip
You can find the full source code presented in this tutorialin thisrepository.
As always, if you run into any problems or have questions, you can use ourforum orGitHub issues to get in touch.
