Creating an issue
Issues can be created in a variety of ways, so you can choose the most convenient method for your workflow.
Who can use this feature?
People with read access can create an issue in a repository where issues are enabled.
In this article
Issues can be used to keep track of bugs, enhancements, or other requests. For more information, seeAbout issues.
Repository administrators can disable issues for a repository. For more information, seeDisabling issues.
Creating an issue from a repository
On GitHub, navigate to the main page of the repository.
Under your repository name, click Issues.

ClickNew issue.
If your repository uses issue templates, next to the type of issue you'd like to open, clickGet started.
If the type of issue you'd like to open isn't included in the available options, clickOpen a blank issue.

In the "Title" field, type a title for your issue.
In the comment body field, type a description of your issue.
If you're a project maintainer, you canassign the issue to someone,add it to a project,associate it with a milestone,set the issue type, orapply a label.
When you're finished, clickSubmit new issue.


Creating an issue with GitHub CLI
GitHub CLI is an open source tool for using GitHub from your computer's command line. When you're working from the command line, you can use the GitHub CLI to save time and avoid switching context. To learn more about GitHub CLI, seeAbout GitHub CLI.
To create an issue, use thegh issue create subcommand. To skip the interactive prompts, include the--body and the--title flags.
gh issue create --title "My new issue" --body "Here are more details."You can also specify assignees, labels, milestones, and projects.
gh issue create --title "My new issue" --body "Here are more details." --assignee @me,monalisa --label "bug,help wanted" --project onboarding --milestone "learning codebase"Creating an issue from a comment
You can open a new issue from a comment in an issue or pull request. When you open an issue from a comment, the issue contains a snippet showing where the comment was originally posted.
Navigate to the comment that you would like to open an issue from.
In that comment, click.

ClickReference in new issue.
Use the "Repository" dropdown menu, and select the repository you want to open the issue in.
Type a descriptive title and body for the issue.
ClickCreate issue.
If you're a project maintainer, you canassign the issue to someone,add it to a project,associate it with a milestone,set the issue type, orapply a label.
When you're finished, clickSubmit new issue.

Creating an issue from code
You can open a new issue from a specific line or lines of code in a file or pull request. When you open an issue from code, the issue contains a snippet showing the line or range of code you chose. You can only open an issue in the same repository where the code is stored.
On GitHub, navigate to the main page of the repository.
Locate the code you want to reference in an issue:
- To open an issue about code in a file, navigate to the file.
- To open an issue about code in a pull request, navigate to the pull request and click Files changed. Then, browse to the file that contains the code you want included in your comment, and clickView.
Choose whether to select a single line or a range.
- To select a single line of code, click the line number to highlight the line.
- To select a range of code, click the number of the first line in the range to highlight the line of code. Then, hover over the last line of the code range, pressShift, and click the line number to highlight the range.
To the left of the code range, click. In the dropdown menu, clickReference in new issue.
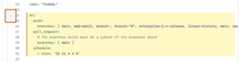
In the "Title" field, type a title for your issue.
In the comment body field, type a description of your issue.
If you're a project maintainer, you canassign the issue to someone,add it to a project,associate it with a milestone,set the issue type, orapply a label.
When you're finished, clickSubmit new issue.

Creating an issue from discussion
People with triage permission to a repository can create an issue from a discussion.
When you create an issue from a discussion, the contents of the discussion post will be automatically included in the issue body, and any labels will be retained. Creating an issue from a discussion does not convert the discussion to an issue or delete the existing discussion. For more information about GitHub Discussions, seeAbout discussions.
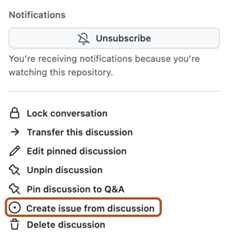
Under your repository or organization name, click Discussions.

In the list of discussions, click the discussion you want to view.
In the right sidebar, click Create issue from discussion.
In the "Title" field, type a title for your issue.
In the comment body field, type a description of your issue.
If you're a project maintainer, you canassign the issue to someone,add it to a project,associate it with a milestone,set the issue type, orapply a label.
When you're finished, clickSubmit new issue.


Creating an issue from a project
You can quickly create issues without leaving your project. When using a view that is grouped by a field, creating an issue in that group will automatically set the new issue's field to the group's value. For example, if you group your view by "Status", when you create an issue in the "Todo" group, the new issue's "Status" will automatically be set to "Todo." For more information about Projects, seeAbout Projects.
Navigate to your project.
At the bottom of a table, group of items, or a column in board layout, click.
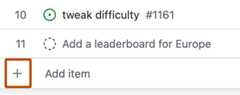
ClickCreate new issue.
At the top of the "Create new issue" dialog, select the repository where you want the new issue to be created.
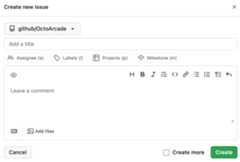
Below the repository dropdown, type a title for the new issue.
Optionally, use the fields below the title field to set assignees, labels, and milestones, and add the new issue to other projects.
Optionally, type a description for your issue.
Optionally, if you want to create more issues, selectCreate more and the dialog will reopen when you create your issue.
ClickCreate.


Creating an issue from a task list item
Within an issue, you can use task lists to break work into smaller tasks and track the full set of work to completion. If a task requires further tracking or discussion, you can convert the task to an issue by hovering over the task and clicking in the upper-right corner of the task. For more information, seeAbout tasklists.
Creating an issue from a URL query
You can use query parameters to open issues. Query parameters are optional parts of a URL you can customize to share a specific web page view, such as search filter results or an issue template on GitHub. To create your own query parameters, you must match the key and value pair.
Tip
You can also create issue templates that open with default labels, assignees, and an issue title. For more information, seeUsing templates to encourage useful issues and pull requests.
You must have the proper permissions for any action to use the equivalent query parameter. For example, you must have permission to add a label to an issue to use thelabels query parameter. For more information, seeRepository roles for an organization.
If you create an invalid URL using query parameters, or if you don't have the proper permissions, the URL will return a404 Not Found error page. If you create a URL that exceeds the server limit, the URL will return a414 URI Too Long error page.
| Query parameter | Example |
|---|---|
title | https://github.com/octo-org/octo-repo/issues/new?labels=bug&title=New+bug+report creates an issue with the label "bug" and title "New bug report." |
body | https://github.com/octo-org/octo-repo/issues/new?title=New+bug+report&body=Describe+the+problem. creates an issue with the title "New bug report" and the comment "Describe the problem" in the issue body. |
labels | https://github.com/octo-org/octo-repo/issues/new?labels=help+wanted,bug creates an issue with the labels "help wanted" and "bug". |
milestone | https://github.com/octo-org/octo-repo/issues/new?milestone=testing+milestones creates an issue with the milestone "testing milestones." |
assignees | https://github.com/octo-org/octo-repo/issues/new?assignees=octocat creates an issue and assigns it to @octocat. |
projects | https://github.com/octo-org/octo-repo/issues/new?title=Bug+fix&projects=octo-org/1 creates an issue with the title "Bug fix" and adds it to the organization's project 1. |
template | https://github.com/octo-org/octo-repo/issues/new?template=issue_template.md creates an issue with a template in the issue body. Thetemplate query parameter works with templates stored in anISSUE_TEMPLATE subdirectory within the root,docs/ or.github/ directory in a repository. For more information, seeUsing templates to encourage useful issues and pull requests. |
You can also use URL query parameters to fill custom text fields that you have defined in issue form templates. Query parameters for issue form fields can also be passed to the issue template chooser. For more information, seeSyntax for GitHub's form schema.
Creating an issue with Copilot Chat on GitHub
Note
This feature is in public preview and subject to change.
Creating issues manually can be repetitive and time-consuming. With Copilot, you can create issues faster by prompting in natural language, or even by uploading a screenshot. Copilot fills out the title, body, labels, assignees, and more, using your repository’s templates and structure. SeeUsing GitHub Copilot to create or update issues.
Creating an issue from Copilot Chat in VS Code
You can also create an issue directly from Copilot Chat in VS Code, using the Model Context Protocol (MCP). SeeExtending GitHub Copilot Chat with Model Context Protocol (MCP) servers.