On this page
Deploy Deno to Amazon Lightsail
Amazon Lightsail is the easiest andcheapest way to get started with Amazon Web Services. It allows you to hostvirtual machines and even entire container services.
This How To guide will show you how to deploy a Deno app to Amazon Lightsailusing Docker, Docker Hub, and GitHub Actions.
Before continuing, make sure you have:
Create Dockerfile and docker-compose.ymlJump to heading
To focus on the deployment, our app will simply be amain.ts file that returnsa string as an HTTP response:
import{ Application}from"jsr:@oak/oak";const app=newApplication();app.use((ctx)=>{ ctx.response.body="Hello from Deno and AWS Lightsail!";});await app.listen({ port:8000});Then, we'll create two files --Dockerfile anddocker-compose.yml -- tobuild the Docker image.
In ourDockerfile, let's add:
FROM denoland/denoEXPOSE 8000WORKDIR /appADD . /appRUN deno install --entrypoint main.tsCMD ["run", "--allow-net", "main.ts"]Then, in ourdocker-compose.yml:
version: "3"services: web: build: . container_name: deno-container image: deno-image ports: - "8000:8000"Let's test this locally by runningdocker compose -f docker-compose.yml build,thendocker compose up, and going tolocalhost:8000.

It works!
Build, Tag, and Push to Docker HubJump to heading
First, let's sign intoDocker Hub andcreate a repository. Let's name itdeno-on-aws-lightsail.
Then, let's tag and push our new image, replacingusername with yours:
Then, let's build the image locally. Note ourdocker-compose.yml file willname the builddeno-image.
docker compose-f docker-compose.yml buildLet'stag the localimage with{{ username }}/deno-on-aws-lightsail:
docker tag deno-image{{ username}}/deno-on-aws-lightsailWe can now push the image to Docker Hub:
docker push{{ username}}/deno-on-aws-lightsailAfter that succeeds, you should be able to see the new image on your Docker Hubrepository:

Create and Deploy to a Lightsail ContainerJump to heading
Let's head over tothe Amazon Lightsail console.
Then click "Containers" and "Create container service". Half way down the page,click "Setup your first Deployment" and select "Specify a custom deployment".
You can write whatever container name you'd like.
InImage, be sure to use{{ username }}/{{ image }} that you have set inyour Docker Hub. For this example, it islambtron/deno-on-aws-lightsail.
Let's clickAdd open ports and add8000.
Finally, underPUBLIC ENDPOINT, select the container name that you justcreated.
The full form should look like below:
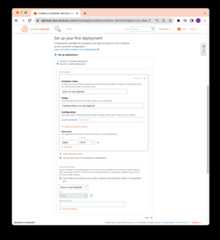
When you're ready, click "Create container service".
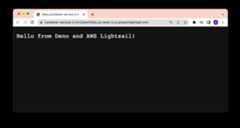
After a few moments, your new container should be deployed. Click on the publicaddress and you should see your Deno app:
Automate using GitHub ActionsJump to heading
In order to automate that process, we'll use theaws CLI with thelightsail subcommand.
The steps in our GitHub Actions workflow will be:
- Checkout the repo
- Build our app as a Docker image locally
- Install and authenticate AWS CLI
- Push local Docker image to AWS Lightsail Container Service via CLI
Pre-requisites for this GitHub Action workflow to work:
- an AWS Lightsail Container Instance is created (see section above)
- IAM user and relevant permissions set.(Learn more about managing access to Amazon Lightsail for an IAM user.)
AWS_ACCESS_KEY_IDandAWS_SUCCESS_ACCESS_KEYfor your user withpermissions. (Followthis AWS guideto get generate anAWS_ACCESS_KEY_IDandAWS_SUCCESS_ACCESS_KEY.)
Let's create a new filecontainer.template.json, which contains configurationfor how to make the service container deployment. Note the similarities theseoption values have with the inputs we entered manually in the previous section.
{"containers":{"app":{"image":"","environment":{"APP_ENV":"release"},"ports":{"8000":"HTTP"}}},"publicEndpoint":{"containerName":"app","containerPort":8000,"healthCheck":{"healthyThreshold":2,"unhealthyThreshold":2,"timeoutSeconds":5,"intervalSeconds":10,"path":"/","successCodes":"200-499"}}}Let's add the below to your.github/workflows/deploy.yml file:
name: Build and Deploy to AWS Lightsailon: push: branches: - mainenv: AWS_REGION: us-west-2 AWS_LIGHTSAIL_SERVICE_NAME: container-service-2jobs: build_and_deploy: name: Build and Deploy runs-on: ubuntu-latest steps: - name: Checkout main uses: actions/checkout@v4 - name: Install Utilities run: | sudo apt-get update sudo apt-get install -y jq unzip - name: Install AWS Client run: | curl "https://awscli.amazonaws.com/awscli-exe-linux-x86_64.zip" -o "awscliv2.zip" unzip awscliv2.zip sudo ./aws/install || true aws --version curl "https://s3.us-west-2.amazonaws.com/lightsailctl/latest/linux-amd64/lightsailctl" -o "lightsailctl" sudo mv "lightsailctl" "/usr/local/bin/lightsailctl" sudo chmod +x /usr/local/bin/lightsailctl - name: Configure AWS credentials uses: aws-actions/configure-aws-credentials@v1 with: aws-region: ${{ env.AWS_REGION }} aws-access-key-id: ${{ secrets.AWS_ACCESS_KEY_ID }} aws-secret-access-key: ${{ secrets.AWS_SECRET_ACCESS_KEY }} - name: Build Docker Image run: docker build -t ${{ env.AWS_LIGHTSAIL_SERVICE_NAME }}:release . - name: Push and Deploy run: | service_name=${{ env.AWS_LIGHTSAIL_SERVICE_NAME }} aws lightsail push-container-image \ --region ${{ env.AWS_REGION }} \ --service-name ${service_name} \ --label ${service_name} \ --image ${service_name}:release aws lightsail get-container-images --service-name ${service_name} | jq --raw-output ".containerImages[0].image" > image.txt jq --arg image $(cat image.txt) '.containers.app.image = $image' container.template.json > container.json aws lightsail create-container-service-deployment --service-name ${service_name} --cli-input-json file://$(pwd)/container.jsonWhoa there is a lot going on here! The last two steps are most important:Build Docker Image andPush and Deploy.
docker build-t${{ env.AWS_LIGHTSAIL_SERVICE_NAME }}:release.This command builds our Docker image with the namecontainer-service-2 andtags itrelease.
aws lightsail push-container-image...This command pushes the local image to our Lightsail container.
aws lightsail get-container-images --service-name${service_name}| jq --raw-output".containerImages[0].image"> image.txtThis command retrieves the image information and, usingjq, parses it and saves the image name in alocal fileimage.txt.
jq--arg image$(cat image.txt)'.containers.app.image = $image' container.template.json> container.jsonThis command uses the image name saved inimage.txt andcontainer.template.json and creates a new options file calledcontainer.json. This options file will be passed toaws lightsail for thefinal deployment in the next step.
aws lightsail create-container-service-deployment --service-name${service_name} --cli-input-json file://$(pwd)/container.jsonFinally, this command creates a new deployment using theservice_name, alongwith the config settings incontainer.json.
When you push to GitHub and the Action succeeds, you'll be able to see your newDeno app on AWS:
🦕 Now you can deploy a Deno app to Amazon Lightsail using Docker, Docker Hub,and GitHub Actions.