
Quick Start
A quick start guide for those that are brand new to Codecov.
This guide is meant to help you get started with Codecov as quickly as possible. By the end of the guide, you will have:
- Integrated Codecov into your CI pipeline
- Uploaded coverage to Codecov
- Viewed coverage reports in Codecov's app as well as in your pull requests / merge requests
Prerequisites
In order to get started, you will need the following:
- Access to a repository withGitHub,Bitbucket, orGitLab.
- If you are a GitHub user youMUST install theCodecov GitHub app for your organization - Codecov can't function without it.
- A CI environment that runs tests and generates coverage reports.
📘
Not ready to use Codecov on your own repositories?
Try it out for yourself with the Codecov tutorials forGitHub,Bitbucket, orGitLab to see what Codecov has to offer.
Getting Started
Step 1: Sign up for Codecov
Sign up for a Codecov account to connect your individual code host account with Codecov. You will be brought to a page with a list of repositories.
Not seeing any repositories? Try clickingNot Configured on the left toggle. If you're a GitHub user, you may need to allow additional repositories to access Codecov in theapp configuration.. Note that if this is your first time logging into Codecov, it may take a few moments for your repositories to sync and appear in the UI.

Additional Admin Approval for GitHub users
If you are signing up via GitHub and not an admin of your Github organization, you may need to request access from an admin to authorize Codecov as a third-party GitHub application. For more information seeGitHub Admin Authorization.
Step 2: Get the repository upload token
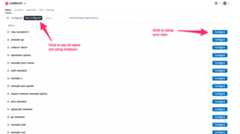
Click onsetup repo for the repository you would like to use Codecov. This should take you to the setup screen for the repository.
Copy the token as shown in step one for later. It will be used to authenticate and verify coverage reports uploaded for this repository.
Step 3: Setup integration/team bot (GitLab and Bitbucket only)
To communicate between your code host and Codecov, you will need toadd a Team Bot for Bitbucket and GitLab.
No further action is required for GitHub users at this step. GitHub utilizes Codecov's GitHub app for this functionality and is handled in Step 1: Signing up for Codecov.
Step 4: Upload coverage reports to Codecov
Use theCodecov CLI and the repository upload token to upload your coverage report(s) to Codecov.These tools should be added as a step in your CI pipeline.
The following CI providers have built-in utilities that will also verify theuploader integrity before uploading to Codecov:
Wehighly recommend using these built-in Codecov utilities in their respective workflows.
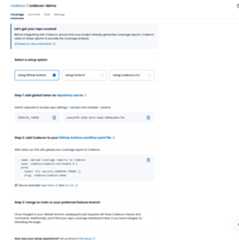
An example of a workflow using the CLI with GitHub Actions is shown below.
name: API workflowon: [push, pull_request]jobs: build: runs-on: ubuntu-latest name: Test python API steps: - uses: actions/checkout@v4 - name: Install requirements run: pip install -r requirements.txt - name: Run tests and collect coverage run: pytest --cov . - name: Upload coverage reports to Codecov run: | # Replace `linux` below with the appropriate OS # Options are `alpine`, `linux`, `macos`, `windows` curl -Os https://cli.codecov.io/latest/linux/codecov chmod +x codecov ./codecov --verbose upload-process --fail-on-error -t ${{ secrets.CODECOV_TOKEN }} -n 'service'-${{ github.run_id }} -F service -f coverage-service.xmlYou can check out some of ourexample repositories for more help on this step.
Step 5: Get coverage analysis from Codecov
After making the above edits, commit your changes and run your CI pipeline. You should see something similar in the build logs

In your pull request, you should see a singlestatus checks like

and apull request comment similar to

By default, Codecov will gate and report oncoverage changes on Git diffin the Pull request; with overall project coverage reporting available on the Codecov dashboard.
Step 6: View the dashboard on Codecov
After merging the above pull request, go back to Codecov and view the dashboard of your repository to see trends in coverage over time.
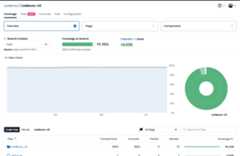
You can also view coverage for individual commits and pull requests, as well as coverage overlays to get a better understanding of what code hasn't been tested.
🚧
Not seeing coverage on the dashboard?
Go to the
Configuration->Generaltab in Codecov and double-check that the default branch is properly set.
Tips and Tricks
1. Want project coverage checks and project coverage report in your PR comments as well? Add the following to yourcodecov.yml
The snippet below adds project coverage checks to every PR.
coverage: status: project: #add everything under here, more options at https://docs.codecov.com/docs/commit-status default: # basic target: auto #default threshold: 0% base: autoThe snippet below adds project coverage reporting to a PR comment from Codecov
comment: #this is a top-level key layout: " diff, flags, files" behavior: default require_changes: false # if true: only post the comment if coverage changes require_base: false # [true :: must have a base report to post] require_head: true # [true :: must have a head report to post] hide_project_coverage: false # [true :: only show coverage on the git diff aka patch coverage]2.Not ready to start using blocking status checks? Set them as informational while you and your team get started with code coverage.
coverage: status: project: default: informational: true patch: default: informational: true# When modifying this file, please validate using# curl -X POST --data-binary @codecov.yml https://codecov.io/validate3.Check out ourrecipe list for common configuration questions.
4.Enforce relative or absolute targets and thresholds during your CI build using theCodecov YAML
5. UseComponents to split up a repository into separate projects by file path. This is great for monorepos or projects that include several teams or components.
6.Useflags to categorize coverage results in a single repository. This is great for monorepos or projects that include different types of test coverage (e.g., unit, end-to-end, integration).
7.Use Codecov with theChrome Browser Extension orFirefox Browser Extension (GitHub Only for now).
Updated about 1 year ago