

Integrate Spanner with IntelliJ
This page describes how to connect to a Spanner database inIntelliJ and other JetBrains products.
IntelliJ IDEA is an integrated development environment fordeveloping software in Java, Kotlin, Groovy, and other JVM-based languages.
This page assumes that you already have IntelliJ or another JetBrains IDEinstalled on your computer.
Connect to Spanner
Connecting IntelliJ to your Spanner database lets you executequeries and other SQL statements on your Spanner databasedirectly from IntelliJ. It also enables code completion and validation for tableand column names in your code.
You can connect to both GoogleSQL-dialect databases and PostgreSQL-dialect databases by following these steps:
In IntelliJ, click the menu option
File > New > Datasource > GoogleSpanner. TheGoogle Spannerdriver is under theOthersub-menu ifyou have not used this driver before.In the Data Sources window, enter your project, instance, and database ID.
Optional: Select a service account key file if you want to authenticateusing a service account. Select
No Authin the Credentials drop-down ifyou want to use your default credentials.
Click OK to create the data source. The Spanner database isadded to the Database window in IntelliJ.
In the Databases window, expand the data source that you just added. Thenclick the
...button next to the textNo schemas selected.Select the option
All schemasto instruct IntelliJ to introspect allschemas in the database. IntelliJ will then populate the database view withall tables and views in your database.
Connect to the Spanner Emulator
You can also connect IntelliJ to a database in theSpannerEmulator:
First start the emulator with one of the following commands:
gcloud emulators spanner startdocker run -p 9010:9010 -p 9020:9020gcr.io/cloud-spanner-emulator/emulator
Click the menu option
File > New > Datasource > Google Spanner. TheGoogle Spannerdriver is under theOthersub-menu if you have not usedthis driver before.Enter the project, instance, and database ID.NOTE: The project,instance and database don't need to exist in the emulator.
Select
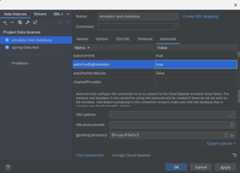
No Authin the Credentials drop-down.Click the
Advancedtab in the Data Sources window.Modify the value of
autoConfigEmulatortotrue.Click OK to accept all changes. The project, instance, and database will becreated on the emulator automatically if these don't exist already.
In the Databases window, expand the data source that you just added. Clickthe
...button next to the textNo schemas selected.Select the option
All schemasto instruct IntelliJ to introspect allschemas in the database. IntelliJ will then populate the database view withall tables and views in your database.
What's next
- For more documentation on how to add and work with data sources in IntelliJ,visitIntelliJ Data sources.
- Learn more about theSpanner Emulator.
Except as otherwise noted, the content of this page is licensed under theCreative Commons Attribution 4.0 License, and code samples are licensed under theApache 2.0 License. For details, see theGoogle Developers Site Policies. Java is a registered trademark of Oracle and/or its affiliates.
Last updated 2025-12-15 UTC.