
Reporting errors
This tutorial shows how to report and track uncaught exceptions in theGetting started with Python tutorial by using theGoogle Cloud console.
Error Reporting provides a centralized dashboard that showscounts of each unique error, stack traces, and a history of occurrences. You canalso set up an alert for when errors occur.
This page is part of a multipage tutorial. To start from the beginning and readthe setup instructions, go toPython Bookshelf app.
Configuring settings
This section uses code in the5-logging directory. Edit the filesand run commands in this directory.
- Open the
config.pyfile for editing and replace the following values: - Set the value of
[PROJECT_ID]to your project ID, which is visible in the Google Cloud console. - Set the value of
[DATA_BACKEND]to the same value you used during theUsing structured data tutorial. - If you are using Cloud SQL or MongoDB, set the values under the
Cloud SQLorMongosection to the same values you used during theUsing structured data step. - Set the value of
[CLOUD_STORAGE_BUCKET]to your Cloud Storage bucket name. Under the
OAuth2 configurationsection, set the values of[GOOGLE_OAUTH2_CLIENT_ID]and[GOOGLE_OAUTH2_CLIENT_SECRET]to the application client ID and secret that you created previously.- Save and close the
config.pyfile.
If you are using Cloud SQL:
- Open the
app.yamlfile for editing. - Set the value of
cloudsql-instanceto the same value used for[CLOUDSQL_CONNECTION_NAME]in theconfig.pyfile. Use the formatproject:region:cloudsql-instance. Uncomment this entire line. - Save and close the
app.yamlfile.
Installing dependencies
To create a virtual environment and install dependencies, use the followingcommands:
Linux/macOS
virtualenv-ppython3envsourceenv/bin/activatepipinstall-rrequirements.txtWindows
virtualenv-ppython3envenv\scripts\activatepipinstall-rrequirements.txtRunning the app on your local machine
Start a local web server:
pythonmain.pyIn your browser, enter the following address:
http://localhost:8080
PressControl+C to exit the worker and then the local web server.
Deploying the app to the App Engine flexible environment
Deploy the sample app:
gcloudappdeployIn your browser, enter the following URL:
https://PROJECT_ID.REGION_ID.r.appspot.comReplace the following:
PROJECT_ID: Your Google Cloud project IDREGION_ID: Acode that App Engine assignsto your app
If you update your app, you deploy the updated version by entering the samecommand that you used to deploy the app. The deployment creates a new versionof your app and promotes it to the default version. The earlier versions of yourapp remain, as do their associated virtual machine (VM) instances. All of theseapp versions and VM instances are billable resources. To reduce costs, delete thenon-default versions of your app.
To delete an app version:
- In the Google Cloud console, go to theVersions page for App Engine.
- Select the checkbox for the non-default app version that you want to delete.Note: The only way you can delete the default version of your App Engine app is by deleting your project. However, you canstop the default version in the Google Cloud console. This action shuts down all instances associated with the version. You can restart these instances later if needed.
In the App Engine standard environment, you can stop the default version only if your app has manual or basic scaling.
- To delete the app version, clickDelete.
For more information about cleaning up billable resources, see theCleaning up section in the final step of this tutorial.
Simulate an error
To see Error Reporting in action, intentionally introduce a mistake inyour code, and then look for the exception in the Google Cloud console'sError Reporting page.
In
bookshelf/crud.py, add an operation that accesses an undefined variableand generates aReferenceErrorin the index view.@crud.route("/")deflist():x[3]
Deploy the app.
gcloudappdeploy
Access the index page.
gcloudappbrowse
You can view the message
An internal error occurred.In the Google Cloud console, go to theError Reporting page:
You can also find this page by using the search bar.
You can see the error listed.
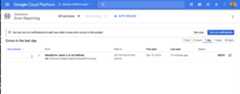
Click the error to see information about the error, such as when the errorwas last seen,the number of times the error occurred, a histogram ofoccurrence times, and the stack trace.
Understanding the code
To report uncaught exceptions, the code first uses the Flaskerrorhandlerdecorator, and then reports the exception to Error Reporting by usingtheCloud Client Libraries for Python.
@app.errorhandler(500)defserver_error(e):client=error_reporting.Client(app.config['PROJECT_ID'])client.report_exception(http_context=error_reporting.build_flask_context(request))return""" An internal error occurred. """,500The client automatically adds the traceback info and uses a helper function toextract the relevant request details from the Flask request, which populatesError Reporting with the relevant stack traces and HTTP contexts for anyuncaughtInternalServerErrorHTTP 500 exception in your app.
500 error handler only triggers when the app isn't inDEBUG mode.DEBUG is on locally by default, so stack trace information is rendered in thebrowser. You can change the local debug setting inmain.py.Clean up
To avoid incurring charges to your Google Cloud account for the resources used in this tutorial, either delete the project that contains the resources, or keep the project and delete the individual resources.
The easiest way to eliminate billing is to delete the project that you created for the tutorial.
To delete the project:
Except as otherwise noted, the content of this page is licensed under theCreative Commons Attribution 4.0 License, and code samples are licensed under theApache 2.0 License. For details, see theGoogle Developers Site Policies. Java is a registered trademark of Oracle and/or its affiliates.
Last updated 2025-12-17 UTC.