

Implement Datastream and Dataflow for analytics
Datastream supports streaming data from Oracle, MySQL and PostgreSQL databases directly intoBigQuery datasets. However, if you need more control over the stream processing logic, such as data transformation or manual setting of logical primary keys, you can integrate Datastream with Dataflow job templates.
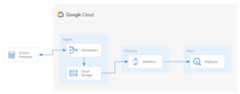
This tutorial shows you how Datastream integrates withDataflowby using Dataflow job templates to stream up-to-date materialized views in BigQuery for analytics.
For organizations with many isolated data sources, access to enterprise data across the organization, especially in a real-time manner, can be limited and slow. This restricts the organization's ability to introspect.
Datastream provides near real-time access to change data from various on-premises and cloud-based data sources. Datastream provides a setup experience where you don't have to do much configuration for streaming data; Datastream does this for you. Datastream also has a unified consumption API which democratizes your organization's access to the freshest available enterprise data to build integrated scenarios.
One such scenario is transferring data from a source database into a cloud-based storage service or messaging queue. After Datastream streams the data, the data is transformed into a form that other applications and services can read. In this tutorial, Dataflow is the web service that communicates with the storage service or messaging queue to capture and process data on Google Cloud.
You learn how to use Datastream to stream changes (data that's inserted, updated, or deleted) from a source MySQL database into a folder in aCloud Storage bucket. Then, you configure the Cloud Storage bucket to send notifications that Dataflow uses to learn about any new files containing the data changes that Datastream streams from the source database. A Dataflow job then processes the files and transfer the changes into BigQuery.
Objectives
In this tutorial, you:- Create a bucket in Cloud Storage. This is the destination bucket into which Datastream streams schemas, tables, and data from a source MySQL database.
- Enable Pub/Sub notifications for the Cloud Storage bucket. By doing this, you're configuring the bucket to send notifications that Dataflow uses to learn about any new files that are ready for processing. These files contain changes to data that Datastream streams from the source database into the bucket.
- Create datasets in BigQuery. BigQuery uses datasets to contain the data that it receives from Dataflow. This data represents the changes in the source database that Datastream streams into the Cloud Storage bucket.
- Create and manage connection profiles for a source database and a destination bucket in Cloud Storage. A stream in Datastream uses the information in the connection profiles to transfer data from the source database into the bucket.
- Create and start a stream. This stream transfers data, schemas, and tables from the source database into the bucket.
- Verify that Datastream transfers the data and tables associated with a schema of the source database into the bucket.
- Create a job in Dataflow. After Datastream streams data changes from the source database into the Cloud Storage bucket, notifications are sent to Dataflow about new files containing the changes. The Dataflow job processes the files and transfers the changes into BigQuery.
- Verify that Dataflow processes the files containing changes associated with this data, and transfers the changes into BigQuery. As a result, you have an end-to-end integration between Datastream and BigQuery.
- Clean up the resources that you created on Datastream, Cloud Storage, Pub/Sub, Dataflow, and BigQuery so they don't take up quota and you aren't billed for them in the future.
Costs
In this document, you use the following billable components of Google Cloud:
- Datastream
- Cloud Storage
- Pub/Sub
- Dataflow
- BigQuery
To generate a cost estimate based on your projected usage, use thepricing calculator.
Before you begin
- Sign in to your Google Cloud account. If you're new to Google Cloud, create an account to evaluate how our products perform in real-world scenarios. New customers also get $300 in free credits to run, test, and deploy workloads.
In the Google Cloud console, on the project selector page, select or create a Google Cloud project.
Roles required to select or create a project
- Select a project: Selecting a project doesn't require a specific IAM role—you can select any project that you've been granted a role on.
- Create a project: To create a project, you need the Project Creator role (
roles/resourcemanager.projectCreator), which contains theresourcemanager.projects.createpermission.Learn how to grant roles.
Verify that billing is enabled for your Google Cloud project.
- Enable the Datastream API.
- Make sure that you have the Datastream Admin role granted to your user account.
- Make sure that you have asource MySQL database that Datastream can access. Also, verify that you have data, tables, and schemas in the database.
- Configure your MySQL database to allow incoming connections from Datastream public IP addresses. For a list of all Datastream regions and their associated public IP addresses, seeIP allowlists and regions.
- Set up change data capture (CDC) for the source database. For more information, seeConfigure a source MySQL database.
Make sure that you meet allprerequisites to enable Pub/Sub notifications for Cloud Storage.
In this tutorial, you create a destination bucket in Cloud Storage and enable Pub/Sub notifications for the bucket. By doing this, Dataflow can receive notifications about new files that Datastream writes to the bucket. These files contain changes to data that Datastream streams from the source database into the bucket.
Requirements
Datastream offers a variety ofsource options,destination options, andnetworking connectivity methods.
For this tutorial, we assume that you're using a standalone MySQL database and a destination Cloud Storage service. For the source database, you should be able to configure your network to add an inbound firewall rule. The source database can be on-premises or in a cloud provider. For the Cloud Storage destination, no connectivity configuration is required.
Because we can't know the specifics of your environment, we can't provide detailed steps when it comes to your networking configuration.
For this tutorial, you selectIP allowlisting as the network connectivity method. IP allowlisting is a security feature often used for limiting and controlling access to the data in your source database to trusted users. You can use IP allowlists to create lists of trusted IP addresses or IP ranges from which your users and other Google Cloud services such as Datastream can access this data. To use IP allowlists, you must open the source database or firewall to incoming connections from Datastream.
Create a bucket in Cloud Storage
Create a destination bucket in Cloud Storage into which Datastream streams schemas, tables, and data from a source MySQL database.
In the Google Cloud console, go to theBrowser page for Cloud Storage.
ClickCreate bucket. TheCreate a bucket page appears.
In the text field of theName your bucket region, enter a unique name foryour bucket, and then clickContinue.
Accept the default settings for each remaining region of the page. At the endeach region, clickContinue.
ClickCreate.
Enable Pub/Sub notifications for the Cloud Storage bucket
In this section, you enable Pub/Sub notifications for the Cloud Storage bucket that you created. By doing this, you're configuring the bucket to notify Dataflow of any new files that Datastream writes to the bucket. These files contain changes to data that Datastream streams from a source MySQL database into the bucket.
Before enabling notifications for your bucket, make sure that you meet allprerequisites.Access the Cloud Storage bucket that you created. TheBucket details page appears.
ClickActivate Cloud Shell.
At the prompt, enter the following command:
bucket-name is a placeholder for the name of your Cloud Storage bucket.gcloud storage buckets notifications create gs://bucket-name --topic=my_integration_notifs --payload-format=json --object-prefix=integration/tutorial/By entering this command, you're creating themy_integration_notifs topic in Pub/Sub. You're also configuring the Pub/Sub notifications to only listen to the Datastream output path which you define in theCreate a destination connection profile for Cloud Storage step.Later in this procedure, you configure this topic in Pub/Sub to have notifications sent to Dataflow about changes to data that Datastream streams into your Cloud Storage bucket.
The Pub/Sub topic captures any changes to this data. Any subscribers to this topic (such as Dataflow) receive this information.
Optional: If anAuthorize Cloud Shell window appears, then clickAuthorize.
Verify that you see the following lines of code:
Created Cloud Pub/Sub topic projects/project-name/topics/my_integration_notifsCreated notification config projects/_/buckets/bucket-name/notificationConfigs/1
In the Google Cloud console, go to theTopics page for Pub/Sub.
Click themy_integration_notifs topic that you created.
On themy_integration_notifs page, go to the bottom of the page. Verify that theSubscriptions tab is active and aNo subscriptions to display message appears.
You're going to create a subscription for themy_integration_notifs topic. Apps that subscribe to this subscription, such as Dataflow, can obtain the information in the topic. This information is associated with changes to data in the source database that Datastream streams into your Cloud Storage bucket.ClickCreate subscription.
In the menu that appears, selectCreate subscription.
In theAdd subscription to topic page:
- In theSubscription ID field, enter
my_integration_notifs_sub. - Set theAcknowledgement deadline value to
120seconds. This allows Dataflow sufficient time to acknowledge the files it has processed, and helps improve the overall performance of the Dataflow job. For more information about Pub/Sub subscription properties, seeSubscription properties. - Leave all other default values on the page.
- ClickCreate.
- In theSubscription ID field, enter
Later in this tutorial, youcreate a Dataflow job. As part of creating this job, you assign Dataflow to be a subscriber to themy_integration_notifs_sub subscription. By doing this, Dataflow can receive notifications about new files that Datastream writes to Cloud Storage, process the files, and transfer the data changes into BigQuery.
Create datasets in BigQuery
In this section, you create datasets in BigQuery. BigQuery uses datasets to contain the data that it receives from Dataflow. This data represents the changes in the source MySQL database that Datastream streams into your Cloud Storage bucket.
Go to theSQL workspace page for BigQuery in the Google Cloud console.
In theExplorer pane, next to your Google Cloud project name, clickView actions.
In the menu that appears, selectCreate dataset.
In theCreate dataset window:
- In theDataset ID field, enter an ID for the dataset. For this tutorial, enter
My_integration_dataset_login the field. - Leave all other default values in the window.
- ClickCreate dataset.
- In theDataset ID field, enter an ID for the dataset. For this tutorial, enter
In theExplorer pane, next to your Google Cloud project name, clickExpand node, and then verify that you see the dataset that you created.
Use the steps in this procedure to create a second dataset:My_integration_dataset_final.
The changes that are staged in theMy_integration_dataset_log dataset are merged into theMy_integration_dataset_final dataset to create a one-to-one replica of the tables in the source database.Next to each dataset, expandExpand node.
Verify that each dataset is empty.
After Datastream streams data changes from the source database into your Cloud Storage bucket, a Dataflow job processes the files containing the changes and transfers the changes into the BigQuery datasets.
Create connection profiles in Datastream
In this section, you create connection profiles in Datastream for a source database and a destination. As part of creating the connection profiles, you selectMySQL as the profile type for your source connection profile andCloud Storage as the profile type for your destination connection profile.
Datastream uses the information defined in the connection profiles to connect to both the source and the destination so that it can stream data from the source database into your destination bucket in Cloud Storage.
Create a source connection profile for your MySQL database
In the Google Cloud console, go to theConnection profiles page for Datastream.
ClickCreate profile.
To create a source connection profile for your MySQL database, in theCreate a connection profile page, click theMySQL profile type.
In theDefine connection settings section of theCreate MySQL profile page, supply the following information:
- In theConnection profile name field, enter
My Source Connection Profile. - Keep the autogeneratedConnection profile ID.
Select theRegion where you want to store the connection profile.
Connection profiles, like all resources, are saved in a region, and a stream can only use connection profiles that are stored in the same region as the stream. Region selection doesn't impact whether Datastream can connect to the source or the destination, but can impact availability if the region experiences downtime.EnterConnection details:
- In theHostname or IP field, enter a hostname or public IP address that Datastream can use to connect to the source database. You're providing a public IP address because you useIP allowlisting as the network connectivity method for this tutorial.
- In thePort field, enter the port number that's reserved for the source database. For a MySQL database, the default port is typically
3306. - Enter aUsername andPassword to authenticate to your source database.
- In theConnection profile name field, enter
In theDefine connection settings section, clickContinue. TheSecure your connection to your source section of theCreate MySQL profile page is active.
From theEncryption type menu, selectNone. For more information about this menu, seeCreate a connection profile for MySQL database.
In theSecure your connection to your source section, clickContinue. TheDefine connectivity method section of theCreate MySQL profile page is active.
In theConnectivity method drop-down, choose the networking method that you'd like to use to establish connectivity between Datastream and the source database. For this tutorial, selectIP allowlisting as the connectivity method.
Configure your source database to allow incoming connections from the Datastream public IP addresses that appear.
In theDefine connectivity method section, clickContinue. TheTest connection profile section of theCreate MySQL profile page is active.
ClickRun test to verify that the source database and Datastream can communicate with each other.
Verify that you see theTest passed status.If the test fails, you can address the problem in the appropriate part of the flow, and then return to re-test. Refer to theDiagnose issues page for troubleshooting steps.
ClickCreate.
Create a destination connection profile for Cloud Storage
In the Google Cloud console, go to theConnection profiles page for Datastream.
ClickCreate profile.
To create a destination connection profile for Cloud Storage, in theCreate a connection profile page, click theCloud Storage profile type.
In theCreate Cloud Storage profile page, supply the following information:
- In theConnection profile name field, enter
My Destination Connection Profile. - Keep the autogeneratedConnection profile ID.
- Select theRegion where you want to store the connection profile.
In theConnection details pane, clickBrowse to select the Cloud Storage bucket that youcreated earlier in this tutorial. This is the bucket into which Datastream transfers data from the source database. After making your selection, clickSelect.
Your bucket appears in theBucket name field of theConnection details pane.
In theConnection profile path prefix field, provide a prefix for the path that you want to append to the bucket name when Datastream streams data to the destination. Make sure that Datastream writes data to a path inside the bucket, not to the bucket root folder. For this tutorial, use the path that you defined when you configured your Pub/Sub notification. Enter
/integration/tutorialin the field.
- In theConnection profile name field, enter
ClickCreate.
After creating a source connection profile for your MySQL database and a destination connection profile for Cloud Storage, you can use them to create a stream.
Create a stream in Datastream
In this section, you create a stream. This stream uses the information in the connection profiles to transfer data from a source MySQL database into a destination bucket in Cloud Storage.
Datastream comes equipped with a setup assistant to help you create a stream. This assistant consists of six panels: Get started, Define & test source, Configure source, Define destination, Configure destination, and Review & create. To populate each panel, complete the instructions in the following sections.
Define settings for the stream
In the Google Cloud console, go to theStreams page for Datastream.
ClickCreate stream.
Supply the following information in theDefine stream details panel of theCreate stream page:
- In theStream name field, enter
My Stream. - Keep the autogeneratedStream ID.
- From theRegion menu, select the region where you created your source and destination connection profiles.
- From theSource type menu, select theMySQL profile type.
- From theDestination type menu, select theCloud Storage profile type.
- In theStream name field, enter
Review the required prerequisites that are generated automatically to reflect how your environment must be prepared for a stream. These prerequisites can include how to configure the source database and how to connect Datastream to the destination bucket in Cloud Storage.
For more information about these prerequisites, seeConfigure a source MySQL database.ClickContinue. TheDefine MySQL connection profile panel of theCreate stream page appears.
Specify information about the source connection profile
In this section, you select the connection profile that you created for your source database (the source connection profile). For this tutorial, this isMy Source Connection Profile.
From theSource connection profile menu, select yoursource connection profile for MySQL database.
ClickRun test to verify that the source database and Datastream can communicate with each other.
If the test fails, then the issue associated with the connection profile appears. Refer to theDiagnose issues page for troubleshooting steps. Make the necessary changes to correct the issue, and then retest.
ClickContinue. TheConfigure stream source panel of theCreate stream page appears.
Configure information about the source database for the stream
In this section, you configure information about the source database for the stream by specifying the tables and schemas in the source database that Datastream:
- Can transfer into the destination.
- Is restricted from transferring into the destination.
You also determine whether Datastream backfills historical data, as well as stream ongoing changes into the destination, or stream only changes to the data.
Use theObjects to include menu to specify the tables and schemas in your source database that Datastream can transfer into a folder in the destination bucket in Cloud Storage. The menu only loads if your database has up to 5,000 objects.
For this tutorial, you want Datastream to transfer all tables and schemas. Therefore, selectAll tables from all schemas from the menu.
Verify that theSelect objects to exclude panel is set toNone. You don't want to restrict Datastream from transferring any tables and schemas in your source database into Cloud Storage.
Verify that theChoose backfill mode for historical data panel is set toAutomatic. Datastream streams all existing data, in addition to changes to the data, from the source into the destination.
ClickContinue. TheDefine Cloud Storage connection profile panel of theCreate stream page appears.
Select a destination connection profile
In this section, you select the connection profile that you created for Cloud Storage (the destination connection profile). For this tutorial, this isMy Destination Connection Profile.
From theDestination connection profile menu, select yourdestination connection profile for Cloud Storage.
ClickContinue. TheConfigure stream destination panel of theCreate stream page appears.
Configure information about the destination for the stream
In this section you configure information about the destination bucket for the stream. This information includes:
- The output format of files written to Cloud Storage.
- The folder of the destination bucket into which Datastream transfers schemas, tables, and data from the source database.
In theOutput format field, select the format of files written to Cloud Storage. Datastream supports two output formats: Avro and JSON. For this tutorial,Avro is the file format.
You don't have to populate theStream path prefix field. In this field, you can provide a prefix for the path that's appended to your bucket name when Datastream transfers data to the destination. This is the path of your Cloud Storage bucket into which Datastream transfers schemas, tables, and data from a source MySQL database.
You already provided the path of/integration/tutorial when youcreated the destination connection profile for Cloud Storage.
ClickContinue. TheReview stream details and create panel of theCreate stream page appears.
Create the stream
Verify details about the stream as well as the source and destination connection profiles that the stream uses to transfer data from a source MySQL database to a destination bucket in Cloud Storage.
To validate the stream, clickRun validation. By validating a stream, Datastream checks that the source is configured properly, validates that the stream can connect to both the source and the destination, and verifies the end-to-end configuration of the stream.
If a validation check passes, then a check mark icon appears.
If a validation check doesn't pass, then an exclamation point icon and aSee error details button appear. Click the button, and a dialog appears, explaining why the check didn't pass and information about what to do to rectify the problem. After making the appropriate corrections, clickRevalidate.
For more information about troubleshooting validation checks that don't pass, seeDiagnose issues.
After all validation checks pass, clickCreate.
In theCreate stream? dialog, clickCreate.
Start the stream
For this tutorial, you create and start a stream separately in case the stream creation process incurs an increased load on your source database. To put off that load, you create the stream without starting it, and then start the stream when your database can handle the load.
By starting the stream, Datastream can transfer data, schemas, and tables from the source database to the destination.
In the Google Cloud console, go to theStreams page for Datastream.
Select the checkbox next to the stream that you want to start. For this tutorial, this isMy Stream.
ClickStart.
In the dialog, clickStart. The status of the stream changes from
It takes about 30 seconds for the stream to start running. Background resources need to start so that the stream can start.Not startedtoStartingtoRunning.
After starting a stream, you can verify that Datastream transferred data from the source database to the destination.
Verify the stream
In this section, you confirm that Datastream transfers the data from all tables of a source MySQL database into the/integration/tutorial folder of your Cloud Storage destination bucket.
In the Google Cloud console, go to theStreams page for Datastream.
Click the stream that you created. For this tutorial, this isMy Stream.
In theStream details page, click thebucket-name/integration/tutorial link, wherebucket-name is the name that you gave your Cloud Storage bucket. This link appears after theDestination write path field. TheBucket details page of Cloud Storage opens in a separate tab.
The link is comprised of the name of your bucket and the folder of your bucket into which Datastream transfers schemas, tables, and data from the source database. You specified this folder to be/integration/tutorial when youcreated the destination connection profile for Cloud Storage.Verify that you see folders that represent tables of the source database.
Click one of the table folders and then click each subfolder until you see data that's associated with the table.
The first folder is
[schema]_[table], followed by folders that represent the year, month, day, hour, and minute that Datastream transferred data from the source database into a destination bucket in Cloud Storage.A folder is created every minute (when there's new data to write).
A new file is created when the file size reaches 250 MB, or whenever a schema changes. If tables are partitioned, then files are created for each partition.
Create a Dataflow job
In this section, you create a job in Dataflow. After Datastream streams data changes from a source MySQL database into your Cloud Storage bucket, Pub/Sub sends notifications to Dataflow about new files containing the changes. The Dataflow job processes the files and transfers the changes into BigQuery.
In the Google Cloud console, go to theJobs page for Dataflow.
ClickCreate job from template.
In theJob name field of theCreate job from template page, enter a name for the Dataflow job that you're creating. For this tutorial, enter
my-dataflow-integration-jobin the field.From theRegional endpoint menu, select the region where you want to store the job. This is the same region that you selected for thesource connection profile,destination connection profile, andstream that you created.
From theDataflow template menu, select the template that you're using to create the job. For this tutorial, selectDatastream to BigQuery.
After making this selection, additional fields related to this template appear.
The Datastream to BigQuery template is a streaming pipeline that reads Datastream data and replicates it into BigQuery. The template reads data from Cloud Storage using Pub/Sub notifications and replicates it into a time-partitioned BigQuery staging table. Following replication, the template executes a
Mergein BigQuery to upsert all change data capture (CDC) changes into a replica of the source table.To minimize the cost associated with frequent
Mergeoperations, we suggest starting with an initial frequency of once every 6-12 hours. After all backfills have completed and data is replicating smoothly, reduce this value to your selected frequency.For more information about the Datastream to BigQuery template, seeDatastream to BigQuery (Stream).
In theFile location for Datastream file output in Cloud Storage. field, enter the name of your Cloud Storage bucket using the following format:
gs://bucket-name.In thePub/Sub subscription being used in a Cloud Storage notification policy. field, enter the path that contains the name of your Pub/Sub subscription. For this tutorial, enter
project-name is a placeholder for the name of your Google Cloud project. Also, you created themy_integration_notifs_sub subscription in theEnabling Pub/Sub notifications for the Cloud Storage bucket section of this tutorial.projects/project-name/subscriptions/my_integration_notifs_sub.In theDatastream output file format (avro/json). field, enter
avrobecause, for this tutorial, Avro is the file format of files that Datastream writes to Cloud Storage.In theName or template for the dataset to contain staging tables. field, enter
My_integration_dataset_logbecause Dataflow uses this dataset to stage the data changes that it receives from Datastream.In theTemplate for the dataset to contain replica tables. field, enter
You created theMy_integration_dataset_log andMy_integration_dataset_final datasets in theCreate datasets in BigQuery section of this tutorial.My_integration_dataset_finalbecause this is the dataset where the changes that are staged in theMy_integration_dataset_log dataset merge to create a one-to-one replica of the tables in the source database.In theDead letter queue directory. field, enter the path that contains the name of your Cloud Storage bucket and a folder for a dead letter queue. Make sure that you don't use a path in the root folder, and that the path is different than the one to which Datastream writes data. Any data changes that Dataflow fails to transfer into BigQuery are stored in the queue. You can fix the content in the queue so that Dataflow can reprocess it.
For this tutorial, enter
gs://bucket-name/dlqin theDead letter queue directory. field (wherebucket-name is the name of your bucket anddlq is the folder for the dead letter queue).ClickRun job.
Verify the integration
In theVerify the stream section of this tutorial, you confirmed that Datastream transferred the data from all tables of a source MySQL database into the/integration/tutorial folder of your Cloud Storage destination bucket.
In this section, you verify that Dataflow processes the files containing changes associated with this data, and transfers the changes into BigQuery. As a result, you have an end-to-end integration between Datastream and BigQuery.
In the Google Cloud console, go to theSQL workspace page for BigQuery.
In theExplorer pane, expand the node next to the name of your Google Cloud project.
Expand the nodes next to theMy_integration_dataset_log andMy_integration_dataset_final datasets.
Verify that each dataset now contains data. This confirms that Dataflow processed the files containing changes associated with the data that Datastream streamed into Cloud Storage, and transferred these changes into BigQuery.
Clean up
To avoid incurring charges to your Google Cloud account for the resources used in this tutorial, use the Google Cloud console to do the following:
- Delete your project, Datastream stream, and Datastream connection profiles.
- Stop the Dataflow job.
- Delete the BigQuery datasets, Pub/Sub topic and subscription, and Cloud Storage bucket.
By cleaning up the resources that you created on Datastream, Dataflow, BigQuery, Pub/Sub, and Cloud Storage, you prevent the resources from taking up quota and you aren't billed for them in the future.
Delete your project
The easiest way to eliminate billing is to delete the project that you created for this tutorial.
Deleting a project has the following effects:
- Everything in the project is deleted. If you used an existing project for this tutorial, then when you delete it, you also delete any other work you've done in the project.
- Custom project IDs are lost. When you created this project, you might have created a custom project ID that you want to use in the future. To preserve the URLs that use the project ID, such as the
appspot.comURL, delete selected resources inside the project instead of deleting the whole project.
If you plan to explore multiple tutorials and quickstarts, then reusing projects can help you avoid exceeding project quota limits.
In the Google Cloud console, go to theManage resources page.
In the project list, select the project that you want to delete, and then clickDelete.
To delete the project, in the dialog, type the project ID, and then clickShut down.
Delete the stream
In the Google Cloud console, go to theStreams page for Datastream.
Click the stream that you want to delete. For this tutorial, this isMy Stream.
ClickPause.
In the dialog, clickPause.
In theStream status pane of theStream details page, verify that the status of the stream is
You pause the stream before deleting it to make sure that all in-flight data transfers from the source database to the destination.Paused.ClickDelete.
In the dialog, in the text field, enter
Delete, and then clickDelete.
Delete the connection profiles
In the Google Cloud console, go to theConnection profiles page for Datastream.
Select the checkbox for each connection profile that you want to delete:My Source Connection Profile andMy Destination Connection Profile.
ClickDelete.
In the dialog, clickDelete.
Stop the Dataflow job
You can't delete a job in Dataflow. However, you can stop a job so that the job no longer processes files containing data changes that stream into the Cloud Storage bucket or transfers the data changes into BigQuery.In the Google Cloud console, go to theJobs page for Dataflow.
Click the job that you want to stop. For this tutorial, this ismy-dataflow-integration-job.
ClickStop.
In theStop job dialog, select theDrain option, and then clickStop job.
Dataflow finishes processing any remaining buffered data so that all in-flight" data transfers into BigQuery before the job stops.
Delete the BigQuery datasets
In the Google Cloud console, go to theSQL workspace page for BigQuery.
In theExplorer pane, expand the node next to your Google Cloud project name.
Click theView actions button to the right of one of the datasets that you created inCreate datasets in BigQuery. This button looks like a vertical ellipsis.
For this tutorial, click theView actions button to the right ofMy_integration_dataset_log.
SelectDelete from the drop-down menu that appears.
In theDelete dataset? dialog, enter
deletein the text field, and then clickDelete.Repeat the steps in this procedure to delete the second dataset that you created:My_integration_dataset_final.
Delete the Pub/Sub subscription and topic
In the Google Cloud console, go to theSubscriptions page for Pub/Sub.
Click the checkbox next to the subscription that you want to delete. For this tutorial, click the checkbox next to themy_integration_notifs_sub subscription.
ClickDelete.
In theDelete subscription dialog, clickDelete.
In the Google Cloud console, go to theTopics page for Pub/Sub.
Click the checkbox next to themy_integration_notifs topic.
ClickDelete.
In theDelete topic dialog, enter
deletein the text field, and then clickDelete.
Delete your Cloud Storage bucket
In the Google Cloud console, go to theBrowser page for Cloud Storage.
Select the checkbox next to your bucket.
ClickDelete.
In the dialog, enter
Deletein the text field, and then clickDelete.
What's next
- Learn more aboutDatastream.
- Use the legacy streaming APIto perform advanced capabilities with streaming data into BigQuery.
- Try out other Google Cloud features for yourself. Have a look at ourtutorials.
Except as otherwise noted, the content of this page is licensed under theCreative Commons Attribution 4.0 License, and code samples are licensed under theApache 2.0 License. For details, see theGoogle Developers Site Policies. Java is a registered trademark of Oracle and/or its affiliates.
Last updated 2025-12-15 UTC.