

Use Sensitive Data Protection with Cloud Data Fusion
This guide explains how to useSensitive Data Protection with Cloud Data Fusion.
Cloud Data Fusion provides a Sensitive Data Protectionpluginthat provides three transforms that can filter, redact, or decrypt your sensitive data:
The PII Filter transform lets youfilter sensitive records from aninput stream of data.
The Redact transform lets youtransform sensitive data, such asmasking the data or encrypting it.
The Decrypt transform lets youdecrypt sensitive data that was previouslyencrypted using the Redact transform,
Costs
In this document, you use the following billable components of Google Cloud:
To generate a cost estimate based on your projected usage, use thepricing calculator.
Before you begin
In the Google Cloud console, go to the project selector page and select orcreate a project.
Enable the Cloud Data Fusion API for your project.
Enable the DLP API (part of Sensitive Data Protection) for your project.
Create a Cloud Data Fusion instance.
Note: The Sensitive Data Protection plugin is available for instances usingCloud Data Fusion version 6.1.1 or higher.
Grant Sensitive Data Protection permissions
In the Google Cloud console, go to the IAM page.
In the permissions table, select one of the following service accountsin thePrincipal column:
For permission to resources at runtime, select the service account thatyour Dataproc cluster uses. The default is the Compute Engineservice account, which is not recommended for security reasons
For permission to resources when using Wrangler or Preview inCloud Data Fusion (not at runtime), instead select the serviceaccount that matches the format:
service-project-number@gcp-sa-datafusion.iam.gserviceaccount.com.

Click the pencil icon to the right of the service account.
ClickAdd Another Role.
Click the dropdown that appears.
Use the search bar to search and then selectDLP Administrator.

ClickSave. Check thatDLP Administrator appears in theRole column.

Deploy the Sensitive Data Protection plugin
Go to your instance:
In the Google Cloud console, go to the Cloud Data Fusion page.
To open the instance in the Cloud Data Fusion Studio,clickInstances, and then clickView instance.
In the Cloud Data Fusion web UI, clickHub in the upper right.
Click theData Loss Prevention plugin.
ClickDeploy.
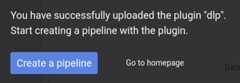
ClickFinish.
ClickCreate a pipeline.
Use the PII Filter transform
This transform separates sensitive records from non-sensitive records. A recordis considered sensitive if it matches criteria that you define in aSensitive Data Protection template. For example, when you create your template, you candefine sensitive data to be credit card information or Social Security numbers.
Open your pipeline in Cloud Data Fusion and clickStudio>Transform.

Click thePII Filter transform.
Hold the pointer over thePII Filter node and clickProperties.
UnderFilter on, choose whether you want to filter records or fields.
In compliance withSensitive Data Protection limits,if a record exceeds 0.5 MB, your Cloud Data Fusion pipeline will fail.To avoid such a failure, filter by field instead of record.
UnderTemplate ID, enter the template ID of the Sensitive Data Protectiontemplate you created.
UnderError Handling, define how to proceed when your pipeline encounterssensitive data. Choose one of the following error handling options:
- Stop pipeline: Stops the pipeline as soon as an error is encountered.
- Skip record: Skips the record that caused the error. The pipelinecontinues to run, and no error is reported.
- Send to error: Sends errors to the error port. The pipeline continues torun.
Click theX button.
Use the Redact transform
This transform identifies sensitive records in the input stream and appliestransformations that you define to those records. A record is consideredsensitive if it matches predefined Sensitive Data Protection filters you choseor a custom template you defined.
In theStudio page of the Cloud Data Fusion web UI, click to expandtheTransform menu.
Click theRedact transform.
Hold the pointer over theRedact node and clickProperties.
Choose if you want to apply transformations to predefined filters or ifyou'd like to create your own.
You cannot combine these two options. You can either use predefined filters OR create a custom template.
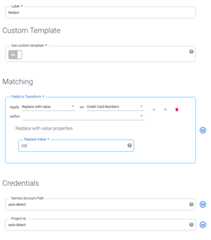
Predefined filters
To apply transformations to predefined filters, leave theCustomTemplate set toNo, and underMatching, define a rule:
FollowingApply, click the dropdown and choose a transformation. Learn more about the available transformations in theDescription section of the plugin'sDocumentation tab.
Followingon, click the dropdown and choose a category, which is a set of predefined Sensitive Data Protection filters grouped together by type. For the full list of provided categories and what filters they contain, see theDLP Filter Mapping section in the plugin'sDocumentation tab.
To set multiple matching rules, click the+ button.
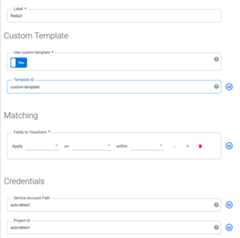
Custom template
To apply transformations according to a custom template, set theCustomTemplate toYes.
Back in the Cloud Data Fusion web UI, in the Redact properties menu, underTemplate ID, enter the template ID of the custom template you created.
Click theX button.
Use the Decrypt transform
This transform identifies records that were encrypted using Sensitive Data Protectionin the input stream and applies decryption. Only records that were encryptedusing a reversible algorithm such asFormat Preserving Encryption orDeterministic Encryption can be decrypted.
In theStudio page of the Cloud Data Fusion web UI, click to expandtheTransform menu.
Click theDecrypt transform.
Hold the pointer over theDecrypt node and clickProperties.
Enter the same values that were used to configure theRedact plugin thatencrypted this data. The properties for this plugin are identical to theRedact plugin.

Click theX button.
What's next
- Follow atutorial to redact sensitive user data.
- Read more aboutSensitive Data Protection.
Except as otherwise noted, the content of this page is licensed under theCreative Commons Attribution 4.0 License, and code samples are licensed under theApache 2.0 License. For details, see theGoogle Developers Site Policies. Java is a registered trademark of Oracle and/or its affiliates.
Last updated 2025-12-15 UTC.