
Manage Cloud APIs and Cloud Client Libraries in Cloud Code for VS Code
To access Google Cloud products and services programmatically, you useCloud APIs. These APIs expose a simple JSON RESTinterface. The recommended way to access the Cloud APIs is to use theCloud Client Libraries.
Cloud Code makes it easy to add the Cloud Client Librariesfor the Cloud APIs and language you're using to your project. In the same view,you can search for samples for each API and easily incorporate samples into yourapplication.
Browsing Cloud APIs
To explore all available Google Cloud APIs:
Click
 Cloud Code and then expand theCloud APIssection.
The Cloud APIs view groups Cloud APIs by category.
To view details of an API, click the API name. Details such as the servicename, status, installation instructions for client libraries, documentation,and code samples are displayed.
Enabling Cloud APIs
To enable Cloud APIs for a project using the API details page, follow thesesteps:
- On the Cloud API details page, choose the project to enable the Cloud API for.
- ClickEnable API. After the API is enabled, a message is displayed to confirm the change.
Adding client libraries to your project
In addition to exploring and enabling Cloud APIs using Cloud Code,you can add a language-specific client library to your project.
To install a client library, follow the instructions on the API details pagefor your language.
Note: If you're using thepip package management system and your OS splitspip andpip3, edit the command to replacepip withpip3 before runningthe command. This applies to OSs including Debian and Chromebook.Using API samples
You can search for and use code samples for each API in the API browser.
Click
Cloud Code and then expand theCloud APIssection.To open the detail view, click the name of an API.
To view code samples for the API, clickCode Samples.
To filter the list of samples, type text to search for or choose aprogramming language from theLanguage list.
To view a sample, click the name of the sample. There are also options tocopy the sample to your clipboard or view the sample in GitHub.
Setting up authentication
After you've enabled the required APIs and added the necessary clientlibraries, you need to configure your application for it to be successfullyauthenticated. Your configuration depends on your type of development andthe platform you're running on.
After you complete the authentication steps, your application can authenticateand is ready to be deployed.
Local development
Local machine
If you logged into Google Cloud in your IDE, Cloud Code sets your Application Default Credentials (ADC) and you can skip this step. If you logged into Google Cloud outside your IDE (for example, using the gcloud CLI), set up your ADC and let Google Cloud client libraries authenticate through ADC by running:
gcloudauthlogin--update-adc
minikube
If you logged into Google Cloud in your IDE, Cloud Code sets your Application Default Credentials (ADC) and you can skip this step. If you logged into Google Cloud outside your IDE (for example, using the gcloud CLI), set up your ADC and let Google Cloud client libraries authenticate through ADC by running:
gcloudauthlogin--update-adc
- Start minikube by running
minikube start --addons gcp-auth. This command mounts your ADC in your pods. For detailed information about minikube authentication with Google Cloud, see theminikube gcp-auth docs.
Other local K8s clusters
If you logged into Google Cloud in your IDE, Cloud Code sets your Application Default Credentials (ADC) and you can skip this step. If you logged into Google Cloud outside your IDE (for example, using the gcloud CLI), set up your ADC and let Google Cloud client libraries authenticate through ADC by running:
gcloudauthlogin--update-adc
- To make sure that the Google Cloud client libraries can find your credentials, mount your local
~/.config/gclouddirectory in your Kubernetes pods by editing the deployment manifests. - Set your Google Cloud Project ID as an environment variable named
GOOGLE_CLOUD_PROJECT.
Kubernetes pod configuration example:
apiVersion:v1kind:Podmetadata:name:my-applabels:name:my-appspec:containers:-name:my-appimage:gcr.io/google-containers/busyboxports:-containerPort:8080env:-name:GOOGLE_CLOUD_PROJECTvalue:my-project-idvolumeMounts:-mountPath:/root/.config/gcloudname:gcloud-volumevolumes:-name:gcloud-volumehostPath:path:/path/to/home/.config/gcloudCloud Run
If you logged into Google Cloud in your IDE, Cloud Code sets your Application Default Credentials (ADC) and you can skip this step. If you logged into Google Cloud outside your IDE (for example, using the gcloud CLI), set up your ADC and let Google Cloud client libraries authenticate through ADC by running:
gcloudauthlogin--update-adc
Local development with APIs that require a service account
Some APIs, such as the Cloud Translation API, require a service account withappropriate permissions to authenticate your requests. For more information, seeCreating and managing service accounts.For a quickstart that uses a service account, seeUse the Cloud Client Libraries in Cloud Code.
To open a terminal, clickTerminal>New Terminal.
Create a service account to authenticate your API requests:
gcloudiamservice-accountscreate\SERVICE_ACCOUNT_ID\--projectPROJECT_ID
Replace the following values:
SERVICE_ACCOUNT_ID: the service account IDPROJECT_ID: the project ID
To find these IDs, in Google Cloud, click theNavigation menu at thetop-left of the screen, hold your pointer overIAM & Admin and clickService Accounts.
TheEmail column shows the unique
SERVICE_ACCOUNT_IDandPROJECT_IDfor each of your service accounts in thefollowing format:SERVICE_ACCOUNT_ID@PROJECT_ID.iam.gserviceaccount.comFor example: A service account email address of
my-service-account@my-project.iam.gserviceaccount.comhas the followingvalues:SERVICE_ACCOUNT_ID:my-service-accountPROJECT_ID:my-project
Grant your service account the appropriate role. The following samplecommand grants the Cloud Translation API User role. To determine the role togrant, see the documentation for the Cloud API you're using.
gcloudprojects\add-iam-policy-binding\PROJECT_ID\--member='serviceAccount:SERVICE_ACCOUNT_ID@PROJECT_ID.iam.gserviceaccount.com'\--role='roles/cloudtranslate.user'
Create a service account key:
gcloudiamservice-accountskeys\createkey.json--iam-account\SERVICE_ACCOUNT_ID@PROJECT_ID.iam.gserviceaccount.com
Set the key as your default credentials:
export\GOOGLE_APPLICATION_CREDENTIALS=key.jsonOptional: To permit users toimpersonate the service account,run the
gcloud iam service-accounts add-iam-policy-bindingcommand to grant a user the Service Account User role(roles/iam.serviceAccountUser) on the service account:gcloudiamservice-accountsadd-iam-policy-binding\SERVICE_ACCOUNT_ID@PROJECT_ID.iam.gserviceaccount.com\--member="user:USER_EMAIL"\--role="roles/iam.serviceAccountUser"
Replace the following values:
USER_EMAIL: the email address for the user
Remote development
GKE
Depending on the scope of your project, you can choose how you authenticate Google Cloud services on GKE:
- (Development only)
- Note: GKE cluster service account and access scope settings are permanent; after your cluster is created, these settings can't be changed. Specify the settings as recommended below.
- Create a GKE cluster with the following settings:
- Make sure that you're using the service account GKE uses by default, the Compute Engine default service account, and thatAccess scopes is set atAllow full access to all Cloud APIs (both settings are accessible in theNode Pools >Security section). Since the Compute Engine service account is shared by all workloads deployed on your node, this method overprovisions permissions and should only be used for development.
- Make sure that Workload Identity isn't enabled on your cluster (in theCluster >Security section).
- Assign the necessary roles to your service account:
- If you're trying to access a secret, follow theSecret Manager-specific steps to set up the required roles on your service account.
- If you're using the Compute Engine default service account, the correct IAM roles might already be applied.
- For a list of IAM role types and predefined roles that you can grant to identities, see theUnderstanding roles guide. For steps to grant the roles, seeGranting, changing, and revoking access to resources.
- Create a GKE cluster with the following settings:
- (Recommended for production)
- Configure your GKE cluster and application with Workload Identity to authenticate Google Cloud services on GKE. This associates your Kubernetes service account with your Google service account.
- Configure your Kubernetes Deployment to reference the Kubernetes service account by setting the
.spec.serviceAccountNamefield in your Kubernetes Deployment YAML file. If you're working on an app created from a Cloud Code sample application, this file is located under the kubernetes-manifests folder. - If the Google Cloud service you're trying to access requires additional roles, grant them for the Google service account you're using to develop your app:
- If you're trying to access a secret, follow theseSecret Manager-specific steps to set up the required roles on your service account.
- For a list of IAM role types and predefined roles you can grant to identities, see theUnderstanding roles guide. For steps to grant the roles, seeGranting, changing, and revoking access to resources.
Cloud Run
- To create a new unique service account for deploying your Cloud Run application, navigate to the Service Accounts page and then select the project that your secret is stored in.
- ClickCreate service account.
- In theCreate service account dialog, enter a descriptive name for the service account.
- Change theService account ID to a unique, recognizable value and then clickCreate.
- If the Google Cloud service you're trying to access requires additional roles, grant the roles, clickContinue, and then clickDone.
- To add your service account to your deploy configuration:
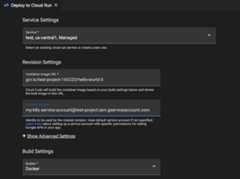
- Using the Cloud Code status bar, choose theCloud Run: Deploy command.
- In the Cloud Run Deployment UI, underRevision Settings, in theService Account field, specify your service account.

Cloud Run
Depending on the scope of your project, you can choose how you authenticate Google Cloud services on GKE:
- (Development only)
- Note: GKE cluster service account and access scope settings are permanent; after your cluster is created, these settings can't be changed. Specify the settings as recommended below.
- Create a GKE cluster with the following settings:
- Make sure that you're using the service account that GKE uses by default, the Compute Engine default service account, and thatAccess scopes is set atAllow full access to all Cloud APIs (both settings accessible in theNode Pools >Security section). Since the Compute Engine service account is shared by all workloads deployed on your node, this method overprovisions permissions and should only be used for development.
- Make sure that Workload Identity isn't enabled on your cluster (in theCluster >Security section).
- Assign the necessary roles to your service account:
- If you're trying to access a secret, follow theseSecret Manager-specific steps to set up the required roles on your service account.
- If you're using the Compute Engine default service account, the correct IAM roles might already be applied.
- For a list of IAM role types and predefined roles you can grant to identities, see theUnderstanding roles guide. For steps to grant the roles, seeGranting, changing, and revoking access to resources.
- Create a GKE cluster with the following settings:
- (Recommended for production)
- Configure your GKE cluster and application with Workload Identity to authenticate Google Cloud services on GKE. This associates your Kubernetes service account with your Google service account.
- To add your service account to your deploy configuration:
- Using the Cloud Code status bar, choose theCloud Run: Deploy command.
- In the Cloud Run Deployment UI, underRevision Settings, in theService Account field, specify your service account.
- If the Google Cloud service you're trying to access requires additional roles, grant them for the Google service account you're using to develop your app:
- If you're trying to access a secret, follow theseSecret Manager-specific steps to set up the required roles on your service account.
- For a list of IAM role types and predefined roles you can grant to identities, see theUnderstanding roles guide. For steps to grant the roles, seeGranting, changing, and revoking access to resources.
Remote development with Secret Manager permissions enabled
If you're developing remotely, using a service account for authentication,and your application usessecrets, youneed to complete a few more steps in addition to theremote development instructions. These steps assign your Google service accounttherole required to access a particular Secret Manager secret:
Click
Cloud Code and then expand theSecret Manager section.
Right-click the secret and selectEdit Permissions in Cloud console.This launches the Secret Manager configuration page for thatsecret in your web browser.

In Google Cloud console, clickPermissions and then clickAdd.
In theNew principals field, enter the name of your service account.
In theSelect a role field, choose theSecret Manager Secret Accessorrole.
ClickSave.
Your service account now has permission to access this particular secret.
Get Support
To send feedback, report issues onGitHub,or ask a question onStack Overflow.Except as otherwise noted, the content of this page is licensed under theCreative Commons Attribution 4.0 License, and code samples are licensed under theApache 2.0 License. For details, see theGoogle Developers Site Policies. Java is a registered trademark of Oracle and/or its affiliates.
Last updated 2025-12-15 UTC.