

Use Vertex AI Pipelines for propensity modeling on Google Cloud
This document describes an example of a pipeline implemented inGoogle Cloud that performs propensity modeling. It's intended for dataengineers, machine learning engineers, or marketing science teams that createand deploy machine learning models. The document assumes that you know machinelearning concepts and that you are familiar with Google Cloud,BigQuery, Vertex AI Pipelines, Python, and Jupyter notebooks. It alsoassumes that you have an understanding of Google Analytics 4 and ofthe raw export feature in BigQuery.
The pipeline that you work with uses Google Analytics sample data. Thepipeline builds several models by using BigQuery ML and XGBoost, and yourun the pipeline by using Vertex AI Pipelines. Thisdocument describes the processes of training the models, evaluating them,and deploying them. It also describes how you can automate the entire process.
The full pipeline code is in a Jupyter notebook in aGitHub repository.
What is propensity modeling?
Propensity modeling predicts actions that a consumer might take. Examples ofpropensity modeling include predicting which consumers are likely to buy aproduct, to sign up for a service, or even to churn and no longerbe an active customer for a brand.
The output of a propensity model is a score between 0 and 1 for each consumer,where this score represents how likely the consumer is to take that action. Oneof the key drivers pushing organizations toward propensity modeling is the needto do more with first-party data. For marketing use cases, the best propensitymodels include signals both from online and offline sources, such as siteanalytics and CRM data.
This demo uses GA4 sample data that's in BigQuery. For youruse case, you might want to consider additional offline signals.
How MLOps simplifies your ML pipelines
Most ML models aren't used in production. Model results generate insights, andfrequently after data science teams finish a model, an ML engineering orsoftware engineering team needs to wrap it in code for production using aframework such asFlask orFastAPI.This process often requires the model to be built in a new framework, whichmeans that the data must be retransformed. This work can take weeks or months,and many models therefore don't make it to production.
Machine learning operations (MLOps) has become important for getting value fromML projects, and MLOps and is now an evolving skill set for data scienceorganizations. To help organizations understand this value, Google Cloudhas published aPractitioners Guide to MLOps that provides an overview of MLOps.
By using MLOps principles and Google Cloud, you can push models to anendpoint using an automatic process that removes much of the complexity ofthe manual process. The tools and process described in this documentdiscuss an approach to owning your pipeline end to end, which helps youget your models into production. The practitioners guide document mentionedearlier provides a horizontal solution and an outline of what's possible usingMLOps and Google Cloud.
What is Vertex AI Pipelines?
Vertex AI Pipelines lets you run ML pipelines that were built using either Kubeflow Pipelines SDKor TensorFlow Extended (TFX).Without Vertex AI, running either of these open source frameworksat scale requires you to set up and maintain your own Kubernetes clusters.Vertex AI Pipelines addresses this challenge. Because it's a managedservice, it scales up or scales down as required, and it doesn't require ongoingmaintenance.
Each step in the Vertex AI Pipelines process consists of an independent container that can take input or produce output in the form of artifacts. For example, if a step in the process builds your dataset, the output is the dataset artifact. This dataset artifact can be used as the input to the next step. Because each component is a separate container, you need to provide information for each component of the pipeline, such as the name of the base image and a list of any dependencies.
The pipeline build process
The example described in this document uses a Jupyter notebook to create thepipeline components and to compile, run, and automate them. As noted earlier,the notebook is in a GitHub repository.
You can run the notebook code using aVertex AI Workbench user-managed notebooks instance,which handles authentication for you. Vertex AI Workbench letsyou work with notebooks to create machines, build notebooks, and connectto Git. (Vertex AI Workbench includes manymore features, but those aren't covered in this document.)
Vertex AI Workbench user-managed notebooks isdeprecated. On January 30, 2025, support for user-managed notebooks will end and the ability to create user-managed notebooks instances will be removed.
When the pipeline run finishes, a diagram similar to the following one isgenerated in Vertex AI Pipelines:
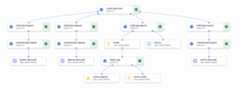
The preceding diagram is adirected acyclic graph (DAG). Building and reviewing the DAG is acentral step to understanding your data or ML pipeline. The keyattributes of DAGs are that components flow in a single direction (inthis case, from top to bottom) and that no cycle occurs—that is, a parentcomponent doesn't rely on its child component. Some components can occur inparallel, while others have dependencies and therefore occur in series.
The green checkbox in each component signifies that the code ran properly. Iferrors occurred, then you see a red exclamation point. You can click eachcomponent in the diagram to view more details of the job.
The DAG diagram is included in this section of the document to serve as a blueprintfor each component that's built by the pipeline. The following list providesa description of each component.
The complete pipeline performs the following steps, as shown in the DAG diagram:
create-input-view: This component creates a BigQueryview. The component copies SQL from a Cloud Storage bucket and fills inparameter values that you provide. This BigQuery view is theinput dataset that's used for all models later in the pipeline.build-bqml-logistic: The pipeline uses BigQuery ML tocreate a logistic regression model. When this component completes, a newmodel is viewable in the BigQuery console. You can use thismodel object to view model performance and later to build predictions.evaluate-bqml-logistic: The pipeline uses this component to create aprecision/recall curve (logistic_data_pathin the DAG diagram) for thelogistic regression. This artifact is stored in a Cloud Storagebucket.build-bqml-xgboost: This component creates an XGBoost model by usingBigQuery ML. When this component completes, you can view anew model object (system.Model) in the BigQuery console.You can use this object to view model performance and later to buildpredictions.evaluate-bqml-xgboost: This component creates a precision/recall curvenamedxgboost_data_pathfor the XGBoost model. This artifact is stored ina Cloud Storage bucket.build-xgb-xgboost: The pipeline creates an XGBoost model. Thiscomponent uses Python instead of BigQuery ML so that you cansee different approaches to creating the model. When this componentcompletes, it stores a model object and performance metrics in aCloud Storage bucket.deploy-xgb: This component deploys the XGBoost model. It creates anendpoint that allows either batch or online predictions. You can explorethe endpoint in theModels tab in the Vertex AI consolepage. The endpoint autoscales to match traffic.build-bqml-automl: The pipeline creates an AutoML modelby using BigQuery ML. When this component completes,a new model object is viewable in the BigQuery console.You can use this object to view model performance and later tobuild predictions.evaluate-bqml-automl: The pipeline creates a precision/recall curvefor the AutoML model. The artifact is stored in aCloud Storage bucket.
Notice that the process doesn't push the BigQuery ML models to anendpoint. That's because you can generate predictions directly from the modelobject that's in BigQuery. As you decide between usingBigQuery ML and using other libraries for your solution, considerhow predictions need to be generated. If a daily batch prediction satisfies yourneeds, then staying in the BigQuery environment can simplify yourworkflow. However, if you require real-time predictions, or if your scenarioneeds functionality that's in another library, then follow the steps in thisdocument to push your saved model to an endpoint.
Costs
In this document, you use the following billable components of Google Cloud:
To generate a cost estimate based on your projected usage, use thepricing calculator.
Before you begin
- Sign in to your Google Cloud account. If you're new to Google Cloud, create an account to evaluate how our products perform in real-world scenarios. New customers also get $300 in free credits to run, test, and deploy workloads.
In the Google Cloud console, on the project selector page, select or create a Google Cloud project.
Roles required to select or create a project
- Select a project: Selecting a project doesn't require a specific IAM role—you can select any project that you've been granted a role on.
- Create a project: To create a project, you need the Project Creator role (
roles/resourcemanager.projectCreator), which contains theresourcemanager.projects.createpermission.Learn how to grant roles.
Verify that billing is enabled for your Google Cloud project.
The Jupyter notebook for this scenario
The tasks for creating and building the pipeline are built into a Jupyternotebook that's in aGitHub repository.
To perform the tasks, you get the notebook and then run the code cells inthe notebook in order. The flow described in this document assumes you'rerunning the notebooks in Vertex AI Workbench.
Open the Vertex AI Workbench environment
You start by cloning the GitHub repository into aVertex AI Workbench environment.
- In the Google Cloud console, select the project where you want tocreate the notebook.
Go to the Vertex AI Workbench page.
On theUser-managed notebooks tab, clickNew Notebook.
In the list of notebook types, choose a Python 3 notebook.
In theNew notebook, dialog, clickAdvanced Options and thenunderMachine type, select the machine type that you want to use. Ifyou are unsure, then choosen1-standard-1 (1 cVPU, 3.75 GB RAM).
ClickCreate.
It takes a few moments for the notebook environment to be created.
When the notebook has been created, select the notebook, and then clickOpen Jupyterlab.
The JupyterLab environment opens in your browser.
To launch a terminal tab, selectFile> New> Launcher.
Click theTerminal icon in theLauncher tab.
In the terminal, clone the
mlops-on-gcpGitHub repository:gitclonehttps://github.com/GoogleCloudPlatform/cloud-for-marketing/
When the command finishes, you see the
cloud-for-marketingfolder in thefile browser.
Configure notebooks settings
Before you run the notebook, you must configure it. The notebook requires aCloud Storage bucket to store pipeline artifacts, so you start bycreating that bucket.
- Create a Cloud Storage bucket where the notebook can store pipeline artifacts. The name of the bucketmust be globally unique.
- In the
cloud-for-marketing/marketing-analytics/predicting/kfp_pipeline/folder,open thePropensity_Pipeline.ipynbnotebook. - In the notebook, set the value of the
PROJECT_IDvariable to the ID ofthe Google Cloud project where you want to run the pipeline. - Set the value of the
BUCKET_NAMEvariable to the name of the bucketthat you just created.
The remainder of this document describes code snippets that are important forunderstanding how the pipeline works. For the complete implementation, see theGitHub repository.
Build the BigQuery view
The first step in the pipeline generates the input data, which will be usedto build each model. This Vertex AI Pipelines component generates aBigQuery view. To simplify the process of creating the view, someSQL has already been generated and saved in a text file in GitHub.
The code for each component begins bydecorating (modifying a parent class orfunction through attributes) the Vertex AI Pipelines component class. The codethen defines thecreate_input_view function, which is a step in the pipeline.
The function requires several inputs. Some of these values are currentlyhardcoded into the code, like the start date and end date. When you automateyour pipeline, you can modify the code to use suitable values (for example,using theCURRENT_DATE function for a date), or you can update the component to take these values asparameters rather than keeping them hard-coded. You must also change the valueofga_data_ref to the name of your GA4 table, and set the value of theconversion variable to your conversion. (This example uses the public GA4sample data.)
The following listing shows the code for thecreate-input-view component.
@component(# this component builds a BigQuery view, which will be the underlying source for modelpackages_to_install=["google-cloud-bigquery","google-cloud-storage"],base_image="python:3.9",output_component_file="output_component/create_input_view.yaml",)defcreate_input_view(view_name:str,data_set_id:str,project_id:str,bucket_name:str,blob_path:str):fromgoogle.cloudimportbigqueryfromgoogle.cloudimportstorageclient=bigquery.Client(project=project_id)dataset=client.dataset(data_set_id)table_ref=dataset.table(view_name)ga_data_ref='bigquery-public-data.google_analytics_sample.ga_sessions_*'conversion="hits.page.pageTitle like '%Shopping Cart%'"start_date='20170101'end_date='20170131'defget_sql(bucket_name,blob_path):fromgoogle.cloudimportstoragestorage_client=storage.Client()bucket=storage_client.get_bucket(bucket_name)blob=bucket.get_blob(blob_path)content=blob.download_as_string()returncontentdefif_tbl_exists(client,table_ref):...else:content=get_sql()content=str(content,'utf-8')create_base_feature_set_query=content.format(start_date=start_date,end_date=end_date,ga_data_ref=ga_data_ref,conversion=conversion)shared_dataset_ref=client.dataset(data_set_id)base_feature_set_view_ref=shared_dataset_ref.table(view_name)base_feature_set_view=bigquery.Table(base_feature_set_view_ref)base_feature_set_view.view_query=create_base_feature_set_query.format(project_id)base_feature_set_view=client.create_table(base_feature_set_view)
Build the BigQuery ML model
After the view is created, you run the component namedbuild_bqml_logistic tobuild a BigQuery ML model. This block of the notebook is a corecomponent. Using the training view that you created in the first block, itbuilds a BigQuery ML model. In this example, the notebook useslogistic regression.
For information about model types and the hyperparameters available, see theBigQuery ML reference documentation.
The following listing shows the code for this component.
@component(# this component builds a logistic regression with BigQuery MLpackages_to_install=["google-cloud-bigquery"],base_image="python:3.9",output_component_file="output_component/create_bqml_model_logistic.yaml")defbuild_bqml_logistic(project_id:str,data_set_id:str,model_name:str,training_view:str):fromgoogle.cloudimportbigqueryclient=bigquery.Client(project=project_id)model_name=f"{project_id}.{data_set_id}.{model_name}"training_set=f"{project_id}.{data_set_id}.{training_view}"build_model_query_bqml_logistic=''' CREATE OR REPLACE MODEL `{model_name}` OPTIONS(model_type='logistic_reg' , INPUT_LABEL_COLS = ['label'] , L1_REG = 1 , DATA_SPLIT_METHOD = 'RANDOM' , DATA_SPLIT_EVAL_FRACTION = 0.20 ) AS SELECT * EXCEPT (fullVisitorId, label), CASE WHEN label is null then 0 ELSE label end as label FROM `{training_set}` '''.format(model_name=model_name,training_set=training_set)job_config=bigquery.QueryJobConfig()client.query(build_model_query_bqml_logistic,job_config=job_config)
Use XGBoost instead of BigQuery ML
The component illustrated in the previous section usesBigQuery ML. The next section of the notebooks shows you how touse XGBoost in Python directly instead of using BigQuery ML.
You run the component namedbuild_bqml_xgboost to build the component to run astandard XGBoost classification model with a grid search. The code then savesthe model as an artifact in the Cloud Storage bucket that you created.The function supports additional parameters (metrics andmodel) for outputartifacts; these parameters are required by Vertex AI Pipelines.
@component(# this component builds an xgboost classifier with xgboostpackages_to_install=["google-cloud-bigquery","xgboost","pandas","sklearn","joblib","pyarrow"],base_image="python:3.9",output_component_file="output_component/create_xgb_model_xgboost.yaml")defbuild_xgb_xgboost(project_id:str,data_set_id:str,training_view:str,metrics:Output[Metrics],model:Output[Model]):...data_set=f"{project_id}.{data_set_id}.{training_view}"build_df_for_xgboost=''' SELECT * FROM `{data_set}` '''.format(data_set=data_set)...xgb_model=XGBClassifier(n_estimators=50,objective='binary:hinge',silent=True,nthread=1,eval_metric="auc")random_search=RandomizedSearchCV(xgb_model,param_distributions=params,n_iter=param_comb,scoring='precision',n_jobs=4,cv=skf.split(X_train,y_train),verbose=3,random_state=1001)random_search.fit(X_train,y_train)xgb_model_best=random_search.best_estimator_predictions=xgb_model_best.predict(X_test)score=accuracy_score(y_test,predictions)auc=roc_auc_score(y_test,predictions)precision_recall=precision_recall_curve(y_test,predictions)metrics.log_metric("accuracy",(score*100.0))metrics.log_metric("framework","xgboost")metrics.log_metric("dataset_size",len(df))metrics.log_metric("AUC",auc)dump(xgb_model_best,model.path+".joblib")
Build an endpoint
You run the component nameddeploy_xgb to build an endpoint by using theXGBoost model from the previous section. The component takes the previousXGBoost model artifact, builds a container, and then deploys the endpoint, whilealso providing the endpoint URL as an artifact so that you can view it. Whenthis step is completed, a Vertex AI endpoint has been created andyou can view the endpoint in the console page for Vertex AI.
@component(# Deploys xgboost modelpackages_to_install=["google-cloud-aiplatform","joblib","sklearn","xgboost"],base_image="python:3.9",output_component_file="output_component/xgboost_deploy_component.yaml",)defdeploy_xgb(model:Input[Model],project_id:str,vertex_endpoint:Output[Artifact],vertex_model:Output[Model]):fromgoogle.cloudimportaiplatformaiplatform.init(project=project_id)deployed_model=aiplatform.Model.upload(display_name="tai-propensity-test-pipeline",artifact_uri=model.uri.replace("model",""),serving_container_image_uri="us-docker.pkg.dev/vertex-ai/prediction/xgboost-cpu.1-4:latest")endpoint=deployed_model.deploy(machine_type="n1-standard-4")# Save data to the output paramsvertex_endpoint.uri=endpoint.resource_namevertex_model.uri=deployed_model.resource_name
Define the pipeline
To define the pipeline, you define each operation based on the components thatyou created previously. You can then specify the order of the pipeline elementsif those aren't explicitly called in the component.
For example, the following code in the notebook defines a pipeline. In thiscase, the code requires thebuild_bqml_logistic_op component to run after thecreate_input_view_op component.
@dsl.pipeline(# Default pipeline root. You can override it when submitting the pipeline.pipeline_root=PIPELINE_ROOT,# A name for the pipeline.name="pipeline-test",description='Propensity BigQuery ML Test')defpipeline():create_input_view_op=create_input_view(view_name=VIEW_NAME,data_set_id=DATA_SET_ID,project_id=PROJECT_ID,bucket_name=BUCKET_NAME,blob_path=BLOB_PATH)build_bqml_logistic_op=build_bqml_logistic(project_id=PROJECT_ID,data_set_id=DATA_SET_ID,model_name='bqml_logistic_model',training_view=VIEW_NAME)# several components have been deleted for brevitybuild_bqml_logistic_op.after(create_input_view_op)build_bqml_xgboost_op.after(create_input_view_op)build_bqml_automl_op.after(create_input_view_op)build_xgb_xgboost_op.after(create_input_view_op)evaluate_bqml_logistic_op.after(build_bqml_logistic_op)evaluate_bqml_xgboost_op.after(build_bqml_xgboost_op)evaluate_bqml_automl_op.after(build_bqml_automl_op)
Compile and run the pipeline
You can now compile and run the pipeline.
The following code in the notebook sets theenable_caching value to true inorder to enable caching. When caching is enabled, any previous runs where acomponent has successfully completed won't be re-run. This flag is usefulespecially when you're testing the pipeline because when caching is enabled, therun completes faster and uses fewer resources.
compiler.Compiler().compile(pipeline_func=pipeline,package_path="pipeline.json")TIMESTAMP=datetime.now().strftime("%Y%m%d%H%M%S")run=pipeline_jobs.PipelineJob(display_name="test-pipeine",template_path="pipeline.json",job_id="test-{0}".format(TIMESTAMP),enable_caching=True)run.run()
Automate the pipeline
At this stage, you've launched the first pipeline. You can check theVertex AI Pipelines page in the console to see the status of this job. You can watch as eachcontainer is built and run. You can also track errors for specific components inthis section by clicking each one.
To schedule the pipeline, you build a Cloud Run function and use ascheduler that's similar to a cron job.
The code in the last section of the notebook schedules the pipeline to run oncea day, as shown in the following code snippet:
fromkfp.v2.google.clientimportAIPlatformClientapi_client=AIPlatformClient(project_id=PROJECT_ID,region='us-central1')api_client.create_schedule_from_job_spec(job_spec_path='pipeline.json',schedule='0 * * * *',enable_caching=False)
Use the finished pipeline in production
The completed pipeline has performed the following tasks:
- Created an input dataset.
- Trained several models using both BigQuery ML as well asPython's XGBoost.
- Analyzed model results.
- Deployed the XGBoost model.
You've also automated the pipeline by using Cloud Run functionsand Cloud Scheduler to run daily.
The pipeline that's defined in the notebook was created to illustrate ways tocreate various models. You wouldn't run the pipeline as it is currently built ina production scenario. However, you can use this pipeline as a guide and modifythe components to suit your needs. For example, you can edit thefeature-creation process to take advantage of your data, modify date ranges, andperhaps build alternative models. You would also pick the model from among thoseillustrated that best meets your production requirements.
When the pipeline is ready for production, you might implement additionaltasks. For example, you might implement a champion/challenger model, where eachday a new model is created and both the new model (the challenger) and theexisting one (the champion) are scored on new data. You put the new model intoproduction only if its performance is better than the performance of the currentmodel. To monitor progress of your system, you might also keep a record of eachday's model performance and visualize trending performance.
Clean up
What's next
- To learn about using MLOps to create production-ready ML systems, seePractitioners Guide to MLOps.
- To learn about Vertex AI, see theVertex AI documentation.
- To learn about Kubeflow Pipelines, see theKFP documentation.
- To learn about TensorFlow Extended, see theTFX User Guide.
- For an overview of architectural principles and recommendations that are specific to AIand ML workloads in Google Cloud, see theAI and ML perspectivein the Well-Architected Framework.
- For more reference architectures, diagrams, and best practices, explore theCloud Architecture Center.
Contributors
Author:Tai Conley | Cloud Customer Engineer
Other contributor:Lars Ahlfors | Cloud Customer Engineer
Except as otherwise noted, the content of this page is licensed under theCreative Commons Attribution 4.0 License, and code samples are licensed under theApache 2.0 License. For details, see theGoogle Developers Site Policies. Java is a registered trademark of Oracle and/or its affiliates.
Last updated 2024-06-25 UTC.