

Step 10: Deploy an API proxy
Now that you've configuredGoogle Cloud and the Apigee UI, and installed and configured theruntime, you're ready to see how it all works together.
1. Create a new API proxy using the Apigee UI
This section describes how to create a new API proxy in the UI by using the API Proxy Wizard.
Note: There is a new version of the Apigee UI, which is integrated with the Google Cloud console. The new UI is calledApigee in Cloud console. The instructions in the first two tabs below explain how to use either Apigee in Cloud console or classic Apigee UI.Apigee in Cloud console
To create a new API proxy using Apigee in Cloud console:
- OpenApigee UI in Cloud console in a browser.
- Select your organization from the dropdown menu in the upper left corner.
- SelectProxy development > API proxies in the main view.
- ClickCreate.The API Proxy Wizard starts.
- SelectReverse proxy (most common).
TheProxy details view is displayed.
- Configure your proxy with the following settings:
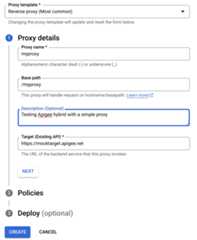
- Proxy name: Entermyproxy. The remaining steps in this section assume that this is your proxy's ID.
- Base path: Automatically set to/ followed by the proxy name, which in this example is/myproxy. TheBase path is part of the URL used to make requests to your API. Edge uses the URL to match and route incoming requests to the proper API proxy.
- (Optional) Description: Enter a description for your new API proxy, such as "Testing Apigee hybrid with a simple proxy".
- Target (Existing API): Enter "https://mocktarget.apigee.net". This defines the target URL that Apigee invokes on a request to the API proxy. The mocktarget service is hosted at Apigee and returns simple data. It requires no API key or access token.
Your API proxy's details should look like the following:
- ClickNext.
- On thePolicies screen, selectPass through (no authorization) as the security option.
- ClickNext.
- UnderDeploy (optional), you have the option to select one or more environments in which to deploy your proxy, in theDeployment environments field. If you prefer not to deploy the proxy at this point, leave theDeployment environments field empty. You can always deploy the proxy later.
- ClickCreate. Apigee generates the proxy (sometimes referred to asthe proxy bundle).
Apigee displays theProxy summary view. If you chose to deploy the proxy, theDeployments section displays theRevision number, which is 1 when you first deploy. TheStatus column displays the environments in which the proxy is deployed with a green status indicator.
Below that, theEndpoints section displays:
- Proxy endpoints: The basepath you set for the proxy, which is this example is
/myproxy. - Target endpoints: The basepath you set for the target, which in this example is
https://mocktarget.apigee.net.
Classic Apigee
To create a new API proxy using Classic Apigee:
- OpenApigee UI in a browser.
- Select your organization from the dropdown menu in the upper left corner.
- SelectDevelop > API Proxies in the main view.
- ClickCreate New.The API Proxy Wizard starts.
- SelectReverse proxy (most common).
TheProxy details view is displayed.
- Configure your proxy with the following settings:
- Proxy Name: Enter "myproxy". The remaining steps in this section assume that this is your proxy's ID.
- Proxy Base Path: Automatically set to "/myproxy". TheProxy Base Path is part of the URL used to make requests to your API. Edge uses the URL to match and route incoming requests to the proper API proxy.
- (Optional) Description: Enter a description for your new API proxy, such as "Testing Apigee hybrid with a simple proxy".
- Target (Existing API): Enter "https://mocktarget.apigee.net". This defines the target URL that Apigee invokes on a request to the API proxy. The mocktarget service is hosted at Apigee and returns simple data. It requires no API key or access token.
Your API proxy's details should look like the following:

- ClickNext.
- On thePolicies screen, selectPass through (no authorization) as the security option.
- ClickNext.
- On theSummary screen, select an environment to deploy your proxy to and clickCreate and Deploy.
Hybrid generates the proxy (sometimes referred to asthe proxy bundle):

- ClickGo to proxy list.
Apigee displays theProxies view, which displays a list of API proxies. Your new proxy should display with a green status indicator, meaning that it has been deployed.
2. Call the API proxy
When the UI indicates your proxy is deployed, you can try calling it using cURL or the REST client of your choice.For example:
- Make sure your
DOMAINenvironment variable is set to the domain name you used for the hostname for your environment group inProject and org setup - Step 3: Create an environment group.echo $DOMAIN
Find the external IP address and port of the Apigee ingress gateway with the following command:
kubectl get svc -n apigee -l app=apigee-ingressgateway
Your output should look something like:
NAME TYPE CLUSTER-IP EXTERNAL-IP PORT(S) AGEapigee-ingressgateway-prod-hybrid-37a39bd LoadBalancer 192.0.2.123233.252.0.123 15021:32049/TCP,80:31624/TCP,443:30723/TCP 16h
- Export your external IP and port to variables:
export INGRESS_IP_ADDRESS=EXTERNAL_IP_ADDRESS
export INGRESS_PORT=PORT_NUMBER - Call the API proxy:
curl -H Host:$DOMAIN --resolve \$DOMAIN:$INGRESS_PORT:$INGRESS_IP_ADDRESS \ https://$DOMAIN:$INGRESS_PORT/myproxy -k
For example:
curl -H Host:example.com --resolve example.com:443:233.252.0.123 https://example.com:443/myproxy -k
To learn more about building and deploying API proxies, seeBuild your first proxy overview.
Congratulations!You've successfully installed Apigee hybrid. To learn more about building and deploying API proxies, seeIntroduction to API proxy building.
Except as otherwise noted, the content of this page is licensed under theCreative Commons Attribution 4.0 License, and code samples are licensed under theApache 2.0 License. For details, see theGoogle Developers Site Policies. Java is a registered trademark of Oracle and/or its affiliates.
Last updated 2025-12-15 UTC.