

Step 4: Test your API
This pageapplies toApigee andApigee hybrid.
View Apigee Edge documentation.
To test the deployedhelloworld API, click theTerminal tabin Apigee in Cloud Code and enter the following curl call:
curl 0:8998/helloworld
The following error message is displayed:

Because you enabled API key-based authentication when creating the API proxy, you need to pass an API key using theapikey query parameter when calling the API.
To obtain an API key, you need to create a test bundle and configure the following test resources:
API product used to bundle the API and make it available to developers.
Developer that will create an app to access the API.
Developer app that will enable access to the API using an API key.
0 for the host value and8998 for the port value. You can configure the port values, as described in Manage the Apigee Emulator. If you get an error when using0, substitutelocalhost for the0:curl localhost:8998/helloworld
Build and Export test resources
- Create a test bundle:
- Position your cursor over thetest data folder and click
 .
.
TheCreate test bundle wizard opens.
- Entermytestbundle for the test bundle name and pressEnter.
The test bundle is created.
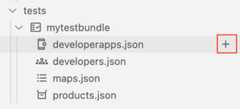
- Expand themytestbundle folder to view its contents.

- Position your cursor over thetest data folder and click
- Configure the API product test resource:
- Position your cursor over theproducts.json file and click.

TheCreate API product wizard opens.

- Entermyproduct for the name of the API product and pressEnter to confirm and proceed.
- Entermyproduct for the description of the API product and pressEnter to confirm and proceed.
- Selecthelloworld to add the API proxy to the API product and clickOK.
The
products.jsonfile is opened in the editor with the new API product configured:[ { "attributes": [ { "name": "sample_attribute_0", "value": "sample_attribute_value_0" } ], "scopes": [], "environments": [], "apiResources": [ "/", "/*", "/**" ], "quota": "100", "quotaInterval": "1", "quotaTimeUnit": "minute", "name": "myproduct", "displayName": "myproduct", "proxies": [ "helloworld" ] }]
- Position your cursor over theproducts.json file and click
- Configure the developer test resource:
- Position your cursor over thedevelopers.json file and click.

TheCreate developer wizard opens.

- Enter the following values at the prompts and pressEnter to confirm and proceed:
- Developer email:ahamilton@example.com
- Username:ahamilton
- First name:Alex
- Last name:Hamilton
The
developers.jsonfile is opened in the editor with the new developer configured:[ { "attributes": [ { "name": "sample_attribute_0", "value": "sample_attribute_value_0" } ], "email": "ahamilton@example.com", "userName": "ahamilton", "firstName": "Alex", "lastName": "Hamilton" } ]
- Position your cursor over thedevelopers.json file and click
- Configure the developer app test resource:
- Position your cursor over thedeveloperapps.json file and click.
TheCreate developer app wizard opens.

- Selectahamilton@example.com as the owner of the app.
- Enter the following values at the next set of prompts and pressEnter to confirm and proceed:
- App name:myapp
- Description:myapp
- Callback URL:Leave blank
- Selectmyproduct to add it to the app and clickOK.
- Selectnever for the expiry value.
The
developerapps.jsonfile is opened in the editor with the new app configured:[ { "attributes": [ { "name": "sample_attribute_0", "value": "sample_attribute_value_0" } ], "developerEmail": "ahamilton@example.com", "name": "myapp", "displayName": "myapp", "callbackUrl": "", "apiProducts": [ "myproduct" ], "expiryType": "never" }]
- Position your cursor over thedeveloperapps.json file and click
- Export the test resources to the Apigee Emulator.
Position the cursor over themytestbundle test bundle and click
 .
.
Note: If multiplecontainers for the Apigee Emulator are running, you are prompted to select the container to which you want to deploy the environment.
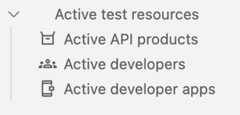
The active test resources appears in the Apigee Emulators section, as shown in the following figure.
Obtain the API key
Obtain the API key credentials for your developer app:
- In theemulators section, underActive test data, clickActive developer apps.
The active developer apps configuration file is opened in the editor. The file contains credentials for
myproduct, as highlighted in the following figure.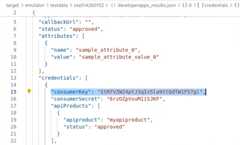
- Copy the
consumerKeyvalue (without the quotes) for themyproductAPI product.
Test your API
Test your API with the API key:
- Pass the API key in your curl call using the
apikeyquery parameter, as follows:curl 0:8998/helloworld?apikey=API_KEY
The following response is returned:
Hello, Guest!
Congratulations! You've successfully run an API in your local environment.
In the next step, you'll learn how to change the target endpoint.
1234(NEXT) Step 5: Change the target endpoint678
Except as otherwise noted, the content of this page is licensed under theCreative Commons Attribution 4.0 License, and code samples are licensed under theApache 2.0 License. For details, see theGoogle Developers Site Policies. Java is a registered trademark of Oracle and/or its affiliates.
Last updated 2025-12-17 UTC.