

Editing an API proxy (create a proxy revision)
This pageapplies toApigee andApigee hybrid.
View Apigee Edge documentation.
More Information
For more information, see:
Use the Apigee UI or API to edit an API proxy. Editing an API proxy can include configuringpolicies, configuring proxy endpoints, target endpoints, andintegration endpoints, adding or removingflow hooks, anddeploying the proxy.
When you edit an API proxy, you can decide whichof the following to do with the resulting changes:
- Save your changes on the server but do not create a new revision. You do this when you do not want to deploy your saved changes, but just want to ensure that they are not lost if you end the session.
OR
- Create a new API proxy revision and deploy it to the cluster. You cannot deploy changes to an API proxy without creating a new revision of it.
Apigee UI
To edit an API proxy and save your changes using the Apigee UI:
In the Google Cloud console, go to theApigee> Proxy development> API proxies page.
Select the proxy that you want to edit from the list of proxies. The UI displays theOverview tab for that proxy in the Google Cloud console.

- Click theDevelop tab to make your changes to the proxy.
For example, to add a policy, click the+ icon next toPolicies, select the policy to add, enter a name and an optional display name, clickCreate, and configure the policy in the interface.
- When you are done making changes, you can do one of the following:
- To save your changes butnot create a new revision, click theSave button. (You should do this periodically to ensure that your changes are not lost if you end the session).
- To save your changes as a new revision (when you are getting ready to deploy and test), click the drop-down menu next to theSave button and selectSave as new revision:
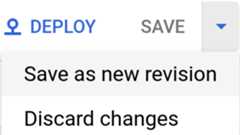
The Apigee UI saves your changes and generates a new revision of the proxy for you. It does not deploy the new bundle to the runtime; you must explicitly do that, as described inDeploying an API proxy.
Apigee API
Edit an API proxy to create a revision in your Apigee organization by issuing aPOST request to the following resource:
https://apigee.googleapis.com/v1/organizations/$ORG/apis
You must define the name of the API proxy using thename query parameter. Restrict the characters used in the name to the following:A-Za-z0-9._\-$ %
Optionally, you can import an API proxy configuration bundle by performing the following steps:
- Set the
actionquery parameter toimport - Set the
Content-typeheader tomultipart/form-data - Pass the name of the API proxy configuration bundle on your local file system
The following example demonstrates how to edit an API proxy by importing an API proxyconfiguration bundle (helloworld-config.zip) on your local file system using theAPI.
export TOKEN=$(gcloud auth print-access-token)export ORG=ORGANIZATION_NAMEcurl "https://apigee.googleapis.com/v1/organizations/$ORG/apis?name=helloworld&action=import" \ -X POST \ -H "Authorization: Bearer$TOKEN" \ -H "Content-type: multipart/form-data" \ -F "file=@helloworld-config.zip"
Where$TOKEN is set to your OAuth 2.0 access token, as described inObtaining an OAuth 2.0 access token. For information about thecurl options used in this example, seeUsing curl. For a description of environment variables you can use, seeSettingenvironment variables for Apigee API requests.
The following provides an example of the response output:
{"basepaths":["/helloworld"],"configurationVersion":{"majorVersion":4},"createdAt":"1559145292799","displayName":"helloworld","entityMetaDataAsProperties":{"bundle_type":"zip","subType":"Proxy","lastModifiedAt":"1559145292799","createdAt":"1559145292799"},"lastModifiedAt":"1559145292799","name":"helloworld","policies":["verify-api-key","remove-query-param-apikey","OAuth-v20-1"],"proxies":["default"],"proxyEndpoints":["default"],"resourceFiles":{},"targetEndpoints":["default"],"targets":["default"],"type":"Application","revision":"1","description":"Hello world"}
For more information on editing an API proxy, see theapis.create method in the Apigee API. To see all the methods available for API proxies, see theAPI proxies API.
Except as otherwise noted, the content of this page is licensed under theCreative Commons Attribution 4.0 License, and code samples are licensed under theApache 2.0 License. For details, see theGoogle Developers Site Policies. Java is a registered trademark of Oracle and/or its affiliates.
Last updated 2026-02-19 UTC.