

Deploying an API proxy
This pageapplies toApigee andApigee hybrid.
View Apigee Edge documentation.
You cannot invoke an API proxy until it has been deployed. After you create a new API proxy ormake a change to an existing one, you can deploy it to yourcluster.
When you create a new revision of an API proxy without changing its base path, then deploy it to an environment in which it's already deployed, the previous revision is undeployed and the new revision is deployed in its place.
Note: You cannot make incremental changes to an API proxy revision and redeploythat same revision to Apigee. To deploy changes to an API proxy, you mustsave it as a new revision and deploy it.Deploy an API proxy
Deploy an API proxy revision as described for one of the following methods.
Apigee in Cloud console
To deploy an API proxy:
In the Google Cloud console, go to theProxy Development> API Proxies page.
Click the API proxy that you want to deploy. The UI displays theOverview page:

- To deploy your changes, clickDeploy to display theDeploy dialog:
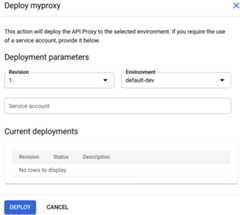
- Enter the following:
- Revision: The revision number of the proxy you want to deploy.
- Environment: The environment where you want to deploy the proxy.
- Service account (optional): Aservice account for the proxy.
- ClickDeploy.
The UI begins the process of deploying the selected revision.
Note: It may take a few minutes for Apigee to deploy the new proxy.When the proxy is deployed, theStatus column in theDeployments section displaysa green icon to show that revision 1 of the proxy is deployed.

Classic UI
To deploy an API proxy in the Apigee UI:
- Sign in to theApigee UI.
- SelectDevelop > API Proxies.
The UI displays a list of API proxies and their deployment status:

- From theEnvironment drop-down list, select the environment to which you want to deploy the API proxy.
Click the API proxy that you want to deploy.
The UI displays theAPI Proxies Overview tab. This view includes theDeployments,Proxy Endpoints, andTarget Endpoints sections:

If this is a new API proxy that you have not deployed before (or an API proxy that you haveundeployed), theRevision column showsNot deployed.
- In theRevision column, expand the drop-down selector.
If this is a new API proxy that has never been deployed before, the drop-down list displays only1 andUndeploy:

For API proxies with multiple revisions, the drop-down list displays all revisions that you can choose from as well asUndeploy.

- Select the revision that you want to deploy from the drop-down list.
The UI prompts you to confirm the deployment:

- ClickDeploy.
The UI begins the process of deploying the selected revision.
Note: It may take a few minutes for Apigee to deploy the new proxy.Position the cursor over theDetails link in the Status column to view the status of the deployment. If there are one or more revisions already deployed, you can monitor the status of their undeployment, as shown in the following figure. For more information, seeZero-downtime deployment.

When deployment is complete, theStatus details indicates that the revision is fully deployed:

Note that deployment is not an instantaneous process. Apigee'seventually consistent deployment model means that a new deployment will be rolled out to the cluster over a short period of time and not immediately. For more information, seeAbout deployment.
For information on what the status indicators mean and how to check the status, see seeViewing deployment status.
Alternatively, you can deploy the current revision you are editing in theDevelop tab. When you do this, Apigee creates a new revision for you.
- Click theDeploy to:env_name drop-down list

The UI displays a list of environments. In theRevision column, the UI lists the currently deployed revision (or "‑‑" if none).
- ClickDeployrevision to deploy the revision that you most recently edited.
The UI prompts you to confirm the deployment.
- ClickDeploy.
The UI begins the process of deploying the selected revision.
Apigee API
The following sections provide examples of using the Apigee API to deploy API proxy revisions and list the deployments for your organization.
- Create a deployment change report before deploying
- Deploying an API proxy revision using the API
- Listing deployments of an API proxy using the API
See alsoViewing deployment status.
Note: Apigee restricts the number of deployment requests processed per second. If you attempt a large number of deployment requests simultaneously, you may see deployment failures due to timeout errors.Create a deployment change report before deploying
Deploying a proxy in more than one environment in the same environment group may lead to undefined behavior. To determine whether this will occur, you can generate a report using thegenerateDeployChangeReport method as follows:
curl "https://apigee.googleapis.com/v1/organizations/$ORG/environments/$ENV/apis/$API/revisions/$REV/deployments:generateDeployChangeReport" \-X POST \-H "Authorization: Bearer $TOKEN"
This returns a deployment change report that warns you if a base path in the proxy you want to deploy will not receive traffic due to an existing deployment that is already using that base path.
Deploying an API proxy revision using the API
To deploy an API proxy revision, use the following API call:
curl "https://apigee.googleapis.com/v1/organizations/$ORG/environments/$ENV/apis/$API/revisions/$REV/deployments" \ -X POST \ -H "Authorization: Bearer $TOKEN"
Where$TOKEN is set to your OAuth 2.0 access token, as described inObtaining an OAuth 2.0 access token. For information about thecurl options used in this example, seeUsing curl. For a description of environment variables you can use, seeSettingenvironment variables for Apigee API requests.
override query parameter totrue. In this case, Apigee deploys the new revision fully before undeploying the existing revision, as described inZero-downtime deployment.The following shows an example of the response output. In this example, revision1 of thehelloworld API proxy was deployed successfully to thetest environment:
{ "environment": "test", "apiProxy": "helloworld", "revision": "1", "deployStartTime": "1559149080457"}For more information, seeDeploy API proxy revision API.
Listing deployments using the API
To list all deployments of API proxies and shared flows for your organization, enter the following API call:
curl "https://apigee.googleapis.com/v1/organizations/$ORG/deployments" \ -X GET \ -H "Authorization: Bearer $TOKEN"
Where$TOKEN is set to your OAuth 2.0 access token, as described inObtaining an OAuth 2.0 access token. For information about thecurl options used in this example, seeUsing curl. For a description of environment variables you can use, seeSettingenvironment variables for Apigee API requests.
The following provides an example of the response. In this example, there are three API proxiesdeployed, includinghelloworld which was deployed in the previous section.
{ "deployments": [ { "environment": "test", "apiProxy": "helloworld", "revision": "1", "deployStartTime": "1559149080457" }, { "environment": "test", "apiProxy": "weather", "revision": "1", "deployStartTime": "1558620435217" }, { "environment": "test", "apiProxy": "testproxy", "revision": "2", "deployStartTime": "1558635113086" } ]}gcloud
The following sections provide examples of usinggcloud apigee CLI commands to deploy API proxy revisions and list the deployments for your organization.
- Deploying an API proxy revision using the gcloud CLI
- Listing deployments of an API proxy using the gcloud CLI
See alsoViewing deployment status.
For more information and a description of the environment variables used in the examples,seeGetting started using gcloud with Apigee.
Deploying an API proxy revision using the gcloud CLI
To deploy an API proxy revision, use the followinggcloud command:
gcloud apigee apis deploy$REV --api=$API --environment=$ENV
override flag totrue. In this case, Apigee deploys the new revision fully before undeploying the existing revision, as described inZero-downtime deployment.The following shows an example of the response output. In this example, revision1 of thehelloworld API proxy was deployed successfully to thetest environment:
Using Apigee organization 'my-org'apiProxy: helloworlddeployStartTime: '1598032332802'environment: testrevision: '1'
For more information, seeDeploy API proxy revision CLI.
Listing deployments using the gcloud CLI
To list all deployments of API proxies and shared flows for your organization, use the followinggcloud command:
gcloud apigee deployments list
The following provides an example of the response. In this example, there are three API proxiesdeployed, includinghelloworld which was deployed in the previous section.
Using Apigee organization `my-org` - apiProxy: helloworld deployStartTime: 1598032332802 environment: test revision: 1 - apiProxy: weather deployStartTime: 1558620435217 environment: test revision: 1 - apiProxy: testproxy deployStartTime: 1558635113086 environment: test revision: 2
For more information, seeList deployments CLI.
Troubleshooting
If you are unable to deploy your API proxy, check to see if one of the following common scenarios may apply.
Naming restrictions for environment groups
If the name of your environment group does not comply with naming restrictions your proxy will not deploy. In some cases, it is possible to create an environment group and add environments to it without having to meet these restrictions. However, this will prevent proxy deployment.
SeeCreating environment groups for a description of naming guidelines and restrictions.
Environment created with a previously used environment name
If you create an environment with the same name as an environment that was previously deleted, your proxy will not deploy. For example, if you created an environment namedprod-1 after previously creating and deleting aprod-1 environment, you will need to remove it. You can use the following steps to resolve this issue:
- Detach the
prod-1environment from your environment group using the API. - Delete the
prod-1environment using theAPI. - Create a new environment. For example,
prod-2. - Attach the new
prod-2environment to your environment group using the API.
Except as otherwise noted, the content of this page is licensed under theCreative Commons Attribution 4.0 License, and code samples are licensed under theApache 2.0 License. For details, see theGoogle Developers Site Policies. Java is a registered trademark of Oracle and/or its affiliates.
Last updated 2025-12-17 UTC.