
Build an HTTP Google Chat app

Page Summary
This guide details building a Google Chat add-on using an HTTP service, allowing interaction with Google Cloud or on-premises servers.
The architecture involves a user sending a message, triggering an HTTP request to the add-on's server, processing the request (potentially with other services), and sending a response back to the user in Chat.
Prerequisites include a Google Workspace account and a Google Cloud project with billing enabled.
The setup involves enabling necessary APIs, creating and deploying a Cloud Function to handle messages, authorizing the add-on, and configuring it in the Google Chat API settings.
By following the steps, developers can build a flexible and integrated Google Chat add-on leveraging an HTTP service for enhanced functionality.
This page explains how to build a Google Workspace add-on that works inGoogle Chat using an HTTP service.
Note: In Google Chat, add-ons appear to users asGoogle Chat apps. You can also build your Chat app usingGoogle Chat API interaction events. To learn more, see theExtend Google Chat overview.
This quickstart shows you how to build an HTTP service using Google Cloudservices. To build the Chat app, you write and deploy aCloud Run functionthat the Chat app uses to respond to a user's message.
With an HTTP architecture, you configure Chat to integrate withGoogle Cloud or an on-premises server by using HTTP, as shown in thefollowing diagram:

In the preceding diagram, a user interacting with an HTTPChat app has the following flow of information:
- A user sends a message in Chat to aChat app, either in a direct message or in aChat space.
- An HTTP request is sent to a web server that is either a cloud oron-premises system that contains the Chat applogic.
- Optionally, the Chat app logic can integrate withGoogle Workspace services (like Calendar andSheets), other Google services(like Maps, YouTube, and Vertex AI), or other web services (like a projectmanagement system or ticketing tool).
- The web server sends an HTTP response back to theChat app service in Chat.
- The response is delivered to the user.
- Optionally, the Chat app can call theChat API to asynchronously post messages or perform otheroperations.
This architecture provides you the flexibility to use existing libraries andcomponents that already exist in your system because theseChat apps can be designed using different programming languages.
Objectives
- Set up your environment.
- Create and deploy a Cloud Run function.
- Configure a Google Workspace add-on for the Chat app.
- Test the app.
Prerequisites
- A Business or EnterpriseGoogle Workspace account with access toGoogle Chat.
- A Google Cloud project with billing enabled. To check that an existing project has billing enabled,seeVerify thebilling status of your projects. To create a project and set up billing, seeCreate a Google Cloud project.
Set up the environment
Before using Google APIs, you need to turn them on in a Google Cloud project.You can turn on one or more APIs in a single Google Cloud project.In the Google Cloud console, enable the Cloud Build API, Cloud Functions API, Cloud Pub/Sub API, Cloud Logging API, Artifact Registry API, and Cloud Run API.
Create and deploy a Cloud Run function
Create and deploy a Cloud Run function that generates a Chat cardwith the sender's display name and avatar image. When theChat app receives a message, it runs the function andresponds with the card.
To create and deploy the function for your Chat app,complete the following steps:
Node.js
In the Google Cloud console, go to the Cloud Run page:
Make sure that the project for your Chat app isselected.
ClickWrite a function.
On theCreate service page, set up your function:
- In theService name field, enter
addonchatapp. - In theRegion list, select a region.
- In theRuntime list, select the most recent version of Node.js.
- In theAuthentication section, selectRequire authentication.
- ClickCreate, and wait for Cloud Run to create the service.The console redirects you to theSource tab.
- In theService name field, enter
In theSource tab:
- InEntry point, delete the default text and enter
avatarApp. - Replace the contents of
index.jswith the following code:
node/chat/avatar-app/index.jsimport{http}from'@google-cloud/functions-framework';// The ID of the slash command "/about".// You must use the same ID in the Google Chat API configuration.constABOUT_COMMAND_ID=1;/** * Handle requests from Google Workspace add on * * @param {Object} req Request sent by Google Chat * @param {Object} res Response to be sent back to Google Chat */http('avatarApp',(req,res)=>{constchatEvent=req.body.chat;letmessage;if(chatEvent.appCommandPayload){message=handleAppCommand(chatEvent);}else{message=handleMessage(chatEvent);}res.send({hostAppDataAction:{chatDataAction:{createMessageAction:{message:message}}}});});/** * Responds to an APP_COMMAND event in Google Chat. * * @param {Object} event the event object from Google Chat * @return the response message object. */functionhandleAppCommand(event){switch(event.appCommandPayload.appCommandMetadata.appCommandId){caseABOUT_COMMAND_ID:return{text:'The Avatar app replies to Google Chat messages.'};}}/** * Responds to a MESSAGE event in Google Chat. * * @param {Object} event the event object from Google Chat * @return the response message object. */functionhandleMessage(event){// Stores the Google Chat user as a variable.constchatUser=event.messagePayload.message.sender;constdisplayName=chatUser.displayName;constavatarUrl=chatUser.avatarUrl;return{text:'Here\'s your avatar',cardsV2:[{cardId:'avatarCard',card:{name:'Avatar Card',header:{title:`Hello${displayName}!`,},sections:[{widgets:[{textParagraph:{text:'Your avatar picture: '}},{image:{imageUrl:avatarUrl}}]}]}}]};}
- ClickSave and redeploy.
- InEntry point, delete the default text and enter
Python
In the Google Cloud console, go to the Cloud Run page:
Make sure that the project for your Chat app isselected.
ClickWrite a function.
On theCreate service page, set up your function:
- In theService name field, enter
addonchatapp. - In theRegion list, select a region.
- In theRuntime list, select the most recent version of Python.
- In theAuthentication section, selectRequire authentication.
- ClickCreate, and wait for Cloud Run to create the service.The console redirects you to theSource tab.
- In theService name field, enter
In theSource tab:
- InEntry point, delete the default text and enter
avatar_app. - Replace the contents of
main.pywith the following code:
python/chat/avatar-app/main.pyfromtypingimportAny,Mappingimportflaskimportfunctions_framework# The ID of the slash command "/about".# You must use the same ID in the Google Chat API configuration.ABOUT_COMMAND_ID=1@functions_framework.httpdefavatar_app(req:flask.Request)->Mapping[str,Any]:"""Handle requests from Google Workspace add on Args: flask.Request req: the request sent by Google Chat Returns: Mapping[str, Any]: the response to be sent back to Google Chat """chat_event=req.get_json(silent=True)["chat"]ifchat_eventand"appCommandPayload"inchat_event:message=handle_app_command(chat_event)else:message=handle_message(chat_event)return{"hostAppDataAction":{"chatDataAction":{"createMessageAction":{"message":message}}}}defhandle_app_command(event:Mapping[str,Any])->Mapping[str,Any]:"""Responds to an APP_COMMAND event in Google Chat. Args: Mapping[str, Any] event: the event object from Google Chat Returns: Mapping[str, Any]: the response message object. """ifevent["appCommandPayload"]["appCommandMetadata"]["appCommandId"]==ABOUT_COMMAND_ID:return{"text":"The Avatar app replies to Google Chat messages.",}return{}defhandle_message(event:Mapping[str,Any])->Mapping[str,Any]:"""Responds to a MESSAGE event in Google Chat. Args: Mapping[str, Any] event: the event object from Google Chat Returns: Mapping[str, Any]: the response message object. """# Stores the Google Chat user as a variable.chat_user=event["messagePayload"]["message"]["sender"]display_name=chat_user.get("displayName","")avatar_url=chat_user.get("avatarUrl","")return{"text":"Here's your avatar","cardsV2":[{"cardId":"avatarCard","card":{"name":"Avatar Card","header":{"title":f"Hello{display_name}!"},"sections":[{"widgets":[{"textParagraph":{"text":"Your avatar picture:"}},{"image":{"imageUrl":avatar_url}},]}]}}]}
- ClickSave and redeploy.
- InEntry point, delete the default text and enter
Java
In the Google Cloud console, go to the Cloud Run page:
Make sure that the project for your Chat app isselected.
ClickWrite a function.
On theCreate service page, set up your function:
- In theService name field, enter
addonchatapp. - In theRegion list, select a region.
- In theRuntime list, select the most recent version of Java.
- In theAuthentication section, selectRequire authentication.
- ClickCreate, and wait for Cloud Run to create the service.The console redirects you to theSource tab.
- In theService name field, enter
In theSource tab:
- InEntry point, delete the default text and enter
App. - Rename the default Java file to
src/main/java/com/google/chat/avatar/App.java. - Replace the contents of
App.javawith the following code:
java/chat/avatar-app/src/main/java/com/google/chat/avatar/App.javapackagecom.google.chat.avatar;importcom.google.api.services.chat.v1.model.CardWithId;importcom.google.api.services.chat.v1.model.GoogleAppsCardV1Card;importcom.google.api.services.chat.v1.model.GoogleAppsCardV1CardHeader;importcom.google.api.services.chat.v1.model.GoogleAppsCardV1Image;importcom.google.api.services.chat.v1.model.GoogleAppsCardV1Section;importcom.google.api.services.chat.v1.model.GoogleAppsCardV1TextParagraph;importcom.google.api.services.chat.v1.model.GoogleAppsCardV1Widget;importcom.google.api.services.chat.v1.model.Message;importcom.google.cloud.functions.HttpFunction;importcom.google.cloud.functions.HttpRequest;importcom.google.cloud.functions.HttpResponse;importcom.google.gson.Gson;importcom.google.gson.JsonObject;importjava.util.List;publicclassAppimplementsHttpFunction{// The ID of the slash command "/about".// You must use the same ID in the Google Chat API configuration.privatestaticfinalintABOUT_COMMAND_ID=1;privatestaticfinalGsongson=newGson();/** * Handle requests from Google Workspace add on * * @param request the request sent by Google Chat * @param response the response to be sent back to Google Chat */@Overridepublicvoidservice(HttpRequestrequest,HttpResponseresponse)throwsException{JsonObjectevent=gson.fromJson(request.getReader(),JsonObject.class);JsonObjectchatEvent=event.getAsJsonObject("chat");Messagemessage;if(chatEvent.has("appCommandPayload")){message=handleAppCommand(chatEvent);}else{message=handleMessage(chatEvent);}JsonObjectcreateMessageAction=newJsonObject();createMessageAction.add("message",gson.fromJson(gson.toJson(message),JsonObject.class));JsonObjectchatDataAction=newJsonObject();chatDataAction.add("createMessageAction",createMessageAction);JsonObjecthostAppDataAction=newJsonObject();hostAppDataAction.add("chatDataAction",chatDataAction);JsonObjectdataActions=newJsonObject();dataActions.add("hostAppDataAction",hostAppDataAction);response.getWriter().write(gson.toJson(dataActions));}/** * Handles an APP_COMMAND event in Google Chat. * * @param event the event object from Google Chat * @return the response message object. */privateMessagehandleAppCommand(JsonObjectevent)throwsException{switch(event.getAsJsonObject("appCommandPayload").getAsJsonObject("appCommandMetadata").get("appCommandId").getAsInt()){caseABOUT_COMMAND_ID:returnnewMessage().setText("The Avatar app replies to Google Chat messages.");default:returnnull;}}/** * Handles a MESSAGE event in Google Chat. * * @param event the event object from Google Chat * @return the response message object. */privateMessagehandleMessage(JsonObjectevent)throwsException{// Stores the Google Chat user as a variable.JsonObjectchatUser=event.getAsJsonObject("messagePayload").getAsJsonObject("message").getAsJsonObject("sender");StringdisplayName=chatUser.has("displayName")?chatUser.get("displayName").getAsString():"";StringavatarUrl=chatUser.has("avatarUrl")?chatUser.get("avatarUrl").getAsString():"";returnnewMessage().setText("Here's your avatar").setCardsV2(List.of(newCardWithId().setCardId("avatarCard").setCard(newGoogleAppsCardV1Card().setName("Avatar Card").setHeader(newGoogleAppsCardV1CardHeader().setTitle(String.format("Hello %s!",displayName))).setSections(List.of(newGoogleAppsCardV1Section().setWidgets(List.of(newGoogleAppsCardV1Widget().setTextParagraph(newGoogleAppsCardV1TextParagraph().setText("Your avatar picture:")),newGoogleAppsCardV1Widget().setImage(newGoogleAppsCardV1Image().setImageUrl(avatarUrl)))))))));}}
- InEntry point, delete the default text and enter
Replace the contents of
pom.xmlwith the following code:java/chat/avatar-app/pom.xml<projectxmlns="http://maven.apache.org/POM/4.0.0"xmlns:xsi="http://www.w3.org/2001/XMLSchema-instance"xsi:schemaLocation="http://maven.apache.org/POM/4.0.0http://maven.apache.org/xsd/maven-4.0.0.xsd"><modelVersion>4.0.0</modelVersion><groupId>com.google.chat</groupId><artifactId>avatar-app</artifactId><version>1.0-SNAPSHOT</version><properties><maven.compiler.target>17</maven.compiler.target><maven.compiler.source>17</maven.compiler.source></properties><dependencies><dependency><groupId>com.google.cloud.functions</groupId><artifactId>functions-framework-api</artifactId><version>1.1.4</version></dependency><dependency><groupId>com.google.code.gson</groupId><artifactId>gson</artifactId><version>2.9.1</version></dependency><dependency><groupId>com.google.apis</groupId><artifactId>google-api-services-chat</artifactId><version>v1-rev20230115-2.0.0</version></dependency></dependencies><build><plugins><plugin><groupId>org.apache.maven.plugins</groupId><artifactId>maven-compiler-plugin</artifactId><version>3.8.1</version><configuration><excludes><exclude>.google/</exclude></excludes></configuration></plugin></plugins></build></project>
- ClickSave and redeploy.
The Cloud Run service details page opens. Wait for the function to deploy.
Configure the add-on
After the Cloud Run function is deployed, follow these steps to create aadd-on and deploy the Google Chat app:
In the Google Cloud console, go to the Cloud Run page:
Make sure that the project for which you enabled Cloud Run is selected.
In the list of functions, clickaddonchatapp.
On theService details page, copy theURL for the function. TheURL ends in
run.app.In the Google Cloud search field, search for "Google Chat API", thenclickGoogle Chat API, and clickManage.
ClickConfiguration and set up the Google Chat app:
- InApp name, enter
Add-onChat app. - InAvatar URL, enter
https://developers.google.com/workspace/add-ons/images/quickstart-app-avatar.png. - InDescription, enter
Add-onChat app. - UnderFunctionality, selectJoin spaces and group conversations.
- UnderConnection settings, selectHTTP endpoint URL.
- Copy theService account email. You need this email when youauthorize your add-on to invoke your function.
- UnderTriggers, selectUse a common HTTP endpoint URL for alltriggers, and paste the URL for the Cloud Run function trigger into thebox.
- UnderVisibility, selectMake this Google Chat app available to specific people andgroups in your domain and enter your email address.
- UnderLogs, selectLog errors to Logging.
- InApp name, enter
ClickSave.
Next, authorize the Chat app to invoke the Cloud Runfunction.
Authorize Google Chat to invoke your function
To Authorize Google Workspace add-on to invoke your function, add theGoogle Workspace add-on service account with theCloud Run ServiceInvoker role.
In the Google Cloud console, go to the Cloud Run page:
In the Cloud Run services list, select the checkbox next to the receiving function. (Don't click the function itself.)
ClickPermissions. ThePermissions panel opens.
ClickAdd principal.
InNew principals, enter the email address of the Google Workspace add-on service account associated to your Chat app.
The service account email address is on the Chat API configuration page, underConnection settings >HTTP endpoint URL >Service Account Email:
InSelect a role, selectCloud Run >Cloud Run Service Invoker.
ClickSave.
The Chat app is ready to receive and respond tomessages on Chat.
Test your Chat app
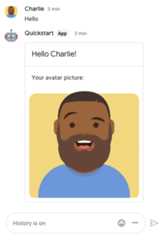
To test your Chat app, open a direct message space withthe Chat app and send a message:
Open Google Chat using the Google Workspace account that you provided when you added yourself as a trusted tester.
- ClickNew chat.
- In theAdd 1 or more people field, type the name of your Chat app.
Select your Chat app from the results. A direct message opens.
Note: If you don't see your Chat app in the list of results, ensure that you've included your Google Workspace account in theVisibility settings of theChat API Configuration page in the Google Cloud console.- In the new direct message with the app, type
Helloand pressenter.
The Chat app'smessage contains a card that displaysthe sender's name and avatar image, as demonstrated in the following image:
To add trusted testers and learn more about testing interactive features, seeTest interactive features forGoogle Chat apps.
Troubleshoot
When a Google Chat app orcard returns an error, the Chat interface surfaces a message saying "Something went wrong." or "Unable to process your request." Sometimes the Chat UI doesn't display any error message, but the Chat app or card produces an unexpected result; for example, a card message might not appear.
Although an error message might not display in the Chat UI, descriptive error messages and log data are available to help you fix errors when error logging for Chat apps is turned on. For help viewing, debugging, and fixing errors, seeTroubleshoot and fix Google Chat errors.
Clean up
To avoid incurring charges to your Google Cloud account for the resources used in this tutorial, we recommend that you delete the Cloud project.
Caution: Deleting a project has the following effects:
- Everything in the project is deleted. If you used an existing project for this tutorial, when you delete it, you also delete any other work you've done in the project.
- Custom project IDs are lost. When you created this project, you might have created a custom project ID that you want to use in the future. To preserve the URLs that use the project ID, such as a URL on appspot.com, delete the selected resources inside the project instead of deleting the whole project.
If you plan to explore multiple tutorials and quickstarts, reusing projects can help you avoid exceeding project quota limits.
- In the Google Cloud console, go to theManage resources page. ClickMenu>IAM & Admin>Manage Resources.
- In the project list, select the project you want to delete and then clickDelete.
- In the dialog, type the project ID and then clickShut down to delete the project.
Except as otherwise noted, the content of this page is licensed under theCreative Commons Attribution 4.0 License, and code samples are licensed under theApache 2.0 License. For details, see theGoogle Developers Site Policies. Java is a registered trademark of Oracle and/or its affiliates.
Last updated 2025-12-11 UTC.