
Fact-check statements with an ADK AI agent and Gemini model

Page Summary
The webpage provides an advanced guide on creating a fact-check custom function for Google Sheets using Google Apps Script, powered by a Vertex AI agent and Gemini model.
This solution demonstrates integrating AI agents for complex reasoning and AI models for advanced text capabilities directly into Google Sheets.
The custom function, named
FACT_CHECK, analyzes statements using a Vertex AI agent for reasoning and a Gemini model for output formatting.Implementing this solution requires setting up a Google Cloud project, enabling billing and necessary APIs, creating a service account, and deploying the Vertex AI agent.
The custom function can be used by entering
=FACT_CHECK("Your statement here")in a Google Sheet cell, with an optional second argument for specific output formatting.
Coding level: Advanced
Duration: 30 minutes
Project type:Custom function
Overview
A fact-check custom function for Google Sheets to be used as a bound AppsScript project powered by aVertex AIagent and Gemini model.
This sample demonstrates how you can use two powerful types of AI resourcesdirectly into your Google Sheets spreadsheets:
- AI agents for sophisticated, multi-tool, multi-step reasoningcapabilities using ADK agents deployed in the Vertex AI Agent Engine.
- AI models for advanced understanding, generative, and summarizationcapabilities using Gemini models from Vertex AI.
Objectives
- Understand what the solution does.
- Understand how the solution is implemented.
- Deploy the Vertex AI agent.
- Set up the script.
- Run the script.
About this solution
The Sheets custom function is namedFACT_CHECK and it operates as anend-to-end solution. It analyzes a statement, grounds its response using thelatest web information, and returns the result in the format you need:
- Usage:
=FACT_CHECK("Your statement here")for a concise and summarizedoutput.=FACT_CHECK("Your statement here", "Your output formattinginstructions here")for a specific output format.
- Reasoning:LLM Auditor ADK AI Agent(Python sample).
- Output formatting:Geminimodel.
This solution requests Vertex AI REST APIs usingUrlFetchApp.
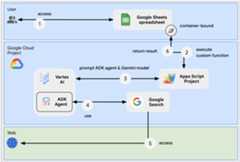
Architecture
The following diagram shows the architecture of the Google Workspace and GoogleCloud resources used by the custom function.
Prerequisites
To use this sample, you need the following prerequisites:
- A Google Account (Google Workspace accounts mightrequire administrator approval).
A web browser with access to the internet.
Prerequisites of the LLM Auditor ADK agent
- Python 3.11+: For installation, follow instructions on the officialPython website.
- Python Poetry: For installation, follow instructions on the officialPoetry website.
- Google Cloud CLI: For installation, follow instructions on the officialGoogle Cloud website.
Prepare the environment
This section shows how to create and configure a Google Cloud project.
Create a Google Cloud project
Google Cloud console
- In the Google Cloud console, go to Menu>IAM & Admin>Create a Project.
- In theProject Name field, enter a descriptive name for your project.
Optional: To edit theProject ID, clickEdit. The project ID can't be changed after the project is created, so choose an ID that meets your needs for the lifetime of the project.
- In theLocation field, clickBrowse to display potential locations for your project. Then, clickSelect.Caution: Can't find your Google Workspace organization?
This means you aren't signed in to a Google Workspace account. Some of the features described in Google Workspace developer documentation are only available to projects associated with an organization. - ClickCreate. The Google Cloud console navigates to the Dashboard page and your project is created within a few minutes.
gcloud CLI
In one of the following development environments, access the Google Cloud CLI (gcloud):
- Cloud Shell: To use an online terminal with the gcloud CLI already set up, activate Cloud Shell.
Activate Cloud Shell - Local Shell: To use a local development environment,install andinitialize the gcloud CLI.
To create a Cloud project, use thegcloud projects createcommand:gcloud projects createPROJECT_ID
Enable billing for the Cloud project
If you're unable to link a billing account, you don't have thepermissions needed to make this change. For more information, seePermissions required to enable billing.Google Cloud console
- In the Google Cloud console, go toBilling. ClickMenu>Billing>My Projects.
- InSelect an organization, choose the organization associated with your Google Cloud project.
- In the project row, open theActions menu (), clickChange billing, and choose the Cloud Billing account.
- ClickSet account.
gcloud CLI
- To list available billing accounts, run:
gcloud billing accounts list - Link a billing account with a Google Cloud project:
gcloud billing projects linkPROJECT_ID --billing-account=BILLING_ACCOUNT_IDReplace the following:
PROJECT_IDis theProject ID for the Cloud project for which you want to enable billing.BILLING_ACCOUNT_IDis thebilling account ID to link with the Google Cloud project.
Enable the Vertex AI API
Google Cloud console
In the Google Cloud console, enable the Vertex AI, and Cloud ResourceManager APIs.
Confirm that you're enabling the Vertex AI API in the correctCloud project, then clickNext.
Confirm that you're enabling the correct API, then clickEnable.
gcloud CLI
If necessary, set the current Cloud project to the one youcreated with the
gcloud config set projectcommand:gcloudconfigsetprojectPROJECT_IDReplacePROJECT_ID with theProject ID of theCloud project you created.
Enable the Vertex AI API with the
gcloud services enablecommand:gcloudservicesenableaiplatform.googleapis.com
Create a service account in Google Cloud console
Create a new service account with the roleVertex AI User by followingthese steps:
Google Cloud console
- In the Google Cloud console, go to Menu>IAM & Admin>Service Accounts.
- ClickCreate service account.
- Fill in the service account details, then clickCreate and continue.Note: By default, Google creates a unique service account ID. If you would like to change the ID, modify the ID in the service account ID field.
- Optional: Assign roles to your service account to grant access to your Google Cloud project's resources. For more details, refer toGranting, changing, and revoking access to resources.
- ClickContinue.
- Optional: Enter users or groups that can manage and perform actions with this service account. For more details, refer toManaging service account impersonation.
- ClickDone. Make a note of the email address for the service account.
gcloud CLI
- Create the service account:
gcloud iam service-accounts createSERVICE_ACCOUNT_NAME\ --display-name="SERVICE_ACCOUNT_NAME" - Optional: Assign roles to your service account to grant access to your Google Cloud project's resources. For more details, refer toGranting, changing, and revoking access to resources.
The service account appears on the service account page. Next, create a privatekey for the service account.
Create a private key
Warning: This example uses an exportedservice account key for simplicity's sake. Exporting a private key is notrecommended in production because it shouldn't be stored in an insecurelocation, such as source control.
To learn more about secure serviceaccount implementations and best practices, seeChoosewhen to use service accounts.
To create and download a private key for the service account, follow thesesteps:
- In the Google Cloud console, go to Menu>IAM & Admin>Service Accounts.
- Select your service account.
- ClickKeys>Add key>Create new key.
- SelectJSON, then clickCreate.
Your new public/private key pair is generated and downloaded to your machine as a new file. Save the downloaded JSON file as
credentials.jsonin your working directory. This file is the only copy of this key. For information about how to store your key securely, seeManaging service account keys. - ClickClose.
For more information about service accounts, seeservice accountsin the Google Cloud IAM documentation.
Deploy the LLM Auditor ADK AI Agent
If not done already, authenticate with your Google Cloud account andconfigure Google Cloud CLI to use your Google Cloud project.
gcloudauthapplication-defaultlogingcloudconfigsetprojectPROJECT_IDgcloudauthapplication-defaultset-quota-projectPROJECT_IDReplacePROJECT_ID with the ID of the Cloud project youcreated.
Download this GitHub repository
In your preferred local development environment, extract the downloadedarchive file and open the
adk-samples/python/agents/llm-auditordirectory.unzipadk-samples-main.zipcdadk-samples-main/python/agents/llm-auditorCreate a new Cloud Storage bucket dedicated to the ADK agent.
gcloudstoragebucketscreategs://CLOUD_STORAGE_BUCKET_NAME--project=PROJECT_ID--location=PROJECT_LOCATIONReplace the following:
- CLOUD_STORAGE_BUCKET_NAME with a unique bucket name you wantto use.
- PROJECT_ID with the ID of the Cloud project youcreated.
- PROJECT_LOCATION with the location of theCloud project you created.
Set the following environment variables:
exportGOOGLE_GENAI_USE_VERTEXAI=trueexportGOOGLE_CLOUD_PROJECT=PROJECT_IDexportGOOGLE_CLOUD_LOCATION=PROJECT_LOCATIONexportGOOGLE_CLOUD_STORAGE_BUCKET=CLOUD_STORAGE_BUCKET_NAMEReplace the following:
- CLOUD_STORAGE_BUCKET_NAME with the name of the bucket youcreated.
- PROJECT_ID with the ID of the Cloud project youcreated.
- PROJECT_LOCATION with the location of theCloud project you created.
Install and deploy ADK agent from virtual environment.
python3-mvenvmyenvsourcemyenv/bin/activatepoetryinstall--withdeploymentpython3deployment/deploy.py--createRetrieve the agent ID, you'll need it later to configure the custom function.
python3deployment/deploy.py--list
Review the sample code
Optionally, before creating the new spreadsheet, take a moment to review andfamiliarize yourself with the sample code hosted on GitHub.
Create and configure in a new spreadsheet
Click the following button and make a complete copy of the sample GoogleSheets spreadsheet including its container-bound Apps Scriptproject.
In the newly created spreadsheet, go toExtensions > Apps Script.
In the Apps Script project, go toProject Settings, clickEdit script properties, then clickAdd script property to add thefollowing script properties:
LOCATIONwith the location of the Google Cloud project created in previous stepssuch asus-central1.GEMINI_MODEL_IDwith the Gemini model you want to use such asgemini-2.5-flash-lite.REASONING_ENGINE_IDwith the ID of the LLM Auditor ADK Agent deployedin previous steps such as1234567890.SERVICE_ACCOUNT_KEYwith the JSON key from the service accountdownloaded in previous steps such as{ ... }.
ClickSave script properties
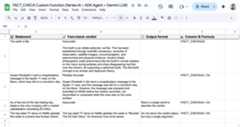
Test the custom function
- Go to the newly created spreadsheet.
- Change statements incolumn A.
- Formulas incolumn B execute and then display fact-check results.
Clean up
To avoid incurring charges to your Google Cloud account for the resources used in this tutorial, we recommend that you delete the Cloud project.
Caution: Deleting a project has the following effects:
- Everything in the project is deleted. If you used an existing project for this tutorial, when you delete it, you also delete any other work you've done in the project.
- Custom project IDs are lost. When you created this project, you might have created a custom project ID that you want to use in the future. To preserve the URLs that use the project ID, such as a URL on appspot.com, delete the selected resources inside the project instead of deleting the whole project.
If you plan to explore multiple tutorials and quickstarts, reusing projects can help you avoid exceeding project quota limits.
- In the Google Cloud console, go to theManage resources page. ClickMenu>IAM & Admin>Manage Resources.
- In the project list, select the project you want to delete and then clickDelete.
- In the dialog, type the project ID and then clickShut down to delete the project.
Next steps
- Plan travels with an AI agent accessible across Google Workspace
- Custom functions in Google Sheets
- Extending Google Sheets
Except as otherwise noted, the content of this page is licensed under theCreative Commons Attribution 4.0 License, and code samples are licensed under theApache 2.0 License. For details, see theGoogle Developers Site Policies. Java is a registered trademark of Oracle and/or its affiliates.
Last updated 2025-12-16 UTC.