
Inject scripts into the active tab
Simplify the styling of the current page by clicking the extension toolbar icon.
Overview
This tutorial builds an extension that simplifies the styling of the Chrome extension andChrome Web Store documentation pages so that they are easier to read.
In this guide, we're going to explain how to do the following:
- Use the extension service worker as the event coordinator.
- Preserve user privacy through the
"activeTab"permission. - Run code when the user clicks the extension toolbar icon.
- Insert and remove a style sheet using theScripting API.
- Use a keyboard shortcut to execute code.
Before you start
This guide assumes that you have basic web development experience. We recommend checking outHello World for an introduction to the extension development workflow.
Build the extension
To start, create a new directory calledfocus-mode that will hold the extension's files. If youprefer, you can download the complete source code fromGitHub.
Step 1: Add the extension data and icons
Create a file calledmanifest.json and include the following code.
{"manifest_version":3,"name":"Focus Mode","description":"Enable focus mode on Chrome's official Extensions and Chrome Web Store documentation.","version":"1.0","icons":{"16":"images/icon-16.png","32":"images/icon-32.png","48":"images/icon-48.png","128":"images/icon-128.png"}}To learn more about these manifest keys, check out the "Run scripts on every tab" tutorial that explains the extension'smetadata andicons in more detail.
Create animages folder thendownload the icons into it.
Step 2: Initialize the extension
Extensions can monitor browser events in the background using theextension's serviceworker. Service workers are special JavaScript environments that handleevents and terminate when they're not needed.
Start by registering the service worker in themanifest.json file:
{..."background":{"service_worker":"background.js"},...}Create a file calledbackground.js and add the following code:
chrome.runtime.onInstalled.addListener(()=>{chrome.action.setBadgeText({text:"OFF",});});The first event our service worker will listen for isruntime.onInstalled(). This method allows the extension to set an initialstate or complete some tasks on installation. Extensions can use theStorage API andIndexedDB to store the application state. In this case, though, since we're only handling two states, we will use theaction's badge text itself to track whether the extension is 'ON' or 'OFF'.
Step 3: Enable the extension action
Theextension action controls the extension's toolbar icon. So whenever the user clicks theextension icon, it will either run some code (like in this example) or display a popup. Add thefollowing code to declare the extension action in themanifest.json file:
{..."action":{"default_icon":{"16":"images/icon-16.png","32":"images/icon-32.png","48":"images/icon-48.png","128":"images/icon-128.png"}},...}Use the activeTab permission to protect user privacy
TheactiveTab permission grants the extensiontemporary ability to execute codeon the active tab. It also allows access tosensitive properties ofthe current tab.
This permission is enabled when the userinvokes the extension. In this case, the user invokes theextension by clicking on the extension action.
💡What other user interactions enable the activeTab permission in my own extension?
- Pressing a keyboard shortcut combination.
- Selecting a context menu item.
- Accepting a suggestion from the omnibox.
- Opening an extension popup.
The"activeTab" permission allows users topurposefully choose to run the extension on thefocused tab; this way, it protects the user's privacy. Another benefit is that it does nottrigger apermission warning.
To use the"activeTab" permission, add it to the manifest's permission array:
{..."permissions":["activeTab"],...}Step 4: Track the state of the current tab
After the user clicks the extension action, the extension will check if the URL matches adocumentation page. Next, it will check the state of the current tab and set the next state. Add thefollowing code tobackground.js:
constextensions='https://developer.chrome.com/docs/extensions';constwebstore='https://developer.chrome.com/docs/webstore';chrome.action.onClicked.addListener(async(tab)=>{if(tab.url.startsWith(extensions)||tab.url.startsWith(webstore)){// Retrieve the action badge to check if the extension is 'ON' or 'OFF'constprevState=awaitchrome.action.getBadgeText({tabId:tab.id});// Next state will always be the oppositeconstnextState=prevState==='ON'?'OFF':'ON';// Set the action badge to the next stateawaitchrome.action.setBadgeText({tabId:tab.id,text:nextState,});}});Step 5: Add or remove the style sheet
Now it's time to change the layout of the page. Create a file namedfocus-mode.css and include thefollowing code:
*{display:none!important;}html,body,*:has(article),article,article*{display:revert!important;}[role='navigation']{display:none!important;}article{margin:auto;max-width:700px;}Insert or remove the style sheet using theScripting API. Start bydeclaring the"scripting" permission in the manifest:
{..."permissions":["activeTab","scripting"],...}Finally, inbackground.js add the following code to change the layout of the page:
...if(nextState==="ON"){// Insert the CSS file when the user turns the extension onawaitchrome.scripting.insertCSS({files:["focus-mode.css"],target:{tabId:tab.id},});}elseif(nextState==="OFF"){// Remove the CSS file when the user turns the extension offawaitchrome.scripting.removeCSS({files:["focus-mode.css"],target:{tabId:tab.id},});}}});💡Can I use the Scripting API to inject code instead of a style sheet?
Yes. You can usescripting.executeScript() to inject JavaScript.
Optional: Assign a keyboard shortcut
Just for fun, add a shortcut to make it easier to enable or disable focus mode. Add the"commands" key to the manifest.
{..."commands":{"_execute_action":{"suggested_key":{"default":"Ctrl+B","mac":"Command+B"}}}}The"_execute_action" key runs the same code as theaction.onClicked() event, so no additionalcode is needed.
Test that it works
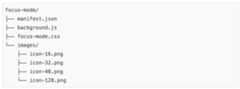
Verify that the file structure of your project looks like the following:
Load your extension locally
To load an unpacked extension in developer mode, follow the steps inHello World.
Test the extension on a documentation page
First, open any of the following pages:
Then, click the extension action. If you set up akeyboard shortcut, you can test it by pressingCtrl + B orCmd + B.
It should go from this:
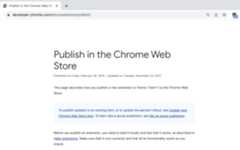
To this:
🎯 Potential enhancements
Based on what you've learned today, try to accomplish any of the following:
- Improve the CSS style sheet.
- Assign a different keyboard shortcut.
- Change the layout of your favorite blog or documentation site.
Keep building.
Congratulations on finishing this tutorial 🎉. Continue leveling up your skills by completing othertutorials on this series:
| Extension | What you will learn |
|---|---|
| Reading time | To insert an element on a specific set of pages automatically. |
| Tabs Manager | To create a popup that manages browser tabs. |
Continue exploring
We hope you enjoyed building this Chrome extension and are excited to continue your extensiondevelopment learning journey. We recommend the following learning paths:
- Thedeveloper's guide has dozens of additional links to pieces of documentationrelevant to advanced extension creation.
- Extensions have access to powerful APIs beyond what's available on the open web.TheChrome APIs documentation walks through each API.
Except as otherwise noted, the content of this page is licensed under theCreative Commons Attribution 4.0 License, and code samples are licensed under theApache 2.0 License. For details, see theGoogle Developers Site Policies. Java is a registered trademark of Oracle and/or its affiliates.
Last updated 2022-10-04 UTC.