Spring Boot 3 (Spring Security 6) with Kotlin & JWT
In this article, I will show you how to implement a secure REST API with Spring Boot 3, Spring Security, Kotlin, and JWT tokens.


If you would like to learn how to secure a REST API withSpring Boot 3 (Spring Security 6),Kotlin, andJWT tokens, then you came to the right place 😉
In this, comprehensive guide I will show you step-by-step how to:
- authenticate and authorize users,
- assign and verify roles,
- generate JWT tokens,
- and implement a refresh token flow.
And everything that with our beloved Kotlin programming language!
Video Tutorial
If you prefervideo content, then you can find this tutorial as a YouTube playlistright here.
Alternatively, you can start from the introduction:

If you find this content useful, please leave a subscription 😉
What Exactly Will We Implement?
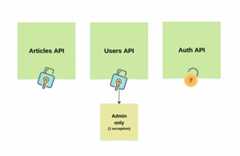
Well, in our project we will implement a REST API forarticles andusers.
Articles will be visible to any user who successfully authenticates using the JWT access token.
Usersendpoint, on the other hand, will be accessibleonly for admin users in our system (with one exception- a public endpoint for creating new users).
Of course, we will expose additional authentication endpoints, which will take data from users, likeemail andpassword and generate access and refresh tokens for our system.
Long story short- I believe this project will be simple enough to easily understand the topic, and comprehensive enough to cover the most popular real-life cases.
A Tiny Bit Of Theory
In this paragraph, I’d like to cover what exactly JWT tokens are, the difference between authorization and authentication, and present from a bird’s eye view how Spring Security works.
So, if you feel that you understand these and came here for the practice, then please skip to the next chapter 😉
Authentication vs Authorization
I am pretty sure that you heard both terms plenty of times already and even heard people using them alternately.
Nevertheless, although similar, these two terms refer to completely different things.
Imagine you’re at the entrance of a super-secret club:
Authentication is like showing your ID to prove you are who you say you are. It’s the process of confirming your identity. So, in our club scenario, it’s like showing your driver’s license to the bouncer.
Authorization, on the other hand, is like being allowed into different parts of the club based on your VIP status. Once you’re inside (thanks to authentication), authorization decides what you can and cannot do. For example, VIP members might access the VIP lounge, while regular guests can’t.
JWT Tokens
Among plenty of existing ways to authenticate users, JWTs (JSON Web Tokens) are one of the most popular ones.
They are like a digital secret handshake on the internet. When we log into a website, the server gives us a special JWT. This token is like a digital badge that says, “Hey, this person is legit!”
Why are they so cool? Well, they aresafe, compact,and allow us tohold information.
JWTs consist of three parts separated by dots: header.payload.signature:
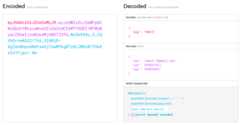
As we can see, the encoded value can be easily decoded and JWT token values can be read.
Theheadertypically consists of two parts: the type of the token (missing above), and the signing algorithm being used (HMAC SHA512).
The second part of the token is the payload, which contains theclaims. Claims, Claims are statements about an entity (typically, the user) and additional data.
Lastly, thesignature is used to verify that the sender of the JWT is who it says it is and to ensure that the message wasn’t changed along the way.
Bird’s Eye View on Spring Security
At this point, we know the difference between authentication and authorization and also what JWT tokens are. Awesome!
So, now I’ll try to do the impossible- explain how Spring Security works in a few sentences 🙂
Spring Security is like the security team of a building. It manages authentication and authorization for our app with:
- Filters– think of security filters as checkpoints at different doors in the building. When a request comes in, it goes through these filters. These filters handle tasks like authentication and authorization. For instance, there might be a filter that checks if you have a proper access card (authentication), and another that ensures you can enter specific rooms (authorization).
- Authentication– when you log in, Spring Security checks your credentials (like username and password). If they match, you’re authenticated. Spring Security uses authentication providers, which can be a database, LDAP, or any other source, to verify your identity.
- Security Context– once authenticated, your security details are stored in the Security Context. It’s like being given a special pass after passing through the checkpoint. This pass (security context) contains your roles and permissions.
- Authorization– now, when you try to access a specific part of the application, Spring Security checks your roles and permissions stored in the security context. If you’re authorized (based on your roles), you’re allowed in. Otherwise, you might be denied access.
- Customization– Spring Security allows you to customize the security filters, authentication providers, and access rules according to your application’s requirements. You can configure which URLs need authentication, what roles are required, etc.
And that’sbasically what we’re gonna learn today.
Import Spring Boot 3 Project
As the first step, let’s generate a new Spring Boot 3 project.
To do so, we can use theSpring Initializr page:

As we can see, in this project, we will useSpring Boot 3.1.5,Kotlin as a programming language, andKotlin DSL for our Gradle build config.
At this point, the only dependency required to expose a REST API isSpring Web. We will add Spring Security, and libraries necessary for JWT tokens later (and we will see why later, too).
With all of that done, we can hit thegenerate button, download the zip file, and import it to IntelliJ.
Expose Articles API
Following, let’s implement the logic necessary to expose our first endpoint-GET /api/article .
In the future, this endpoint will be accessible only to users with a valid JWT token.
Create Article Model
As the first step, let’s introduce a new package-model – and create a new data class-Article:
import java.util.*data class Article( val id: UUID, val title: String, val content: String,)
This class consists of three example fields simulating a real-life article.
Implement Article Repository
Secondly, we must introduce a new class responsible for article retrieval and storage.
Let’s add therepository package and implementArticleRepository:
import com.codersee.jwtauth.model.Articleimport org.springframework.stereotype.Repositoryimport java.util.UUID@Repositoryclass ArticleRepository { private val articles = listOf( Article(id = UUID.randomUUID(), title= "Article 1", content= "Content 1"), Article(id = UUID.randomUUID(), title= "Article 2", content= "Content 2"), ) fun findAll(): List<Article> = articles}In our example, articles are nothing else, than a hardcoded private list of items.
Additionally, we expose thefindAll() method, which encapsulates the list and which we will be invoking from outside the class.
Of course, I did it this way to keep it simple and so that we do not lose focus on what matters in this tutorial- Spring Boot security with Kotlin and JWT tokens.
Nevertheless, you can easily adjust this project to your needs. In real life, this would be the class where you can put logic responsible for communication with your database.
Create Service
As the next step, let’s create theservice package and introduce theArticleService:
import com.codersee.jwtauth.model.Articleimport com.codersee.jwtauth.repository.ArticleRepositoryimport org.springframework.stereotype.Service@Serviceclass ArticleService( private val articleRepository: ArticleRepository) { fun findAll(): List<Article> = articleRepository.findAll()}As we can see, this class exposes thefindAll() function and does nothing else than invoking thefindAll() method from our repository.
Again, this might look a bit like anoverengineering. But trust me, keeping a well-organized project from the very beginning will pay off in the future.
Expose Article REST API
Lastly, let’s add thecontroller.article package and put two classes in it.
Let’s start with theArticleResponse:
import java.util.*data class ArticleResponse( val id: UUID, val title: String, val content: String,)
Before returning any article from our REST API, we will map model objects into the response objects.
And with that done, let’s implement theArticleController:
import com.codersee.jwtauth.model.Articleimport com.codersee.jwtauth.service.ArticleServiceimport org.springframework.web.bind.annotation.*import java.util.*@RestController@RequestMapping("/api/article")class ArticleController( private val articleService: ArticleService) { @GetMapping fun listAll(): List<ArticleResponse> = articleService.findAll() .map { it.toResponse() } private fun Article.toResponse(): ArticleResponse = ArticleResponse( id = this.id, title = this.title, content = this.content, )}As we can see, we must annotate our controller class with the@RestControllerannotation in order to expose a REST API in Spring Boot.
Additionally, we add the@RequestMapping annotation so that whenever we hit the/api/article endpoint, Spring knows that this is the class it should use to handle the request.
Lastly, we mark thelistAll() function with@GetMapping, and convert all foundArticle instances to theArticleResponse.
Later, when we add the JWT security to our Spring Boot Kotlin project, these endpoints will be accessible only forADMIN users with one exception- the endpoint responsible for creating new users- which will be publicly exposed.
Add User Model
With that said, let’s add theUser.kt file to themodel package:
import java.util.*data class User( val id: UUID, val email: String, val password: String, val role: Role)enum class Role { USER, ADMIN}As we can see, apart from theid, the User class contains three important fields:email,password, androle, which we will extensively when dealing with JWT tokens.
Implement UserRepository
Following, let’s create theUserRepository in therepository package:
import com.codersee.jwtauth.model.Roleimport com.codersee.jwtauth.model.Userimport org.springframework.stereotype.Repositoryimport java.util.*@Repositoryclass UserRepository { private val users = mutableSetOf( User( id = UUID.randomUUID(), email = "email-1@gmail.com", password = "pass1", role = Role.USER, ), User( id = UUID.randomUUID(), email = "email-2@gmail.com", password = "pass2", role = Role.ADMIN, ), User( id = UUID.randomUUID(), email = "email-3@gmail.com", password = "pass3", role = Role.USER, ), ) fun save(user: User): Boolean = users.add(user) fun findByEmail(email: String): User? = users .firstOrNull { it.email == email } fun findAll(): Set<User> = users fun findByUUID(uuid: UUID): User? = users .firstOrNull { it.id == uuid } fun deleteByUUID(uuid: UUID): Boolean { val foundUser = findByUUID(uuid) return foundUser?.let { users.removeIf { it.id == uuid } } ?: false }}Similarly to our previous repository- we simply introduce a mutable list, which we can edit with a bunch of util methods.
And don’t worry about the password stored in plain text- we will get back to that topic, too 🙂
Add UserService
Nextly, we must go to theservice package and introduce thisUserService:
import com.codersee.jwtauth.model.Userimport com.codersee.jwtauth.repository.UserRepositoryimport org.springframework.stereotype.Serviceimport java.util.*@Serviceclass UserService( private val userRepository: UserRepository) { fun createUser(user: User): User? { val found = userRepository.findByEmail(user.email) return if (found == null) { userRepository.save(user) user } else null } fun findByUUID(uuid: UUID): User? = userRepository.findByUUID(uuid) fun findAll(): List<User> = userRepository.findAll() .toList() fun deleteByUUID(uuid: UUID): Boolean = userRepository.deleteByUUID(uuid)}Nothing spectacular here, so let’s move to the next step.
Expose User REST API
Just like with articles, let’s start with introducing request/response objects.
This time, we will need both theUserRequest:
data class UserRequest( val email: String, val password: String,)
And theUserResponse, which will be serialized into JSON objects:
import java.util.*data class UserResponse( val uuid: UUID, val email: String,)
And with that done, we can add theUserController class:
import com.codersee.jwtauth.model.Roleimport com.codersee.jwtauth.model.Userimport com.codersee.jwtauth.service.UserServiceimport org.springframework.http.HttpStatusimport org.springframework.http.ResponseEntityimport org.springframework.web.bind.annotation.*import org.springframework.web.server.ResponseStatusExceptionimport java.util.*@RestController@RequestMapping("/api/user")class UserController( private val userService: UserService) { @PostMapping fun create(@RequestBody userRequest: UserRequest): UserResponse = userService.createUser(userRequest.toModel()) ?.toResponse() ?: throw ResponseStatusException(HttpStatus.BAD_REQUEST, "Cannot create user.") @GetMapping fun listAll(): List<UserResponse> = userService.findAll() .map { it.toResponse() } @GetMapping("/{uuid}") fun findByUUID(@PathVariable uuid: UUID): UserResponse = userService.findByUUID(uuid) ?.toResponse() ?: throw ResponseStatusException(HttpStatus.NOT_FOUND, "User not found.") @DeleteMapping("/{uuid}") fun deleteByUUID(@PathVariable uuid: UUID): ResponseEntity<Boolean> { val success = userService.deleteByUUID(uuid) return if (success) ResponseEntity.noContent() .build() else throw ResponseStatusException(HttpStatus.NOT_FOUND, "User not found.") } private fun User.toResponse(): UserResponse = UserResponse( uuid = this.id, email = this.email, ) private fun UserRequest.toModel(): User = User( id = UUID.randomUUID(), email = this.email, password = this.password, role = Role.USER, )}As we can see, the logic above is pretty similar to what we’ve done before.
We mark our class with@RestController and@RequestMapping, functions with annotations matching HTTP Methods they are gonna handle, and also our path variables and request bodies.
When converting between models/requests/responses, we make use ofextension functions, which are my favorite approach for mappers in Kotlin.
Lastly, whenever we want to return anything else than200 OK, we use theResponseStatusException, which is a clean way to do so.
If you would like to test this API now, then check out the followingPostman collection.
Import Spring Security and JWT Library
Wonderful. At this point, we have everything we need to finally add Spring Security to our Spring Boot Kotlin project, and start implementingJWT authentication andauthorization.
Update build.gradle.kts
As the first step, let’s add the following to thebuild.gradle.kts file:
dependencies {// other importsimplementation("io.jsonwebtoken:jjwt-api:0.12.3")implementation("io.jsonwebtoken:jjwt-impl:0.12.3")implementation("io.jsonwebtoken:jjwt-jackson:0.12.3")implementation("org.springframework.boot:spring-boot-starter-security")testImplementation("org.springframework.security:spring-security-test")}As we can see, in order to secure our Spring Boot 3 REST API, we must add not only the Spring Security but also an additional library to deal with JWT tokens.
Although the Spring security is a must-have, please feel free to choose whatever JWT library suits you best (you can find a full listhere). I have decided to go withio.jsonwebtoken which is the most popular Java library.
Sync and Rerun Project
Following, let’s sync our Gradle project and rerun our application.
Among other logs, we will see the following lines:
Using generated security password: 52d7d5b8-ce49-4d93-a4e1-721780290e58This generated password is for development use only. Your security configuration must be updated before running your application in production.
Moreover, when we try to query our endpoints, we will get401 Unauthorized for each request.
But what happened?
Well, whenever we add Spring Security to our Spring Boot project, theauthentication gets enabled by default.
In other words, we can query our endpoint now using thebasic access authentication withuser as a username and the randomly generated password as thepassword.
As a proof, when we update theAuthorization in our Postman collection, we will start seeing results again:

Create JWT Tokens
Although basic auth may be a good choice in some cases, in this tutorial, I would like to show you how to authenticate and authorize requests usingJWT access tokens.
So, let’s start everything by implementing a service responsible for token operations.
Edit application.yaml file
As the first step, let’s navigate to theresources folder and edit theapplication.yaml file:
Note: when generating a new Spring Boot project, theapplication.propertiesfile is created automatically. So before we start, let’s change the extension toyaml.
jwt: key: ${JWT_KEY} access-token-expiration: 3600000 refresh-token-expiration: 86400000As we can see, we introduce 3 custom properties: the key and expiration time (in milliseconds) for both access and refresh tokens.
The key is value will be sourced from theJWT_TOKEN environment variable, which is nothing else than a randomly generated String value. Later, we will see where and why we need it.
Important: vulnerable values should never be hardcoded when implementing a Spring Boot (and not only) application.
Regardless of the environment the app is running in, values should be stored securely and sourced to our application using environment variables.
Make Use Of @ConfigurationProperties
As the next step, let’s make use of the@ConfigurationProperties to easily convert our properties into Kotlin objects.
Let’s start by adding theconfiguration package and theJwtProperties class:
import org.springframework.boot.context.properties.ConfigurationProperties@ConfigurationProperties("jwt")data class JwtProperties( val key: String, val accessTokenExpiration: Long, val refreshTokenExpiration: Long,)If you’d like to learn more about @ConfigurationProperties, then I haveanother article you might want to check out later.
Additionally, let’s add theConfiguration class:
import org.springframework.boot.context.properties.EnableConfigurationPropertiesimport org.springframework.context.annotation.Configuration@Configuration@EnableConfigurationProperties(JwtProperties::class)class Configuration
This way, we enable support for beans annotated with @ConfigurationProperties in our project.
Add TokenService
With all of that done, let’s add theTokenService class:
@Serviceclass TokenService( jwtProperties: JwtProperties) { private val secretKey = Keys.hmacShaKeyFor( jwtProperties.key.toByteArray() ) fun generate( userDetails: UserDetails, expirationDate: Date, additionalClaims: Map<String, Any> = emptyMap() ): String = Jwts.builder() .claims() .subject(userDetails.username) .issuedAt(Date(System.currentTimeMillis())) .expiration(expirationDate) .add(additionalClaims) .and() .signWith(secretKey) .compact() fun isValid(token: String, userDetails: UserDetails): Boolean { val email = extractEmail(token) return userDetails.username == email && !isExpired(token) } fun extractEmail(token: String): String? = getAllClaims(token) .subject fun isExpired(token: String): Boolean = getAllClaims(token) .expiration .before(Date(System.currentTimeMillis())) private fun getAllClaims(token: String): Claims { val parser = Jwts.parser() .verifyWith(secretKey) .build() return parser .parseSignedClaims(token) .payload }}As we can see, this class exposes functions, which we can use to deal with JWT access and refresh tokens.
Let’s walk quickly through our logic:
private val secretKey = Keys.hmacShaKeyFor( jwtProperties.key.toByteArray())
ThesecretKey is nothing else than an instance ofSecretKey, which we will use tosign andverify JWT tokens in our system. In our case, we will use theHMAC-SHA algorithm based on the random key we provided to our project.
fun generate( userDetails: UserDetails, expirationDate: Date, additionalClaims: Map<String, Any> = emptyMap()): String = Jwts.builder() .claims() .subject(userDetails.username) .issuedAt(Date(System.currentTimeMillis())) .expiration(expirationDate) .add(additionalClaims) .and() .signWith(secretKey) .compact()
Thegenerate function is responsible for creating a serialized, URL-safe String with JWT tokens. We set thesubject, expiration date, and additional claims based on the arguments passed to it.
Lastly, we sign the token using theSecretKey instance created in the previous step.
Additionally, we provide more functions which we will use later to extract values from tokens and validate them:
fun isValid(token: String, userDetails: UserDetails): Boolean { val email = extractEmail(token) return userDetails.username == email && !isExpired(token)}fun extractEmail(token: String): String? = getAllClaims(token) .subjectfun isExpired(token: String): Boolean = getAllClaims(token) .expiration .before(Date(System.currentTimeMillis()))private fun getAllClaims(token: String): Claims { val parser = Jwts.parser() .verifyWith(secretKey) .build() return parser .parseSignedClaims(token) .payload}Implement Custom UserDetailsService
As the next step, let’s introduce a custom implementation ofUserDetailsService.
But what exactly isUserDetailsService andUserDetails?
Well, theUserDetails represents the core user information. In our case, we will use the default implementation calledUser, which holds the default information, such as username, password, and a collection of granted authorities (roles).
TheUserDetailsService is nothing else than an interface used to load user-specific data. It is used by Spring Security to interact with our data source and validate users during authentication.
With that said, let’s add a new class-CustomUserDetailsService– to theservice package:
import com.codersee.jwtauth.repository.UserRepositoryimport org.springframework.security.core.userdetails.Userimport org.springframework.security.core.userdetails.UserDetailsimport org.springframework.security.core.userdetails.UserDetailsServiceimport org.springframework.security.core.userdetails.UsernameNotFoundExceptionimport org.springframework.stereotype.Servicetypealias ApplicationUser = com.codersee.jwtauth.model.User@Serviceclass CustomUserDetailsService( private val userRepository: UserRepository) : UserDetailsService { override fun loadUserByUsername(username: String): UserDetails = userRepository.findByEmail(username) ?.mapToUserDetails() ?: throw UsernameNotFoundException("Not found!") private fun ApplicationUser.mapToUserDetails(): UserDetails = User.builder() .username(this.email) .password(this.password) .roles(this.role.name) .build()}As we can see, both theusername andemail in our system refer to the same thing, which is used to uniquely identify users.
And in order to fetchUserDetails we must find the user in our repository and map it to theUser instance.
Additionally, we make use of thetypealiaswhich is a great way to avoid fully qualified name (we have both User in ourmodelpackage and User from Spring Security
Update Configuration
With that done, let’s get back to theConfiguration class and register a few beans:
import com.codersee.jwtauth.repository.UserRepositoryimport com.codersee.jwtauth.service.CustomUserDetailsServiceimport org.springframework.boot.context.properties.EnableConfigurationPropertiesimport org.springframework.context.annotation.Beanimport org.springframework.context.annotation.Configurationimport org.springframework.security.authentication.AuthenticationManagerimport org.springframework.security.authentication.AuthenticationProviderimport org.springframework.security.authentication.dao.DaoAuthenticationProviderimport org.springframework.security.config.annotation.authentication.configuration.AuthenticationConfigurationimport org.springframework.security.core.userdetails.UserDetailsServiceimport org.springframework.security.crypto.bcrypt.BCryptPasswordEncoderimport org.springframework.security.crypto.password.PasswordEncoder@Configuration@EnableConfigurationProperties(JwtProperties::class)class Configuration { @Bean fun userDetailsService(userRepository: UserRepository): UserDetailsService = CustomUserDetailsService(userRepository) @Bean fun encoder(): PasswordEncoder = BCryptPasswordEncoder() @Bean fun authenticationProvider(userRepository: UserRepository): AuthenticationProvider = DaoAuthenticationProvider() .also { it.setUserDetailsService(userDetailsService(userRepository)) it.setPasswordEncoder(encoder()) } @Bean fun authenticationManager(config: AuthenticationConfiguration): AuthenticationManager = config.authenticationManager}Firstly, we must register the bean of typeUserDetailsService, which we introduced in the previous step.
Following, we register aPasswordEncoder. To put it simply,we should never store passwords in plain text. They should be alwaysencrypted, orhashed. In this tutorial, we will use theBCrypt strong hashing function for that purpose.
Following, we must provide theAuthenticationProvider and configure which UserDetailsService we will use and the password encoder.
Update UserRepository
In the previous step, I mentioned that we should never store passwords in plain text.
So, to fix that, let’s get back to theUserRepository and make the necessary changes:
@Repositoryclass UserRepository( private val encoder: PasswordEncoder) { private val users = mutableSetOf( User( id = UUID.randomUUID(), email = "email-1@gmail.com", password = encoder.encode("pass1"), role = Role.USER, ), User( id = UUID.randomUUID(), email = "email-2@gmail.com", password = encoder.encode("pass2"), role = Role.ADMIN, ), User( id = UUID.randomUUID(), email = "email-3@gmail.com", password = encoder.encode("pass3"), role = Role.USER, ), ) fun save(user: User): Boolean { val updated = user.copy(password = encoder.encode(user.password)) return users.add(updated) }}As we can see, after this step both our predefined users and all users which we will create will have their passwords hashed.
Implement AuthenticationFilter
Uff, quite a lot of preparation must be done before we secure our Spring Boot 3 Kotlin app with JWT tokens, isn’t it?
But don’t worry, we’re almost there.
As the next step, let’s navigate to theconfig package and introduce our custom Filter:
import com.codersee.jwtauth.service.CustomUserDetailsServiceimport com.codersee.jwtauth.service.TokenServiceimport jakarta.servlet.FilterChainimport jakarta.servlet.http.HttpServletRequestimport jakarta.servlet.http.HttpServletResponseimport org.springframework.security.authentication.UsernamePasswordAuthenticationTokenimport org.springframework.security.core.context.SecurityContextHolderimport org.springframework.security.core.userdetails.UserDetailsimport org.springframework.security.web.authentication.WebAuthenticationDetailsSourceimport org.springframework.stereotype.Componentimport org.springframework.web.filter.OncePerRequestFilter@Componentclass JwtAuthenticationFilter( private val userDetailsService: CustomUserDetailsService, private val tokenService: TokenService,) : OncePerRequestFilter() { override fun doFilterInternal( request: HttpServletRequest, response: HttpServletResponse, filterChain: FilterChain ) { val authHeader: String? = request.getHeader("Authorization") if (authHeader.doesNotContainBearerToken()) { filterChain.doFilter(request, response) return } val jwtToken = authHeader!!.extractTokenValue() val email = tokenService.extractEmail(jwtToken) if (email != null && SecurityContextHolder.getContext().authentication == null) { val foundUser = userDetailsService.loadUserByUsername(email) if (tokenService.isValid(jwtToken, foundUser)) updateContext(foundUser, request) filterChain.doFilter(request, response) } } private fun String?.doesNotContainBearerToken() = this == null || !this.startsWith("Bearer ") private fun String.extractTokenValue() = this.substringAfter("Bearer ") private fun updateContext(foundUser: UserDetails, request: HttpServletRequest) { val authToken = UsernamePasswordAuthenticationToken(foundUser, null, foundUser.authorities) authToken.details = WebAuthenticationDetailsSource().buildDetails(request) SecurityContextHolder.getContext().authentication = authToken }}I know, quite a lot of logic, but I’ll explain it step-by-step in a moment.
But before that, let’s understandwhat are Filters in Spring Framework.
Well, every request made to our Spring Framework application goes through the filter chain, where each filter in the chain can perform some operations on the request or response.
In our case, we want to use this feature toauthenticaterequests made to our REST API. We want to check whether a user sent a JWT token and validate it, and if everything is fine, we want to update the Spring Security Context.
And that’s exactly what’s happening in the code above.
Firstly, we check if the requestcontains an Authorization header. If no, we do not proceed with this function and we simply pass the request down the filter chain.
Nextly, we extract the JWT token. A validAuthorization header value consists of theBearer <JWT>, so we must extract the token itself.
Following, we read theemail value from the token. And when we make sure it is not null and there’s no previously authenticated principal in the security context, we fetch theUserDetails, which we then use to validate them with the token.
Lastly, we simply update the security context in our system withfoundUser (which isUserDetails) and authorities (which, in our case will be eitherADMIN orUSER).
To sum up, this functionwill be invoked once per each request. In simple terms, it will check the JWT token and if everything is fine, it will update the Spring Security context with information about user and its roles.
Add Security Configuration
At this point, we did everything we needed to to in order toauthenticate the user.
In this step, we will learn how toauthorize him.
And to do so, let’s introduce a new class-SecurityConfiguration – in theconfig package:
import org.springframework.context.annotation.Beanimport org.springframework.context.annotation.Configurationimport org.springframework.http.HttpMethodimport org.springframework.security.authentication.AuthenticationProviderimport org.springframework.security.config.annotation.web.builders.HttpSecurityimport org.springframework.security.config.annotation.web.configuration.EnableWebSecurityimport org.springframework.security.config.http.SessionCreationPolicyimport org.springframework.security.web.DefaultSecurityFilterChainimport org.springframework.security.web.authentication.UsernamePasswordAuthenticationFilter@Configuration@EnableWebSecurityclass SecurityConfiguration( private val authenticationProvider: AuthenticationProvider) { @Bean fun securityFilterChain( http: HttpSecurity, jwtAuthenticationFilter: JwtAuthenticationFilter ): DefaultSecurityFilterChain { http .csrf { it.disable() } .authorizeHttpRequests { it .requestMatchers("/api/auth", "api/auth/refresh", "/error") .permitAll() .requestMatchers(HttpMethod.POST, "/api/user") .permitAll() .requestMatchers("/api/user**") .hasRole("ADMIN") .anyRequest() .fullyAuthenticated() } .sessionManagement { it.sessionCreationPolicy(SessionCreationPolicy.STATELESS) } .authenticationProvider(authenticationProvider) .addFilterBefore(jwtAuthenticationFilter, UsernamePasswordAuthenticationFilter::class.java) return http.build() }}As we can see, the above config exposes a new bean of typeDefaultSecurityFilterChain.
To put it simply, this is the way we can modify the default chain by adding, removing, or replacing filters to tailor the security configuration according to our needs.
The first thing we do isdisable the CSRF protection. It’s enabled by default, and in most cases not needed (but in real-life projects, please learn a bit more about CSRF attacks and whether your codebase is vulnerable).
Following, we configure theauthorization. We can clearly see that requests to “/api/auth”, “api/auth/refresh”, “/error”, and POST requests to “/api/user” will beaccessible without a token. And that’s correct- we cannot require a valid access token for users, who want to sign in, who want to create a new account, and when the API client wants to refresh the token.
And if you are wondering why is the “/error” in this list, too, then here comes the answer. It is because of the way Spring handles errors internally. Without that, every exception we throw in our codebasewill return 403 Forbidden, instead of the HTTP status code we provided.
When it comes to the rest of the “/api/user” requests- we want to allow only users with roleADMIN.
And what with the rest of the requests? Well, we want them to be accessed only by fully authenticated users. But what does it mean? In our, stateless REST API, it means simply that every user with a valid JWT token will be able to access them (regardless of his role).
After that, we informed Spring that it should never create a HttpSession (we want our security to be stateless) and that it should never use it to obtain the SecurityContext.
And lastly, we register ourCustomAuthenticationProvider and let Spring Security know thatJwtAuthenticationFilter we implemented previously should be added before the defaultUsernamePasswordAuthenticationFilter (the one that required us to specify basic auth).
Expose Login Endpoint – Generate Access Token
With all of that done, we can finally expose the endpoint, which will be used by our REST API consumers to get theJWT access token.
Let’s create theconfig.auth package and add a new controller class:
import com.codersee.jwtauth.service.AuthenticationServiceimport org.springframework.web.bind.annotation.PostMappingimport org.springframework.web.bind.annotation.RequestBodyimport org.springframework.web.bind.annotation.RequestMappingimport org.springframework.web.bind.annotation.RestController@RestController@RequestMapping("/api/auth")class AuthController( private val authenticationService: AuthenticationService) { @PostMapping fun authenticate( @RequestBody authRequest: AuthenticationRequest ): AuthenticationResponse = authenticationService.authentication(authRequest)}As we can see, this controller usesAuthenticationService which we will implement in a moment.
But before we do so, let’s add theAuthenticationRequest:
data class AuthenticationRequest( val email: String, val password: String,)
And the response class:
data class AuthenticationResponse( val accessToken: String,)
After that, let’s get back to theservice package and implement a service, which will be responsible for authentication and token generation:
import com.codersee.jwtauth.controller.auth.AuthenticationRequestimport com.codersee.jwtauth.controller.auth.AuthenticationResponseimport com.codersee.jwtauth.controller.config.JwtPropertiesimport org.springframework.security.authentication.AuthenticationManagerimport org.springframework.security.authentication.UsernamePasswordAuthenticationTokenimport org.springframework.security.core.userdetails.UserDetailsimport org.springframework.stereotype.Serviceimport java.util.*@Serviceclass AuthenticationService( private val authManager: AuthenticationManager, private val userDetailsService: CustomUserDetailsService, private val tokenService: TokenService, private val jwtProperties: JwtProperties,) { fun authentication(authenticationRequest: AuthenticationRequest): AuthenticationResponse { authManager.authenticate( UsernamePasswordAuthenticationToken( authenticationRequest.email, authenticationRequest.password ) ) val user = userDetailsService.loadUserByUsername(authenticationRequest.email) val accessToken = createAccessToken(user) return AuthenticationResponse( accessToken = accessToken, ) } private fun createAccessToken(user: UserDetails) = tokenService.generate( userDetails = user, expirationDate = getAccessTokenExpiration() ) private fun getAccessTokenExpiration(): Date = Date(System.currentTimeMillis() + jwtProperties.accessTokenExpiration)}As we can see, the first thing we do is invoke theauthenticate method fromAuthenticationManager.
If theemail andpassword values don’t match with any of the users in our system, theauthenticate method will throwAuthenticationException and the API will return403 Forbidden.
On the other hand, when they match, we will fetch theUserDetails and use it to generate a JWT token with an expiration time set inapplication.yaml
At the moment, I highly encourage you to run our application and try to call endpoints with different cases. If you would like to use a ready-to-go Postman collection, then you can find one with all endpoints in the next chapter about refresh tokens.
JWT Refresh Token
Excellent! At this point, our REST API is properly secured and utilizing the JWT access tokens.
But depending on your needs, you may want to introduce theJWT refresh tokensto the system.
Introduce New Endpoint
Firstly, let’s introduce a new endpoint and update our response classes.
Let’s start by adding a newTokenResponse:
data class TokenResponse( val token: String)
We will use this class to return therefreshed access token.
Following, let’s make the necessary changes to theAuthenticationResponse:
data class AuthenticationResponse( val accessToken: String, val refreshToken: String,)
As we can see, therefreshToken value will be returned when a user authenticates successfully along with the JWT token value.
After that, let’s add theRefreshTokenRequest, which will be used to deserialize refresh token sent by a user:
data class RefreshTokenRequest( val token: String)
Great!
At this point, we can add a new endpoint:
@PostMapping("/refresh") fun refreshAccessToken( @RequestBody request: RefreshTokenRequest ): TokenResponse = authenticationService.refreshAccessToken(request.token) ?.mapToTokenResponse() ?: throw ResponseStatusException(HttpStatus.FORBIDDEN, "Invalid refresh token.") private fun String.mapToTokenResponse(): TokenResponse = TokenResponse( token = this )Don’t worry about the missingrefreshAccessToken method, we will get back to it in a moment.
Implement Refresh Token Repository
As the next step, let’s go to therepository package and introduce theRefreshTokenRepository:
import org.springframework.security.core.userdetails.UserDetailsimport org.springframework.stereotype.Component@Componentclass RefreshTokenRepository { private val tokens = mutableMapOf<String, UserDetails>() fun findUserDetailsByToken(token: String) : UserDetails? = tokens[token] fun save(token: String, userDetails: UserDetails) { tokens[token] = userDetails }}As we can see, this class will be responsible for persisting and retrieving refresh tokens.
Along with our tokens, we will store the associatedUserDetails instances, so that later we could match the associated subject (email).
Edit AuthenticationService
As the last thing, we must get back to theAuthenticationService and make the necessary changes:
import com.codersee.jwtauth.controller.auth.AuthenticationRequestimport com.codersee.jwtauth.controller.auth.AuthenticationResponseimport com.codersee.jwtauth.controller.config.JwtPropertiesimport com.codersee.jwtauth.repository.RefreshTokenRepositoryimport org.springframework.security.authentication.AuthenticationManagerimport org.springframework.security.authentication.UsernamePasswordAuthenticationTokenimport org.springframework.security.core.userdetails.UserDetailsimport org.springframework.stereotype.Serviceimport java.util.*@Serviceclass AuthenticationService( private val authManager: AuthenticationManager, private val userDetailsService: CustomUserDetailsService, private val tokenService: TokenService, private val jwtProperties: JwtProperties, private val refreshTokenRepository: RefreshTokenRepository,) { fun authentication(authenticationRequest: AuthenticationRequest): AuthenticationResponse { authManager.authenticate( UsernamePasswordAuthenticationToken( authenticationRequest.email, authenticationRequest.password ) ) val user = userDetailsService.loadUserByUsername(authenticationRequest.email) val accessToken = createAccessToken(user) val refreshToken = createRefreshToken(user) refreshTokenRepository.save(refreshToken, user) return AuthenticationResponse( accessToken = accessToken, refreshToken = refreshToken ) } fun refreshAccessToken(refreshToken: String): String? { val extractedEmail = tokenService.extractEmail(refreshToken) return extractedEmail?.let { email -> val currentUserDetails = userDetailsService.loadUserByUsername(email) val refreshTokenUserDetails = refreshTokenRepository.findUserDetailsByToken(refreshToken) if (!tokenService.isExpired(refreshToken) && refreshTokenUserDetails?.username == currentUserDetails.username) createAccessToken(currentUserDetails) else null } } private fun createAccessToken(user: UserDetails) = tokenService.generate( userDetails = user, expirationDate = getAccessTokenExpiration() ) private fun createRefreshToken(user: UserDetails) = tokenService.generate( userDetails = user, expirationDate = getRefreshTokenExpiration() ) private fun getAccessTokenExpiration(): Date = Date(System.currentTimeMillis() + jwtProperties.accessTokenExpiration) private fun getRefreshTokenExpiration(): Date = Date(System.currentTimeMillis() + jwtProperties.refreshTokenExpiration)}Let’s summarize what exactly has changed here.
Firstly, we imported theRefreshTokenRepository, so that we could persist new tokens and retrieve the saved ones.
Moreover, we must generate a new refresh token whenever a user authenticates successfully. And that’s why we added thegetRefreshTokenExpiration function and two additional lines in theauthentication method.
When it comes to the refresh token flow, it can be summarized in the following steps:
- We extract the user
emailfrom the passed refresh token. - If this step is completed successfully, we fetch thecurrent user details by the value.
- After that, we look for thepersisted user details with the refresh token.
- Lastly, if the refresh token is not expired and the email from JWT subject matches thecurrent user details, then a newaccess token is generated for that user.
- Otherwise, we return null, which will be translated to
403 Forbiddenin our controller.
And basically, that’s all 🙂
If you would like to use a ready-to-go Postman collection with auh headers, then you canfind it right here.
Summary
And that’s all for this tutorial in which we have learned how to secure the REST API with Spring Boot 3 (Spring Security 6) with JWT access and refresh tokens and Kotlin. Good job!
If you would like to get the source code for this lesson, then check outthis GitHub repository.
Lastly, if you enjoyed this one, then do not forget to leave a comment and check out myComplete Kotlin Course 🙂
Related Posts


Ktor Server Pro Course
Learn everything you need to know to create backends using Kotlin and Ktor. From the very basics- like configuring the environment and setting up a new project- to real-time chats with WebSockets.
8 Comments
Leave a ReplyCancel Reply
First, I would recommend for any application, use Auth0 as a User Repository. This is usually free for developers playing around with an outside Authentication service. Second, I would have the UI use the Auth0/Okta or some other API do the Authentication. This way you are passing the username/password credentials to another source, and they are responsible for making the app secure. You’re app therefore has no exposure to those credentials. The UI will get back a token response (JWT) and yes, that can be sent back to the back-end API’s for Authorization.
Both Users/Roles can be stored in an Authentication Service, and that way you don’t have to worry about saving usernames or passwords in your application database.Very details, thanks a lot.
Your document is very easy to read and understand. It saved my life. Thank you for sharing.
Could you share how to log out?How can I disable the security to implement the controller tests?
How do I create user as ADMIN ROLE?
If I create user I didn’t see any role that We can define.
There are some routes that need ADMIN ROLE to access it.
Thanks
Good tutorial, great to know the nuts and bolts of it.
I can’t get the application (from git) to run. Could be a library issues, but I barely understand the code, so debugging is a little beyond me. Getting this error:Error creating bean with name ‘jwtAuthenticationFilter’ defined in file [\jwt_auth\build\classes\kotlin\main\com\codersee\jwtauth\config\JwtAuthenticationFilter.class]:
Unsatisfied dependency expressed through constructor parameter 1:
Error creating bean with name ‘tokenService’ defined in file
[\jwt_auth\build\classes\kotlin\main\com\codersee\jwtauth\service\TokenService.class]:
Failed to instantiate [com.codersee.jwtauth.service.TokenService]: Constructor threw exception
at org.springframework.beans.factory.support.ConstructorResolver.createArgumentArray
(ConstructorResolver.java:801)Any idea why this might be happening?
thanks
Mick