
Adding in-app purchases to your Flutter app
1. Introduction
Adding in-app purchases to a Flutter app requires correctly setting up the App and Play stores, verifying the purchase, and granting the necessary permissions, such as subscription perks.
In this codelab you'll add three types of in-app purchases to an app (provided for you), and verify these purchases using a Dart backend with Firebase. The provided app, Dash Clicker, contains a game that uses the Dash mascot as currency. You will add the following purchase options:
- A repeatable purchase option for 2000 Dashes at once.
- A one-time upgrade purchase to make the old style Dash into a modern style Dash.
- A subscription that doubles the automatically generated clicks.
The first purchase option gives the user a direct benefit of 2000 Dashes. These are directly available to the user and can be bought many times. This is called a consumable as it is directly consumed and can be consumed multiple times.
The second option upgrades the Dash to a more beautiful Dash. This only has to be purchased once and is available forever. Such a purchase is called non-consumable because it cannot be consumed by the app but is valid forever.
The third and last purchase option is a subscription. While the subscription is active the user will get Dashes more quickly, but when he stops paying for the subscription the benefits also go away.
The backend service (also provided for you) runs as a Dart app, verifies that the purchases are made, and stores them using Firestore. Firestore is used to make the process easier, but in your production app, you can use any type of backend service.


What you'll build
- You will extend an app to support consumable purchases and subscriptions.
- You will also extend a Dart backend app to verify and store the purchased items.
What you'lllearn
- How to configure the App Store and Play Store with purchasable products.
- How to communicate with the stores to verify purchases and store them in Firestore.
- How to manage purchases in your app.
What you'll need
- Android Studio
- Xcode (for iOS development)
- Flutter SDK
2. Set up the development environment
To start this codelab, download the code and change the bundle identifier for iOS and the package name for Android.
Download the code
To clone theGitHub repository from the command line, use the following command:
git clone https://github.com/flutter/codelabs.git flutter-codelabs
Or, if you haveGitHub's cli tool installed, use the following command:
gh repo clone flutter/codelabs flutter-codelabs
The sample code is cloned into aflutter-codelabs directory that contains the code for a collection of codelabs. The code for this codelab is influtter-codelabs/in_app_purchases.
The directory structure underflutter-codelabs/in_app_purchases contains a series of snapshots of where you should be at the end of each named step. The starter code is in step 0, so navigate to it as follows:
cd flutter-codelabs/in_app_purchases/step_00
If you want to skip forward or see what something should look like after a step, look in the directory named after the step you are interested in. The code of the last step is under the foldercomplete.
Set up the starter project
Open the starter project fromstep_00/app in your favorite IDE. We used Android Studio for the screenshots, but Visual Studio Code is also a great option. With either editor, ensure that the latest Dart and Flutter plugins are installed.
The apps you are going to make need to communicate with the App Store and Play Store to know which products are available and for what price. Every app is identified by a unique ID. For the iOS App Store this is called the bundle identifier and for the Android Play Store this is the application ID. These identifiers are usually made using a reverse domain name notation. For example when making an in app purchase app for flutter.dev you would usedev.flutter.inapppurchase. Think of an identifier for your app, you are now going to set that in the project settings.
First, set up the bundle identifier for iOS. To do so, open theRunner.xcworkspace file in the Xcode app.
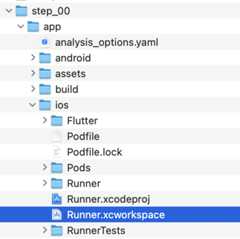
In Xcode's folder structure, theRunner project is at the top, and theFlutter,Runner, andProducts targets are beneath the Runner project. Double-clickRunner to edit your project settings, and clickSigning & Capabilities. Enter the bundle identifier you've just chosen under theTeam field to set your team.

You can now close Xcode and go back to Android Studio to finish the configuration for Android. To do so open thebuild.gradle.kts file underandroid/app, and change yourapplicationId (on line 24 in the screenshot below) to the application ID, the same as the iOS bundle identifier. Note that the IDs for the iOS and Android stores don't have to be identical, however keeping them identical is less error prone and therefore in this codelab we will also use identical identifiers.

3. Install the plugin
In this part of the codelab you'll install the in_app_purchase plugin.
Add dependency in pubspec
Addin_app_purchase to the pubspec by addingin_app_purchase to the dependencies to your project:
$ cd app$ flutter pub add in_app_purchase dev:in_app_purchase_platform_interfaceResolving dependencies... Downloading packages... characters 1.4.0 (1.4.1 available) flutter_lints 5.0.0 (6.0.0 available)+ in_app_purchase 3.2.3+ in_app_purchase_android 0.4.0+3+ in_app_purchase_platform_interface 1.4.0+ in_app_purchase_storekit 0.4.4+ json_annotation 4.9.0 lints 5.1.1 (6.0.0 available) material_color_utilities 0.11.1 (0.13.0 available) meta 1.16.0 (1.17.0 available) provider 6.1.5 (6.1.5+1 available) test_api 0.7.6 (0.7.7 available)Changed 5 dependencies!7 packages have newer versions incompatible with dependency constraints.Try `flutter pub outdated` for more information.
Open yourpubspec.yaml, and confirm that you now havein_app_purchase listed as an entry underdependencies, andin_app_purchase_platform_interface under thedev_dependencies.
pubspec.yaml
dependencies:flutter:sdk:fluttercloud_firestore:^6.0.0cupertino_icons:^1.0.8firebase_auth:^6.0.1firebase_core:^4.0.0google_sign_in:^7.1.1http:^1.5.0intl:^0.20.2provider:^6.1.5logging:^1.3.0in_app_purchase:^3.2.3dev_dependencies:flutter_test:sdk:flutterflutter_lints:^5.0.0in_app_purchase_platform_interface:^1.4.04. Set up the App Store
To set up in-app purchases and test them on iOS, you need to create a new app in the App Store and create purchasable products there. You don't have to publish anything or send the app to Apple for review. You need a developer account to do this. If you don't have one,enroll in the Apple developer program.
Paid Apps Agreements
To use in-app purchases, you also need to have an active agreement for paid apps in App Store Connect. Go tohttps://appstoreconnect.apple.com/, and clickAgreements, Tax, and Banking.

You will see agreements here for free and paid apps. The status of free apps should be active, and the status for paid apps is new. Make sure that you view the terms, accept them, and enter all required information.

When everything is set correctly, the status for paid apps will be active. This is very important because you won't be able to try in-app purchases without an active agreement.

Register App ID
Create a new identifier in the Apple Developer Portal. Visitdeveloper.apple.com/account/resources/identifiers/list and click the "plus" icon next to theIdentifiers header.

Choose App IDs
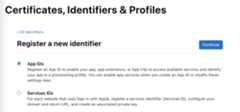
Choose App

Provide some description and set the bundle ID to match the bundle ID to the same value as previously set in XCode.

For more guidance about how to create a new app ID, see theDeveloper Account Help.
Creating a new app
Create a new app in App Store Connect with your unique bundle identifier.


For more guidance about how to create a new app and manage agreements, see theApp Store Connect help.
To test the in-app purchases, you need a sandbox test user. This test user shouldn't be connected to iTunes—it's only used for testing in-app purchases. You can't use an email address that is already used for an Apple account. InUsers and Access, go toSandbox to create a new sandbox account or to manage the existing sandbox Apple IDs.
>Note: If you are using a Gmail account you can create a task-specific email address. For example, if you ownfoo@gmail.com you can create an account with the following emailfoo+sandbox@gmail.com. The email for this account will still be received infoo@gmail.com inbox. You can read more about this in theGoogle Workspace Learning Center.

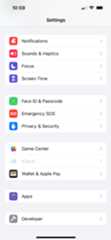
Now you can set up your sandbox user on your iPhone by going toSettings > Developer > Sandbox Apple Account.
Note: Sandbox settings may not be available until a sandbox purchase attempt is made.

Configuring your in-app purchases
Now you'll configure the three purchasable items:
dash_consumable_2k: A consumable purchase that can be purchased many times over, which grants the user 2000 Dashes (the in-app currency) per purchase.dash_upgrade_3d: A non-consumable "upgrade" purchase that can only be purchased once, and gives the user a cosmetically different Dash to click.dash_subscription_doubler: A subscription that grants the user twice as many Dashes per click for the duration of the subscription.

Go toIn-App Purchases.
Create your in-app purchases with the specified IDs:
- Set up
dash_consumable_2kas aConsumable. Usedash_consumable_2kas the Product ID. The reference name is only used in App Store Connect, just set it todash consumable 2k. Set up availability. The product must be available in the country of the sandbox user.
 Add pricing and set the price to
$1.99or the equivalent in other currency. Add your localizations for the purchase. Call the purchase
Spring is in the airwith2000 dashes fly outas the description. Add a review screenshot. The content doesn't matter unless the product is sent for review, but it is required for the product to be in the "Ready to Submit" state, which is necessary when the app fetches products from the App Store.
- Set up
dash_upgrade_3das aNon-consumable. Usedash_upgrade_3das the Product ID. Set the reference name todash upgrade 3d. Call the purchase3D DashwithBrings your dash back to the futureas the description. Set the price to$0.99. Configure availability and upload the review screenshot in the same way as for thedash_consumable_2kproduct.
- Set up
dash_subscription_doubleras anAuto-renewing subscription. The flow for subscriptions is a bit different. First, you have to create a subscription group. When multiple subscriptions are part of the same group, a user can only subscribe to one of these at the same time, but can upgrade or downgrade between these subscriptions. Just call this groupsubscriptions. And add localization for the subscription group.
 Next you'll create the subscription. Set the Reference Name to
dash subscription doublerand Product ID todash_subscription_doubler. Next, select the subscription duration of 1 week and the localizations. Name this subscription
Jet Enginewith the descriptionDoubles your clicks. Set the price to$0.49. Configure availability and upload the review screenshot in the same way as for thedash_consumable_2kproduct.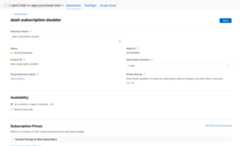
You should now see the products in the lists:


Note: During testing, you'll use the sandbox environment so no real payments are made. The subscription period in the sandbox environment is shorter than in production. For example, 7 days will be 3 minutes, and 1 year will be 60 minutes. You can see all values inthe Apple documentation.
5. Set up the Play Store
As with the App Store, you'll also need a developer account for the Play Store. If you don't have one yet,register an account.
Create a new app
Create a new app in the Google Play Console:
- Open thePlay Console.
- SelectAll apps > Create app.
- Select a default language and add a title for your app. Type the name of your app as you want it to appear on Google Play. You can change the name later.
- Specify that your application is a game. You can change this later.
- Specify whether your application is free or paid.
- Complete the Content guidelines and US export laws declarations.
- SelectCreate app.
After your app is created, go to the dashboard, and complete all the tasks in theSet up your app section. Here, you provide some information about your app, such as content ratings and screenshots.
Sign the application
To be able to test in-app purchases, you need at least one build uploaded to Google Play.
For this, you need your release build to be signed with something other than the debug keys.
Create a keystore
If you have an existing keystore, skip to the next step. If not, create one by running the following at the command line.
On Mac/Linux, use the following command:
keytool -genkey -v -keystore ~/key.jks -keyalg RSA -keysize 2048 -validity 10000 -alias key
On Windows, use the following command:
keytool -genkey -v -keystore c:\Users\USER_NAME\key.jks -storetype JKS -keyalg RSA -keysize 2048 -validity 10000 -alias key
This command stores thekey.jks file in your home directory. If you want to store the file elsewhere, then change the argument you pass to the-keystore parameter.Keep the
keystore
file private; don't check it into public source control!
Note:
Thekeytool command might not be in your path—it's part of Java, which is installed as part of Android Studio. For the concrete path, runflutter doctor -v, and locate the path printed after ‘Java binary at:'. Then, use that fully qualified path, replacingjava (at the end) withkeytool. If your path includes space-separated names, such asProgram Files, use platform-appropriate notation for the names. For example, on Mac/Linux, useProgram\ Files, and on Windows use"Program Files". > The-storetype JKS tag is only required for Java 9 or later. As of the Java 9 release, the keystore type defaults to PKCS12.
Reference the keystore from the app
Create a file named<your app dir>/android/key.properties that contains a reference to your keystore:
storePassword=<password from previous step>keyPassword=<password from previous step>keyAlias=keystoreFile=<location of the key store file, such as /Users/<user name>/key.jks>Warning: Keep thekey.properties file private; don't check it into public source control.
Configure signing in Gradle
Configure signing for your app by editing the<your app dir>/android/app/build.gradle.kts file.
Add the keystore information from your properties file before theandroid block:
importjava.util.Propertiesimportjava.io.FileInputStreamplugins{//omitted}valkeystoreProperties=Properties()valkeystorePropertiesFile=rootProject.file("key.properties")if(keystorePropertiesFile.exists()){keystoreProperties.load(FileInputStream(keystorePropertiesFile))}android{//omitted}Load thekey.properties file into thekeystoreProperties object.
Update thebuildTypes block to:
buildTypes { release { signingConfig = signingConfigs.getByName("release") } }Configure thesigningConfigs block in your module'sbuild.gradle.kts file with the signing configuration information:
signingConfigs { create("release") { keyAlias = keystoreProperties["keyAlias"] as String keyPassword = keystoreProperties["keyPassword"] as String storeFile = keystoreProperties["storeFile"]?.let { file(it) } storePassword = keystoreProperties["storePassword"] as String } } buildTypes { release { signingConfig = signingConfigs.getByName("release") } }Release builds of your app will now be signed automatically.
Note: You might need to runflutter clean after changing the Gradle file. This prevents cached builds from affecting the signing process.
For more information about signing your app, seeSign your app ondeveloper.android.com.
Upload your first build
After your app is configured for signing, you should be able to build your application by running:
flutter build appbundle
This command generates a release build by default and the output can be found at<your app dir>/build/app/outputs/bundle/release/
From the dashboard in the Google Play Console, go toTest and release > Testing > Closed testing, and create a new, closed testing release.
Note: You first need to release on the closed testing track as this results in a code review from Google. This is a requirement to be able to access any play store products.
Next, upload theapp-release.aab app bundle that was generated by the build command.
ClickSave and then clickReview release.
Finally, clickStart rollout to Closed testing to activate the closed testing release.
Set up test users
To be able to test in-app purchases, Google Accounts of your testers must be added in the Google Play console in two locations:
- To the specific test track (Internal testing)
- As a license tester
First, start with adding the tester to the internal testing track. Go back toTest and release > Testing > Internal testing and click theTesters tab.

Create a new email list by clickingCreate email list. Give the list a name, and add the email addresses of the Google Accounts that need access to testing in-app purchases.
Next, select the checkbox for the list, and clickSave changes.
Then, add the license testers:
- Go back to theAll apps view of the Google Play Console.
- Go toSettings > License testing.
- Add the same email addresses of the testers who need to be able to test in-app purchases.
- SetLicense response to
RESPOND_NORMALLY. - ClickSave changes.

Configuring your in-app purchases
Now you'll configure the items that are purchasable within the app.
Just like in the App Store, you have to define three different purchases:
dash_consumable_2k: A consumable purchase that can be purchased many times over, which grants the user 2000 Dashes (the in-app currency) per purchase.dash_upgrade_3d: A non-consumable "upgrade" purchase that can only be purchased once, which gives the user a cosmetically different Dash to click.dash_subscription_doubler: A subscription that grants the user twice as many Dashes per click for the duration of the subscription.
First, add the consumable and non-consumable.
- Go to the Google Play Console, and select your application.
- Go toMonetize > Products > In-app products.
- ClickCreate product

- Enter all the required information for your product. Make sure the product ID matches the ID that you intend to use exactly.
- ClickSave.
- ClickActivate.
- Repeat the process for the non-consumable "upgrade" purchase.
Next, add the subscription:
- Go to the Google Play Console, and select your application.
- Go toMonetize > Products > Subscriptions.
- ClickCreate subscription

- Enter all the required information for your subscription. Make sure the product ID matches the ID you intend to use exactly.
- ClickSave
Your purchases should now be set up in the Play Console.
6. Set up Firebase
In this codelab, you'll use a backend service to verify and track users' purchases.
Using a backend service has several benefits:
- You can securely verify transactions.
- You can react to billing events from the app stores.
- You can keep track of the purchases in a database.
- Users won't be able to fool your app into providing premium features by rewinding their system clock.
While there are many ways to set up a backend service, you'll do this using cloud functions and Firestore, using Google's own Firebase.
Writing the backend is considered out of scope for this codelab, so the starter code already includes a Firebase project that handles basic purchases to get you started.
Firebase plugins are also included with the starter app.
What's left for you to do is to create your own Firebase project, configure both the app and backend for Firebase, and finally deploy the backend.
Create a Firebase project
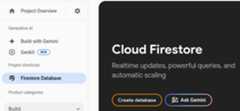
Go to theFirebase console, and create a new Firebase project. For this example, call the project Dash Clicker.
In the backend app, you tie purchases to a specific user, therefore, you need authentication. For this, use Firebase's authentication module with Google sign-in.
- From the Firebase dashboard, go toAuthentication and enable it, if needed.
- Go to theSign-in method tab, and enable theGoogle sign-in provider.

Because you'll also use Firebases's Firestore database, enable this too.
Set Cloud Firestore rules like this:
rules_version = '2';service cloud.firestore { match /databases/{database}/documents { match /purchases/{purchaseId} { allow read: if request.auth != null && request.auth.uid == resource.data.userId } }}Set up Firebase for Flutter
The recommended way to install Firebase on the Flutter app is to use the FlutterFire CLI. Follow the instructions as explained in thesetup page.
When running flutterfire configure, select the project you just created in the previous step.
$ flutterfire configurei Found 5 Firebase projects.? Select a Firebase project to configure your Flutter application with ›❯ in-app-purchases-1234 (in-app-purchases-1234) other-flutter-codelab-1 (other-flutter-codelab-1) other-flutter-codelab-2 (other-flutter-codelab-2) other-flutter-codelab-3 (other-flutter-codelab-3) other-flutter-codelab-4 (other-flutter-codelab-4) <create a new project>
Next, enableiOS andAndroid by selecting the two platforms.
? Which platforms should your configuration support (use arrow keys & space to select)? ›✔ android✔ ios macos web
When prompted about overriding firebase_options.dart, select yes.
? Generated FirebaseOptions file lib/firebase_options.dart already exists, do you want to override it? (y/n) › yes
Set up Firebase for Android: Further steps
From the Firebase dashboard, go toProject Overview, chooseSettings and select theGeneral tab.
Scroll down toYour apps, and select thedashclicker (android) app.
To allow Google sign-in in debug mode, you must provide the SHA-1 hash fingerprint of your debug certificate.
Get your debug signing certificate hash
In the root of your Flutter app project, change directory to theandroid/ folder then generate a signing report.
Note: changing the directory toandroid/ is crucial as otherwisejava won't be able to find your:app project in the next step.
cd android./gradlew :app:signingReport
Note: In case the gradle wrapper file is not present, you can generate it by building your application for Android once by runningflutter build appbundle.
You'll be presented with a large list of signing keys. Because you're looking for the hash for the debug certificate, look for the certificate with theVariant andConfig properties set todebug. It's likely for the keystore to be in your home folder under.android/debug.keystore.
> Task :app:signingReportVariant: debugConfig: debugStore: /<USER_HOME_FOLDER>/.android/debug.keystoreAlias: AndroidDebugKeyMD5: XX:XX:XX:XX:XX:XX:XX:XX:XX:XX:XX:XX:XX:XX:XX:XXSHA1: XX:XX:XX:XX:XX:XX:XX:XX:XX:XX:XX:XX:XX:XX:XX:XX:XX:XX:XX:XXSHA-256: XX:XX:XX:XX:XX:XX:XX:XX:XX:XX:XX:XX:XX:XX:XX:XX:XX:XX:XX:XX:XX:XX:XX:XX:XX:XX:XX:XX:XX:XX:XX:XXValid until: Tuesday, January 19, 2038Copy the SHA-1 hash, and fill in the last field in the app submission modal dialog.
Lastly, run theflutterfire configure command again to update the app to include the signing configuration.
$ flutterfire configure? You have an existing `firebase.json` file and possibly already configured your project for Firebase. Would you prefer to reuse the valus in your existing `firebase.json` file to configure your project? (y/n) › yes✔ You have an existing `firebase.json` file and possibly already configured your project for Firebase. Would you prefer to reuse the values in your existing `firebase.json` file to configure your project? · yes
Set up Firebase for iOS: Further steps
Open theios/Runner.xcworkspace withXcode. Or with your IDE of choice.
On VSCode right-click on theios/ folder and thenopen in xcode.
On Android Studio right-click on theios/ folder then clickflutter followed by theopen iOS module in Xcode option.
To allow for Google sign-in on iOS, add theCFBundleURLTypes configuration option to your buildplist files. (Check thegoogle_sign_in package docs for more information.) In this case, the file isios/Runner/Info.plist.
The key-value pair was already added, but their values must be replaced:
- Get the value for
REVERSED_CLIENT_IDfrom theGoogleService-Info.plistfile, without the<string>..</string>element surrounding it. - Replace the value in your
ios/Runner/Info.plistfile under theCFBundleURLTypeskey.
<key>CFBundleURLTypes</key><array> <dict> <key>CFBundleTypeRole</key> <string>Editor</string> <key>CFBundleURLSchemes</key> <array> <!-- TODO Replace this value: --> <!-- Copied from GoogleService-Info.plist key REVERSED_CLIENT_ID --> <string>com.googleusercontent.apps.REDACTED</string> </array> </dict></array>You are now done with the Firebase setup.
7. Listen to purchase updates
In this part of the codelab you'll prepare the app for purchasing the products. This process includes listening to purchase updates and errors after the app starts.
Listen to purchase updates
Inmain.dart, find the widgetMyHomePage that has aScaffold with aBottomNavigationBar containing two pages. This page also creates threeProviders forDashCounter,DashUpgrades, andDashPurchases.DashCounter tracks the current count of Dashes and auto increments them.DashUpgrades manages the upgrades that you can buy with Dashes. This codelab focuses onDashPurchases.
By default, the object of a provider is defined when that object is first requested. This object listens to purchase updates directly when the app starts, so disable lazy loading on this object withlazy: false:
lib/main.dart
ChangeNotifierProvider<DashPurchases>( create: (context) => DashPurchases( context.read<DashCounter>(), ), lazy: false, // Add this line),You also need an instance of theInAppPurchaseConnection. However, to keep the app testable you need some way to mock the connection. To do this, create an instance method that can be overridden in the test, and add it tomain.dart.
lib/main.dart
// Gives the option to override in tests.classIAPConnection{staticInAppPurchase?_instance;staticsetinstance(InAppPurchasevalue){_instance=value;}staticInAppPurchasegetinstance{_instance??=InAppPurchase.instance;return_instance!;}}Update the test as follows:
test/widget_test.dart
import'package:dashclicker/main.dart';import'package:flutter_test/flutter_test.dart';import'package:in_app_purchase/in_app_purchase.dart';//Addthisimportimport'package:in_app_purchase_platform_interface/src/in_app_purchase_platform_addition.dart';//Andthisimportvoidmain(){testWidgets('App starts',(tester)async{IAPConnection.instance=TestIAPConnection();//Addthislineawaittester.pumpWidget(constMyApp());expect(find.text('Tim Sneath'),findsOneWidget);});}classTestIAPConnectionimplementsInAppPurchase{//Addfromhere@overrideFuture<bool>buyConsumable({requiredPurchaseParampurchaseParam,boolautoConsume=true,}){returnFuture.value(false);}@overrideFuture<bool>buyNonConsumable({requiredPurchaseParampurchaseParam}){returnFuture.value(false);}@overrideFuture<void>completePurchase(PurchaseDetailspurchase){returnFuture.value();}@overrideFuture<bool>isAvailable(){returnFuture.value(false);}@overrideFuture<ProductDetailsResponse>queryProductDetails(Set<String>identifiers){returnFuture.value(ProductDetailsResponse(productDetails:[],notFoundIDs:[]),);}@overrideTgetPlatformAddition<TextendsInAppPurchasePlatformAddition?>(){//TODO:implementgetPlatformAdditionthrowUnimplementedError();}@overrideStream<List<PurchaseDetails>>getpurchaseStream=>Stream.value(<PurchaseDetails>[]);@overrideFuture<void>restorePurchases({String?applicationUserName}){//TODO:implementrestorePurchasesthrowUnimplementedError();}@overrideFuture<String>countryCode(){//TODO:implementcountryCodethrowUnimplementedError();}}//Tohere.Inlib/logic/dash_purchases.dart, go to the code for theDashPurchasesChangeNotifier. At this point, there is only aDashCounter that you can add to your purchased Dashes.
Add a stream subscription property,_subscription (of typeStreamSubscription<List<PurchaseDetails>> _subscription;), theIAPConnection.instance, and the imports. The resulting code should look at follows:
lib/logic/dash_purchases.dart
import'dart:async';import'package:flutter/foundation.dart';import'package:flutter/material.dart';import'package:in_app_purchase/in_app_purchase.dart';//Addthisimportimport'../main.dart';//Andthisimportimport'../model/purchasable_product.dart';import'../model/store_state.dart';import'dash_counter.dart';classDashPurchasesextendsChangeNotifier{DashCountercounter;StoreStatestoreState=StoreState.available;lateStreamSubscription<List<PurchaseDetails>>_subscription;//AddthislineList<PurchasableProduct>products=[PurchasableProduct('Spring is in the air','Many dashes flying out from their nests','\$0.99',),PurchasableProduct('Jet engine','Doubles you clicks per second for a day','\$1.99',),];boolgetbeautifiedDash=>false;finaliapConnection=IAPConnection.instance;//AndthislineDashPurchases(this.counter);Future<void>buy(PurchasableProductproduct)async{product.status=ProductStatus.pending;notifyListeners();awaitFuture<void>.delayed(constDuration(seconds:5));product.status=ProductStatus.purchased;notifyListeners();awaitFuture<void>.delayed(constDuration(seconds:5));product.status=ProductStatus.purchasable;notifyListeners();}}Thelate keyword is added to_subscription because the_subscription is initialized in the constructor. This project is set up to be non-nullable by default (NNBD), which means that properties that aren't declared nullable must have a non-null value. Thelate qualifier lets you delay defining this value.
In the constructor, get thepurchaseUpdated stream and start listening to the stream. In thedispose() method, cancel the stream subscription.
lib/logic/dash_purchases.dart
import'dart:async';import'package:flutter/foundation.dart';import'package:flutter/material.dart';import'package:in_app_purchase/in_app_purchase.dart';import'../main.dart';import'../model/purchasable_product.dart';import'../model/store_state.dart';import'dash_counter.dart';classDashPurchasesextendsChangeNotifier{DashCountercounter;StoreStatestoreState=StoreState.notAvailable;//ModifythislinelateStreamSubscription<List<PurchaseDetails>>_subscription;List<PurchasableProduct>products=[PurchasableProduct('Spring is in the air','Many dashes flying out from their nests','\$0.99',),PurchasableProduct('Jet engine','Doubles you clicks per second for a day','\$1.99',),];boolgetbeautifiedDash=>false;finaliapConnection=IAPConnection.instance;DashPurchases(this.counter){//AddfromherefinalpurchaseUpdated=iapConnection.purchaseStream;_subscription=purchaseUpdated.listen(_onPurchaseUpdate,onDone:_updateStreamOnDone,onError:_updateStreamOnError,);}@overridevoiddispose(){_subscription.cancel();super.dispose();}//Tohere.Future<void>buy(PurchasableProductproduct)async{product.status=ProductStatus.pending;notifyListeners();awaitFuture<void>.delayed(constDuration(seconds:5));product.status=ProductStatus.purchased;notifyListeners();awaitFuture<void>.delayed(constDuration(seconds:5));product.status=ProductStatus.purchasable;notifyListeners();}//Addfromherevoid_onPurchaseUpdate(List<PurchaseDetails>purchaseDetailsList){//Handlepurchaseshere}void_updateStreamOnDone(){_subscription.cancel();}void_updateStreamOnError(dynamicerror){//Handleerrorhere}//Tohere.}Now, the app receives the purchase updates so, in the next section, you'll make a purchase!
Before you proceed, run the tests with "flutter test" to verify everything is set up correctly.
$ flutter test00:01 +1: All tests passed!
8. Make purchases
In this part of the codelab, you'll replace the existing mock products with real purchasable products. These products are loaded from the stores, shown in a list, and are purchased when tapping the product.
Adapt PurchasableProduct
PurchasableProduct displays a mock product. Update it to show actual content by replacing thePurchasableProduct class inpurchasable_product.dart with the following code:
lib/model/purchasable_product.dart
import'package:in_app_purchase/in_app_purchase.dart';enumProductStatus{purchasable,purchased,pending}classPurchasableProduct{Stringgetid=>productDetails.id;Stringgettitle=>productDetails.title;Stringgetdescription=>productDetails.description;Stringgetprice=>productDetails.price;ProductStatusstatus;ProductDetailsproductDetails;PurchasableProduct(this.productDetails):status=ProductStatus.purchasable;}Indash_purchases.dart, remove the dummy purchases and replace them with an empty list,List<PurchasableProduct> products = [];.
Load available purchases
To give a user the ability to make a purchase, load the purchases from the store. First, check whether the store is available. When the store isn't available, settingstoreState tonotAvailable displays an error message to the user.
lib/logic/dash_purchases.dart
Future<void>loadPurchases()async{finalavailable=awaitiapConnection.isAvailable();if(!available){storeState=StoreState.notAvailable;notifyListeners();return;}}When the store is available, load the available purchases. Given the previous Google Play and App Store setup, expect to seestoreKeyConsumable,storeKeySubscription, andstoreKeyUpgrade. When an expected purchase isn't available, print this information to the console; you might also want to send this info to the backend service.
Theawait iapConnection.queryProductDetails(ids) method returns both the IDs that aren't found and the purchasable products that are found. Use theproductDetails from the response to update the UI, and set theStoreState toavailable.
lib/logic/dash_purchases.dart
import'../constants.dart';//...Future<void>loadPurchases()async{finalavailable=awaitiapConnection.isAvailable();if(!available){storeState=StoreState.notAvailable;notifyListeners();return;}constids= <String>{storeKeyConsumable,storeKeySubscription,storeKeyUpgrade,};finalresponse=awaitiapConnection.queryProductDetails(ids);products=response.productDetails.map((e)=>PurchasableProduct(e)).toList();storeState=StoreState.available;notifyListeners();}Call theloadPurchases() function in the constructor:
lib/logic/dash_purchases.dart
DashPurchases(this.counter){finalpurchaseUpdated=iapConnection.purchaseStream;_subscription=purchaseUpdated.listen(_onPurchaseUpdate,onDone:_updateStreamOnDone,onError:_updateStreamOnError,);loadPurchases();//Addthisline}Finally, change the value ofstoreState field fromStoreState.available toStoreState.loading:
lib/logic/dash_purchases.dart
StoreStatestoreState=StoreState.loading;Show the purchasable products
Consider thepurchase_page.dart file. ThePurchasePage widget shows_PurchasesLoading,_PurchaseList, or_PurchasesNotAvailable, depending on theStoreState. The widget also shows the user's past purchases which is used in the next step.
The_PurchaseList widget shows the list of purchasable products and sends a buy request to theDashPurchases object.
lib/pages/purchase_page.dart
class_PurchaseListextendsStatelessWidget{@overrideWidgetbuild(BuildContextcontext){varpurchases=context.watch<DashPurchases>();varproducts=purchases.products;returnColumn(children:products.map((product)=>_PurchaseWidget(product:product,onPressed:(){purchases.buy(product);},),).toList(),);}}You should be able to see the available products on the Android and iOS stores if they are configured correctly. Note that it can take some time before the purchases are available when entered into the respective consoles.

Go back todash_purchases.dart, and implement the function to buy a product. You only need to separate the consumables from the non-consumables. The upgrade and the subscription products are non-consumables.
lib/logic/dash_purchases.dart
Future<void>buy(PurchasableProductproduct)async{finalpurchaseParam=PurchaseParam(productDetails:product.productDetails);switch(product.id){casestoreKeyConsumable:awaitiapConnection.buyConsumable(purchaseParam:purchaseParam);casestoreKeySubscription:casestoreKeyUpgrade:awaitiapConnection.buyNonConsumable(purchaseParam:purchaseParam);default:throwArgumentError.value(product.productDetails,'${product.id}isnotaknownproduct',);}}Before continuing, create the variable_beautifiedDashUpgrade and update thebeautifiedDash getter to reference it.
lib/logic/dash_purchases.dart
bool get beautifiedDash => _beautifiedDashUpgrade; bool _beautifiedDashUpgrade = false;The_onPurchaseUpdate method receives the purchase updates, updates the status of the product that is shown in the purchase page, and applies the purchase to the counter logic. It's important to callcompletePurchase after handling the purchase so the store knows the purchase is handled correctly.
Warning: If you do not complete the purchase for the Google Play Store within three days, the purchase is refunded.
lib/logic/dash_purchases.dart
Future<void>_onPurchaseUpdate(List<PurchaseDetails>purchaseDetailsList,)async{for(varpurchaseDetailsinpurchaseDetailsList){await_handlePurchase(purchaseDetails);}notifyListeners();}Future<void>_handlePurchase(PurchaseDetailspurchaseDetails)async{if(purchaseDetails.status==PurchaseStatus.purchased){switch(purchaseDetails.productID){casestoreKeySubscription:counter.applyPaidMultiplier();casestoreKeyConsumable:counter.addBoughtDashes(2000);casestoreKeyUpgrade:_beautifiedDashUpgrade=true;}}if(purchaseDetails.pendingCompletePurchase){awaitiapConnection.completePurchase(purchaseDetails);}}Note:buyConsumable has a named parameterautoConsume that istrue by default. If you set this parameter tofalse, you'll have to calliapConnection.getPlatformAddition<InAppPurchaseAndroidPlatformAddition>().consumePurchase(purchaseDetails) after you consume the purchase on Android.
9. Set up the backend
Before moving on to tracking and verifying purchases, set up a Dart backend to support doing so.
Note: Using a backend is a best practice because, as stated before, it has several benefits:
- You can securely verify transactions.
- You can react to billing events from the app stores.
- You can keep track of the purchases in a database.
- Users won't be able to fool your app into providing premium features by rewinding their system clock.
In this section, work from thedart-backend/ folder as the root.
Make sure that you have the following tools installed:
- Dart
- Firebase CLI
Base project overview
Because some parts of this project are considered out of scope for this codelab, they are included in the starter code. It's a good idea to go over what is already in the starter code before you get started, to get an idea of how you're going to structure things.
This backend code can run locally on your machine, you don't need to deploy it to use it. However, you need to be able to connect from your development device (Android or iPhone) to the machine where the server will run. For that, they have to be in the same network, and you need to know the IP address of your machine.
Try to run the server using the following command:
$ dart ./bin/server.dartServing at http://0.0.0.0:8080
The Dart backend usesshelf andshelf_router to serve API endpoints. By default, the server doesn't provide any routes. Later on you will create a route to handle the purchase verification process.
One part that is already included in the starter code is theIapRepository inlib/iap_repository.dart. Because learning how to interact with Firestore, or databases in general, isn't considered to be relevant to this codelab, the starter code contains functions for you to create or update purchases in the Firestore, as well as all the classes for those purchases.
Set up Firebase access
To access Firebase Firestore, you need a service account access key. Generate one opening the Firebase project settings and navigate to theService accounts section, then selectGenerate new private key.
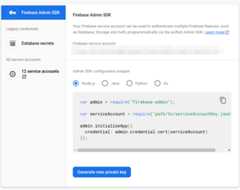
Copy the downloaded JSON file to theassets/ folder, and rename it toservice-account-firebase.json.
Set up Google Play access
To access the Play Store for verifying purchases, you must generate a service account with these permissions, and download the JSON credentials for it.
- Visit theGoogle Play Android Developer API page in the Google Cloud Console.
 In case the Google Play Console requests that you create or link to an existing project, do so first and then come back to this page.
 - Next, go to theService accounts page and click+ Create service account.

- Enter theService account name and clickCreate and continue.

- SelectPub/Sub Subscriber role and clickDone.

- Once the account is created go toManage keys.

- SelectAdd key > Create new key.

- Create and download a JSON key.

- Rename the downloaded file to
service-account-google-play.json,and move it into theassets/directory. - Next, go toUsers and permissions page inPlay Console
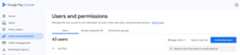
- ClickInvite new users and enter the email address of the service account created earlier. You can find the email in the table onService accounts page

- GrantView financial data andManage orders and subscriptions permissions for the application.

- ClickInvite user.
One more thing we need to do is openlib/constants.dart, and replace the value ofandroidPackageId with the package ID that you chose for your Android app.
Note: It can take a while before the service account grants you access to the Android Publisher APIs. If you run into a situation where your API calls are being denied based on your permissions, try again in a few hours or the next day.
Set up Apple App Store access
To access the App Store for verifying purchases, you have to set up a shared secret:
- OpenApp Store Connect.
- Go toMy Apps, and select your app.
- In the sidebar navigation, go toGeneral > App information.
- ClickManage underApp-Specific Shared Secret header.

- Generate a new secret, and copy it.

- Open
lib/constants.dart,and replace the value ofappStoreSharedSecretwith the shared secret you just generated.
Constants configuration file
Before proceeding, make sure that the following constants are configured in thelib/constants.dart file:
androidPackageId: Package ID used on Android, such ascom.example.dashclickerappStoreSharedSecret: Shared secret to access App Store Connect to perform purchase verification.bundleId: Bundle ID used on iOS, such ascom.example.dashclicker
You can ignore the rest of the constants for the time being.
10. Verify purchases
The general flow for verifying purchases is similar for iOS and Android.
For both stores, your application receives a token when a purchase is made.
This token is sent by the app to your backend service, which then, in turn, verifies the purchase with the respective store's servers using the provided token.
The backend service can then choose to store the purchase, and reply to the application whether the purchase was valid or not.
By having the backend service do the validation with the stores rather than the application running on your user's device, you can prevent the user gaining access to premium features by, for example, rewinding their system clock.
Set up the Flutter side
Set up authentication
As you are going to send the purchases to your backend service, you want to make sure the user is authenticated while making a purchase. Most of the authentication logic is already added for you in the starter project, you just have to make sure thePurchasePage shows the login button when the user is not logged in yet. Add the following code to the beginning of the build method ofPurchasePage:
lib/pages/purchase_page.dart
import'package:flutter/material.dart';import'package:provider/provider.dart';import'../logic/dash_purchases.dart';import'../logic/firebase_notifier.dart';//Addthisimportimport'../model/firebase_state.dart';//Andthisimportimport'../model/purchasable_product.dart';import'../model/store_state.dart';import'../repo/iap_repo.dart';import'login_page.dart';//AndthisoneaswellclassPurchasePageextendsStatelessWidget{constPurchasePage({super.key});@overrideWidgetbuild(BuildContextcontext){//UpdatefromherevarfirebaseNotifier=context.watch<FirebaseNotifier>();if(firebaseNotifier.state==FirebaseState.loading){return_PurchasesLoading();}elseif(firebaseNotifier.state==FirebaseState.notAvailable){return_PurchasesNotAvailable();}if(!firebaseNotifier.loggedIn){returnconstLoginPage();}//Tohere.//...Call verification endpoint from the app
In the app, create the_verifyPurchase(PurchaseDetails purchaseDetails) function that calls the/verifypurchase endpoint on your Dart backend using an http post call.
Send the selected store (google_play for the Play Store orapp_store for the App Store), theserverVerificationData, and theproductID. The server returns status code indicating whether the purchase is verified.
In the app constants, configure the server IP to your local machine IP address.
lib/logic/dash_purchases.dart
import'dart:async';import'dart:convert';//Addthisimportimport'package:flutter/foundation.dart';import'package:flutter/material.dart';import'package:http/http.dart'ashttp;//Andthisimportimport'package:in_app_purchase/in_app_purchase.dart';import'../constants.dart';import'../main.dart';import'../model/purchasable_product.dart';import'../model/store_state.dart';import'dash_counter.dart';import'firebase_notifier.dart';//AndthisoneclassDashPurchasesextendsChangeNotifier{DashCountercounter;FirebaseNotifierfirebaseNotifier;//AddthislineStoreStatestoreState=StoreState.loading;lateStreamSubscription<List<PurchaseDetails>>_subscription;List<PurchasableProduct>products=[];boolgetbeautifiedDash=>_beautifiedDashUpgrade;bool_beautifiedDashUpgrade=false;finaliapConnection=IAPConnection.instance;DashPurchases(this.counter,this.firebaseNotifier){//UpdatethislinefinalpurchaseUpdated=iapConnection.purchaseStream;_subscription=purchaseUpdated.listen(_onPurchaseUpdate,onDone:_updateStreamOnDone,onError:_updateStreamOnError,);loadPurchases();}Add thefirebaseNotifier with the creation ofDashPurchases inmain.dart:
lib/main.dart
ChangeNotifierProvider<DashPurchases>( create: (context) => DashPurchases( context.read<DashCounter>(), context.read<FirebaseNotifier>(), ), lazy: false, ),Add a getter for the User in the FirebaseNotifier, so you can pass the user ID to the verify purchase function.
lib/logic/firebase_notifier.dart
Future<FirebaseFirestore>getfirestoreasync{varisInitialized=await_isInitialized.future;if(!isInitialized){throwException('Firebase is not initialized');}returnFirebaseFirestore.instance;}User?getuser=>FirebaseAuth.instance.currentUser;//AddthislineFuture<void>load()async{//...Add the function_verifyPurchase to theDashPurchases class. Thisasync function returns a boolean indicating whether the purchase is validated.
lib/logic/dash_purchases.dart
Future<bool>_verifyPurchase(PurchaseDetailspurchaseDetails)async{finalurl=Uri.parse('http://$serverIp:8080/verifypurchase');constheaders={'Content-type':'application/json','Accept':'application/json',};finalresponse=awaithttp.post(url,body:jsonEncode({'source':purchaseDetails.verificationData.source,'productId':purchaseDetails.productID,'verificationData':purchaseDetails.verificationData.serverVerificationData,'userId':firebaseNotifier.user?.uid,}),headers:headers,);if(response.statusCode==200){returntrue;}else{returnfalse;}}Call the_verifyPurchase function in_handlePurchase just before you apply the purchase. You should only apply the purchase when it's verified. In a production app, you can specify this further to, for example, apply a trial subscription when the store is temporarily unavailable. However, for this example, apply the purchase when the purchase is verified successfully.
lib/logic/dash_purchases.dart
Future<void>_onPurchaseUpdate(List<PurchaseDetails>purchaseDetailsList,)async{for(varpurchaseDetailsinpurchaseDetailsList){await_handlePurchase(purchaseDetails);}notifyListeners();}Future<void>_handlePurchase(PurchaseDetailspurchaseDetails)async{if(purchaseDetails.status==PurchaseStatus.purchased){//SendtoservervarvalidPurchase=await_verifyPurchase(purchaseDetails);if(validPurchase){//Applychangeslocallyswitch(purchaseDetails.productID){casestoreKeySubscription:counter.applyPaidMultiplier();casestoreKeyConsumable:counter.addBoughtDashes(2000);casestoreKeyUpgrade:_beautifiedDashUpgrade=true;}}}if(purchaseDetails.pendingCompletePurchase){awaitiapConnection.completePurchase(purchaseDetails);}}In the app everything is now ready to validate the purchases.
Set up the backend service
Next, set up the backend for verifying purchases on the backend.
Build purchase handlers
Because the verification flow for both stores is close to identical, set up an abstractPurchaseHandler class with separate implementations for each store.
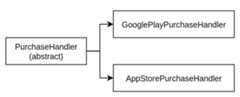
Start by adding apurchase_handler.dart file to thelib/ folder, where you define an abstractPurchaseHandler class with two abstract methods for verifying two different kinds of purchases: subscriptions and non-subscriptions.
lib/purchase_handler.dart
import'products.dart';///Genericpurchasehandler,///mustbeimplementedforGooglePlayandAppleStoreabstractclassPurchaseHandler{///Verifyifnon-subscriptionpurchase(akaconsumable)isvalid///andupdatethedatabaseFuture<bool>handleNonSubscription({requiredStringuserId,requiredProductDataproductData,requiredStringtoken,});///Verifyifsubscriptionpurchase(akanon-consumable)isvalid///andupdatethedatabaseFuture<bool>handleSubscription({requiredStringuserId,requiredProductDataproductData,requiredStringtoken,});}As you can see, each method requires three parameters:
userId:The ID of the logged-in user, so you can tie purchases to the user.productData:Data about the product. You are going to define this in a minute.token:The token provided to the user by the store.
Additionally, to make these purchase handlers easier to use, add averifyPurchase() method that can be used for both subscriptions and non-subscriptions:
lib/purchase_handler.dart
/// Verify if purchase is valid and update the databaseFuture<bool>verifyPurchase({requiredStringuserId,requiredProductDataproductData,requiredStringtoken,})async{switch(productData.type){caseProductType.subscription:returnhandleSubscription(userId:userId,productData:productData,token:token,);caseProductType.nonSubscription:returnhandleNonSubscription(userId:userId,productData:productData,token:token,);}}Now, you can just callverifyPurchase for both cases, but still have separate implementations!
TheProductData class contains basic information about the different purchasable products, which includes the product ID (sometimes also referred to as SKU) and theProductType.
lib/products.dart
classProductData{finalStringproductId;finalProductTypetype;constProductData(this.productId,this.type);}TheProductType can either be a subscription or a non-subscription.
lib/products.dart
enumProductType{subscription,nonSubscription}Finally, the list of products is defined as a map in the same file.
lib/products.dart
constproductDataMap={'dash_consumable_2k':ProductData('dash_consumable_2k',ProductType.nonSubscription,),'dash_upgrade_3d':ProductData('dash_upgrade_3d',ProductType.nonSubscription,),'dash_subscription_doubler':ProductData('dash_subscription_doubler',ProductType.subscription,),};Next, define some placeholder implementations for the Google Play Store and the Apple App Store. Start with Google Play:
Createlib/google_play_purchase_handler.dart, and add a class that extends thePurchaseHandler you just wrote:
lib/google_play_purchase_handler.dart
import'dart:async';import'package:googleapis/androidpublisher/v3.dart'asap;import'constants.dart';import'iap_repository.dart';import'products.dart';import'purchase_handler.dart';classGooglePlayPurchaseHandlerextendsPurchaseHandler{finalap.AndroidPublisherApiandroidPublisher;finalIapRepositoryiapRepository;GooglePlayPurchaseHandler(this.androidPublisher,this.iapRepository);@overrideFuture<bool>handleNonSubscription({requiredString?userId,requiredProductDataproductData,requiredStringtoken,})async{returntrue;}@overrideFuture<bool>handleSubscription({requiredString?userId,requiredProductDataproductData,requiredStringtoken,})async{returntrue;}}For now, it returnstrue for the handler methods; you'll get to them later.
As you might have noticed, the constructor takes an instance of theIapRepository. The purchase handler uses this instance to store information about purchases in Firestore later on. To communicate with Google Play, you use the providedAndroidPublisherApi.
Next, do the same for the app store handler. Createlib/app_store_purchase_handler.dart, and add a class that extends thePurchaseHandler again:
lib/app_store_purchase_handler.dart
import'dart:async';import'package:app_store_server_sdk/app_store_server_sdk.dart';import'constants.dart';import'iap_repository.dart';import'products.dart';import'purchase_handler.dart';classAppStorePurchaseHandlerextendsPurchaseHandler{finalIapRepositoryiapRepository;AppStorePurchaseHandler(this.iapRepository);@overrideFuture<bool>handleNonSubscription({requiredStringuserId,requiredProductDataproductData,requiredStringtoken,})async{returntrue;}@overrideFuture<bool>handleSubscription({requiredStringuserId,requiredProductDataproductData,requiredStringtoken,})async{returntrue;}}Great! Now you have two purchase handlers. Next, create the purchase verification API endpoint.
Use purchase handlers
Openbin/server.dart and create an API endpoint usingshelf_route:
bin/server.dart
import'dart:convert';import'package:firebase_backend_dart/helpers.dart';import'package:firebase_backend_dart/products.dart';import'package:shelf/shelf.dart';import'package:shelf_router/shelf_router.dart';Future<void>main()async{finalrouter=Router();finalpurchaseHandlers=await_createPurchaseHandlers();router.post('/verifypurchase',(Requestrequest)async{finaldynamicpayload=json.decode(awaitrequest.readAsString());final(:userId,:source,:productData,:token)=getPurchaseData(payload);finalresult=awaitpurchaseHandlers[source]!.verifyPurchase(userId:userId,productData:productData,token:token,);if(result){returnResponse.ok('all good!');}else{returnResponse.internalServerError();}});awaitserveHandler(router.call);}({StringuserId,Stringsource,ProductDataproductData,Stringtoken})getPurchaseData(dynamicpayload){if(payloadcase{'userId':StringuserId,'source':Stringsource,'productId':StringproductId,'verificationData':Stringtoken,}){return(userId:userId,source:source,productData:productDataMap[productId]!,token:token,);}else{throwconstFormatException('Unexpected JSON');}}The code is doing the following:
- Define a POST endpoint that will be called from the app you created previously.
- Decode the JSON payload and extract the following information:
userId: Logged in user IDsource: Store used, eitherapp_storeorgoogle_play.productData: Obtained from theproductDataMapyou created previously.token: Contains the verification data to send to the stores.
- Call to the
verifyPurchasemethod, either for theGooglePlayPurchaseHandleror theAppStorePurchaseHandler, depending on the source. - If the verification was successful, the method returns a
Response.okto the client. - If the verification fails, the method returns a
Response.internalServerErrorto the client.
Note: The verifypurchase endpoint you just created does not offer any kind of authentication mechanism, meaning that anyone with access to your server could communicate to it. This is not a problem in the context of this codelab, as your server will run locally in your home network, but when thinking about deploying this or a similar solution, you should implement some sort of user authentication for security.
After creating the API endpoint, you need to configure the two purchase handlers. This requires you to load the service account keys you obtained in the previous step and configure the access to the different services, including the Android Publisher API and the Firebase Firestore API. Then, create the two purchase handlers with the different dependencies:
bin/server.dart
import'dart:convert';import'dart:io';//newimport'package:firebase_backend_dart/app_store_purchase_handler.dart';//newimport'package:firebase_backend_dart/google_play_purchase_handler.dart';//newimport'package:firebase_backend_dart/helpers.dart';import'package:firebase_backend_dart/iap_repository.dart';//newimport'package:firebase_backend_dart/products.dart';import'package:firebase_backend_dart/purchase_handler.dart';//newimport'package:googleapis/androidpublisher/v3.dart'asap;//newimport'package:googleapis/firestore/v1.dart'asfs;//newimport'package:googleapis_auth/auth_io.dart'asauth;//newimport'package:shelf/shelf.dart';import'package:shelf_router/shelf_router.dart';Future<Map<String,PurchaseHandler>>_createPurchaseHandlers()async{//ConfigureAndroidPublisherAPIaccessfinalserviceAccountGooglePlay=File('assets/service-account-google-play.json').readAsStringSync();finalclientCredentialsGooglePlay=auth.ServiceAccountCredentials.fromJson(serviceAccountGooglePlay);finalclientGooglePlay=awaitauth.clientViaServiceAccount(clientCredentialsGooglePlay,[ap.AndroidPublisherApi.androidpublisherScope,]);finalandroidPublisher=ap.AndroidPublisherApi(clientGooglePlay);//ConfigureFirestoreAPIaccessfinalserviceAccountFirebase=File('assets/service-account-firebase.json').readAsStringSync();finalclientCredentialsFirebase=auth.ServiceAccountCredentials.fromJson(serviceAccountFirebase);finalclientFirebase=awaitauth.clientViaServiceAccount(clientCredentialsFirebase,[fs.FirestoreApi.cloudPlatformScope,]);finalfirestoreApi=fs.FirestoreApi(clientFirebase);finaldynamicjson=jsonDecode(serviceAccountFirebase);finalprojectId=json['project_id']asString;finaliapRepository=IapRepository(firestoreApi,projectId);return{'google_play':GooglePlayPurchaseHandler(androidPublisher,iapRepository,),'app_store':AppStorePurchaseHandler(iapRepository,),};}Verify Android purchases: Implement the purchase hander
Next, continue implementing the Google Play purchase handler.
Google already provides Dart packages for interacting with the APIs you need to verify purchases. You initialized them in theserver.dart file and now use them in theGooglePlayPurchaseHandler class.
Implement the handler for non-subscription-type purchases:
lib/google_play_purchase_handler.dart
///Handlenon-subscriptionpurchases(onetimepurchases).//////RetrievesthepurchasestatusfromGooglePlayandupdates///theFirestoreDatabaseaccordingly.@overrideFuture<bool>handleNonSubscription({requiredString?userId,requiredProductDataproductData,requiredStringtoken,})async{print('GooglePlayPurchaseHandler.handleNonSubscription''($userId,${productData.productId},${token.substring(0,5)}...)',);try{//VerifypurchasewithGooglefinalresponse=awaitandroidPublisher.purchases.products.get(androidPackageId,productData.productId,token,);print('Purchasesresponse:${response.toJson()}');//MakesureanorderIDexistsif(response.orderId==null){print('Couldnothandlepurchasewithoutorderid');returnfalse;}finalorderId=response.orderId!;finalpurchaseData=NonSubscriptionPurchase(purchaseDate:DateTime.fromMillisecondsSinceEpoch(int.parse(response.purchaseTimeMillis??'0'),),orderId:orderId,productId:productData.productId,status:_nonSubscriptionStatusFrom(response.purchaseState),userId:userId,iapSource:IAPSource.googleplay,);//Updatethedatabaseif(userId!=null){//IfweknowtheuserId,//updatetheexistingpurchaseorcreateitifitdoesnotexist.awaitiapRepository.createOrUpdatePurchase(purchaseData);}else{//Ifwedon'tknowtheuserID,apreviousentrymustalready//exist,andthuswe'llonlyupdateit.awaitiapRepository.updatePurchase(purchaseData);}returntrue;}onap.DetailedApiRequestErrorcatch(e){print('ErroronhandleNonSubscription:$e\n''JSON:${e.jsonResponse}',);}catch(e){print('ErroronhandleNonSubscription:$e\n');}returnfalse;}You can update the subscription purchase handler in a similar way:
lib/google_play_purchase_handler.dart
///Handlesubscriptionpurchases.//////RetrievesthepurchasestatusfromGooglePlayandupdates///theFirestoreDatabaseaccordingly.@overrideFuture<bool>handleSubscription({requiredString?userId,requiredProductDataproductData,requiredStringtoken,})async{print('GooglePlayPurchaseHandler.handleSubscription''($userId,${productData.productId},${token.substring(0,5)}...)',);try{//VerifypurchasewithGooglefinalresponse=awaitandroidPublisher.purchases.subscriptions.get(androidPackageId,productData.productId,token,);print('Subscriptionresponse:${response.toJson()}');//MakesureanorderIDexistsif(response.orderId==null){print('Couldnothandlepurchasewithoutorderid');returnfalse;}finalorderId=extractOrderId(response.orderId!);finalpurchaseData=SubscriptionPurchase(purchaseDate:DateTime.fromMillisecondsSinceEpoch(int.parse(response.startTimeMillis??'0'),),orderId:orderId,productId:productData.productId,status:_subscriptionStatusFrom(response.paymentState),userId:userId,iapSource:IAPSource.googleplay,expiryDate:DateTime.fromMillisecondsSinceEpoch(int.parse(response.expiryTimeMillis??'0'),),);//Updatethedatabaseif(userId!=null){//IfweknowtheuserId,//updatetheexistingpurchaseorcreateitifitdoesnotexist.awaitiapRepository.createOrUpdatePurchase(purchaseData);}else{//Ifwedon'tknowtheuserID,apreviousentrymustalready//exist,andthuswe'llonlyupdateit.awaitiapRepository.updatePurchase(purchaseData);}returntrue;}onap.DetailedApiRequestErrorcatch(e){print('ErroronhandleSubscription:$e\n''JSON:${e.jsonResponse}',);}catch(e){print('ErroronhandleSubscription:$e\n');}returnfalse;}}Add the following method to facilitate the parsing of order IDs, as well as two methods to parse the purchase status.
lib/google_play_purchase_handler.dart
NonSubscriptionStatus_nonSubscriptionStatusFrom(int? state) { return switch (state) { 0 => NonSubscriptionStatus.completed, 2 => NonSubscriptionStatus.pending, _ => NonSubscriptionStatus.cancelled, };}SubscriptionStatus_subscriptionStatusFrom(int? state) { return switch (state) { // Payment pending 0 => SubscriptionStatus.pending, // Payment received 1 => SubscriptionStatus.active, // Free trial 2 => SubscriptionStatus.active, // Pending deferred upgrade/downgrade 3 => SubscriptionStatus.pending, // Expired or cancelled _ => SubscriptionStatus.expired, };}/// If a subscription suffix is present (..#) extract the orderId.String extractOrderId(String orderId) { final orderIdSplit = orderId.split('..'); if (orderIdSplit.isNotEmpty) { orderId = orderIdSplit[0]; } return orderId;}Your Google Play purchases should now be verified and stored in the database.
Next, move on to App Store purchases for iOS.
Verify iOS purchases: Implement the purchase handler
For verifying purchases with the App Store, a third-party Dart package exists namedapp_store_server_sdk that makes the process easier.
Start by creating theITunesApi instance. Use the sandbox configuration, as well as enable logging to facilitate error debugging.
lib/app_store_purchase_handler.dart
final_iTunesAPI=ITunesApi(ITunesHttpClient(ITunesEnvironment.sandbox(),loggingEnabled:true),);Now, unlike the Google Play APIs, the App Store uses the same API endpoints for both subscriptions and non-subscriptions. This means that you can use the same logic for both handlers. Merge them together so they call the same implementation:
lib/app_store_purchase_handler.dart
@overrideFuture<bool>handleNonSubscription({requiredStringuserId,requiredProductDataproductData,requiredStringtoken,}){returnhandleValidation(userId:userId,token:token);}@overrideFuture<bool>handleSubscription({requiredStringuserId,requiredProductDataproductData,requiredStringtoken,}){returnhandleValidation(userId:userId,token:token);}///Handlepurchasevalidation.Future<bool>handleValidation({requiredStringuserId,requiredStringtoken,})async{//Seenextstep}Now, implementhandleValidation:
lib/app_store_purchase_handler.dart
///Handlepurchasevalidation.Future<bool>handleValidation({requiredStringuserId,requiredStringtoken,})async{print('AppStorePurchaseHandler.handleValidation');finalresponse=await_iTunesAPI.verifyReceipt(password:appStoreSharedSecret,receiptData:token,);print('response:$response');if(response.status==0){print('Successfullyverifiedpurchase');finalreceipts=response.latestReceiptInfo??[];for(finalreceiptinreceipts){finalproduct=productDataMap[receipt.productId];if(product==null){print('Error:Unknownproduct:${receipt.productId}');continue;}switch(product.type){caseProductType.nonSubscription:awaitiapRepository.createOrUpdatePurchase(NonSubscriptionPurchase(userId:userId,productId:receipt.productId??'',iapSource:IAPSource.appstore,orderId:receipt.originalTransactionId??'',purchaseDate:DateTime.fromMillisecondsSinceEpoch(int.parse(receipt.originalPurchaseDateMs??'0'),),type:product.type,status:NonSubscriptionStatus.completed,),);break;caseProductType.subscription:awaitiapRepository.createOrUpdatePurchase(SubscriptionPurchase(userId:userId,productId:receipt.productId??'',iapSource:IAPSource.appstore,orderId:receipt.originalTransactionId??'',purchaseDate:DateTime.fromMillisecondsSinceEpoch(int.parse(receipt.originalPurchaseDateMs??'0'),),type:product.type,expiryDate:DateTime.fromMillisecondsSinceEpoch(int.parse(receipt.expiresDateMs??'0'),),status:SubscriptionStatus.active,),);break;}}returntrue;}else{print('Error:Status:${response.status}');returnfalse;}}Your App Store purchases should now be verified and stored in the database!
Run the backend
At this point, you can rundart bin/server.dart to serve the/verifypurchase endpoint.
$ dart bin/server.dartServing at http://0.0.0.0:8080
11. Keep track of purchases
The recommended way to track your users' purchases is in the backend service. This is because your backend can respond to events from the store and thus is less prone to running into outdated information due to caching, as well as being less susceptible to being tampered with.
First, set up the processing of store events on the backend with the Dart backend you've been building.
Process store events on the backend
Stores have the ability to inform your backend of any billing events that happen, such as when subscriptions renew. You can process these events in your backend to keep the purchases in your database current. In this section, set this up for both the Google Play Store and the Apple App Store.
Process Google Play billing events
Google Play provides billing events through what they call acloud pub/sub topic. These are essentially message queues that messages can be published on, as well as consumed from.
Because this is functionality specific to Google Play, you include this functionality in theGooglePlayPurchaseHandler.
Start by opening uplib/google_play_purchase_handler.dart, and adding thePubsubApi import:
lib/google_play_purchase_handler.dart
import'package:googleapis/pubsub/v1.dart'aspubsub;Then, pass thePubsubApi to theGooglePlayPurchaseHandler, and modify the class constructor to create aTimer as follows:
lib/google_play_purchase_handler.dart
classGooglePlayPurchaseHandlerextendsPurchaseHandler{finalap.AndroidPublisherApiandroidPublisher;finalIapRepositoryiapRepository;finalpubsub.PubsubApipubsubApi;//newGooglePlayPurchaseHandler(this.androidPublisher,this.iapRepository,this.pubsubApi,//new){//PollmessagesfromPub/Subevery10secondsTimer.periodic(Duration(seconds:10),(_){_pullMessageFromPubSub();});}TheTimer is configured to call the_pullMessageFromPubSub method every ten seconds. You can adjust the Duration to your own preference.
Then, create the_pullMessageFromPubSub
lib/google_play_purchase_handler.dart
///ProcessmessagesfromGooglePlay///Calledevery10secondsFuture<void>_pullMessageFromPubSub()async{print('Polling Google Play messages');finalrequest=pubsub.PullRequest(maxMessages:1000);finaltopicName='projects/$googleCloudProjectId/subscriptions/$googlePlayPubsubBillingTopic-sub';finalpullResponse=awaitpubsubApi.projects.subscriptions.pull(request,topicName,);finalmessages=pullResponse.receivedMessages??[];for(finalmessageinmessages){finaldata64=message.message?.data;if(data64!=null){await_processMessage(data64,message.ackId);}}}Future<void>_processMessage(Stringdata64,String?ackId)async{finaldataRaw=utf8.decode(base64Decode(data64));print('Received data: $dataRaw');finaldynamicdata=jsonDecode(dataRaw);if(data['testNotification']!=null){print('Skip test messages');if(ackId!=null){await_ackMessage(ackId);}return;}finaldynamicsubscriptionNotification=data['subscriptionNotification'];finaldynamiconeTimeProductNotification=data['oneTimeProductNotification'];if(subscriptionNotification!=null){print('Processing Subscription');finalsubscriptionId=subscriptionNotification['subscriptionId']asString;finalpurchaseToken=subscriptionNotification['purchaseToken']asString;finalproductData=productDataMap[subscriptionId]!;finalresult=awaithandleSubscription(userId:null,productData:productData,token:purchaseToken,);if(result &&ackId!=null){await_ackMessage(ackId);}}elseif(oneTimeProductNotification!=null){print('Processing NonSubscription');finalsku=oneTimeProductNotification['sku']asString;finalpurchaseToken=oneTimeProductNotification['purchaseToken']asString;finalproductData=productDataMap[sku]!;finalresult=awaithandleNonSubscription(userId:null,productData:productData,token:purchaseToken,);if(result &&ackId!=null){await_ackMessage(ackId);}}else{print('invalid data');}}///ACKMessagesfromPub/SubFuture<void>_ackMessage(Stringid)async{print('ACK Message');finalrequest=pubsub.AcknowledgeRequest(ackIds:[id]);finalsubscriptionName='projects/$googleCloudProjectId/subscriptions/$googlePlayPubsubBillingTopic-sub';awaitpubsubApi.projects.subscriptions.acknowledge(request,subscriptionName,);}The code you just added communicates with the Pub/Sub Topic from Google Cloud every ten seconds and asks for new messages. Then, processes each message in the_processMessage method.
This method decodes the incoming messages and obtains the updated information about each purchase, both subscriptions and non-subscriptions, calling the existinghandleSubscription orhandleNonSubscription if necessary.
Each message needs to be acknowledged with the_askMessage method.
Next, add the required dependencies to theserver.dart file. Add the PubsubApi.cloudPlatformScope to the credentials configuration:
bin/server.dart
import'package:googleapis/pubsub/v1.dart'aspubsub;//AddthisimportfinalclientGooglePlay=awaitauth.clientViaServiceAccount(clientCredentialsGooglePlay,[ap.AndroidPublisherApi.androidpublisherScope,pubsub.PubsubApi.cloudPlatformScope,//Addthisline]);Then, create the PubsubApi instance:
bin/server.dart
final pubsubApi = pubsub.PubsubApi(clientGooglePlay);And finally, pass it to theGooglePlayPurchaseHandler constructor:
bin/server.dart
return { 'google_play': GooglePlayPurchaseHandler( androidPublisher, iapRepository, pubsubApi, // Add this line ), 'app_store': AppStorePurchaseHandler( iapRepository, ), };Google Play setup
You've written the code to consume billing events from the pub/sub topic, but you haven't created the pub/sub topic, nor are you publishing any billing events. It's time to set this up.
First, create a pub/sub topic:
- Set the value of
googleCloudProjectIdinconstants.dartto ID of your Google Cloud Project. - Visit theCloud Pub/Sub page on the Google Cloud Console.
- Ensure that you're on your Firebase project, and click+ Create Topic.

- Give the new topic a name, identical to the value set for
googlePlayPubsubBillingTopicinconstants.dart. In this case, name itplay_billing. If you choose something else, make sure to updateconstants.dart. Create the topic.
- In the list of your pub/sub topics, click the three vertical dots for the topic you just created, and clickView permissions.
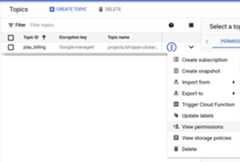
- In the sidebar on the right, chooseAdd principal.
- Here, add
google-play-developer-notifications@system.gserviceaccount.com, and grant it the role ofPub/Sub Publisher.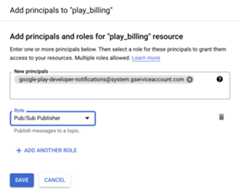
- Save the permission changes.
- Copy theTopic name of the topic you've just created.
- Open the Play Console again, and choose your app from theAll Apps list.
- Scroll down and go toMonetize > Monetization Setup.
- Fill in the full topic and save your changes.

All Google Play billing events will now be published on the topic.
Process App Store billing events
Next, do the same for the App Store billing events. There are two effective ways to implement handling updates in purchases for the App Store. One is by implementing a webhook that you provide to Apple and they use to communicate with your server. The second way, which is the one you will find in this codelab, is by connecting to the App Store Server API and obtaining the subscription information manually.
The reason why this codelab focuses on the second solution is because you would have to expose your server to the Internet in order to implement the webhook.
In a production environment, ideally you would like to have both. The webhook to obtain events from the App Store, and the Server API in case you missed an event or need to double check a subscription status.
Start by opening uplib/app_store_purchase_handler.dart, and adding theAppStoreServerAPI dependency:
lib/app_store_purchase_handler.dart
final AppStoreServerAPI appStoreServerAPI; // Add this member AppStorePurchaseHandler( this.iapRepository, this.appStoreServerAPI, // And this parameter );Modify the constructor to add a timer that will call to the_pullStatus method. This timer will be calling the_pullStatus method every 10 seconds. You can adjust this timer duration to your needs.
lib/app_store_purchase_handler.dart
AppStorePurchaseHandler(this.iapRepository,this.appStoreServerAPI){//PollSubscriptionstatusevery10seconds.Timer.periodic(Duration(seconds:10),(_){_pullStatus();});}Then, create the_pullStatus method as follows:
lib/app_store_purchase_handler.dart
/// Request the App Store for the latest subscription status./// Updates all App Store subscriptions in the database./// NOTE: This code only handles when a subscription expires as example.Future<void>_pullStatus()async{print('PollingAppStore');finalpurchases=awaitiapRepository.getPurchases();// filter for App Store subscriptionsfinalappStoreSubscriptions=purchases.where((element)=>element.type==ProductType.subscription&&element.iapSource==IAPSource.appstore,);for(finalpurchaseinappStoreSubscriptions){finalstatus=awaitappStoreServerAPI.getAllSubscriptionStatuses(purchase.orderId,);// Obtain all subscriptions for the order ID.for(finalsubscriptioninstatus.data){// Last transaction contains the subscription status.for(finaltransactioninsubscription.lastTransactions){finalexpirationDate=DateTime.fromMillisecondsSinceEpoch(transaction.transactionInfo.expiresDate??0,);// Check if subscription has expired.finalisExpired=expirationDate.isBefore(DateTime.now());print('ExpirationDate:$expirationDate-isExpired:$isExpired');// Update the subscription status with the new expiration date and status.awaitiapRepository.updatePurchase(SubscriptionPurchase(userId:null,productId:transaction.transactionInfo.productId,iapSource:IAPSource.appstore,orderId:transaction.originalTransactionId,purchaseDate:DateTime.fromMillisecondsSinceEpoch(transaction.transactionInfo.originalPurchaseDate,),type:ProductType.subscription,expiryDate:expirationDate,status:isExpired?SubscriptionStatus.expired:SubscriptionStatus.active,),);}}}}This method works as follow:
- Obtains the list of active subscriptions from Firestore using the IapRepository.
- For each order, it requests the subscription status to the App Store Server API.
- Obtains the last transaction for that subscription purchase.
- Checks the expiration date.
- Updates the subscription status on Firestore, if it is expired it will be marked as such.
Note: This codelab is presented as a basic example for handling expiring subscriptions. In a production environment, you will have to handle different types of events like renewals, cancellations, offers, etc. As well, you should implement the event webhook as recommended by Apple.
Finally, add all the necessary code to configure the App Store Server API access:
bin/server.dart
import'package:app_store_server_sdk/app_store_server_sdk.dart';//Addthisimportimport'package:firebase_backend_dart/constants.dart';//Andthisone.//addfromherefinalsubscriptionKeyAppStore=File('assets/SubscriptionKey.p8',).readAsStringSync();//ConfigureAppleStoreAPIaccessvarappStoreEnvironment=AppStoreEnvironment.sandbox(bundleId:bundleId,issuerId:appStoreIssuerId,keyId:appStoreKeyId,privateKey:subscriptionKeyAppStore,);//StoredtokenforAppleStoreAPIaccess,ifavailablefinalfile=File('assets/appstore.token');String?appStoreToken;if(file.existsSync() &&file.lengthSync() >0){appStoreToken=file.readAsStringSync();}finalappStoreServerAPI=AppStoreServerAPI(AppStoreServerHttpClient(appStoreEnvironment,jwt:appStoreToken,jwtTokenUpdatedCallback:(token){file.writeAsStringSync(token);},),);//toherereturn{'google_play':GooglePlayPurchaseHandler(androidPublisher,iapRepository,pubsubApi,),'app_store':AppStorePurchaseHandler(iapRepository,appStoreServerAPI,//Addthisargument),};App Store setup
Next, set up the App Store:
- Login toApp Store Connect, and selectUsers and Access.
- Go toIntegrations > Keys > In-App Purchase.
- Tap on the "plus" icon to add a new one.
- Give it a name, such as "Codelab key".
- Download the p8 file containing the key.
- Copy it to the assets folder, with the name
SubscriptionKey.p8. - Copy the key ID from the newly created key and set it to
appStoreKeyIdconstant in thelib/constants.dartfile. - Copy the Issuer ID right at the top of the keys list, and set it to
appStoreIssuerIdconstant in thelib/constants.dartfile.
Note: The generated key can only be downloaded once, create a new one if you lose it. Never share your App Store Server API key online.
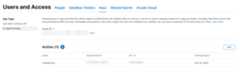
Track purchases on the device
The most secure way to track your purchases is on the server side because the client is hard to secure, but you need to have some way to get the information back to the client so the app can act on the subscription status information. By storing the purchases in Firestore, you can sync the data to the client and keep it updated automatically.
You already included theIAPRepo in the app, which is the Firestore repository that contains all of the user's purchase data inList<PastPurchase> purchases. The repository also containshasActiveSubscription, which is true when there is a purchase withproductId storeKeySubscription with a status that is not expired. When the user isn't logged in, the list is empty.
lib/repo/iap_repo.dart
voidupdatePurchases(){_purchaseSubscription?.cancel();varuser=_user;if(user==null){purchases=[];hasActiveSubscription=false;hasUpgrade=false;return;}varpurchaseStream=_firestore.collection('purchases').where('userId',isEqualTo:user.uid).snapshots();_purchaseSubscription=purchaseStream.listen((snapshot){purchases=snapshot.docs.map((document){vardata=document.data();returnPastPurchase.fromJson(data);}).toList();hasActiveSubscription=purchases.any((element)=>element.productId==storeKeySubscription&&element.status!=Status.expired,);hasUpgrade=purchases.any((element)=>element.productId==storeKeyUpgrade,);notifyListeners();});}All purchase logic is in theDashPurchases class and is where subscriptions should be applied or removed. So, add theiapRepo as a property in the class and assign theiapRepo in the constructor. Next, directly add a listener in the constructor, and remove the listener in thedispose() method. At first, the listener can just be an empty function. Because theIAPRepo is aChangeNotifier and you callnotifyListeners() every time the purchases in Firestore change, thepurchasesUpdate() method is always called when the purchased products change.
lib/logic/dash_purchases.dart
import'../repo/iap_repo.dart';//AddthisimportclassDashPurchasesextendsChangeNotifier{DashCountercounter;FirebaseNotifierfirebaseNotifier;StoreStatestoreState=StoreState.loading;lateStreamSubscription<List<PurchaseDetails>>_subscription;List<PurchasableProduct>products=[];IAPRepoiapRepo;//AddthislineboolgetbeautifiedDash=>_beautifiedDashUpgrade;bool_beautifiedDashUpgrade=false;finaliapConnection=IAPConnection.instance;//Addthis.iapRepoasaparameterDashPurchases(this.counter,this.firebaseNotifier,this.iapRepo){finalpurchaseUpdated=iapConnection.purchaseStream;_subscription=purchaseUpdated.listen(_onPurchaseUpdate,onDone:_updateStreamOnDone,onError:_updateStreamOnError,);iapRepo.addListener(purchasesUpdate);loadPurchases();}Future<void>loadPurchases()async{//Elided.}@overridevoiddispose(){_subscription.cancel();iapRepo.removeListener(purchasesUpdate);//Addthislinesuper.dispose();}voidpurchasesUpdate(){//TODOmanageupdates}Next, supply theIAPRepo to the constructor inmain.dart. You can get the repository by usingcontext.read because it's already created in aProvider.
lib/main.dart
ChangeNotifierProvider<DashPurchases>( create: (context) => DashPurchases( context.read<DashCounter>(), context.read<FirebaseNotifier>(), context.read<IAPRepo>(), // Add this line ), lazy: false, ),Next, write the code for thepurchaseUpdate() function. Indash_counter.dart, theapplyPaidMultiplier andremovePaidMultiplier methods set the multiplier to 10 or 1, respectively, so you don't have to check whether the subscription is already applied. When the subscription status changes, you also update the status of the purchasable product so you can show in the purchase page that it's already active. Set the_beautifiedDashUpgrade property based on whether the upgrade is bought.
lib/logic/dash_purchases.dart
voidpurchasesUpdate(){varsubscriptions=<PurchasableProduct>[];varupgrades=<PurchasableProduct>[];//Getalistofpurchasableproductsforthesubscriptionandupgrade.//Thisshouldbe1pertype.if(products.isNotEmpty){subscriptions=products.where((element)=>element.productDetails.id==storeKeySubscription).toList();upgrades=products.where((element)=>element.productDetails.id==storeKeyUpgrade).toList();}//Setthesubscriptioninthecounterlogicandshow/hidepurchasedonthe//purchasespage.if(iapRepo.hasActiveSubscription){counter.applyPaidMultiplier();for(varelementinsubscriptions){_updateStatus(element,ProductStatus.purchased);}}else{counter.removePaidMultiplier();for(varelementinsubscriptions){_updateStatus(element,ProductStatus.purchasable);}}//SettheDashbeautifierandshow/hidepurchasedon//thepurchasespage.if(iapRepo.hasUpgrade!=_beautifiedDashUpgrade){_beautifiedDashUpgrade=iapRepo.hasUpgrade;for(varelementinupgrades){_updateStatus(element,_beautifiedDashUpgrade?ProductStatus.purchased:ProductStatus.purchasable,);}notifyListeners();}}void_updateStatus(PurchasableProductproduct,ProductStatusstatus){if(product.status!=ProductStatus.purchased){product.status=ProductStatus.purchased;notifyListeners();}}You have now ensured that the subscription and upgrade status is always current in the backend service and synchronized with the app. The app acts accordingly and applies the subscription and upgrade features to your Dash clicker game.
12. All done!
Congratulations!!! You have completed the codelab. You can find the completed code for this codelab in the complete folder.
To learn more, try the otherFlutter codelabs.
Except as otherwise noted, the content of this page is licensed under theCreative Commons Attribution 4.0 License, and code samples are licensed under theApache 2.0 License. For details, see theGoogle Developers Site Policies. Java is a registered trademark of Oracle and/or its affiliates.