
Your first Flutter app
1. Introduction
Flutter is Google's UI toolkit for building applications for mobile, web, and desktop from a single codebase. In this codelab, you will build the following Flutter application:
The application generates cool-sounding names, such as "newstay", "lightstream", "mainbrake", or "graypine". The user can ask for the next name, favorite the current one, and review the list of favorites names on a separate page. The app is responsive to different screen sizes.
What you'll learn
- The basics of how Flutter works
- Creating layouts in Flutter
- Connecting user interactions (like button presses) to app behavior
- Keeping your Flutter code organized
- Making your app responsive (for different screens)
- Achieving a consistent look & feel of your app
You'll start with a basic scaffold so that you can jump straight to the interesting parts.

And here is Filip taking you through the whole codelab!
Click next to start the lab.
2. Set up your Flutter environment
Editor
To make this codelab as straightforward as possible, we assume you'll useVisual Studio Code (VS Code) as your development environment. It's free and works on all major platforms.
Of course it's fine to use any editor you like: Android Studio, other IntelliJ IDEs, Emacs, Vim, or Notepad++. They all work with Flutter.
We recommend using VS Code for this codelab because the instructions default to VS Code-specific shortcuts. It's easier to say things like "click here" or "press this key" instead of something like "do the appropriate action in your editor to do X".

Choose a development target
Flutter is a multi-platform toolkit. Your app can run on any of the following operating systems:
- iOS
- Android
- Windows
- macOS
- Linux
- web
However, it's common practice to choose a single operating system for which you willprimarily develop. This is your "development target"—the operating system that your app runs on during development.

For example, say you're using a Windows laptop to develop a Flutter app. If you choose Android as your development target, you typically attach an Android device to your Windows laptop with a USB cable, and your app-in-development runs on that attached Android device. But you could also choose Windows as the development target, which means your app-in-development runs as a Windows app alongside your editor.
Tip: We strongly recommend choosing your development device's Operating System as your development target. So, for example, if your computer runs Windows, choose Windows as the development target.

It might be tempting to select the web as your development target. The downside of this choice is that you lose one of Flutter's most useful development features: Stateful Hot Reload. Flutter can't hot-reload web applications.
Make your choice now. Remember: You can always run your app on other operating systems later. It's just that having a clear development target in mind makes the next step smoother.
Install Flutter
The most up-to-date instructions on how to install the Flutter SDK are always atdocs.flutter.dev.
The instructions on the Flutter website cover not only the installation of the SDK itself, but also the development target-related tools and the editor plugins. Remember that, for this codelab, you only need to install the following:
- Flutter SDK
- Visual Studio Code with the Flutter plugin
- The software required by your chosen development target (for example:Visual Studio to target Windows, orXcode to target macOS)
In the next section, you'll create your first Flutter project.
If you've had problems so far, you might find some of these questions and answers (from StackOverflow) helpful for troubleshooting.
Frequently Asked Questions
- How do I find the path of the Flutter SDK?
- What do I do when the Flutter command is not found?
- How do I fix the "Waiting for another flutter command to release the startup lock" issue?
- How do I tell Flutter where my Android SDK installation is?
- How do I deal with the Java error when running
flutter doctor --android-licenses? - How do I deal with Android
sdkmanagertool not found? - How do I deal with the "
cmdline-toolscomponent is missing" error? - How do I run CocoaPods on Apple Silicon (M1)?
- How do I disable autoformatting on save in VS Code?
3. Create a project
Create your first Flutter project
Launch Visual Studio Code and open the command palette (withF1 orCtrl+Shift+P orShift+Cmd+P). Start typing "flutter new". Select theFlutter: New Project command.
Next, selectApplication and then a folder in which to create your project. This could be your home directory, or something likeC:\src\.
Finally, name your project. Something likenamer_app ormy_awesome_namer.

Flutter now creates your project folder and VS Code opens it.
Note: VS Code shows a modal window asking whether to trust the contents of the folder.

SelectYes. The other option disables a lot of the Flutter functionality in VS Code.
You'll now overwrite the contents of 3 files with a basic scaffold of the app.
Copy & Paste the initial app
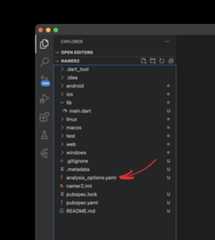
In the left pane of VS Code, make sure thatExplorer is selected, and open thepubspec.yaml file.

Replace the contents of this file with the following:
pubspec.yaml
name:namer_appdescription:"A new Flutter project."publish_to:"none"version:0.1.0environment:sdk:^3.9.0dependencies:flutter:sdk:flutterenglish_words:^4.0.0provider:^6.1.5dev_dependencies:flutter_test:sdk:flutterflutter_lints:^6.0.0flutter:uses-material-design:trueThepubspec.yaml file specifies basic information about your app, such as its current version, its dependencies, and the assets with which it will ship.
Note: If you gave your app a name other thannamer_app, you need to change the first line correspondingly.
Next, open another configuration file in the project,analysis_options.yaml.
Replace its contents with the following:
analysis_options.yaml
include:package:flutter_lints/flutter.yamllinter:rules:avoid_print:falseprefer_const_constructors_in_immutables:falseprefer_const_constructors:falseprefer_const_literals_to_create_immutables:falseprefer_final_fields:falseunnecessary_breaks:trueuse_key_in_widget_constructors:falseThis file determines how strict Flutter should be when analyzing your code. Since this is your first foray into Flutter, you're telling the analyzer to take it easy. You can always tune this later. In fact, as you get closer to publishing an actual production app, you will almost certainly want to make the analyzer stricter than this.
Finally, open themain.dart file under thelib/ directory.

Replace the contents of this file with the following:
lib/main.dart
import'package:english_words/english_words.dart';import'package:flutter/material.dart';import'package:provider/provider.dart';voidmain(){runApp(MyApp());}classMyAppextendsStatelessWidget{constMyApp({super.key});@overrideWidgetbuild(BuildContextcontext){returnChangeNotifierProvider(create:(context)=>MyAppState(),child:MaterialApp(title:'Namer App',theme:ThemeData(colorScheme:ColorScheme.fromSeed(seedColor:Colors.deepOrange),),home:MyHomePage(),),);}}classMyAppStateextendsChangeNotifier{varcurrent=WordPair.random();}classMyHomePageextendsStatelessWidget{@overrideWidgetbuild(BuildContextcontext){varappState=context.watch<MyAppState>();returnScaffold(body:Column(children:[Text('A random idea:'),Text(appState.current.asLowerCase)],),);}}These 50 lines of code are the entirety of the app so far.
Note: This codelab is racing ahead to a point where you can start interactively changing the app—because that's the best way to learn Flutter. If you're missing an explanation of the code above, please be patient: it's coming.
In the next section, run the application in debug mode and start developing.
4. Add a button
This step adds aNext button to generate a new word pairing.
Launch the app
First, openlib/main.dart and make sure that you have your target device selected. At the bottom right corner of VS Code, you'll find a button that shows the current target device. Click to change it.
Whilelib/main.dart is open, find the "play" button in the upper right-hand corner of VS Code's window, and click it.
After about a minute, your app launches in debug mode. It doesn't look like much yet:

Note: If your development target is a mobile device, it's possible that the text is partly obscured by a notch or a status bar. You will learn how to fix this soon.
First Hot Reload
At the bottom oflib/main.dart, add something to the string in the firstText object, and save the file (withCtrl+S orCmd+S). For example:
lib/main.dart
// ...returnScaffold(body:Column(children:[Text('A random AWESOME idea:'),// ← Example change.Text(appState.current.asLowerCase),],),);// ...Notice how the app changes immediately but the random word stays the same. This is Flutter's famousstateful Hot Reload at work. Hot reload is triggered when you save changes to a source file.
Frequently Asked Questions
- What if Hot Reload doesn't work in VSCode?
- Do I have to press ‘r' for hot reload in VSCode?
- Does Hot Reload work on the web?
- How do I remove the "Debug" banner?
Adding a button
Next, add a button at the bottom of theColumn, right below the secondText instance.
lib/main.dart
// ...returnScaffold(body:Column(children:[Text('A random AWESOME idea:'),Text(appState.current.asLowerCase),// ↓ Add this.ElevatedButton(onPressed:(){print('button pressed!');},child:Text('Next'),),],),);// ...When you save the change, the app updates again: A button appears and, when you click it, theDebug Console in VS Code shows abutton pressed! message.
A Flutter crash course in 5 minutes
As much fun as it is to watch theDebug Console, you want the button to do something more meaningful. Before getting to that, though, take a closer look at the code inlib/main.dart, to understand how it works.
lib/main.dart
// ...voidmain(){runApp(MyApp());}// ...At the very top of the file, you'll find themain() function. In its current form, it only tells Flutter to run the app defined inMyApp.
lib/main.dart
//...classMyAppextendsStatelessWidget{constMyApp({super.key});@overrideWidgetbuild(BuildContextcontext){returnChangeNotifierProvider(create:(context)=>MyAppState(),child:MaterialApp(title:'Namer App',theme:ThemeData(colorScheme:ColorScheme.fromSeed(seedColor:Colors.deepOrange),),home:MyHomePage(),),);}}//...TheMyApp class extendsStatelessWidget. Widgets are the elements from which you build every Flutter app. As you can see, even theapp itself is a widget.
Note: We'll get to the explanation ofStatelessWidget (versusStatefulWidget) later.
The code inMyApp sets up the whole app. It creates the app-wide state (more on this later), names the app, defines the visual theme, and sets the "home" widget—the starting point of your app.
lib/main.dart
//...classMyAppStateextendsChangeNotifier{varcurrent=WordPair.random();}//...Next, theMyAppState class defines the app's...well...state. This is your first foray into Flutter, so this codelab will keep it simple and focused. There are many powerful ways to manage app state in Flutter. One of the easiest to explain isChangeNotifier, the approach taken by this app.
MyAppStatedefines the data the app needs to function. Right now, it only contains a single variable with the current random word pair. You will add to this later.- The state class extends
ChangeNotifier, which means that it cannotify others about its ownchanges. For example, if the current word pair changes, some widgets in the app need to know. - The state is created and provided to the whole app using a
ChangeNotifierProvider(see code above inMyApp). This allows any widget in the app to get hold of the state.

lib/main.dart
//...classMyHomePageextendsStatelessWidget{@overrideWidgetbuild(BuildContextcontext){//←1varappState=context.watch<MyAppState>();//←2returnScaffold(//←3body:Column(//←4children:[Text('A random AWESOME idea:'),//←5Text(appState.current.asLowerCase),//←6ElevatedButton(onPressed:(){print('button pressed!');},child:Text('Next'),),],//←7),);}}//...Lastly, there'sMyHomePage, the widget you've already modified. Each numbered line below maps to a line-number comment in the code above:
- Every widget defines a
build()method that's automatically called every time the widget's circumstances change so that the widget is always up to date. MyHomePagetracks changes to the app's current state using thewatchmethod.- Every
buildmethod must return a widget or (more typically) a nestedtree of widgets. In this case, the top-level widget isScaffold. You aren't going to work withScaffoldin this codelab, but it's a helpful widget and is found in the vast majority of real-world Flutter apps. Columnis one of the most basic layout widgets in Flutter. It takes any number of children and puts them in a column from top to bottom. By default, the column visually places its children at the top. You'll soon change this so that the column is centered.- You changed this
Textwidget in the first step. - This second
Textwidget takesappState, and accesses the only member of that class,current(which is aWordPair).WordPairprovides several helpful getters, such asasPascalCaseorasSnakeCase. Here, we useasLowerCasebut you can change this now if you prefer one of the alternatives. - Notice how Flutter code makes heavy use of trailing commas. This particular comma doesn't need to be here, because
childrenis the last (and alsoonly) member of this particularColumnparameter list. Yet it is generally a good idea to use trailing commas: they make adding more members trivial, and they also serve as a hint for Dart's auto-formatter to put a newline there. For more information, seeCode formatting.
Next, you'll connect the button to the state.
Your first behavior
Scroll toMyAppState and add agetNext method.
lib/main.dart
//...classMyAppStateextendsChangeNotifier{varcurrent=WordPair.random();//↓Addthis.voidgetNext(){current=WordPair.random();notifyListeners();}}//...The newgetNext() method reassignscurrent with a new randomWordPair. It also callsnotifyListeners()(a method ofChangeNotifier)that ensures that anyone watchingMyAppState is notified.
All that remains is to call thegetNext method from the button's callback.
lib/main.dart
// ...ElevatedButton(onPressed:(){appState.getNext();// ← This instead of print().},child:Text('Next'),),// ...Save and try the app now. It should generate a new random word pair every time you press theNext button.
In the next section, you'll make the user interface prettier.
5. Make the app prettier
This is how the app looks at the moment.

Not great. The centerpiece of the app—the randomly generated pair of words—should be more visible. It is, after all, the main reason our users are using this app! Also, the app contents are weirdly off-center, and the whole app is boringly black & white.
This section addresses these issues by working on the app's design. The end goal for this section is something like the following:

Extract a widget
The line responsible for showing the current word pair looks like this now:Text(appState.current.asLowerCase). To change it into something more complex, it's a good idea to extract this line into a separate widget. Having separate widgets for separate logical parts of your UI is an important way of managing complexity in Flutter.
Flutter provides a refactoring helper for extracting widgets but before you use it, make sure that the line being extracted only accesses what it needs. Right now, the line accessesappState, but really only needs to know what the current word pair is.
For that reason, rewrite theMyHomePage widget as follows:
lib/main.dart
//...classMyHomePageextendsStatelessWidget{@overrideWidgetbuild(BuildContextcontext){varappState=context.watch<MyAppState>();varpair=appState.current;//←Addthis.returnScaffold(body:Column(children:[Text('A random AWESOME idea:'),Text(pair.asLowerCase),//←Changetothis.ElevatedButton(onPressed:(){appState.getNext();},child:Text('Next'),),],),);}}//...Nice. TheText widget no longer refers to the wholeappState.
Now, call up theRefactor menu. In VS Code, you do this in one of two ways:
- Right-click the piece of code you want to refactor (
Textin this case) and selectRefactor... from the drop-down menu,
OR
- Move your cursor to the piece code you want to refactor (
Text, in this case), and pressCtrl+.(Win/Linux) orCmd+.(Mac).
In theRefactor menu, selectExtract Widget. Assign a name, such asBigCard, and clickEnter.
This automatically creates a new class,BigCard, at the end of the current file. The class looks something like the following:
lib/main.dart
//...classBigCardextendsStatelessWidget{constBigCard({super.key,requiredthis.pair});finalWordPairpair;@overrideWidgetbuild(BuildContextcontext){returnText(pair.asLowerCase);}}//...Notice how the app keeps working even through this refactoring.
Add a Card
Now it's time to make this new widget into the bold piece of UI we envisioned at the beginning of this section.
Find theBigCard class and thebuild() method within it. As before, call up theRefactor menu on theText widget. However, this time you aren't going to extract the widget.
Instead, selectWrap with Padding. This creates a new parent widget around theText widget calledPadding. After saving, you'll see that the random word already has more breathing room.
Increase the padding from the default value of8.0. For example, use something like20 for roomier padding.
Note: Flutter uses Composition over Inheritance whenever it can. Here, instead of padding being anattribute ofText, it's a widget!
This way, widgets can focus on their single responsibility, and you, the developer, have total freedom in how to compose your UI. For example, you can use thePadding widget to pad text, images, buttons, your own custom widgets, or the whole app. The widget doesn't care what it's wrapping.
Next, go one level higher. Place your cursor on thePadding widget, pull up theRefactor menu, and selectWrap with widget....
This allows you to specify the parent widget. Type "Card" and pressEnter.
This wraps thePadding widget, and therefore also theText, with aCard widget.
lib/main.dart
//...classBigCardextendsStatelessWidget{constBigCard({super.key,requiredthis.pair});finalWordPairpair;@overrideWidgetbuild(BuildContextcontext){returnCard(child:Padding(padding:constEdgeInsets.all(20),child:Text(pair.asLowerCase),),);}}//...The app will now look something like this:

Theme and style
To make the card stand out more, paint it with a richer color. And because it's always a good idea to keep a consistent color scheme, use the app'sTheme to choose the color.
Make the following changes toBigCard'sbuild() method.
lib/main.dart
//...@overrideWidgetbuild(BuildContextcontext){finaltheme=Theme.of(context);//←Addthis.returnCard(color:theme.colorScheme.primary,//←Andalsothis.child:Padding(padding:constEdgeInsets.all(20),child:Text(pair.asLowerCase),),);}//...These two new lines do a lot of work:
- First, the code requests the app's current theme with
Theme.of(context). - Then, the code defines the card's color to be the same as the theme's
colorSchemeproperty. The color scheme contains many colors, andprimaryis the most prominent, defining color of the app.
The card is now painted with the app's primary color:

You can change this color, and the color scheme of the whole app, by scrolling up toMyApp and changing the seed color for theColorScheme there.
Tip: Flutter'sColors class gives you convenient access to a palette of hand-picked colors, such asColors.deepOrange orColors.red. But you can, of course, choose any color. To define pure green with full opacity, for example, useColor.fromRGBO(0, 255, 0, 1.0). If you're a fan of hexadecimal numbers, there's alwaysColor(0xFF00FF00).
Notice how the color animates smoothly. This is called animplicit animation. Many Flutter widgets will smoothly interpolate between values so that the UI doesn't just "jump" between states.
The elevated button below the card also changes color. That's the power of using an app-wideTheme as opposed to hard-coding values.
TextTheme
The card still has a problem: the text is too small and its color is hard to read. To fix this, make the following changes toBigCard'sbuild() method.
lib/main.dart
//...@overrideWidgetbuild(BuildContextcontext){finaltheme=Theme.of(context);//↓Addthis.finalstyle=theme.textTheme.displayMedium!.copyWith(color:theme.colorScheme.onPrimary,);returnCard(color:theme.colorScheme.primary,child:Padding(padding:constEdgeInsets.all(20),//↓Changethisline.child:Text(pair.asLowerCase,style:style),),);}//...What's behind this change:
- By using
theme.textTheme,you access the app's font theme. This class includes members such asbodyMedium(for standard text of medium size),caption(for captions of images), orheadlineLarge(for large headlines). - The
displayMediumproperty is a large style meant for display text. The worddisplay is used in the typographic sense here, such as indisplay typeface. The documentation fordisplayMediumsays that "display styles are reserved for short, important text"—exactly our use case. - The theme's
displayMediumproperty could theoretically benull. Dart, the programming language in which you're writing this app, is null-safe, so it won't let you call methods of objects that are potentiallynull. In this case, though, you can use the!operator ("bang operator") to assure Dart you know what you're doing. (displayMediumis definitelynot null in this case. The reason we know this is beyond the scope of this codelab, though.) - Calling
copyWith()ondisplayMediumreturns acopy of the text stylewith the changes you define. In this case, you're only changing the text's color. - To get the new color, you once again access the app's theme. The color scheme's
onPrimaryproperty defines a color that is a good fit for useon the app'sprimary color.
The app should now look something like the following:

If you feel like it, change the card further. Here are some ideas:
copyWith()lets you change a lot more about the text style than just the color. To get the full list of properties you can change, put your cursor anywhere insidecopyWith()'s parentheses, and hitCtrl+Shift+Space(Win/Linux) orCmd+Shift+Space(Mac).- Similarly, you can change more about the
Cardwidget. For example, you can enlarge the card's shadow by increasing theelevationparameter's value. - Try experimenting with colors. Apart from
theme.colorScheme.primary, there's also.secondary,.surface, and a myriad of others. All of these colors have theironPrimaryequivalents.
Improve accessibility
Flutter makes apps accessible by default. For example, every Flutter app correctly surfaces all text and interactive elements in the app to screen readers such as TalkBack and VoiceOver.

Sometimes, though, some work is required. In the case of this app, the screen reader might have problems pronouncing some generated word pairs. While humans don't have problems identifying the two words incheaphead, a screen reader might pronounce theph in the middle of the word asf.
A solution is to replacepair.asLowerCase with"${pair.first} ${pair.second}". The latter uses string interpolation to create a string (such as"cheap head") from the two words contained inpair. Using two separate words instead of a compound word makes sure that screen readers identify them appropriately, and provides a better experience to visually impaired users.
However, you might want to keep the visual simplicity ofpair.asLowerCase. UseText'ssemanticsLabel property to override the visual content of the text widget with a semantic content that is more appropriate for screen readers:
lib/main.dart
//...@overrideWidgetbuild(BuildContextcontext){finaltheme=Theme.of(context);finalstyle=theme.textTheme.displayMedium!.copyWith(color:theme.colorScheme.onPrimary,);returnCard(color:theme.colorScheme.primary,child:Padding(padding:constEdgeInsets.all(20),//↓Makethefollowingchange.child:Text(pair.asLowerCase,style:style,semanticsLabel:"${pair.first} ${pair.second}",),),);}//...Now, screen readers correctly pronounce each generated word pair, yet the UI stays the same. Try this in action byusing a screen reader on your device.
Tip: Flutter has a variety of tools for accessibility, including automated tests and theSemantics widget. Learn more on Flutter documentation'sAccessibility page.
Center the UI
Now that the random word pair is presented with enough visual flair, it's time to place it in the center of the app's window/screen.
First, remember thatBigCard is part of aColumn. By default, columns lump their children to the top, but we can override this. Go toMyHomePage'sbuild() method, and make the following change:
lib/main.dart
//...classMyHomePageextendsStatelessWidget{@overrideWidgetbuild(BuildContextcontext){varappState=context.watch<MyAppState>();varpair=appState.current;returnScaffold(body:Column(mainAxisAlignment:MainAxisAlignment.center,//←Addthis.children:[Text('A random AWESOME idea:'),BigCard(pair:pair),ElevatedButton(onPressed:(){appState.getNext();},child:Text('Next'),),],),);}}//...This centers the children inside theColumn along its main (vertical) axis.

The children are already centered along the column'scross axis (in other words, they are already centered horizontally). But theColumnitself isn't centered inside theScaffold. We can verify this by using theWidget Inspector.
The Widget Inspector itself is beyond the scope of this codelab, but you can see that when theColumn is highlighted, it doesn't take up the whole width of the app. It only takes up as much horizontal space as its children need.
You can just center the column itself. Put your cursor ontoColumn, call up theRefactor menu (withCtrl+. orCmd+.), and selectWrap with Center.
The app should now look something like the following:

If you want, you can tweak this some more.
- You can remove the
Textwidget aboveBigCard. It could be argued that the descriptive text ("A random AWESOME idea:") isn't needed anymore since the UI makes sense even without it. And it's cleaner that way. - You can also add a
SizedBox(height: 10)widget betweenBigCardandElevatedButton. This way, there's a bit more separation between the two widgets. TheSizedBoxwidget just takes space and doesn't render anything by itself. It's commonly used to create visual "gaps".
With the optional changes,MyHomePage contains this code:
lib/main.dart
//...classMyHomePageextendsStatelessWidget{@overrideWidgetbuild(BuildContextcontext){varappState=context.watch<MyAppState>();varpair=appState.current;returnScaffold(body:Center(child:Column(mainAxisAlignment:MainAxisAlignment.center,children:[BigCard(pair:pair),SizedBox(height:10),ElevatedButton(onPressed:(){appState.getNext();},child:Text('Next'),),],),),);}}//...And the app looks like the following:

In the next section, you'll add the ability to favorite (or ‘like') generated words.
6. Add functionality
The app works, and occasionally even provides interesting word pairs. But whenever the user clicksNext, each word pair disappears forever. It would be better to have a way of "remembering" the best suggestions: such as a ‘Like' button.

Add the business logic
Scroll toMyAppState and add the following code:
lib/main.dart
//...classMyAppStateextendsChangeNotifier{varcurrent=WordPair.random();voidgetNext(){current=WordPair.random();notifyListeners();}//↓Addthecodebelow.varfavorites=<WordPair>[];voidtoggleFavorite(){if(favorites.contains(current)){favorites.remove(current);}else{favorites.add(current);}notifyListeners();}}//...Examine the changes:
- You added a new property to
MyAppStatecalledfavorites. This property is initialized with an empty list:[]. - You also specified that the list can only ever contain word pairs:
<WordPair>[], usinggenerics. This helps make your app more robust—Dart refuses to evenrun your app if you try to add anything other thanWordPairto it. In turn, you can use thefavoriteslist knowing that there can never be any unwanted objects (likenull) hiding in there.
Note: Dart has collection types other thanList (expressed with[]). You could argue that aSet (expressed with{}) would make more sense for a collection of favorites. To make this codelab as straightforward as possible, we're sticking with a list. But if you want, you can use aSet instead. The code wouldn't change much.
- You also added a new method,
toggleFavorite(), which either removes the current word pair from the list of favorites (if it's already there), or adds it (if it isn't there yet). In either case, the code callsnotifyListeners();afterwards.
Add the button
With the "business logic" out of the way, it's time to work on the user interface again. Placing the ‘Like' button to the left of the ‘Next' button requires aRow. TheRow widget is the horizontal equivalent ofColumn, which you saw earlier.
First, wrap the existing button in aRow. Go toMyHomePage'sbuild() method, put your cursor on theElevatedButton, call up theRefactor menu withCtrl+. orCmd+., and selectWrap with Row.
When you save, you'll notice thatRow acts similarly toColumn—by default, it lumps its children to the left. (Column lumped its children to the top.) To fix this, you could use the same approach as before, but withmainAxisAlignment. However, for didactic (learning) purposes, usemainAxisSize. This tellsRow not to take all available horizontal space.
Make the following change:
lib/main.dart
//...classMyHomePageextendsStatelessWidget{@overrideWidgetbuild(BuildContextcontext){varappState=context.watch<MyAppState>();varpair=appState.current;returnScaffold(body:Center(child:Column(mainAxisAlignment:MainAxisAlignment.center,children:[BigCard(pair:pair),SizedBox(height:10),Row(mainAxisSize:MainAxisSize.min,//←Addthis.children:[ElevatedButton(onPressed:(){appState.getNext();},child:Text('Next'),),],),],),),);}}//...The UI is back to where it was before.
Next, add theLike button and connect it totoggleFavorite(). For a challenge, first try to do this by yourself, without looking at the code block below.
It's okay if you don't do it exactly the same way as it's done below. In fact, don't worry about the heart icon unless you really want a major challenge.
It's also completely okay to fail—this is your first hour with Flutter, after all.

Here's one way to add the second button toMyHomePage. This time, use theElevatedButton.icon() constructor to create a button with an icon. And at the top of thebuild method, choose the appropriate icon depending on whether the current word pair is already in favorites. Also, note the use ofSizedBox again, to keep the two buttons a bit apart.
lib/main.dart
//...classMyHomePageextendsStatelessWidget{@overrideWidgetbuild(BuildContextcontext){varappState=context.watch<MyAppState>();varpair=appState.current;//↓Addthis.IconDataicon;if(appState.favorites.contains(pair)){icon=Icons.favorite;}else{icon=Icons.favorite_border;}returnScaffold(body:Center(child:Column(mainAxisAlignment:MainAxisAlignment.center,children:[BigCard(pair:pair),SizedBox(height:10),Row(mainAxisSize:MainAxisSize.min,children:[//↓Andthis.ElevatedButton.icon(onPressed:(){appState.toggleFavorite();},icon:Icon(icon),label:Text('Like'),),SizedBox(width:10),ElevatedButton(onPressed:(){appState.getNext();},child:Text('Next'),),],),],),),);}}//...The app should look as follows:
Unfortunately, the user can'tsee the favorites. It's time to add a whole separate screen to our app. See you in the next section!
7. Add navigation rail
Most apps can't fit everything into a single screen. This particular app probably could, but for didactic purposes, you are going to create a separate screen for the user's favorites. To switch between the two screens, you are going to implement your firstStatefulWidget.

To get to the meat of this step as soon as possible, splitMyHomePage into 2 separate widgets.
Select all ofMyHomePage, delete it, and replace with the following code:
lib/main.dart
//...classMyHomePageextendsStatelessWidget{@overrideWidgetbuild(BuildContextcontext){returnScaffold(body:Row(children:[SafeArea(child:NavigationRail(extended:false,destinations:[NavigationRailDestination(icon:Icon(Icons.home),label:Text('Home'),),NavigationRailDestination(icon:Icon(Icons.favorite),label:Text('Favorites'),),],selectedIndex:0,onDestinationSelected:(value){print('selected: $value');},),),Expanded(child:Container(color:Theme.of(context).colorScheme.primaryContainer,child:GeneratorPage(),),),],),);}}classGeneratorPageextendsStatelessWidget{@overrideWidgetbuild(BuildContextcontext){varappState=context.watch<MyAppState>();varpair=appState.current;IconDataicon;if(appState.favorites.contains(pair)){icon=Icons.favorite;}else{icon=Icons.favorite_border;}returnCenter(child:Column(mainAxisAlignment:MainAxisAlignment.center,children:[BigCard(pair:pair),SizedBox(height:10),Row(mainAxisSize:MainAxisSize.min,children:[ElevatedButton.icon(onPressed:(){appState.toggleFavorite();},icon:Icon(icon),label:Text('Like'),),SizedBox(width:10),ElevatedButton(onPressed:(){appState.getNext();},child:Text('Next'),),],),],),);}}//...When saved, you'll see that the visual side of the UI is ready—but it doesn't work. Clicking ♥︎ (the heart) in the navigation rail does nothing.

Examine the changes.
- First, notice that the entire contents of
MyHomePageis extracted into a new widget,GeneratorPage. The only part of the oldMyHomePagewidget that didn't get extracted isScaffold. - The new
MyHomePagecontains aRowwith two children. The first widget isSafeArea, and the second is anExpandedwidget. - The
SafeAreaensures that its child is not obscured by a hardware notch or a status bar. In this app, the widget wraps aroundNavigationRailto prevent the navigation buttons from being obscured by a mobile status bar, for example. - You can change the
extended: falseline inNavigationRailtotrue. This shows the labels next to the icons. In a future step, you will learn how to do this automatically when the app has enough horizontal space. - The navigation rail has two destinations (Home andFavorites), with their respective icons and labels. It also defines the current
selectedIndex. A selected index of zero selects the first destination, a selected index of one selects the second destination, and so on. For now, it's hard coded to zero. - The navigation rail also defines what happens when the user selects one of the destinations with
onDestinationSelected. Right now, the app merely outputs the requested index value withprint(). - The second child of the
Rowis theExpandedwidget. Expanded widgets are extremely useful in rows and columns—they let you express layouts where some children take only as much space as they need (SafeArea, in this case) and other widgets should take as much of the remaining room as possible (Expanded, in this case). One way to think aboutExpandedwidgets is that they are "greedy". If you want to get a better feel of the role of this widget, try wrapping theSafeAreawidget with anotherExpanded. The resulting layout looks something like this:

- Two
Expandedwidgets split all the available horizontal space between themselves, even though the navigation rail only really needed a little slice on the left. - Inside the
Expandedwidget, there's a coloredContainer, and inside the container, theGeneratorPage.
Stateless versus stateful widgets
Until now,MyAppState covered all your state needs. That's why all the widgets you have written so far are stateless. They don't contain any mutable state of their own. None of the widgets can changeitself—they must go throughMyAppState.
This is about to change.
You need some way to hold the value of the navigation rail'sselectedIndex. You also want to be able to change this value from within theonDestinationSelected callback.
Youcould addselectedIndex as yet another property ofMyAppState. And it would work. But you can imagine that the app state would quickly grow beyond reason if every widget stored its values in it.

Some state is only relevant to a single widget, so it should stay with that widget.
Enter theStatefulWidget, a type of widget that hasState. First, convertMyHomePage to a stateful widget.
Place your cursor on the first line ofMyHomePage (the one that starts withclass MyHomePage...), and call up theRefactor menu usingCtrl+. orCmd+.. Then, selectConvert to StatefulWidget.
The IDE creates a new class for you,_MyHomePageState. This class extendsState, and can therefore manage its own values. (It can changeitself.) Also notice that thebuild method from the old, stateless widget has moved to the_MyHomePageState (instead of staying in the widget). It was moved verbatim — nothing inside thebuild method changed. It now merely lives somewhere else.
The underscore (_) at the start of_MyHomePageState makes that class private and is enforced by the compiler. If you want to know more about privacy in Dart, and other topics, read theLanguage Tour.
setState
The new stateful widget only needs to track one variable:selectedIndex. Make the following 3 changes to_MyHomePageState:
lib/main.dart
//...class_MyHomePageStateextendsState<MyHomePage>{varselectedIndex=0;//←Addthisproperty.@overrideWidgetbuild(BuildContextcontext){returnScaffold(body:Row(children:[SafeArea(child:NavigationRail(extended:false,destinations:[NavigationRailDestination(icon:Icon(Icons.home),label:Text('Home'),),NavigationRailDestination(icon:Icon(Icons.favorite),label:Text('Favorites'),),],selectedIndex:selectedIndex,//←Changetothis.onDestinationSelected:(value){//↓Replaceprintwiththis.setState((){selectedIndex=value;});},),),Expanded(child:Container(color:Theme.of(context).colorScheme.primaryContainer,child:GeneratorPage(),),),],),);}}//...Examine the changes:
- You introduce a new variable,
selectedIndex, and initialize it to0. - You use this new variable in the
NavigationRaildefinition instead of the hard-coded0that was there until now. - When the
onDestinationSelectedcallback is called, instead of merely printing the new value to console, you assign it toselectedIndexinside asetState()call. This call is similar to thenotifyListeners()method used previously—it makes sure that the UI updates.
The navigation rail now responds to user interaction. But the expanded area on the right stays the same. That's because the code isn't usingselectedIndex to determine what screen displays.
Use selectedIndex
Place the following code at the top of_MyHomePageState'sbuild method, just beforereturn Scaffold:
lib/main.dart
// ...Widgetpage;switch(selectedIndex){case0:page=GeneratorPage();break;case1:page=Placeholder();break;default:throwUnimplementedError('nowidgetfor$selectedIndex');}// ...Examine this piece of code:
- The code declares a new variable,
page, of the typeWidget. - Then, a switch statement assigns a screen to
page, according to the current value inselectedIndex. - Since there's no
FavoritesPageyet, usePlaceholder; a handy widget that draws a crossed rectangle wherever you place it, marking that part of the UI as unfinished.

- Applying thefail-fast principle, the switch statement also makes sure to throw an error if
selectedIndexis neither 0 or 1. This helps prevent bugs down the line. If you ever add a new destination to the navigation rail and forget to update this code, the program crashes in development (as opposed to letting you guess why things don't work, or letting you publish a buggy code into production).
Now thatpage contains the widget you want to show on the right, you can probably guess what other change is needed.
Here's_MyHomePageState after that single remaining change:
lib/main.dart
//...class_MyHomePageStateextendsState<MyHomePage>{varselectedIndex=0;@overrideWidgetbuild(BuildContextcontext){Widgetpage;switch(selectedIndex){case0:page=GeneratorPage();break;case1:page=Placeholder();break;default:throwUnimplementedError('no widget for $selectedIndex');}returnScaffold(body:Row(children:[SafeArea(child:NavigationRail(extended:false,destinations:[NavigationRailDestination(icon:Icon(Icons.home),label:Text('Home'),),NavigationRailDestination(icon:Icon(Icons.favorite),label:Text('Favorites'),),],selectedIndex:selectedIndex,onDestinationSelected:(value){setState((){selectedIndex=value;});},),),Expanded(child:Container(color:Theme.of(context).colorScheme.primaryContainer,child:page,//←Here.),),],),);}}//...The app now switches between ourGeneratorPage and the placeholder that will soon become theFavorites page.
Responsiveness
Next, make the navigation rail responsive. That is to say, make it automatically show the labels (usingextended: true) when there's enough room for them.

Flutter provides several widgets that help you make your appsautomatically responsive. For example,Wrap is a widget similar toRow orColumn that automatically wraps children to the next "line" (called "run") when there isn't enough vertical or horizontal space. There'sFittedBox, a widget that automatically fits its child into available space according to your specifications.
ButNavigationRail doesn'tautomatically show labels when there's enough space because it can't know whatis enough space in every context. It's up to you, the developer, to make that call.
Say you decide to show labels only ifMyHomePage is at least 600 pixels wide.
Note: Flutter works with logical pixels as a unit of length. They are also sometimes calleddevice-independent pixels. A padding of 8 pixels is visually the same regardless of whether the app is running on an old low-res phone or a newer ‘retina' device. There are roughly 38 logical pixels per centimeter, or about 96 logical pixels per inch, of the physical display.
The widget to use, in this case, isLayoutBuilder. It lets you change your widget tree depending on how much available space you have.
Once again, use Flutter'sRefactor menu in VS Code to make the required changes. This time, though, it's a little more complicated:
- Inside
_MyHomePageState'sbuildmethod, put your cursor onScaffold. - Call up theRefactor menu with
Ctrl+.(Windows/Linux) orCmd+.(Mac). - SelectWrap with Builder and pressEnter.
- Modify the name of the newly added
BuildertoLayoutBuilder. - Modify the callback parameter list from
(context)to(context, constraints).
LayoutBuilder'sbuilder callback is called every time the constraints change. This happens when, for example:
- The user resizes the app's window
- The user rotates their phone from portrait mode to landscape mode, or back
- Some widget next to
MyHomePagegrows in size, makingMyHomePage's constraints smaller
Now your code can decide whether to show the label by querying the currentconstraints. Make the following single-line change to_MyHomePageState'sbuild method:
lib/main.dart
//...class_MyHomePageStateextendsState<MyHomePage>{varselectedIndex=0;@overrideWidgetbuild(BuildContextcontext){Widgetpage;switch(selectedIndex){case0:page=GeneratorPage();break;case1:page=Placeholder();break;default:throwUnimplementedError('no widget for $selectedIndex');}returnLayoutBuilder(builder:(context,constraints){returnScaffold(body:Row(children:[SafeArea(child:NavigationRail(extended:constraints.maxWidth>=600,//←Here.destinations:[NavigationRailDestination(icon:Icon(Icons.home),label:Text('Home'),),NavigationRailDestination(icon:Icon(Icons.favorite),label:Text('Favorites'),),],selectedIndex:selectedIndex,onDestinationSelected:(value){setState((){selectedIndex=value;});},),),Expanded(child:Container(color:Theme.of(context).colorScheme.primaryContainer,child:page,),),],),);});}}//...Now, your app responds to its environment, such as screen size, orientation, and platform! In other words, it's responsive!.
The only work that remains is to replace thatPlaceholder with an actualFavorites screen. That's covered in the next section.
8. Add a new page
Remember thePlaceholder widget we used instead of theFavorites page?
It's time to fix this.
If you feel adventurous, try to do this step by yourself. Your goal is to show the list offavorites in a new stateless widget,FavoritesPage, and then show that widget instead of thePlaceholder.
Here are a few pointers:
- When you want a
Columnthat scrolls, use theListViewwidget. - Remember, access the
MyAppStateinstance from any widget usingcontext.watch<MyAppState>(). - If you also want to try a new widget,
ListTilehas properties liketitle(generally for text),leading(for icons or avatars) andonTap(for interactions). However, you can achieve similar effects with the widgets you already know. - Dart allows using
forloops inside collection literals. For example, ifmessagescontains a list of strings, you can have code like the following:
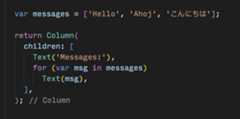
On the other hand, if you're more familiar with functional programming, Dart also lets you write code likemessages.map((m) => Text(m)).toList(). And, of course, you can always create a list of widgets and imperatively add to it inside thebuild method.
The advantage of adding theFavorites page yourself is that you learn more by making your own decisions. The disadvantage is that you might run into trouble that you aren't yet able to solve by yourself. Remember: failing is okay, and is one of the most important elements of learning. Nobody expects you to nail Flutter development in your first hour, and neither should you.
What follows is justone way to implement the favorites page. How it's implemented will (hopefully) inspire you to play with the code—improve the UI and make it your own.
Here's the newFavoritesPage class:
lib/main.dart
//...classFavoritesPageextendsStatelessWidget{@overrideWidgetbuild(BuildContextcontext){varappState=context.watch<MyAppState>();if(appState.favorites.isEmpty){returnCenter(child:Text('No favorites yet.'),);}returnListView(children:[Padding(padding:constEdgeInsets.all(20),child:Text('You have ''${appState.favorites.length} favorites:'),),for(varpairinappState.favorites)ListTile(leading:Icon(Icons.favorite),title:Text(pair.asLowerCase),),],);}}Here's what the widget does:
- It gets the current state of the app.
- If the list of favorites is empty, it shows a centered message:No favorites yet.
- Otherwise, it shows a (scrollable) list.
- The list starts with a summary (for example,You have 5 favorites.).
- The code then iterates through all the favorites, and constructs a
ListTilewidget for each one.
All that remains now is to replace thePlaceholder widget with aFavoritesPage. And voilá!
You can get the final code of this app in thecodelab repo on GitHub.
9. Next steps
Congratulations!
Look at you! You took a non-functional scaffold with aColumn and twoText widgets, and made it into a responsive, delightful little app.

What we've covered
- The basics of how Flutter works
- Creating layouts in Flutter
- Connecting user interactions (like button presses) to app behavior
- Keeping your Flutter code organized
- Making your app responsive
- Achieving a consistent look & feel of your app
What next?
- Experiment more with the app you wrote during this lab.
- Look at the code ofthis advanced version of the same app, to see how you can add animated lists, gradients, cross-fades, and more.
- Follow your learning journey by going toflutter.dev/learn.
Except as otherwise noted, the content of this page is licensed under theCreative Commons Attribution 4.0 License, and code samples are licensed under theApache 2.0 License. For details, see theGoogle Developers Site Policies. Java is a registered trademark of Oracle and/or its affiliates.