
Introduction to Query Insights for Cloud SQL
1. Before you begin
Query Insights for Cloud SQL helps you detect, diagnose, and prevent query performance problems for Cloud SQL databases. It provides self-service, intuitive monitoring, and diagnostic information that goes beyond detection to help you to identify the root cause of performance problems.
In this codelab, you will learn how to set up a Cloud SQL for PostgreSQL instance, deploy a Node.js app to use the Cloud SQL instance as its backend storage, and then use Query Insights to view and monitor queries.
Prerequisites
- Basic familiarity with Node.js programming language and tools
What you'll do
- Use Cloud SQL in a Node.js app.
- Enable SQL Commenter in a Node.js app.
- Use Query Insights for Cloud SQL to monitor and investigate query performance.
What you'll need
- A Google Cloud account where you have permissions to enable APIs and create services
2. Setup and requirements
Self-paced environment setup
- Sign in toCloud Console andcreate a new project or reuse an existing one. (If you don't already have a Gmail or Google Workspace account, you mustcreate one.)
Remember the project ID for the project you are using. It will be referred to later in this codelab asPROJECT-ID.
- Next, you'll need toenable billing in Cloud Console in order to use Google Cloud resources.
Running through this codelab shouldn't cost much, if anything at all. Be sure to to follow any instructions in the "Clean Up and Learn More" section, which advises you how to shut down resources so you don't incur billing beyond this tutorial. New users of Google Cloud are eligible for the$300USD Free Trial program.
Activate Cloud Shell
- From the Cloud Console, clickActivate Cloud Shell.

If you've never started Cloud Shell before, you'll be presented with an intermediate screen (below the fold) describing what it is. If that's the case, clickContinue (and you won't ever see it again). Here's what that one-time screen looks like:

It should only take a few moments to provision and connect to Cloud Shell.

This virtual machine is loaded with all the development tools you'll need. It offers a persistent 5GB home directory and runs in Google Cloud, greatly enhancing network performance and authentication.
- Run the following command in Cloud Shell to confirm that you are using the correct project:
Once connected to Cloud Shell, you should see that you are already authenticated and that the project is already set to your project ID.
Note: Thegcloud command-line tool is the powerful and unified command-line tool in Google Cloud. It comes preinstalled in Cloud Shell. You will notice its support for tab completion. For more information, seegcloud command-line tool overview.
Run the following command to confirm that you are using the correct project.
gcloud config list project
If you want to use a different project than the one you had selected when you opened Cloud Shell, you can set a new one by running:
gcloud config set project <PROJECT-ID>;
3. Set up a Cloud SQL for PostgreSQL instance with Query Insights enabled
- After Cloud Shell launches, you can use the command line to create a new Cloud SQL instance named
my-instance, with Query Insights enabled:
Note: In this codelab, you're enabling Query Insights via the command line; however, it can also be enabled in the Console from your instance's Query Insights menu.
gcloud sql instances create my-instance --tier db-f1-micro --database-version=POSTGRES_12 --region=us-central --root-password=<PASSWORD> --insights-config-query-insights-enabled --insights-config-record-application-tags --insights-config-record-client-address
Here's a brief explanation of the flags and what they mean:
- The
--tier db-f1-microflag is specifying a machine type with minimal resources, since this is for development purposes, and you don't need a lot of resources for the codelab. You can learn more about tiershere. - The
--database-version=POSTGRES_12flag creates an instance that will be PostgreSQL version 12. - The
--region=us-centralflag specifies the region where the instance will be created. - The
--root-password=<PASSWORD>flag allows you to specify the password for the rootpostgresuser. Be sure to replace <PASSWORD> with a password of your choice. - The
--insights-config-query-insights-enabledflag enables Query Insights on your instance. - The
--insights-config-record-application-tagsflag allows application tags to be recorded. You'll learn more about application tags in later sections. - The
--insights-config-record-client-addressflag allows client IP addresses to be recorded by Query Insights.
You may be prompted to enable the API sqladmin.googleapis.com for your project. If you are prompted, selecty to enable the API.
Creating the instance will take several minutes. Once this operation completes, your instance will be ready to use.
- Now create a database that you will use for the sample app:
gcloud sql databases create votesdb --instance my-instance
You can also access and configure the instance via theCloud Console.
- Get the instance connection name in the format
PROJECT-ID:ZONE-ID:INSTANCE-IDby running the following command. You will use this later in configuring your Node.js app.
gcloud sql instances describe my-instance | grep connectionName
4. Create a service account to use with the app
Service accounts are used to grant permissions to use different services within your GCP project. For this codelab, you need one in order to grant the Cloud SQL Proxy permission to connect to your Cloud SQL instance.
Create a service account in the Console
- Go to theIAM service accounts page and click the
button at the top of the page.
- Give your service account a unique name and ID and clickCREATE.
- On the next page, click the drop-down for Select a role. Filter for "Cloud SQL" and select the Cloud SQL Client role. ClickCONTINUE and then clickDONE.
- After the service account has been created, click the three dots underActions for your new service account and choose Manage keys. On the next page, selectADD KEY and thenCreate new key. JSON will be selected; keep that default, and clickCREATE. This will download a .json private key file. ClickCLOSE.
- In Cloud Shell, click the three dots for theMore menu and chooseUpload File. Browse to the .json file you downloaded on your local machine and select it. This will upload the .json file to your home directory in Cloud Shell.
5. Install and launch the Cloud SQL Proxy
You will use theCloud SQL Proxy for communication between the application and the database instance.
- Download the Cloud SQL proxy. In Cloud Shell, you can run:
wget https://dl.google.com/cloudsql/cloud_sql_proxy.linux.amd64 -O cloud_sql_proxy && chmod +x cloud_sql_proxy
- Run the proxy as follows after replacing
<INSTANCE_CONNECTION_NAME>with the instance connection name you copied from the Cloud SQL instance Overview page.
./cloud_sql_proxy -instances=<INSTANCE_CONNECTION_NAME>=tcp:5432 &
If this is successful, you should see a few lines of output, ending with aReady for new connections message.
6. Clone and test the app locally
- Clone the repo for the sample application, and install the packages necessary to run the app.
git clone https://github.com/GoogleCloudPlatform/nodejs-docs-samples/cd nodejs-docs-samples/cloud-sql/postgres/knexnpm install
- Set the following environment variables:
exportINSTANCE_CONNECTION_NAME='<PROJECT-ID>:<ZONE-ID>:<INSTANCE-ID>'exportDB_HOST='127.0.0.1:5432'exportDB_USER='postgres'exportDB_PASS='<PASSWORD>'exportDB_NAME='votesdb'- Start the sample app.
npm start
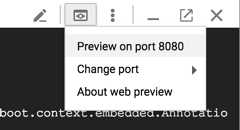
- ClickWeb Preview
 in Cloud Shell, then selectPreview on port 8080.
You should see the Tabs vs Spaces voting app as shown here in your browser:

- Click the buttons to make some votes and save some data in the database.
7. Add a page to view all votes
Because this sample application is very simple, you will add an additional page that displays all votes. The primary reason for doing this is so you have more data to look at when you use Query Insights later.
- Enter
Ctrl+cin your Cloud Shell to stop the sample app. - In Cloud Shell, click the
 button to launch the Cloud Shell Editor.
 - In the file explorer, find
nodejs-docs-samples/cloud-sql/postgres/knex/server.jsand click on it to load theserver.jsfile in the editor.
Add the following code after where thegetVotes function is defined:
/** * Retrieve all vote records from the database. * * @param {object} pool The Knex connection object. * @returns {Promise} */constgetAllVotes=asyncpool=>{returnawaitpool.select('candidate','time_cast').from('votes').orderBy('time_cast','desc');};- Add the following code for the
'/getAllVotes'route below where the other routes are defined:
app.get('/getAllVotes',async(req,res)=>{pool=pool||createPool();try{//Queryallvotesfromthedatabase.constvotes=awaitgetAllVotes(pool);res.render('allvotes.pug',{votes:votes,});}catch(err){console.error(err);res.status(500).send('Unable to load page; see logs for more details.').end();}});- Create a new file in the
nodejs-docs-samples/cloud-sql/postgres/knex/viewsdirectory namedallvotes.pug. Paste in the following code:
doctypehtmlhtml(lang="en")headtitleTabsVSSpaceslink(rel="stylesheet",href="https://cdnjs.cloudflare.com/ajax/libs/materialize/1.0.0/css/materialize.min.css")link(rel="stylesheet",href="https://fonts.googleapis.com/icon?family=Material+Icons")script(src="https://cdnjs.cloudflare.com/ajax/libs/materialize/1.0.0/js/materialize.min.js")bodynav(class="red lighten-1")div(class="nav-wrapper")a(href="#"class="brand-logo center")TabsVSSpacesdiv(class="section")h4(class="header center")RecentVotesul(class="container collection center")eachvoteinvotesli(class="collection-item avatar")ifvote.candidate.trim()==='TABS'i(class="material-icons circle green")keyboard_tabelsei(class="material-icons circle blue")space_barspan(class="title")Avotefor<b>#{vote.candidate}</b>pwascastat#{vote.time_cast}.- Click the
 button to return to Cloud Shell and run:
npmstart- Open the app from Web Preview to make sure it's working. Add
/getAllVoteson the URL in the browser to view the new page you added.
8. Enable SQL Commenter in the app
Now you'll install and enableSQL Commenter, an open-source library that enables ORMs to augment SQL statements with comments before execution. SQLcommenter supports several ORMs and frameworks, including the one the sample app uses:Knex.js. Query Insights uses the information in these comments to give an application-centric view into database performance and identify which application code is causing problems. The performance overhead is expected to be small. SeeQuery Insights documentation.
- Enter
Ctrl+cin your Cloud Shell to stop the sample app. - Run the following command to install the packages that SQLcommenter needs:
npminstall@google-cloud/sqlcommenter-knex@opencensus/nodejs@opencensus/propagation-tracecontext@opentelemetry/api@opentelemetry/core--save- In Cloud Shell, click the button to launch the Cloud Shell Editor.
- In the file explorer, find
nodejs-docs-samples/cloud-sql/postgres/knex/server.jsand click on it to load theserver.jsfile in the editor. - Find this code in the file:
constprocess=require('process');Below it, add the following code:
const{wrapMainKnexAsMiddleware}=require('@google-cloud/sqlcommenter-knex');- Find this code in the file:
//SetContent-Typeforallresponsesfortheseroutes.app.use((req,res,next)=>{res.set('Content-Type','text/html');next();});Below it, add the following code:
app.use(wrapMainKnexAsMiddleware(Knex,{traceparent:true,tracestate:true,route:true,db_driver:true}));Once this is done, your code should look something like this:
...//Requireprocess,sowecanmockenvironmentvariables.constprocess=require('process');const{wrapMainKnexAsMiddleware}=require('@google-cloud/sqlcommenter-knex');constexpress=require('express');constKnex=require('knex');constfs=require('fs');constapp=express();app.set('view engine','pug');app.enable('trust proxy');//Automaticallyparserequestbodyasformdata.app.use(express.urlencoded({extended:false}));//ThismiddlewareisavailableinExpressv4.16.0onwardsapp.use(express.json());//SetContent-Typeforallresponsesfortheseroutes.app.use((req,res,next)=>{res.set('Content-Type','text/html');next();});app.use(wrapMainKnexAsMiddleware(Knex,{traceparent:true,tracestate:true,route:true,db_driver:true}));...- Click the button to return to Cloud Shell and run:
npmstart- In the Tabs vs Spaces application, click the buttons to cast some more votes to add more data to the database.
9. Use Insights to view query performance and end-to-end tracing
The Query Insights dashboard helps you troubleshoot Cloud SQL queries to look for performance issues. To access Insights, selectQuery insights in the left navigation for your Cloud SQL instance.
Database load - all queries graph
The top-level Query Insights dashboard shows theDatabase load - all queries graph.
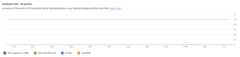
The graph contains information for CPU Capacity, CPU and CPU wait, IO Wait, and Lock Wait. You can learn more about what these metrics mean, where metrics are stored, and see some examples of what this graph looks like for problematic queries in thedocumentation. In the case of this sample application the database query load is low, so there are not any large spikes on the graph.
Which queries are responsible for the most load?
Below the graph, you will find the QUERIES table that contains the normalized queries for the time range you selected. The queries in the table are sorted by the total execution time.
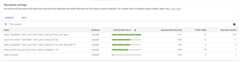
You can click into an individual query to view detailed information about the query, such as database load for this specific query, query latency, query plan samples, and top users. If an application is built using an ORM, as is the case for the sample application, you may not know which part of the application is responsible for which query. The Top Tags section can help you figure that out.
Where is the query load originating in the application?
Toggle from the QUERIES table to the TAGS table to see a list of queries tagged by business logic, giving you a more application centric view.

In the TAGS table, you can see the database load broken out by which route generated the load. In the screenshot above, you can see that the'/getAllVotes' route has a higher average execution time and has more rows returned on average. While the execution time we see in the table is not problematic in this case, let's click the row for'/getAllVotes' anyway to look at the data in more detail.
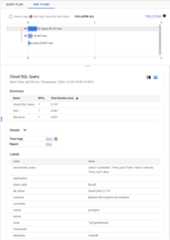
Why are queries running slowly?
Click on the dot in theQuery plan samples graph to see a query plan.

The query plans show how PostgreSQL executes a query under the covers, making it easier to determine if there are operations that result in slowness.
Which application code is contributing to slowness?
Query Insights also provides in-context visualization of end-to-end tracing, which can be helpful for doing further investigation into what parts of an application are generating slow queries.
Click theEND TO END tab to view an in-context trace.
Note: You can learn more about how to use and interpret the query plans and end-to-end tracing in thedocumentation.
10. Clean Up and Learn More
You learned how to use Query Insights to monitor and investigate query performance with a Node.js app and a Cloud SQL PostgreSQL database!
Cleaning Up
If you don't want to keep your Cloud SQL instance running, you can delete it now.
gcloudsqlinstancesdeletemy-instanceLearn More
Except as otherwise noted, the content of this page is licensed under theCreative Commons Attribution 4.0 License, and code samples are licensed under theApache 2.0 License. For details, see theGoogle Developers Site Policies. Java is a registered trademark of Oracle and/or its affiliates.