
Adding an AdMob banner and native inline ads to a Flutter app
1. Introduction
In this codelab, you implement an AdMob banner and an AdMob native inline ad in a Flutter app.
What you'll build
This codelab guides you through implementing an AdMob inline banner and AdMob native inline ads in a Flutter app using the Google Mobile Ads plugin for Flutter.
|
|
If you have any issues (code bugs, grammatical errors, unclear wording, and so on) as you work through this codelab, report the issue using theReport a mistake link in the lower, left corner of the codelab.
What you'll learn
- How to configure the Google Mobile Ads Flutter plugin
- How to implement an inline banner and rewarded ads in a Flutter app
What you'll need
- Android Studio 4.1 or later
- Xcode 12 or later (for iOS development)
How would you rate your level of experience with AdMob?
How would you rate your level of experience with Flutter?
2. Set up your Flutter development environment
You need two pieces of software to complete this lab—theFlutter SDK andan editor.
You can run the codelab using any of these devices:
- A physicalAndroid oriOS device connected to your computer and set to Developer mode.
- The iOS simulator (requires installing Xcode tools).
- TheAndroid Emulator (requires setup in Android Studio).
- A browser (Chrome is required for debugging).
- As aWindows,Linux, ormacOS desktop application. You must develop on the platform where you plan to deploy. So, if you want to develop a Windows desktop app, you must develop on Windows to access the appropriate build chain. There are operating system-specific requirements that are covered in detail ondocs.flutter.dev/desktop.
Download the code
After you download the zip file, extract its contents. You will have a folder namedadmob-inline-ads-in-flutter-main.
Alternatively, you can clone the GitHub repository from the command line:
$ git clone https://github.com/googlecodelabs/admob-inline-ads-in-flutter
The repository contains three folders:
 starter: Starting code that you will build in this codelab.
- complete: Completed code for this codelab. (Java & Objective-C for native code)
- complete_kotlin_swift: Completed code for this codelab. (Kotlin & Swift for native code)
3. Set up AdMob app and ad units
Because Flutter is a multi-platform SDK, you need to add an app and ad units for both Android and iOS in AdMob.
Note: If you want to follow the codelab instead of creating a new application and ad units on your own, go to theUse the test AdMob app and ad units section.
Set up for Android
To set up for Android, you need to add an Android app and create ad units.
Add an Android app
- In theAdMob console, clickADD APP from theApps menu.
- When you're askedHave you published your app on Google Play or the App Store?, clickNO.
- Enter
AdMob inline adsin the app name field, and selectAndroid as the platform.

- Enabling user metrics is not necessary to complete this codelab. However, we recommend that you do because it allows you to understand user behavior in more detail. ClickADD to complete the process.

Create ad units
To add ad units:
- SelectAdMob inline ads app fromApps menu in theAdMob console.
- Click theAd units menu.
Banner
|
|

Native
|
|

Important: When building and testing your apps, make sure that youuse test ads, rather than live, production ads. Failure to do so can lead to suspension of your account. For more information about how the Mobile Ads SDK's test ads work, seeTest Ads.
It usually takes a few hours for a new ad unit to be able to serve ads.
If you want to test the ad's behavior immediately, then use the test app ID and ad unit IDs listed in the Android app ID/ad unit ID and iOS app ID/ad unit ID tables.
Set up for iOS
To set up for iOS, you need to add an iOS app and create ad units.
Add an iOS app
- In theAdMob console, clickADD APP from theApps menu.
- When you're askedHave you published your app on Google Play or the App Store?, clickNO.
- Enter
AdMob inline adsin the app name field, and selectiOS as the platform.

- Enabling user metrics is not necessary to complete this codelab. However, we recommend that you do because it allows you to understand user behavior in more detail. ClickADD to complete the process.
Create ad units
To add ad units:
- SelectAdMob inline ads app fromApps menu in theAdMob console.
- Click theAd units menu.
Banner
|
|
Native
|
|
Important: When building and testing your apps, make sure that youuse test ads, rather than live, production ads. Failure to do so can lead to suspension of your account. For more information about how the Mobile Ads SDK's test ads work, seeTest Ads.
It usually takes a few hours for a new ad unit to be able to serve ads.
If you want to test the ad's behavior immediately, then use the test app ID and ad unit IDs listed in the following table.
Optional: Use the test AdMob app and ad units
If you want to follow the codelab instead of creating a new application and ad units on your own, you can use the test AdMob app ID and ad unit IDs listed in the following tables.
Android app ID/ad unit ID
Item | app ID/ad unit ID |
AdMob app ID |
|
Banner |
|
Native |
|
iOS app ID/ad unit ID
Item | app ID/ad unit ID |
AdMob app ID |
|
Banner |
|
Native |
|
For more information about the test ads, see theAndroid test ads and theiOS test ads developer documentation.
4. Add the Google Mobile Ads Flutter plugin
Flutter uses plugins to provide access to a wide range of platform-specific services. Plugins enable you to access services and APIs on each platform.
Thegoogle_mobile_ads plugin supports loading and displaying banner, interstitial, rewarded, and native ads using the AdMob API.
Because Flutter is a multi-platform SDK, the google_mobile_ads plugin is applicable for both iOS and Android. So, if you add the plugin to your Flutter app, it's used by both Android and iOS versions of the AdMob inline ads app.
Add the Google Mobile Ads plugin as a dependency
To access the AdMob APIs from theAdMob inline ads project, addgoogle_mobile_ads as a dependency to thepubspec.yaml file located at the root of the project.
pubspec.yaml
...dependencies: flutter: sdk: flutter google_fonts: ^0.3.9 # TODO: Add google_mobile_ads as a dependency google_mobile_ads: ^1.2.0...ClickPub get to install the plugin in theAdMob inline ads project.

Update AndroidManifest.xml (Android)
- Open the
android/app/src/main/AndroidManifest.xmlfile in Android Studio. - Add your AdMob app ID by adding a
<meta-data>tag with the namecom.google.android.gms.ads.APPLICATION_ID. For example, if your AdMob app ID isca-app-pub-3940256099942544~3347511713, then you need to add the following lines to theAndroidManifest.xmlfile.
AndroidManifest.xml
<manifest> ... <application> ... <meta-data android:name="com.google.android.gms.ads.APPLICATION_ID" android:value="ca-app-pub-3940256099942544~3347511713"/> </application></manifest>Update Info.plist (iOS)
- Open the
ios/Runner/Info.plistfile in Android Studio. - Add a
GADApplicationIdentifierkey with the string value of your AdMob app ID. For example, if your AdMob app ID isca-app-pub-3940256099942544~1458002511, then you need to add the following lines to theInfo.plistfile.
ios/Runner/Info.plist
...<key>GADApplicationIdentifier</key><string>ca-app-pub-3940256099942544~1458002511</string>...5. Add a helper class for ads
Create a new file namedad_helper.dart under thelib directory. Then, implement theAdHelper class, which provides an AdMob app ID and ad unit IDs for Android and iOS.
Make sure that you replace the AdMob app ID (ca-app-pub-xxxxxx~yyyyy) and the ad unit ID (ca-app-pub-xxxxxxx/yyyyyyyy) with the IDs you created in the previous step.
ad_helper.dart
import'dart:io';classAdHelper{staticStringgetbannerAdUnitId{if(Platform.isAndroid){return"<YOUR_ANDROID_BANNER_AD_UNIT_ID";}elseif(Platform.isIOS){return"<YOUR_IOS_BANNER_AD_UNIT_ID>";}else{throwUnsupportedError("Unsupported platform");}}staticStringgetnativeAdUnitId{if(Platform.isAndroid){return"<YOUR_ANDROID_NATIVE_AD_UNIT_ID>";}elseif(Platform.isIOS){return"<YOUR_IOS_NATIVE_AD_UNIT_ID>";}else{throwUnsupportedError("Unsupported platform");}}}Use the following code snippet if you want to use the test AdMob app ID and test ad unit IDs.
ad_helper.dart
import'dart:io';classAdHelper{staticStringgetbannerAdUnitId{if(Platform.isAndroid){return'ca-app-pub-3940256099942544/6300978111';}elseif(Platform.isIOS){return'ca-app-pub-3940256099942544/2934735716';}throwUnsupportedError("Unsupported platform");}staticStringgetnativeAdUnitId{if(Platform.isAndroid){return'ca-app-pub-3940256099942544/2247696110';}elseif(Platform.isIOS){return'ca-app-pub-3940256099942544/3986624511';}throwUnsupportedError("Unsupported platform");}}6. Initialize the Google Mobile Ads SDK
Before loading ads, you need to initialize the Google Mobile Ads SDK. Open thelib/home_page.dart file, and modify_initGoogleMobileAds() to initialize the SDK before the home page is loaded.
Note that you need to change the return type of the_initGoogleMobileAds() method fromFuture<dynamic> toFuture<InitializationStatus> to get the SDK initialization result after it completes.
home_page.dart
//TODO:Importgoogle_mobile_ads.dartimport'package:google_mobile_ads/google_mobile_ads.dart';import'package:flutter/material.dart';...classHomePageextendsStatelessWidget{...Future<InitializationStatus>_initGoogleMobileAds(){//TODO:InitializeGoogleMobileAdsSDKreturnMobileAds.instance.initialize();}}7. Add a banner ad
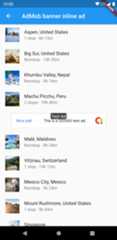
In this section, you display a banner ad in the middle of the list, as shown in the following screenshot.
- Open the
lib/banner_inline_page.dartfile. - Import
ad_helper.dartandgoogle_mobile_ads.dartby adding the following lines:
banner_inline_page.dart
...//TODO:Importad_helper.dartimport'package:admob_inline_ads_in_flutter/ad_helper.dart';//TODO:Importgoogle_mobile_ads.dartimport'package:google_mobile_ads/google_mobile_ads.dart';classBannerInlinePageextendsStatefulWidget{...}- In the
_BannerInlinePageStateclass, add the following members and methods for a banner ad.
Note that_kAdIndex indicates the index where a banner ad will be displayed, and it's used to calculate the item index from the_getDestinationItemIndex() method.
banner_inline_page.dart
class_BannerInlinePageStateextendsState<BannerInlinePage>{//TODO:Add_kAdIndexstaticfinal_kAdIndex=4;//TODO:AddabanneradinstanceBannerAd?_ad;...//TODO:Add_getDestinationItemIndex()int_getDestinationItemIndex(intrawIndex){if(rawIndex>=_kAdIndex &&_ad!=null){returnrawIndex-1;}returnrawIndex;}...}- In the
initState()method, create and load aBannerAdfor the 320x50 banner (AdSize.banner). Note that an ad event listener is configured to update the UI (setState()) when an ad is loaded.
banner_inline_page.dart
@overridevoidinitState(){super.initState();//TODO:LoadabanneradBannerAd(adUnitId:AdHelper.bannerAdUnitId,size:AdSize.banner,request:AdRequest(),listener:BannerAdListener(onAdLoaded:(ad){setState((){_ad=adasBannerAd;});},onAdFailedToLoad:(ad,error){//Releasesanadresourcewhenitfailstoloadad.dispose();print('Ad load failed (code=${error.code} message=${error.message})');},),).load();}- Modify the
build()method to display a banner ad when available. - Update
itemCount,to count a banner ad entry, and updateitemBuilder,to render a banner ad at the ad index (_kAdIndex) when the ad is loaded. - Update the code to use the
_getDestinationItemIndex()method to retrieve an index for the content item.
banner_inline_page.dart
@overrideWidgetbuild(BuildContextcontext){returnScaffold(...body:ListView.builder(//TODO:AdjustitemCountbasedontheadloadstateitemCount:widget.entries.length+(_ad!=null?1:0),itemBuilder:(context,index){//TODO:Renderabanneradif(_ad!=null &&index==_kAdIndex){returnContainer(width:_ad!.size.width.toDouble(),height:72.0,alignment:Alignment.center,child:AdWidget(ad:_ad!),);}else{//TODO:Getadjusteditemindexfrom_getDestinationItemIndex()finalitem=widget.entries[_getDestinationItemIndex(index)];returnListTile(...);}},),);}- Release the resource associated with the
BannerAdobject by calling theBannerAd.dispose()method in thedispose()callback method.
banner_inline_page.dart
@overridevoiddispose(){//TODO:DisposeaBannerAdobject_ad?.dispose();super.dispose();}That's it! Run the project, and click theBanner inline ad button from the home page. After an ad is loaded, you'll see a banner ad in the middle of the list.


8. Add a native ad
In this section, you display a native ad in the middle of the list, as shown in the following screenshot.

Native ads are presented to users using UI components that are native to the platform (for example,View on Android orUIView on iOS).
However, it isn't possible to create native UI components directly by using Flutter widgets. So, you have to implement aNativeAdFactory for each platform, which is used to build a platform-specific native ad view (NativeAdView on Android andGADNativeAdView on iOS) from a native ad object (NativeAd on Android andGADNativeAd on iOS).
Implement NativeAdFactory forAndroid (Java)
Note: If your project uses Kotlin instead of Java, go to theImplement NativeAdFactory for Android (Kotlin) section below.
- Open the
android/build.gradlefile (or any file under theandroid folder), and clickOpen for Editing in Android Studio to open an Android project.

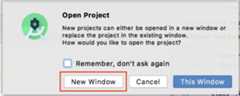
- If you're asked to select a window to open a new project, clickNew Window to make the Flutter project remain open while you're working on the Android project.
Create a native ad layout
- With the Android project opened, right-clickapp from the project pane in Android Studio, and selectNew > Android Resource File from the context menu.

- In theNew Resource File dialog, enter
list_tile_native_ad.xmlas the file name. - SelectLayout as the resource type, and enter
com.google.android.gms.ads.nativead.NativeAdViewas a root element. - ClickOK to create a new layout file.

- Implement the ad layout as follows. Note that the layout should match the visual design of the user experience for the platform it's intended for.
list_tile_native_ad.xml
<?xmlversion="1.0"encoding="utf-8"?><com.google.android.gms.ads.nativead.NativeAdViewxmlns:android="http://schemas.android.com/apk/res/android"xmlns:tools="http://schemas.android.com/tools"android:layout_width="match_parent"android:layout_height="match_parent"><FrameLayoutandroid:layout_width="match_parent"android:layout_height="match_parent"><TextViewandroid:id="@+id/tv_list_tile_native_ad_attribution_small"android:layout_width="wrap_content"android:layout_height="wrap_content"android:background="#F19938"android:text="Ad"android:textColor="#FFFFFF"android:textSize="12sp"/><ImageViewandroid:id="@+id/iv_list_tile_native_ad_icon"android:layout_width="48dp"android:layout_height="48dp"android:layout_gravity="center_vertical"android:layout_marginStart="16dp"android:layout_marginLeft="16dp"android:scaleType="fitXY"tools:background="#EDEDED"/><TextViewandroid:id="@+id/tv_list_tile_native_ad_attribution_large"android:layout_width="48dp"android:layout_height="48dp"android:layout_gravity="center_vertical"android:layout_marginStart="16dp"android:layout_marginLeft="16dp"android:background="#F19938"android:gravity="center"android:text="Ad"android:textColor="#FFFFFF"android:visibility="invisible"/><LinearLayoutandroid:layout_width="match_parent"android:layout_height="wrap_content"android:layout_gravity="center_vertical"android:layout_marginStart="80dp"android:layout_marginLeft="80dp"android:layout_marginEnd="16dp"android:layout_marginRight="16dp"android:orientation="vertical"><TextViewandroid:id="@+id/tv_list_tile_native_ad_headline"android:layout_width="wrap_content"android:layout_height="wrap_content"android:ellipsize="end"android:lines="1"android:maxLines="1"android:textColor="#000000"android:textSize="16sp"tools:text="Headline"/><TextViewandroid:id="@+id/tv_list_tile_native_ad_body"android:layout_width="wrap_content"android:layout_height="wrap_content"android:ellipsize="end"android:lines="1"android:maxLines="1"android:textColor="#828282"android:textSize="14sp"tools:text="body"/></LinearLayout></FrameLayout></com.google.android.gms.ads.nativead.NativeAdView>Create the ListTileNativeAdFactory class
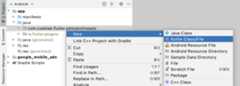
- In the Project pane, right-click thecom.codelab.flutter.admobinlineads package, and selectNew > Java Class.

- Enter
ListTileNativeAdFactoryas the name, and selectClass from the list.
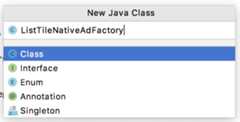
- After theNew Class dialog appears, leave everything empty, and clickOK.
You'll see that theListTileNativeAdFactory class is created in the packagecom.codelab.flutter.admobinlineads.

- Implement the
ListTileNativeAdFactoryclass as follows. Note that the class implements thecreateNativeAd()method in theGoogleMobileAdsPlugin.NativeAdFactoryinterface.
The factory class is responsible for creating a view object for rendering a native ad. As you can see from the code, the factory class creates aUnifiedNativeAdView and populates it with aNativeAd object.
ListTileNativeAdFactory.java
//TODO:ImplementListTileNativeAdFactoryclasspackagecom.codelab.flutter.admobinlineads;importcom.google.android.gms.ads.nativead.NativeAd;importcom.google.android.gms.ads.nativead.NativeAdView;importandroid.content.Context;importandroid.view.LayoutInflater;importandroid.view.View;importandroid.widget.ImageView;importandroid.widget.TextView;importjava.util.Map;importio.flutter.plugins.googlemobileads.GoogleMobileAdsPlugin;classListTileNativeAdFactoryimplementsGoogleMobileAdsPlugin.NativeAdFactory{privatefinalContextcontext;ListTileNativeAdFactory(Contextcontext){this.context=context;}@OverridepublicNativeAdViewcreateNativeAd(NativeAdnativeAd,Map<String,Object>customOptions){NativeAdViewnativeAdView=(NativeAdView)LayoutInflater.from(context).inflate(R.layout.list_tile_native_ad,null);TextViewattributionViewSmall=nativeAdView.findViewById(R.id.tv_list_tile_native_ad_attribution_small);TextViewattributionViewLarge=nativeAdView.findViewById(R.id.tv_list_tile_native_ad_attribution_large);ImageViewiconView=nativeAdView.findViewById(R.id.iv_list_tile_native_ad_icon);NativeAd.Imageicon=nativeAd.getIcon();if(icon!=null){attributionViewSmall.setVisibility(View.VISIBLE);attributionViewLarge.setVisibility(View.INVISIBLE);iconView.setImageDrawable(icon.getDrawable());}else{attributionViewSmall.setVisibility(View.INVISIBLE);attributionViewLarge.setVisibility(View.VISIBLE);}nativeAdView.setIconView(iconView);TextViewheadlineView=nativeAdView.findViewById(R.id.tv_list_tile_native_ad_headline);headlineView.setText(nativeAd.getHeadline());nativeAdView.setHeadlineView(headlineView);TextViewbodyView=nativeAdView.findViewById(R.id.tv_list_tile_native_ad_body);bodyView.setText(nativeAd.getBody());bodyView.setVisibility(nativeAd.getBody()!=null?View.VISIBLE:View.INVISIBLE);nativeAdView.setBodyView(bodyView);nativeAdView.setNativeAd(nativeAd);returnnativeAdView;}}Register the ListTileNativeAdFactory class
An instance of aNativeAdFactory should be registered to theGoogleMobileAdsPlugin before it can be used from the Flutter side.
- Open the
MainActivity.javafile, and override theconfigureFlutterEngine()method and thecleanUpFlutterEngine()method. - Register the
ListTileNativeAdFactoryclass with a unique string ID (listTile) in theconfigureFlutterEngine()method.
MainActivity.java
publicclassMainActivityextendsFlutterActivity{@OverridepublicvoidconfigureFlutterEngine(@NonNullFlutterEngineflutterEngine){super.configureFlutterEngine(flutterEngine);//TODO:RegistertheListTileNativeAdFactoryGoogleMobileAdsPlugin.registerNativeAdFactory(flutterEngine,"listTile",newListTileNativeAdFactory(getContext()));}...}- Every
NativeAdFactoryinstance should be unregistered during the cleanup process. Unregister theListTileNativeAdFactoryclass in thecleanUpFlutterEngine()method.
MainActivity.java
publicclassMainActivityextendsFlutterActivity{...@OverridepublicvoidcleanUpFlutterEngine(@NonNullFlutterEngineflutterEngine){super.cleanUpFlutterEngine(flutterEngine);//TODO:UnregistertheListTileNativeAdFactoryGoogleMobileAdsPlugin.unregisterNativeAdFactory(flutterEngine,"listTile");}}Now you're ready to use theListTileNativeAdFactory class to render native ads on Android.
Implement NativeAdFactory for Android (Kotlin)
- Open the
android/build.gradlefile (or any file under theandroid folder), and clickOpen for Editing in Android Studio to open an Android project.
- If you're asked to select a window to open a new project, clickNew Window to make the Flutter project remain open while you're working on the Android project.
Create a native ad layout
- With the Android project opened, right-clickapp from the project pane in Android Studio, and selectNew > Android Resource File from the context menu.
- In theNew Resource File dialog, enter
list_tile_native_ad.xmlas the file name. - SelectLayout as the resource type, and enter
com.google.android.gms.ads.nativead.NativeAdViewas a root element. - ClickOK to create a new layout file.
- Implement the ad layout as follows. Note that the layout should match the visual design of the user experience for the platform it's intended for.
list_tile_native_ad.xml
<?xmlversion="1.0"encoding="utf-8"?><com.google.android.gms.ads.nativead.NativeAdViewxmlns:android="http://schemas.android.com/apk/res/android"xmlns:tools="http://schemas.android.com/tools"android:layout_width="match_parent"android:layout_height="match_parent"><FrameLayoutandroid:layout_width="match_parent"android:layout_height="match_parent"><TextViewandroid:id="@+id/tv_list_tile_native_ad_attribution_small"android:layout_width="wrap_content"android:layout_height="wrap_content"android:background="#F19938"android:text="Ad"android:textColor="#FFFFFF"android:textSize="12sp"/><ImageViewandroid:id="@+id/iv_list_tile_native_ad_icon"android:layout_width="48dp"android:layout_height="48dp"android:layout_gravity="center_vertical"android:layout_marginStart="16dp"android:layout_marginLeft="16dp"android:scaleType="fitXY"tools:background="#EDEDED"/><TextViewandroid:id="@+id/tv_list_tile_native_ad_attribution_large"android:layout_width="48dp"android:layout_height="48dp"android:layout_gravity="center_vertical"android:layout_marginStart="16dp"android:layout_marginLeft="16dp"android:background="#F19938"android:gravity="center"android:text="Ad"android:textColor="#FFFFFF"android:visibility="invisible"/><LinearLayoutandroid:layout_width="match_parent"android:layout_height="wrap_content"android:layout_gravity="center_vertical"android:layout_marginStart="80dp"android:layout_marginLeft="80dp"android:layout_marginEnd="16dp"android:layout_marginRight="16dp"android:orientation="vertical"><TextViewandroid:id="@+id/tv_list_tile_native_ad_headline"android:layout_width="wrap_content"android:layout_height="wrap_content"android:ellipsize="end"android:lines="1"android:maxLines="1"android:textColor="#000000"android:textSize="16sp"tools:text="Headline"/><TextViewandroid:id="@+id/tv_list_tile_native_ad_body"android:layout_width="wrap_content"android:layout_height="wrap_content"android:ellipsize="end"android:lines="1"android:maxLines="1"android:textColor="#828282"android:textSize="14sp"tools:text="body"/></LinearLayout></FrameLayout></com.google.android.gms.ads.nativead.NativeAdView>Create the ListTileNativeAdFactory class
- In the Project pane, right-click thecom.codelab.flutter.admobinlineads package, and selectNew > Kotlin File/Class.
- Enter
ListTileNativeAdFactoryas the name, and selectClass from the list.

- You'll see that the
ListTileNativeAdFactoryclass is created in the packagecom.codelab.flutter.admobinlineads. - Implement the
ListTileNativeAdFactoryclass as follows. Note that the class implements thecreateNativeAd()method in theGoogleMobileAdsPlugin.NativeAdFactoryinterface.
The factory class is responsible for creating a view object for rendering a native ad. As you can see from the code, the factory class creates aNativeAdView and populates it with aNativeAd object.
ListTileNativeAdFactory.kt
//TODO:ImplementListTileNativeAdFactoryclasspackagecom.codelab.flutter.admobinlineadsimportandroid.content.Contextimportandroid.view.LayoutInflaterimportandroid.view.Viewimportandroid.widget.ImageViewimportandroid.widget.TextViewimportcom.google.android.gms.ads.nativead.NativeAdimportcom.google.android.gms.ads.nativead.NativeAdViewimportio.flutter.plugins.googlemobileads.GoogleMobileAdsPluginclassListTileNativeAdFactory(valcontext:Context):GoogleMobileAdsPlugin.NativeAdFactory{overridefuncreateNativeAd(nativeAd:NativeAd,customOptions:MutableMap<String,Any>?):NativeAdView{valnativeAdView=LayoutInflater.from(context).inflate(R.layout.list_tile_native_ad,null)asNativeAdViewwith(nativeAdView){valattributionViewSmall=findViewById<TextView>(R.id.tv_list_tile_native_ad_attribution_small)valattributionViewLarge=findViewById<TextView>(R.id.tv_list_tile_native_ad_attribution_large)valiconView=findViewById<ImageView>(R.id.iv_list_tile_native_ad_icon)valicon=nativeAd.iconif(icon!=null){attributionViewSmall.visibility=View.VISIBLEattributionViewLarge.visibility=View.INVISIBLEiconView.setImageDrawable(icon.drawable)}else{attributionViewSmall.visibility=View.INVISIBLEattributionViewLarge.visibility=View.VISIBLE}this.iconView=iconViewvalheadlineView=findViewById<TextView>(R.id.tv_list_tile_native_ad_headline)headlineView.text=nativeAd.headlinethis.headlineView=headlineViewvalbodyView=findViewById<TextView>(R.id.tv_list_tile_native_ad_body)with(bodyView){text=nativeAd.bodyvisibility=if(nativeAd.body.isNotEmpty())View.VISIBLEelseView.INVISIBLE}this.bodyView=bodyViewsetNativeAd(nativeAd)}returnnativeAdView}}Register the ListTileNativeAdFactory class
An instance of aNativeAdFactory should be registered to theGoogleMobileAdsPlugin before it can be used from the Flutter side.
- Open the
MainActivity.ktfile, and override theconfigureFlutterEngine()method and thecleanUpFlutterEngine()method. - Register the
ListTileNativeAdFactoryclass with a unique string ID (listTile) in theconfigureFlutterEngine()method.
MainActivity.kt
classMainActivity:FlutterActivity(){overridefunconfigureFlutterEngine(flutterEngine:FlutterEngine){super.configureFlutterEngine(flutterEngine)// TODO: Register the ListTileNativeAdFactoryGoogleMobileAdsPlugin.registerNativeAdFactory(flutterEngine,"listTile",ListTileNativeAdFactory(context))}...}- Every
NativeAdFactoryinstance should be unregistered during the cleanup process. Unregister theListTileNativeAdFactoryclass in thecleanUpFlutterEngine()method.
MainActivity.kt
classMainActivity:FlutterActivity(){...overridefuncleanUpFlutterEngine(flutterEngine:FlutterEngine){super.cleanUpFlutterEngine(flutterEngine)// TODO: Unregister the ListTileNativeAdFactoryGoogleMobileAdsPlugin.unregisterNativeAdFactory(flutterEngine,"listTile")}}Now you're ready to use theListTileNativeAdFactory class to render native ads on Android.
Implement NativeAdFactory for iOS (Objective-C)
Note: If your project uses Swift instead of Objective-C, go to theImplement NativeAdFactory for iOS (Swift) section below.
Open theios/Podfile file (or any file under theios folder), and clickOpen iOS module in Xcode to open an iOS project.

Prepare a native ad layout
You'll need to have a custom view (*.xib) for laying out native ad assets. In this codelab, the preconfigured view is used to minimize your efforts.
Note: Check out theCode example section in the developer documentation for more details about creating a custom view for native ads.
With the iOS project opened in Xcode, confirm thatListTileNativeAdView.xib exists in theRunner project.

Create the ListTileNativeAdFactory class
- From the project navigator, right-click theRunner group, and selectNew File to create a header file for the new class.

- In the template dialog, select theHeader File, and name it
ListTileNativeAdFactory. - After the
ListTileNativeAdFactory.hfile is created, define theListNativeAdFactoryclass as follows:
ListTileNativeAdFactory.h
#ifndef ListTileNativeAdFactory_h#define ListTileNativeAdFactory_h// TODO: Import FLTGoogleMobileAdsPlugin.h#import "FLTGoogleMobileAdsPlugin.h"// TODO: Declare ListTileNativeAdFactory@interfaceListTileNativeAdFactory :NSObject<FLTNativeAdFactory>@end#endif/* ListTileNativeAdFactory_h */- Create an Objective-C file by selectingNew File from theRunner group.
- In the next dialog, enter
ListTileNativeAdFactoryin theFile field, and selectEmpty File as the file type.

- After you clickNext, you're asked to select a folder where the new file should be created. Leave everything unchanged, and clickCreate.

- Implement the
ListTileNativeFactoryclass as follows. Note that the class implements thecreateNativeAd()method in theFLTNativeAdFactoryprotocol.
The factory class is responsible for creating a view object for rendering a native ad. As you can see from the code, the factory class creates aGADNativeAdView and populates it with aGADNativeAd object.
ListTileNativeAdFactory.m
// TODO: Import ListTileNativeAdFactory.h#import "ListTileNativeAdFactory.h"// TODO: Implement ListTileNativeAdFactory@implementationListTileNativeAdFactory-(GADNativeAdView*)createNativeAd:(GADNativeAd*)nativeAdcustomOptions:(NSDictionary*)customOptions{GADNativeAdView*nativeAdView=[[NSBundlemainBundle]loadNibNamed:@"ListTileNativeAdView"owner:niloptions:nil].firstObject;((UILabel*)nativeAdView.headlineView).text=nativeAd.headline;((UILabel*)nativeAdView.bodyView).text=nativeAd.body;nativeAdView.bodyView.hidden=nativeAd.body?NO:YES;((UIImageView*)nativeAdView.iconView).image=nativeAd.icon.image;nativeAdView.iconView.hidden=nativeAd.icon?NO:YES;nativeAdView.callToActionView.userInteractionEnabled=NO;nativeAdView.nativeAd=nativeAd;returnnativeAdView;}@endRegister the ListTileNativeAdFacotry class
An implementation of aFLTNativeAdFactory should be registered to theFLTGoogleMobileAdsPlugin before it can be used from the Flutter side.
Open theAppDelegate.m file, and register theListTileNativeAdFactory with a unique string ID (listTile) by calling the[FLTGoogleMobileAdsPlugin registerNativeAdFactory] method.
AppDelegate.m
#import "AppDelegate.h"#import "GeneratedPluginRegistrant.h"// TODO: Import ListTileNativeAdFactory.h#import "ListTileNativeAdFactory.h"@implementationAppDelegate-(BOOL)application:(UIApplication*)applicationdidFinishLaunchingWithOptions:(NSDictionary*)launchOptions{[GeneratedPluginRegistrantregisterWithRegistry:self];// TODO: Register ListTileNativeAdFactoryListTileNativeAdFactory*listTileFactory=[[ListTileNativeAdFactoryalloc]init];[FLTGoogleMobileAdsPluginregisterNativeAdFactory:selffactoryId:@"listTile"nativeAdFactory:listTileFactory];// Override point for customization after application launch.return[superapplication:applicationdidFinishLaunchingWithOptions:launchOptions];}@endNow you're ready to use theListTileNativeAdFactory to render native ads on iOS.
Implement NativeAdFactory for iOS (Swift)
Open theios/Podfile file (or any file under theios folder), and clickOpen iOS module in Xcode to open an iOS project.
Prepare a native ad layout
You'll need to have a custom view (*.xib) for laying out native ad assets. In this codelab, the preconfigured view is used to minimize your efforts.
Note: Check out theCode example section in the developer documentation for more details about creating a custom view for native ads.
With the iOS project opened in Xcode, confirm thatListTileNativeAdView.xib exists in theRunner project.
Create the ListTileNativeAdFactory class
- From the project navigator, right-click theRunner group, and selectNew File to create a header file for the new class.

- In the template dialog, select theSwift File, and name it
ListTileNativeAdFactory. - After the
ListTileNativeAdFactory.swiftfile is created, implement theListNativeAdFactoryclass.
Note that the class implements thecreateNativeAd() method in theFLTNativeAdFactory protocol.
The factory class is responsible for creating a view object for rendering a native ad. As you can see from the code, the factory class creates aGADNativeAdView and populates it with aGADNativeAd object.
ListTileNativeAdFactory.swift
//TODO:Importgoogle_mobile_adsimportgoogle_mobile_ads//TODO:ImplementListTileNativeAdFactoryclassListTileNativeAdFactory:FLTNativeAdFactory{funccreateNativeAd(_nativeAd:GADNativeAd,customOptions:[AnyHashable:Any]?=nil)->GADNativeAdView?{letnibView=Bundle.main.loadNibNamed("ListTileNativeAdView",owner:nil,options:nil)!.firstletnativeAdView=nibViewas!GADNativeAdView(nativeAdView.headlineViewas!UILabel).text=nativeAd.headline(nativeAdView.bodyViewas!UILabel).text=nativeAd.bodynativeAdView.bodyView!.isHidden=nativeAd.body==nil(nativeAdView.iconViewas!UIImageView).image=nativeAd.icon?.imagenativeAdView.iconView!.isHidden=nativeAd.icon==nilnativeAdView.callToActionView?.isUserInteractionEnabled=falsenativeAdView.nativeAd=nativeAdreturnnativeAdView}}Register the ListTileNativeAdFacotry class
An implementation of aFLTNativeAdFactory should be registered to theFLTGoogleMobileAdsPlugin before it can be used from the Flutter side.
Open theAppDelegate.m file, and register theListTileNativeAdFactory with a unique string ID (listTile) by calling theFLTGoogleMobileAdsPlugin.registerNativeAdFactory() method.
AppDelegate.swift
importUIKitimportFlutter//TODO:Importgoogle_mobile_adsimportgoogle_mobile_ads@UIApplicationMain@objcclassAppDelegate:FlutterAppDelegate{overridefuncapplication(_application:UIApplication,didFinishLaunchingWithOptionslaunchOptions:[UIApplication.LaunchOptionsKey:Any]?)->Bool{GeneratedPluginRegistrant.register(with:self)//TODO:RegisterListTileNativeAdFactoryletlistTileFactory=ListTileNativeAdFactory()FLTGoogleMobileAdsPlugin.registerNativeAdFactory(self,factoryId:"listTile",nativeAdFactory:listTileFactory)returnsuper.application(application,didFinishLaunchingWithOptions:launchOptions)}}Now you're ready to use theListTileNativeAdFactory to render native ads on iOS.
Integrate the native ad with Flutter widgets
- Open
lib/native_inline_page.dartfile. Then, importad_helper.dartandgoogle_mobile_ads.dartby adding the following lines:
native_inline_page.dart
...//TODO:Importad_helper.dartimport'package:admob_inline_ads_in_flutter/ad_helper.dart';//TODO:Importgoogle_mobile_ads.dartimport'package:google_mobile_ads/google_mobile_ads.dart';classNativeInlinePageextendsStatefulWidget{...}- In
_NativeInlinePageStateclass, add the following members and methods for a native ad.
Note that_kAdIndex indicates the index where a banner ad will be displayed, and it's used to calculate the item index from the_getDestinationItemIndex() method.
native_inline_page.dart
class_NativeInlinePageStateextendsState<NativeInlinePage>{//TODO:Add_kAdIndexstaticfinal_kAdIndex=4;//TODO:AddanativeadinstanceNativeAd?_ad;...//TODO:Add_getDestinationItemIndex()int_getDestinationItemIndex(intrawIndex){if(rawIndex>=_kAdIndex &&_ad!=null){returnrawIndex-1;}returnrawIndex;}...}- In the
initState()method, create and load aNativeAdthat usesListTileNativeAdFactoryto generate a native ad view.
Note that the same factory ID (listTile) used to register the factory to the plugin is used.
native_inline_page.dart
@overridevoidinitState(){super.initState();//TODO:CreateaNativeAdinstance_ad=NativeAd(adUnitId:AdHelper.nativeAdUnitId,factoryId:'listTile',request:AdRequest(),listener:NativeAdListener(onAdLoaded:(ad){setState((){_ad=adasNativeAd;});},onAdFailedToLoad:(ad,error){//Releasesanadresourcewhenitfailstoloadad.dispose();print('Ad load failed (code=${error.code} message=${error.message})');},),);_ad.load();}- Modify the
build()method to display a banner ad when available. - Update
itemCount,to count a banner ad entry, and update theitemBuilder,to render a banner ad at the ad index (_kAdIndex) when the ad is loaded. - Update the code to use the
_getDestinationItemIndex()method to retrieve an index for the content item.
native_inline_page.dart
@overrideWidgetbuild(BuildContextcontext){returnScaffold(...body:ListView.builder(//TODO:AdjustitemCountbasedontheadloadstateitemCount:widget.entries.length+(_ad!=null?1:0),itemBuilder:(context,index){//TODO:Renderabanneradif(_ad!=null &&index==_kAdIndex){returnContainer(height:72.0,alignment:Alignment.center,child:AdWidget(ad:_ad!),);}else{//TODO:Getadjusteditemindexfrom_getDestinationItemIndex()finalitem=widget.entries[_getDestinationItemIndex(index)];returnListTile(...);}},),);}- Release the resource associated with the
NativeAdobject by callingNativeAd.dispose()method in thedispose()callback method.
native_inline_page.dart
@overridevoiddispose(){//TODO:DisposeaNativeAdobject_ad?.dispose();super.dispose();}That's it! Run the project, and click theNative inline ad button from the home page. After an ad is loaded, you'll see a native ad in the middle of the list.

9. All done!
You completed the codelab. You can find the completed code for this codelab in thecomplete or thecomplete_kotlin_swift folder.
Except as otherwise noted, the content of this page is licensed under theCreative Commons Attribution 4.0 License, and code samples are licensed under theApache 2.0 License. For details, see theGoogle Developers Site Policies. Java is a registered trademark of Oracle and/or its affiliates.