Staging and committing changes
Creating focused commits with clear descriptions helps you and your team understand the history of your codebase. VS Code provides integrated Git tools for staging changes and creating commits, with support for granular control over which changes to include.
This article covers the staging and commit workflow in VS Code, from Git's two-step process to using AI assistance for commit messages and reviewing changes before committing.
Git workflow
Git uses a two-step process to save your work: staging and committing. When you modify files, Git tracks these changes but doesn't automatically include them in your next commit. Staging lets you select which changes to include in each commit.
Think of staging as preparing a snapshot of your work. You can stage all changes at once for a comprehensive commit, or stage specific files and even individual lines to create focused, logical commits that are easier to review and understand later.
View changes
The Source Control view (⌃⇧G (Windows, LinuxCtrl+Shift+G)) is your central hub for managing changes in your Git repository. Changes are organized into two sections based on their staging status:
- Changes: lists all modified, added, or deleted files that are not yet staged for commit
- Staged Changes: lists files that have been staged and are ready to be committed

Notice that changed files are listed with a "U" (untracked), "M" (modified), or "D" (deleted) icon next to them to indicate the type of change. This change indicator is also shown in the Explorer view and in the editor tab title for modified files.
The source control icon in the Activity Bar also shows a badge with the number of affected files to give you a quick overview of your uncommitted changes.
You can view the list of changes in either a flat or tree structure. Toggle this with theMore Actions (...) >View & Sort >View as Tree/List option in the Source Control view toolbar.
Editor gutter indicators
To help you quickly identify changes in your files, VS Code shows gutter indicators in the editor next to the line number to represent added, modified, or deleted lines since your last commit. You can also see these indicators in theminimap.
The gutter color indicates the type of change:
- Green bar: new lines added since the last commit
- Blue bar: lines modified since the last commit
- Red triangle: lines deleted (shown above the deletion point)
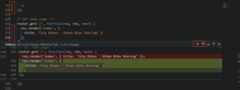
When you select the gutter indicator, an inline diff preview of your changes appears. You can stage or revert changes directly from this preview using the corresponding buttons.
You can customize the gutter indicator behavior with these settings:
- scm.diffDecorations: control when diff decorations appear (all, gutter, overview, minimap, or none)
- scm.diffDecorationsGutterAction: control the actions available in the gutter menu
- scm.diffDecorationsGutterPattern: customize the pattern used for gutter decorations
- scm.diffDecorationsGutterVisibility: control when to show gutter decorations (always or on hover)
- scm.diffDecorationsGutterWidth: set the width of the gutter indicator
- scm.diffDecorationsIgnoreTrimWhitespace: ignore whitespace changes in diff decorations
Staging changes
Staging changes prepares them for adding to your next commit. You can stage entire files or specific lines and code blocks for more granular control.
To stage individual files, hover over them in theChanges list and select the+ (plus) icon, or right-click the file and selectStage Changes. You can also drag files from theChanges section and drop them into theStaged Changes section to stage them.

When you're using the tree view, you can stage entire folders by staging the folder itself. To stage all modified files at once, hover over theChanges header and select the+ (plus) icon.
There are more specialized staging actions available in the Command Palette (⇧⌘P (Windows, LinuxCtrl+Shift+P)). Type "Git: Stage" to see options for staging files.
Stage specific lines or code blocks
Instead of staging entire files, you can also stage specific parts of a file. Partial staging enables you to create focused commits. For example, if you've made formatting changes and bug fixes in the same file, you can commit them separately with appropriate commit messages.
You can perform partial staging from the diff editor:
Select a file in theChanges list to open thediff editor
Select the lines you want to stage
Use theStage button in the gutter of the diff editor next to your selection to stage only those lines

You can also right-click the selection and chooseStage Selected Ranges or runGit: Stage Selected Ranges from the Command Palette.
Unstage changes
To remove files from staging, hover over them in theStaged Changes list and select the- (minus) icon, or right-click and chooseUnstage Changes. The files move back to theChanges section without losing your modifications.

Similarly, you can also unstage specific lines or code blocks from the diff editor using theUnstage button in the gutter next to your selection.
Commit your changes
Once you've staged your changes, you can create a commit to save them to your local repository. To create a commit, you need to write a commit message that describes the changes. This message helps you and others understand the purpose of the commit when reviewing the commit history.
Write commit messages
A commit message describes the changes you're committing and helps others (and your future self) understand the purpose of the commit. Type your message in the commit message input box at the top of the Source Control view and selectCommit to save your staged changes.
To help you write a commit message, select the sparkle icon in the commit message input box to use AI to generate the message based on your staged changes. You cancreate custom instructions to guide the AI in generating messages.

If you want to write commit messages with multiple paragraphs, you can use a full editor instead of the input box. Enable this with thegit.useEditorAsCommitInput setting. When you commit changes without a commit message, a new editor tab opens for you to write your message.
To cycle through your previous commit messages, press↑ (Windows, LinuxUp) and↓ (Windows, LinuxDown) while focused in the commit message input box.
Use the editor for commit messages
Instead of using the commit message input box, you can write commit messages in a full editor tab. This is useful for longer messages or when you want more space to compose your message.
In the Source Control view, selectCommit without entering a message in the commit input box. This opens a new editor tab named
COMMIT_EDITMSG.
Write your commit message in the editor. You can use multiple paragraphs and format your message as needed.
To accept the commit message and complete the commit operation, either close the editor tab or selectCommit in the editor.

To cancel the commit operation, you can either clear the contents of the text editor and close the editor tab, or selectCancel (
X) in the editor.
To disable using the editor for commit messages and revert to the quick input control, disable thegit.useEditorAsCommitInput setting (restart VS Code for the change to take effect).
To use the same flow forgit commit commands executed in the integrated terminal, enable thegit.terminalGitEditor setting (restart your terminal for the change to take effect).
Commit changes
Select theCommit button in the Source Control view to commit the changes in theStaged Changes section. Any unstaged changes remain in theChanges section for future commits.
To commit all changes (staged and unstaged) at once, select theMore Actions (...) menu and chooseCommit >Commit All. This stages and commits all modified files in one step.
Amend the previous commit
If you need to modify your most recent commit, you can amend it instead of creating a new commit. This is useful for adding forgotten changes or correcting the commit message.
To amend a commit, select theCommit button dropdown and selectCommit (Amend), or use theCommit Staged (Amend) option from theMore Actions (...) menu.
Only amend commits that haven't been pushed to a shared repository. Amending pushed commits rewrites history and can cause issues for other collaborators.
Undo the last commit
If you need to undo your last commit, select theMore Actions (...) menu in the Source Control view, then chooseCommit >Undo Last Commit. This removes the last commit from your branch history but keeps all the changes from that commit staged in theStaged Changes section.
Discard changes
To completely discard uncommitted changes and revert a file to its last committed state, right-click the file in the Source Control view and selectDiscard Changes. Alternatively, hover over the file in theChanges list and select the discard icon (a curved arrow pointing left).
Discarded changes are moved to the Recycle Bin (Windows) or Trash (macOS/Linux), giving you a chance to recover them if needed.
Review changes with the diff editor
The diff editor shows what changed in your files. It displays side-by-side comparisons of the original and modified versions. The diff editor can open in side-by-side or inline view.
To open the diff editor, select any file in the Source Control viewChanges orStaged Changes lists to see the changes for that file versus the last committed version.
For large files, collapse the unchanged sections by selecting theCollapse Unchanged Regions button in the diff editor toolbar. This helps you focus on the actual changes. You can also quickly navigate between changes using theNext Change andPrevious Change buttons.
Side-by-side vs inline view
By default, the diff editor shows a side-by-side comparison with the original file on the left and your changes on the right.
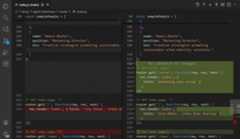
Toggle to inline view by selectingMore Actions (...) >Inline View in the diff editor toolbar to view changes within one editor.

Configure your preferred default view with thediffEditor.renderSideBySide setting.
Stage and revert from the diff editor
The diff editor includes a gutter withStage andRevert buttons next to each change. These buttons let you:
- Stage individual code blocks or lines directly from the diff view
- Revert specific changes without affecting other modifications
If you select specific lines in the diff editor, the buttons operate only on your selection.
You can hide the diff editor gutter with thediffEditor.renderGutterMenu setting.
Accessible diff viewer
For screen reader users, VS Code provides the Accessible Diff Viewer, which presents changes in a unified patch format. To open the Accessible Diff Viewer, use theMore Actions (...) menu in the diff editor toolbar and selectOpen Accessible Diff Viewer or use theF7 keyboard shortcut.
Navigate through changes withGo to Next Difference (F7) andGo to Previous Difference () commands.
Review code changes with AI
VS Code enables you to review your uncommitted changes using AI assistance before committing them. These AI features complement manual code review and help catch problems early in your development workflow.
To perform an AI-powered code review of your uncommitted changes:
Select theCode Review button in the Source Control view

VS Code analyzes your changes and generates review comments and suggestions, which appear as overlay comments in the editor

Git blame information
VS Code can show git blame information inline in the editor and in the Status Bar. Hover over the Status Bar item or editor inline hint to view detailed git blame information.
To enable or disable git blame information, use theGit: Toggle Git Blame Editor Decoration andGit: Toggle Git Blame Status Bar Item commands, or configure these settings:
- git.blame.statusBarItem.enabled (enabled by default)
- git.blame.editorDecoration.enabled
You can customize the format of the message that is shown in the editor and in the Status Bar with thegit.blame.editorDecoration.template andgit.blame.statusBarItem.template settings. You can use variables for the most common information.
For example, the following template shows the subject of the commit, the author's name, and the author's date relative to now:
{ "git.blame.editorDecoration.template":"${subject}, ${authorName} (${authorDateAgo})"}To adjust the color of the editor decoration, use thegit.blame.editorDecorationForeground theme color.
Graph view for commit history
The Source Control Graph in the Source Control view provides a visual representation of your commit history and branch relationships. When you have a remote repository configured, you can see how many commits you are ahead or behind the remote.
The graph contains the current branch, the current branch's upstream branch, and an optional base branch. The root of the graph is the common ancestor of these branches.

The graph provides the following functionality:
- Select an entry to see the files that are changed in that commit. Select theOpen Changes action to see the diff of the commit in the editor.
- Right-click on a commit to perform actions such as checkout, cherry-pick, adding it as context to chat, and more.
- Select a file to see the diff of that file in the editor.
- Select a commit and compare it with another branch or tag by right-clicking the commit and selectingCompare with,Compare with Remote, orCompare with Merge Base.
Use the actions in the Graph view tool bar to select the branch, fetch, pull, push, and sync changes.
Timeline view for file history
The Timeline view, accessible at the bottom of the File Explorer, is a unified view for visualizing the events history for a file. For example, you can view Git commits or local file saves in a timeline view.

Learn more about theTimeline view.
Next steps
- Branches and Worktrees - Learn about branch management, Git worktrees, and stash operations
- Repositories and Remotes - Learn about cloning, publishing, and syncing with remote repositories
- Merge Conflicts - Handle conflicts when merging branches
- Working with GitHub - Learn how to work with pull requests and issues
- Copilot in VS Code - Discover more AI-powered development features