Quickstart: use source control in VS Code
Get up and running with Git in Visual Studio Code in minutes. This guide covers the essentials of setting up a repository, saving your changes, and syncing your code.
Prerequisites
Install Git: make sure Git is installed on your computer.Download Git
Open VS Code: make sure you have the latest version ofVisual Studio Code installed.
Step 1: Open a project
You can start with an existing Git repository or a local project folder.
Option A: Clone a repository locally
Clone a repository if you want to work on code that is already hosted on GitHub, Azure DevOps, or another Git provider. If you have previously cloned the repository, you can open the folder directly in VS Code and VS Code will detect the Git repository automatically.
To clone a repository in VS Code:
Open the Source Control view (⌃⇧G (Windows, LinuxCtrl+Shift+G)) and selectClone Repository

Alternatively, open the Command Palette (⇧⌘P (Windows, LinuxCtrl+Shift+P)) and enter
Git: Clone.Enter the repository URL (for example,
https://github.com/microsoft/PowerToys)If you're cloning from GitHub, you can also selectClone from GitHub and sign in to your GitHub account to see a list of your repositories.
Select a parent folder on your computer to save the project
SelectOpen when prompted to open the cloned repository in VS Code
Confirm whether you trust the repository in theWorkspace Trust dialog
CautionOnly trust repositories from sources you know. Untrusted code can potentially harm your computer.
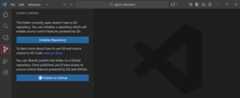
Option B: Initialize a repository in a local folder
To start a new project with Git, you can initialize a repository in an existing local folder. This option creates a new Git repository in your folder to track changes.
Open your project folder in VS Code (File >Open Folder...).
Open the Source Control view (⌃⇧G (Windows, LinuxCtrl+Shift+G)) and selectInitialize Repository
Alternatively, open the Command Palette (⇧⌘P (Windows, LinuxCtrl+Shift+P)) and enter
Git: Initialize Repository.
Step 2: Make changes and review
Git tracks changes to files in your project. The Source Control view in VS Code is your hub for managing these changes without using the command line.
Let's make a simple code change and use the Source Control view and diff editor to review it.
Edit an existing file in your project, and save it.
If you've just initialized a new repository, you can move on to the next step.
Open the Source Control view (⌃⇧G (Windows, LinuxCtrl+Shift+G)).
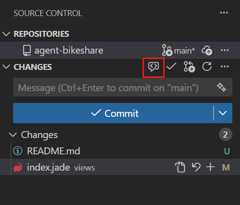
Notice that the changed file(s) are listed underChanges with a "U" (untracked) or "M" (modified) icon next to them. The source control icon in the Activity Bar also shows a badge with the number of affected files.

To review the changes to a file, select it in the Source Control view to open a diff editor.
A diff editor shows the differences between the current version of the file and the last committed version. If the window is wide enough, the diff editor displays a side-by-side comparison, otherwise the changes are shown inline.
 Tip
TipIf you have a Copilot subscription, select the Code Review button in the Source Control view to perform an AI-powered code review of your changes before committing them.
Step 3: Stage and commit
Git uses a two-step process to save changes: Stage (prepare) and Commit (save). In the Source Control view, changes are first listed underChanges and after staging them, they move toStaged Changes where they are ready to be committed.
To stage your changes, do one of the following:
Hover over a file in theChanges list and select+ (plus) to stage it

Right-click a file in theChanges list and selectStage Changes
Hover over theChanges header and select the+ (plus) button to stage all changes at once
(Optional) You can unstage changes or discard changes if needed:
To unstage a file, hover over it in theStaged Changes list and select the- (minus) button
To discard changes to a file, right-click it in theChanges list and selectDiscard Changes
To commit your staged changes you can provide a commit message.
Enter a commit message in the text box at the top of the Source Control view.
You can also use AI to generate a commit message based on your staged changes by selecting the sparkle icon in the commit message input box.
SelectCommit to commit your changes to your Git history

After committing, the staged changes are cleared from the Source Control view and saved in your local Git history.
NoteOnly staged changes are included in a commit. If you have unstaged changes, they remain listed underChanges for future commits.
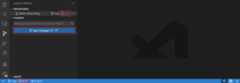
To view your commit history, select theSource Control Graph in the Source Control view.

Step 4: Sync with the server
If your repository is connected to a remote server (for example, GitHub or Azure DevOps), you can sync your local commits with the remote repository.
Open the Source Control view (⌃⇧G (Windows, LinuxCtrl+Shift+G))
SelectSync Changes to pull the latest changes from the remote and push your local commits
Alternatively, the Status Bar shows sync status and enables you to sync changes by selecting the sync icon (rotating arrows).
Select it to pull new changes from the server and push your commits.
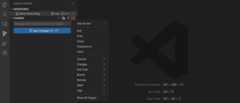
To pull or push individually, select the ellipsis menu (...) in the Source Control view and choosePull orPush.
If you started with a local folder (Option B) and want to save it to GitHub, use thePublish to GitHub button in the Source Control view.
Next steps
Now that you know the basics, explore more features:
- Branches and Worktrees - Learn about branch management and parallel development.
- Repositories and Remotes - Learn about cloning, publishing, and syncing with remote repositories.
- Resolve Merge Conflicts - Learn how to handle conflicts when merging branches.
- Working with GitHub - Learn about Pull Requests and Issues.
- Troubleshooting - Diagnose and resolve Git issues.
- Source Control Overview - Full reference for source control features.