Git Branches and Worktrees in VS Code
Git branches enable you to work on different features or experiments simultaneously without affecting your main codebase. VS Code provides tools for branch management, Git worktrees for parallel development, and stash management for temporary changes.
This article covers working with branches, worktrees, and stashes in VS Code to manage parallel development work.
Working with branches
Branches are lightweight, movable pointers to specific commits in your Git history. They allow you to diverge from the main line of development and work on features independently.
For example, suppose you're working on a web application and need to add user authentication while also fixing a bug in the payment system. You can create two branches:
feature/user-authentication- contains your login and signup functionalitybugfix/payment-validation- contains fixes for payment processing errors
Each branch maintains its own set of changes without affecting the other. You can switch between branches to work on different tasks, and later merge the completed branches back into your main branch.
View current branch
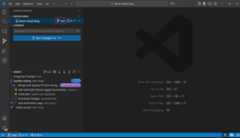
The current branch appears in several places in VS Code:
- Status Bar: shows the current branch name and allows quick branch switching
- Repositories view: displays the current branch in the repository header
- Source Control Graph: visually represents branch relationships and history
Switch between branches
Switching to a different branch is called "checking out" a branch in Git terminology. When you check out a branch, Git updates your working directory to match that branch's state.
To switch to a different branch:
Select the branch name in the Status Bar, or run theGit: Checkout to command from the Command Palette (⇧⌘P (Windows, LinuxCtrl+Shift+P)).
Choose from the list of available branches:
- Local branches: Branches that exist on your local machine
- Remote branches: Branches from the remote repository that you can check out locally
- Recent branches: Recently used branches
If you have uncommitted changes when switching branches, Git might prevent the switch to avoid losing work. Consider committing your changes or using astash before switching.
Create new branches
Create a new branch to start working on a feature or experiment:
Select the branch name in the Status Bar or runGit: Create Branch from the Command Palette.
Enter a name for your new branch. Use descriptive names like
feature/user-authenticationorbugfix/login-error.TipVS Code can generate random branch names for you. Configure this with thegit.branchRandomName.enable andgit.branchRandomName.dictionary settings.
Choose the source branch (usually
mainordevelop) from which to create the new branch.
VS Code switches to the new branch after creation.
If you use theGitHub Pull Requests and Issues extension, you can create branches directly from GitHub issues, which gets you started working in a new local branch and automatically prefills the pull request for you.
Rename and delete branches
To rename the current branch:
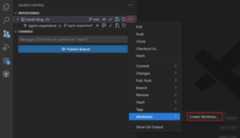
- RunGit: Rename Branch from the Command Palette or select it from theMore Actions (...) menu.
- Enter the new branch name.
To delete a branch:
- Switch to a different branch (you can't delete the currently active branch).
- RunGit: Delete Branch from the Command Palette or select it from theMore Actions (...) menu.
- Select the branch to delete from the list.
You can also delete a remote branch by using the matchingDelete Remote Branch action.
Deleting a branch permanently removes it from your local repository. Make sure the branch has been merged or you no longer need the changes.
Merge and publish branches
When your feature is complete, merge it back into the main branch:
- Switch to the target branch (usually
mainordevelop). - RunGit: Merge Branch from the Command Palette.
- Select the branch to merge.
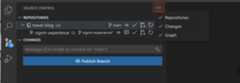
To publish a branch to your remote repository, use thePublish Branch action.
VS Code shows the merge result in the Source Control view. If there are conflicts, VS Code highlights them and provides tools to resolve them. Learn more aboutresolving merge conflicts.
Working with Git worktrees
VS Code has built-in support forGit worktrees, making it easy to manage and work with multiple branches at the same time.
Understanding worktrees
A worktree is a separate checkout of a Git branch in its own directory. This allows you to have multiple working directories for the same repository, each on a different branch. Worktree functionality is especially useful for:
- Work on multiple features simultaneously in separate folders
- Run different versions of your application side by side
- Compare implementations across branches
Create a worktree
To create a new worktree in VS Code:
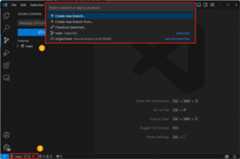
Open theSource Control Repositories view from the Source Control view.
Select your repository, open theMore Actions (...) menu, and chooseWorktrees >Create Worktree.
Follow the prompts to choose a branch and location for the new worktree.
VS Code creates a new folder for the worktree at the specified location and checks out the selected branch into that folder.
The new worktree appears as a separate entry in theSource Control Repositories view.
Switch between worktrees
VS Code can display multiple repositories (including worktrees) simultaneously:
- Each worktree appears as a separate repository in theSource Control Repositories view
- You can open multiple VS Code windows, each pointing to a different worktree
- UseFile >Open Recent to quickly switch between worktree directories
Open a worktree
There are multiple ways to open a worktree:
Directly open the folder associated with the worktree in VS Code. VS Code automatically detects that it's a worktree of an existing repository.
Right-click the worktree in the Source Control Repositories view and selectOpen Worktree in New Window orOpen Worktree in Current Window.
Run theGit: Open Worktree in Current Window orGit: Open Worktree in New Window command in the Command Palette and select the desired worktree.
Compare and migrate changes from a worktree
When you make changes in a worktree, you can compare those changes with your main workspace and bring worktree changes back into your main repository.
In the Source Control view, right-click a changed file in the worktree and selectCompare with Workspace to see the differences side-by-side.
After reviewing, use theMigrate Worktree Changes command from the Command Palette to merge all changes from a worktree into your current workspace.
Next steps
- Staging and Committing - Learn about committing changes within branches
- Merge Conflicts - Handle conflicts when merging branches
- Repositories and Remotes - Work with remote branches and collaboration
- Collaborate on GitHub - Use GitHub pull requests with your branch workflow