Python environments in VS Code
The Python Environments extension brings environment and package management into Visual Studio Code's UI. The extension provides a unified interface for creating environments, installing packages, and switching interpreters, regardless whether you're usingvenv,uv,conda,pyenv,poetry, orpipenv.
Core features:
- Creating, deleting, and switching between environments
- Installing and managing packages
- Activated Python in terminals
- Assigning environments to specific files or folders (called "Python projects")
The extension works alongside thePython extension and requires no setup to get started.
Quick start
Most users don't need to configure anything. The extension automatically discovers your Python environments and uses them when running code.
If you have a basic setup, such as one environment for your whole workspace:
- Open a Python file
- Check the Status Bar to see which environment is active
- To switch environments, select the environment control in the Status Bar
Need to create an environment? Open the Python sidebar, expandEnvironment Managers, and select the+ button. The extension walks you through the different steps.
User interface components
Environment discovery
The following environment managers are discovered automatically:
| Manager | Search locations |
|---|---|
| venv | Workspace folders (configurable viaworkspaceSearchPaths) |
| System Python | PATH,/usr/bin,/usr/local/bin, Windows Registry, python.org installs |
| Conda | Runsconda info --envs to find configured environment directories |
| Pyenv | $PYENV_ROOT/versions or~/.pyenv/versions |
| Poetry | Project.venv folders and~/.cache/pypoetry/virtualenvs |
| Pipenv | ~/.local/share/virtualenvs (Linux/macOS) or%USERPROFILE%\.virtualenvs (Windows) |
Discovery runs automatically when the extension activates. The extension uses the Python Environment Tool (PET) Rust binary that scans your system for Python environments. PET finds environment managers by checking your PATH (for example, by looking forconda,pyenv, andpoetry executables) and known installation locations, and then searches for environments managed by each of these environment managers.
To manually trigger a refresh:
- Open the Command Palette (
Cmd+Shift+PorCtrl+Shift+P) - RunPython Environments: Refresh All Environment Managers
You can also click the refresh icon in theEnvironment Managers view header.

Select the refresh icon to rescan for environments.
View discovered environments
Discovered environments appear in two places:
- Environment Managers view: in the Python sidebar, environments are grouped by manager type (for example, venv, Conda, and more)
- Environment selection: when selecting an interpreter for a project, all discovered environments appear in a unified list
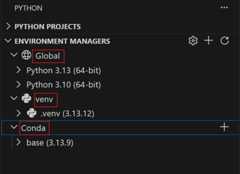
The Environment Managers view groups environments by type.
Don't have an environment yet? See thePython Projects section for information on how to create one with the extension.
Configure search paths
By default, the extension searches your entire workspace for virtual environments using the glob pattern./**/.venv. This finds any folder named.venv anywhere in your workspace.
To discover environments in custom locations, update thepython-envs.workspaceSearchPaths setting:
This setting must be configured at the workspace or folder level, not user level.
{ "python-envs.workspaceSearchPaths": ["./**/.venv","./envs/**","./my-custom-env"]}Tips:
- Use
**for recursive searches (for example,./**/envfinds any folder namedenvat any depth) - Relative paths resolve from your workspace folder root
To quickly open search path settings:
- Open the Command Palette
- RunPython Environments: Configure Search Settings

Add custom glob patterns to search additional locations.
Global search paths: For environments outside your workspace (like a shared~/envs folder), usepython-envs.globalSearchPaths:
{ "python-envs.globalSearchPaths": ["/Users/yourname/envs","/opt/shared-envs"]}This setting requires absolute paths and is configured at the user (global) level.
Legacy settings: If you previously usedpython.venvPath orpython.venvFolders, these are automatically merged with the new search paths. Consider migrating topython-envs.globalSearchPaths for future compatibility.
Select an environment
To use a discovered environment:
- Status Bar: select the Python version shown at the bottom of the window
- Command Palette: runPython: Select Interpreter and choose from the list
The selected environment is used for running code, debugging, and language features like IntelliSense.
By default, the debugger uses your selected environment. To use a different interpreter for debugging, set thepython property in yourlaunch.json debug configuration.

Select the Python version in the Status Bar to switch environments.How the extension auto-selects: When you open a workspace without explicitly selecting an environment, the extension chooses one automatically in the following order:
- Workspace-local virtual environments (
.venv,venv) - Global/system interpreters
To override this priority order, setpython-envs.defaultEnvManager to prefer a specific manager (for example,ms-python.python:conda), or configurePython Projects for per-folder control. The legacy setting is still supported as well.
Troubleshoot environment discovery
| Symptom | Cause | Solution |
|---|---|---|
| Environment not listed | Location not in search paths | Add the path toworkspaceSearchPaths orglobalSearchPaths |
| Environment shows as "(broken)" | Missingpyvenv.cfg or invalid Python executable | Recreate the environment or fix the broken files |
| Recently created environment missing | Discovery cache is stale | RunRefresh All Environment Managers |
| Conda environment not found | Conda not detected | Ensureconda is in your PATH or install Conda |
| Settings not taking effect | Wrong setting scope | EnsureworkspaceSearchPaths is set at workspace level, not user level |
For advanced troubleshooting, run the Python Environment Tool (PET) directly to see raw discovery output:
- Open the Command Palette
- RunPython Environments: Run Python Environment Tool (PET) in Terminal...
- Choose an option:
- Find All Environments: runs
pet find --verboseto list all discovered environments with detailed output - Resolve Environment...: enter a path to a Python executable to debug why a specific environment isn't being detected
- Find All Environments: runs

PET verbose output shows exactly what environments are discovered and why.
Advanced troubleshooting is useful for the following scenarios:
- You need to verify an environment is being detected
- You want to understand why an environment appears under a specific manager
- You're debugging path resolution issues
Create, delete, and manage environments
Create environments
The extension provides two ways to create environments:Quick Create for speed, andCustom Create for control.
Quick Create
Select the+ button in the Environment Managers view. The extension performs the following steps:
- Uses your default manager (venv by default, configurable via
python-envs.defaultEnvManager) - Picks the latest Python version available
- Names the environment
.venv(or.venv-1,.venv-2if one already exists) - Installs dependencies from
requirements.txtorpyproject.tomlif found - Selects the new environment for your workspace
This is the fastest way to get a working environment.

Quick Create builds an environment with sensible defaults.
Custom Create
For more control, runPython: Create Environment from the Command Palette and walk through the prompts:
- Choose manager: venv or conda
- Select Python version: pick from discovered interpreters (venv) or available Python versions (conda)
- Name your environment: enter a custom name or accept the default
- Install dependencies: choose to install from
requirements.txt,pyproject.toml, orenvironment.yml

Custom Create lets you configure each step.
Using uv for faster creation
Ifuv is installed, the extension uses it automatically for venv creation and package installation, which is significantly faster than standard tools. Configure this with:
{ "python-envs.alwaysUseUv":true}WhenalwaysUseUv is enabled (the default), uv manages all virtual environments. Set it tofalse to only use uv for environments explicitly created by uv.
Supported managers
| Manager | Quick Create | Custom Create |
|---|---|---|
| venv | ✅ | ✅ |
| conda | ✅ | ✅ |
| pyenv | — | — |
| poetry | — | — |
| pipenv | — | — |
Onlyvenv andconda support creating environments from VS Code. Other managers (pyenv, poetry, pipenv) discover existing environments but don't create new ones through the extension. Use their respective CLI tools to create environments, and then the extension will discover them automatically.
Delete environments
To delete an environment:
- In theEnvironment Managers view, find the environment
- Right-click and selectDelete
Deleting an environment removes the environment folder from disk. Any projects that use this environment will require that you select a new one.
Python projects
APython project is any file or folder you want to associate with a specific environment. By default, your entire workspace uses one environment. Projects let you assign different environments to different folders. This is essential for mono-repos, microservices, or testing across Python versions.
Why use projects?
| Scenario | Without projects | With projects |
|---|---|---|
| Mono-repo with backend + ML service | Both share one interpreter | Each gets its own environment |
| Testing Python 3.10 vs 3.12 | Manually switch interpreters | Assign different versions to different folders |
| Shared workspace with teammates | Everyone configures manually | Settings sync via.vscode/settings.json |
If you only have one environment for your whole workspace, you don't need to set up projects explicitly. Select an interpreter and you're done.
Workspace├── Python Project: backend/│ └── Environment: .venv (Python 3.12)│ └── Manager: venv│├── Python Project: frontend-utils/│ └── Environment: .venv (Python 3.10)│ └── Manager: venv│└── Python Project: ml-pipeline/ └── Environment: ml-env (Python 3.11) └── Manager: condaWhat uses project assignments?
- Running and debugging: uses the project's environment
- Terminals: activated with the project's environment
- Test Explorer: each project gets its own test tree with its own interpreter (seeMulti-Project Testing)
Pylance and Jupyter currently use a single interpreter per workspace, not per-project environments. SeeKnown Limitations.
Add a project
To treat a folder or file as a separate project:
- Right-click it in the Explorer
- SelectAdd as Python Project
Alternatively, select+ in thePython Projects view and choose either of these options:
- Add Existing: select files/folders manually
- Auto Find: discover folders with
pyproject.tomlorsetup.py
When you add a project, its folder is automatically added to the environment search path. Environments inside project folders (for example,my-project/.venv) are discovered automatically without the need to updateworkspaceSearchPaths.

Add existing folders or auto-discover projects.
Assign an environment
Once a folder is a project, assign its environment:
- In thePython Projects view, click the environment shown under your project (or "No environment")
- Select from discovered environments
The selected environment is used whenever you run or debug files in that project.
Click the environment to change it.
How settings are stored
When you assign an environment to a project, the extension writes to your workspace settings (.vscode/settings.json):
{ "python-envs.pythonProjects": [ { "path":"backend", "envManager":"ms-python.python:venv" }, { "path":"ml-service", "envManager":"ms-python.python:conda" } ]}Notice that settings store theenvironment manager, not hardcoded interpreter paths. The extension remembers which specific environment you selected separately, and resolves it at runtime. This design makes settings shareable:
- No machine-specific paths: teammates don't need
/Users/yourname/.venv - Portable across systems: works on macOS, Windows, and Linux
- Survives environment recreation: if you delete and recreate
.venv, it still works
Sharing with teammates:
- Commit
.vscode/settings.jsonto your repo - Teammates clone and open the workspace
- They create their own environments (Quick Create works great here)
- The extension automatically uses each project's configured manager
The environmentfolders (like.venv) still need to be created on each machine. Only the configuration is shared, not the environment itself.
Remove a project
Right-click a project in thePython Projects view and selectRemove Python Project. This removes the mapping. It does not delete any files.
Create a project from a template
To scaffold a new project with the right structure, runPython Envs: Create New Project from Template from the Command Palette. Choose between:
- Package: creates a folder with
pyproject.toml, package directory, and tests - Script: creates a single
.pyfile with inline dependency metadata (PEP 723)
See the fullPython Projects guide for details on template structure.
Learn more
For detailed guidance on templates, multi-root workspaces, common scenarios, and troubleshooting, see the fullPython Projects guide.
Package management
Install and uninstall Python packages directly from VS Code without opening a terminal.
Install packages
- In theEnvironment Managers view, find an environment
- Right-click and selectManage Packages
- Search for packages and select the ones you want to install
Or runPython Envs: Manage Packages from the Command Palette.

Search and install packages directly from VS Code.
Installing from a requirements file: You can also install packages fromrequirements.txt,pyproject.toml, orenvironment.yml. When prompted, select the file, and the extension installs all listed dependencies.
Uninstall packages
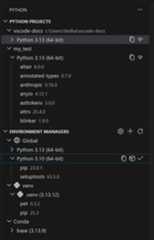
- Expand an environment in theEnvironment Managers view to see installed packages
- Right-click a package and selectUninstall Package
Package managers by environment
The extension automatically uses the appropriate package manager based on your environment:
| Environment | Package Manager |
|---|---|
| venv | pip |
| conda | conda |
| pyenv | pip |
| poetry | pip |
| pipenv | pip |
| system | pip |
To override the default, setpython-envs.defaultPackageManager.
Faster installation with uv
Ifuv is installed andpython-envs.alwaysUseUv is enabled (the default), package installation in venv environments usesuv pip instead of regularpip, which is significantly faster for large dependency trees.
Settings and configuration
This section covers all extension settings, how interpreter selection works, and legacy settings migration.
Interpreter selection priority
When you open a workspace, the extension determines which environment to use by checking these sources in order:
| Priority | Source | When it applies |
|---|---|---|
| 1 | pythonProjects[] | If you've configured a project for this path |
| 2 | defaultEnvManager | Only if you've explicitly set this (not the default value) |
| 3 | python.defaultInterpreterPath | Legacy setting, if configured |
| 4 | Auto-discovery | Finds workspace-local.venv, then global interpreters |
Key principle: User-configured settings always win over defaults. If you haven't explicitly setdefaultEnvManager (it has the built-in default), the extension skips it and checks the next priority.
Caching: The extension caches resolved environments for performance, but your explicit settings always take precedence over cached values. You never need to worry about stale cache overriding your choices.
For more details on interpreter selection behavior, see theInterpreter Selection Quick Reference.
When settings are written
The extension only writes to settings when you make an explicit change:
| Action | Writes to settings? |
|---|---|
| Open workspace (first time) | ❌ No |
| Extension auto-selects an environment | ❌ No |
| You manually select an environment | ✅ Yes, updatespythonProjects |
| You create a new environment | ✅ Yes, may updatepythonProjects |
| You change settings in UI | ✅ Yes |
This ensures that opening a workspace does not add auto-generated entries to yoursettings.json.
Python Environments settings
| Setting | Default | Description |
|---|---|---|
python-envs.defaultEnvManager | ms-python.python:venv | Default environment manager for creating environments. Options:ms-python.python:venv,ms-python.python:conda |
python-envs.defaultPackageManager | ms-python.python:pip | Default package manager. Usually determined by the environment manager. |
python-envs.pythonProjects | [] | Array of project configurations. Managed via UI, rarely edited manually. |
python-envs.workspaceSearchPaths | ["./**/.venv"] | Glob patterns to search for environments in your workspace. Must be set at workspace level. |
python-envs.globalSearchPaths | [] | Absolute paths to search for environments globally (for example,~/envs). |
python-envs.alwaysUseUv | true | Use uv for venv creation and package installation when available. |
Terminal settings
When you open a terminal in VS Code, the extension automatically activates your selected Python environment so thatpython,pip, and related commands use the correct interpreter.
| Setting | Default | Description |
|---|---|---|
python-envs.terminal.autoActivationType | command | Determines how environments are activated in terminals. See below. |
python-envs.terminal.showActivateButton | false | (Experimental) Show activate/deactivate button in terminal. |
python.terminal.useEnvFile | false | Whentrue, injects variables from.env files into terminals. |
python.envFile | ${workspaceFolder}/.env | Path to the.env file to use whenuseEnvFile is enabled. |
Terminal activation types:
| Value | Behavior | Best for |
|---|---|---|
shellStartup | Activates via shell startup scripts. The environment is active immediately when the terminal opens | Copilot terminal commands, cleaner experience |
command | Runs the activation command visibly in the terminal after it opens | Compatibility with all shells |
off | No automatic activation | Manual control |
UseshellStartup if you use Copilot to run terminal commands. It ensures that the environment is active before the first command executes. This will become the default in a future release.
After changingautoActivationType, restart your terminals for the change to take effect. To undoshellStartup changes, runPython Envs: Revert Shell Startup Script Changes.
Opening a terminal for a specific environment:
You can open a new terminal with any environment activated:
- In theEnvironment Managers view, find the environment
- Right-click and selectOpen in Terminal

Open a terminal with any environment activated.
For detailed troubleshooting and how activation works under the hood, seeTerminal Auto-Activation Explained.
.env file support
To inject environment variables from a.env file into your terminals:
- Create a
.envfile in your workspace root or specify a custom path withpython.envFile - Set
python.terminal.useEnvFiletotrue
# .envAPI_KEY=your-secret-keyDATABASE_URL=postgres://localhost/mydbVariables are injected when terminals are created. This is useful for development credentials that shouldn't be committed to source control.
Legacy settings
These settings from the Python extension are still supported but have newer equivalents:
| Legacy setting | New equivalent | Notes |
|---|---|---|
python.venvPath | python-envs.globalSearchPaths | Automatically merged. Consider migrating. |
python.venvFolders | python-envs.globalSearchPaths | Automatically merged. Consider migrating. |
python.terminal.activateEnvironment | python-envs.terminal.autoActivationType | Set tooff to disable. New setting takes precedence. |
python.defaultInterpreterPath | — | Still supported. Used as fallback in priority chain. |
python.condaPath | — | Still supported. Specifies custom conda executable location. |
Settings scope reference
Settings behave differently depending on where they're configured:
| Setting | User | Workspace | Folder |
|---|---|---|---|
defaultEnvManager | ✅ | ✅ | ❌ |
defaultPackageManager | ✅ | ✅ | ❌ |
pythonProjects | ❌ | ✅ | ✅ |
workspaceSearchPaths | ❌ | ✅ | ✅ |
globalSearchPaths | ✅ | ❌ | ❌ |
alwaysUseUv | ✅ | ❌ | ❌ |
terminal.autoActivationType | ✅ | ❌ | ❌ |
Key insight:workspaceSearchPaths must be set at workspace or folder level (not user level) because it's relative to workspace folders.
Extensibility
The Python Environments extension is designed to be extensible. Any environment or package manager can build an extension that plugs into the Python sidebar, appearing alongside the built-in managers. This means the ecosystem can grow to support new tools without waiting for updates to this extension.
Community members are building extensions for additional environment managers like thePixi Extension.
Known limitations
Pylance and multi-project workspaces
Pylance does not support multiple Python projects with different interpreters in the same workspace. Even if you configure separate environments for different folders usingPython Projects, Pylance uses a single interpreter for the entire workspace—typically the one associated with the workspace root. To use different interpreters for different folders, add them as workspace folders in amulti-root workspace (File >Add Folder to Workspace), since Pylance runs independently per workspace folder.
Jupyter notebooks
Jupyter notebooks do not use the Python Environments API for environment discovery. Instead, they rely on the older Python extension API. This means notebook kernel selection may show a different set of environments than theEnvironment Managers view.
Next steps
- Python tutorial - Get started with Python in VS Code.
- Debugging - Learn to debug your Python code.
- Testing - Configure and run tests for your Python projects.
- Settings reference - Explore all Python extension settings.