

VPC with connectors
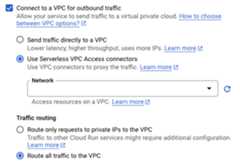
You can enable your Cloud Run service or job to send traffic to a VPCnetwork by configuring aServerless VPC Accessconnector.
Note: Serverless VPC Access connectors incur a monthly charge.For more information, see Serverless VPC Accesspricing.Before you begin
If you don't already have a VPC network in your project,create one.
If you use Shared VPC, seeConnecting to a Shared VPC network.
In the Google Cloud console, ensure that the Serverless VPC AccessAPI is enabled for your project.
Each Serverless VPC Access connector requires its own
/28subnet toplace connector instances on; this subnet must not have any other resources onit other than the connector. If you don't use Shared VPC, you can eithercreate a subnet for the connector to use, or specify an unused custom IP rangefor the connector to create a subnet for its use. If you choose the custom IPrange, the subnet that is created is hidden and cannot be used in firewall rulesand NAT configurations.
Limitation
- High packet rates can exhaust shared CPU credits and connection trackingmemory on
f1ande2-microinstances, causing timeouts even when bandwidthlimits aren't reached. We recommende2-standard-4instances for productionenvironments that involve high concurrency or frequent small requests to ensuresufficient dedicated resources.
Create a connector
To send requests to your VPC network and receive thecorresponding responses without using the public internet, you can use aServerless VPC Access connector.
If your connector is located in the same project as its VPCnetwork, you can either create a connector using an existing subnet or createa connector and a new subnet.
If your connector is located in a service project and uses a Shared VPCnetwork, the connector and its associated VPC network are indifferent projects. When a connector and its VPC network are indifferent projects, a Shared VPC network administrator must create theconnector's subnet in the Shared VPC networkbefore you can create theconnector,and you must create the connector using an existing subnet.
To learn more about subnet requirements, seeconnector subnetrequirements.
To learn about connector throughput, including machine type and scaling, seeThroughput and scaling.
You can create a connector by using the Google Cloud console, Google Cloud CLI, orTerraform.
Console
Go to the Serverless VPC Access overview page.
ClickCreate connector.
In theName field, enter a name for your connector, matchingCompute Enginenamingconventions, withthe additional requirements that the name must be less than 21characters long, and that hyphens (-) count as two characters.
In theRegion field, select a region for your connector.This must match the region of your serverless service.
If your service or job is in the region
us-centraloreurope-west,useus-central1oreurope-west1.In theNetwork field, select the VPC networkto attach your connector to.
In theSubnet field, select one of the following options:
Create a connector using an existing subnet: Select the existingsubnet in theSubnet field.
Create a connector and a new subnet: SelectCustom IP range intheSubnet field. Then, enter the first address in an unused
/28CIDR (for example10.8.0.0/28) to use as the primary IPv4 addressrange of a new subnet that Google Cloud creates in the connector'sVPC network. Ensure that the IP range does not conflictwith any existing routes in the connector's VPC network.The name of the new subnet begins with the "aet-" prefix.
(Optional) To set scaling options for additional control overthe connector, clickShow Scaling Settings to display the scalingform.
- Set the minimum and maximum number of instances for your connector,or use the defaults, which are 2 (min) and 10 (max). Theconnector scales up to the maximum specified if traffic usage requiresit, butthe connector does not scale back down when trafficdecreases. You must use values between
2and10. - In theInstance Type menu, choose the machine type to beused for the connector, or use the default
e2-micro. Notice the costsidebar on the right when you choose the instance type, which displaysbandwidth and cost estimations.
- Set the minimum and maximum number of instances for your connector,or use the defaults, which are 2 (min) and 10 (max). Theconnector scales up to the maximum specified if traffic usage requiresit, butthe connector does not scale back down when trafficdecreases. You must use values between
ClickCreate.
A green check mark will appear next to the connector's name when it isready to use.
gcloud
In the Google Cloud console, activate Cloud Shell.
At the bottom of the Google Cloud console, aCloud Shell session starts and displays a command-line prompt. Cloud Shell is a shell environment with the Google Cloud CLI already installed and with values already set for your current project. It can take a few seconds for the session to initialize.
Update
gcloudcomponents to the latest version:gcloudcomponentsupdate
Ensure that the Serverless VPC Access API is enabled foryour project:
gcloudservicesenablevpcaccess.googleapis.comCreate the connector using one of the following options:
For more details and optional arguments, see the
gcloudreference.Create a connector using an existing subnet:
gcloudcomputenetworksvpc-accessconnectorscreateCONNECTOR_NAME\--regionREGION\--subnetSUBNET_NAME\--subnet-projectHOST_PROJECT_ID\--min-instancesMIN\--max-instancesMAX\--machine-typeMACHINE_TYPE
Replace the following:
CONNECTOR_NAME: a name for your connector,matching Compute Enginenamingconventions,with the additional requirements that the name must be less than 21characters long, and that hyphens (-) count as two characters.REGION: a region for your connector, matching theregion of your serverless service or job. If your service or job isinus-centraloreurope-west, useus-central1oreurope-west1.SUBNET_NAME: the name of the existing subnet.HOST_PROJECT_ID: the Shared VPC hostproject ID. If the connector and existing subnet are located thesame project, omit the--subnet-projectflag.MIN: the minimum number of instances to use forthe connector. Use an integer between2(the default) and9.MAX: the maximum number of instances to use forthe connector. Use an integer between3and10(the default).If the connector scales up to the maximum number of instances,itdoes not scale back down.MACHINE_TYPE: must be one of the following:f1-micro,e2-micro, ore2-standard-4.
Create a connector and a new subnet:
gcloudcomputenetworksvpc-accessconnectorscreateCONNECTOR_NAME\--regionREGION\--networkVPC_NETWORK\--rangeIP_RANGE--min-instancesMIN\--max-instancesMAX\--machine-typeMACHINE_TYPE
Replace the following:
CONNECTOR_NAME: a name for your connector,matching Compute Enginenamingconventions,with the additional requirements that the name must be less than 21characters long, and that hyphens (-) count as two characters.REGION: a region for your connector, matching theregion of your serverless service or job. If your service or job isinus-centraloreurope-west, useus-central1oreurope-west1.VPC_NETWORK: the name of the VPCnetwork to attach your connector to. The connector andVPC network must be located in the same project.IP_RANGE: provide an unused/28CIDR (forexample10.8.0.0/28) to use as the primary IPv4 address rangeof a new subnet that Google Cloud creates in the connector'sVPC network. Ensure that the IP range does notconflict with any existing routes in the connector'sVPC network. The name of the new subnet begins withthe "aet-" prefix.MIN: the minimum number of instances to use forthe connector. Use an integer between2(the default) and9.MAX: the maximum number of instances to use forthe connector. Use an integer between3and10(the default).If the connector scales up to the maximum number of instances,itdoes not scale back down.MACHINE_TYPE: must be one of the following:f1-micro,e2-micro, ore2-standard-4.
Verify that your connector is in the
READYstate before using it:gcloudcomputenetworksvpc-accessconnectorsdescribeCONNECTOR_NAME\--regionREGIONReplace the following:
CONNECTOR_NAME: the name of your connector; this isthe name that you specified in the previous step.REGION: the region of your connector; this is theregion that you specified in the previous step.
The output should contain the line
state: READY.
Terraform
You can use aTerraform resource to enable thevpcaccess.googleapis.com API.
resource "google_project_service" "vpcaccess-api" { project = var.project_id # Replace this with your project ID in quotes service = "vpcaccess.googleapis.com"}You can useTerraform modules to create a VPC network and subnet and then create theconnector.
module "test-vpc-module" { source = "terraform-google-modules/network/google" version = "~> 13.0" project_id = var.project_id # Replace this with your project ID in quotes network_name = "my-serverless-network" mtu = 1460 subnets = [ { subnet_name = "serverless-subnet" subnet_ip = "10.10.10.0/28" subnet_region = "us-central1" } ]}module "serverless-connector" { source = "terraform-google-modules/network/google//modules/vpc-serverless-connector-beta" version = "~> 13.0" project_id = var.project_id vpc_connectors = [{ name = "central-serverless" region = "us-central1" subnet_name = module.test-vpc-module.subnets["us-central1/serverless-subnet"].name # host_project_id = var.host_project_id # Specify a host_project_id for shared VPC machine_type = "e2-standard-4" min_instances = 2 max_instances = 7 } # Uncomment to specify an ip_cidr_range # , { # name = "central-serverless2" # region = "us-central1" # network = module.test-vpc-module.network_name # ip_cidr_range = "10.10.11.0/28" # subnet_name = null # machine_type = "e2-standard-4" # min_instances = 2 # max_instances = 7 } ] depends_on = [ google_project_service.vpcaccess-api ]}Configure your service
You can configure your Cloud Run service to use a Serverless VPC Accessconnector for sending egress traffic. You can do this by using the Google Cloud console,Google Cloud CLI, or YAML file when youcreate a new serviceordeploy a new revision:
Console
In the Google Cloud console, go to Cloud Run:
SelectServices from the Cloud Run navigation menu, and clickDeploy container to configure a new service.If you are configuring an existing service, click theservice, then clickEdit and deploy new revision.
If you are configuring a new service, fill out the initial servicesettings page, then clickContainer(s), Volumes, Networking, Security to expand theservice configuration page.
Click theNetworking tab.
- In theNetwork field, choose one of thefollowing options from the menu:
- To disconnect your service from a VPCnetwork, selectNone.
- To use an existing connector, select it from the drop-down list or selectCustom to use an existing connector that's not shown in the drop-downlist.
- To create a new connector, selectAdd new VPC connector.SeeCreate a Serverless VPC Access connectorfor details on creating a connector.
- ForTraffic routing, select one of the following:
- Route only requests to private IPs to the VPC to send onlytraffic to internal addresses through the VPC network.
- Route all traffic to the VPC to send all outbound trafficthrough the VPC network.
- In theNetwork field, choose one of thefollowing options from the menu:
ClickCreate orDeploy.
gcloud
To specify a connector duringdeployment, use the--vpc-connectorflag:
gcloudrundeploySERVICE--imageIMAGE_URL--vpc-connectorCONNECTOR_NAME
Replace the following:
SERVICE: the name of your service.- IMAGE_URL: a reference to the container image, forexample,
us-docker.pkg.dev/cloudrun/container/hello:latest. If you use Artifact Registry,therepositoryREPO_NAME mustalready be created. The URL follows the format ofLOCATION-docker.pkg.dev/PROJECT_ID/REPO_NAME/PATH:TAG. CONNECTOR_NAME: the name of yourconnector.
To attach, update, or remove a connector for an existing service, use thegcloud run services updatecommand with either of the following flags as needed:
For example, to attach or update a connector:
gcloudrunservicesupdateSERVICE--vpc-connectorCONNECTOR_NAME
Replace the following:
SERVICE: the name of your service.CONNECTOR_NAME: the name of yourconnector.
YAML
If you are creating a new service, skip this step.If you are updating an existing service, download itsYAML configuration:
gcloudrunservicesdescribeSERVICE--formatexport>service.yamlAdd or update the
run.googleapis.com/vpc-access-connectorattribute undertheannotationsattribute under the top-levelspecattribute:apiVersion:serving.knative.dev/v1kind:Servicemetadata:name:SERVICEspec:template:metadata:annotations:run.googleapis.com/vpc-access-connector:CONNECTOR_NAMEname:REVISION
Replace the following:
- SERVICE: the name of yourCloud Run service.
- CONNECTOR_NAME: the name of yourconnector.
- REVISION with a new revision name or delete it (if present). If you supply a new revision name, itmust meet the following criteria:
- Starts with
SERVICE- - Contains only lowercase letters, numbers and
- - Does not end with a
- - Does not exceed 63 characters
- Starts with
Create or update the service using the following command:
gcloudrunservicesreplaceservice.yaml
Terraform
You can use aTerraform resource to create a service and configure it to use your connector.
# Cloud Run serviceresource "google_cloud_run_v2_service" "gcr_service" { name = "mygcrservice" location = "us-west1" deletion_protection = false # set to "true" in production template { containers { image = "us-docker.pkg.dev/cloudrun/container/hello" resources { limits = { cpu = "1000m" memory = "512Mi" } } # the service uses this SA to call other Google Cloud APIs # service_account_name = myservice_runtime_sa } scaling { # Limit scale up to prevent any cost blow outs! max_instance_count = 5 } vpc_access { # Use the VPC Connector connector = google_vpc_access_connector.connector.id # all egress from the service should go through the VPC Connector egress = "ALL_TRAFFIC" } }}Configure your job
After you have created a Serverless VPC Access connector,you can configure your Cloud Run job to use the connector. You cando this by using the Google Cloud console, Google Cloud CLI, or YAML when youcreate a new job:
Console
In the Google Cloud console, go to the Cloud RunJobs page:
ClickDeploy container to fill outthe initial job settings page. If you are configuring an existing job,select the job, then clickView and edit job configuration.
ClickContainer(s), Volumes, Connections, Security to expand the job properties page.
Click theConnections tab.
- In theNetwork field, choose one of thefollowing options from the menu:
- To disconnect your job from a VPCnetwork, selectNone.
- To use an existing connector, select it from the drop-down list or selectCustom to use an existing connector that's not shown in the drop-downlist.
- To create a new connector, selectAdd new VPC connector.SeeCreate a Serverless VPC Access connectorfor details on creating a connector.
- In theNetwork field, choose one of thefollowing options from the menu:
ClickCreate orUpdate.
gcloud
To specify a connector during the job deployment, use the--vpc-connectorflag:
gcloudrunjobscreateJOB--imageIMAGE_URL--vpc-connectorCONNECTOR_NAMEReplace the following:
JOB: the name of your job.- IMAGE_URL: a reference to the container image, forexample,
us-docker.pkg.dev/cloudrun/container/hello:latest. If you use Artifact Registry,therepositoryREPO_NAME mustalready be created. The URL follows the format ofLOCATION-docker.pkg.dev/PROJECT_ID/REPO_NAME/PATH:TAG. CONNECTOR_NAME: the name of yourconnector.
To attach, update, or remove a connector for an existing service, use thegcloud run jobs updatecommand with either of the following flags as needed:
For example, to attach or update a connector:
gcloudrunjobsupdateJOB--vpc-connectorCONNECTOR_NAMEReplace the following:
JOB: the name of your job.CONNECTOR_NAME: the name of yourconnector.
YAML
You can download and view an existing job configuration by using thegcloud run jobs describe --format export command, which yields cleanedresults in YAML format. You can then modify the fields described below andupload the modified YAML by using thegcloud run jobs replace command.Make sure you only modify fields as documented.
To view and download the configuration:
gcloudrunjobsdescribeJOB--formatexport>job.yaml
Add or update the
run.googleapis.com/vpc-access-connectorattribute undertheannotationsattribute under the top-levelspecattribute:apiVersion:serving.knative.dev/v1kind:Jobmetadata:name:JOBspec:template:metadata:annotations:run.googleapis.com/vpc-access-connector:CONNECTOR_NAME
Replace the following:
- JOB: the name of your Cloud Run job.
- CONNECTOR_NAME: the name of your connector.The
run.googleapis.com/vpc-access-connectorattribute isrequired when specifying an egress setting.
Replace the job with its new configuration by using the following command:
gcloudrunjobsreplacejob.yaml
Access to VPC resources
You can restrict access from your connector by using firewall rules andpolicies, and you can add additional restrictions by configuring egress andingress settings.
Firewall rules and policy settings
Required firewall rules for connectors in service projects
If you create a connector in a standalone VPC network or in thehost project of a Shared VPC network, Google Cloud creates allnecessary firewall rules for the connector's operation. For more information,seeFirewall rules for connectors in standalone VPC networks or Shared VPC host projects.
However, if you create a connector in a service project and the connector targetsa Shared VPC network in the host project, you must add firewall rulesto allow necessary traffic for the connector's operation from the followingranges:
- Serverless infrastructure IP range:
35.199.224.0/19 - Health check probe IP ranges:
35.191.0.0/16,35.191.192.0/18, and130.211.0.0/22
These ranges are used by the Google infrastructure underlyingCloud Run, Cloud Run functions, and App Engine standard environment. All requests fromthese IP addresses originate from Google infrastructure to make surethat each serverless resource only communicates with theconnector that it's connected to.
You must also allow traffic from the connector's subnet to resources in yourVPC network.
To perform these steps, you must have one of the following roles on thehost project:
- Owner role (
roles/owner) - Compute Security Admin role (
roles/compute.securityAdmin) - CustomIdentity and Access Management (IAM) role with the
compute.firewalls.createpermissionenabled
For a basic configuration, apply the rules to allow serverless resources in anyservice project connected to the Shared VPC network to send requests toany resource in the network.
Important: The rules you create using the following process apply to existingand future connectors that target a given Shared VPC network. If youwant to scope these rules so they only apply to specified connectors, seeCreate firewall rules for specific connectors.To apply these rules, run the following commands in the host project:
Create firewall rules that allow requests from Google's serverlessinfrastructure and health check probes to reach all connectors in thenetwork. In these commands, UDP and TCP ports are used as proxies and forHTTP health checks, respectively. Don't change the specified ports.
gcloudcomputefirewall-rulescreateserverless-to-vpc-connector\ --allowtcp:667,udp:665-666,icmp\ --source-ranges=35.199.224.0/19\ --direction=INGRESS\ --target-tagsvpc-connector\ --network=VPC_NETWORK
gcloudcomputefirewall-rulescreatevpc-connector-to-serverless\ --allowtcp:667,udp:665-666,icmp\ --destination-ranges=35.199.224.0/19\ --direction=EGRESS\ --target-tagsvpc-connector\ --network=VPC_NETWORK
gcloudcomputefirewall-rulescreatevpc-connector-health-checks\ --allowtcp:667\ --source-ranges=35.191.0.0/16,35.191.192.0/18,130.211.0.0/22\ --direction=INGRESS\ --target-tagsvpc-connector\ --network=VPC_NETWORK
Replace
VPC_NETWORKwith the name of theVPC network to attach your connector to.Create an ingress firewall rule on your VPC network to allowrequests from connectors that target this network:
gcloudcomputefirewall-rulescreatevpc-connector-requests\ --allowtcp,udp,icmp\ --direction=INGRESS\ --source-tagsvpc-connector\ --network=VPC_NETWORK
This rule gives the connector access to every resource in the network. Tolimit the resources that your serverless environment can reach by usingServerless VPC Access, seeRestrict connector VM access to VPC network resources.
Create firewall rules for specific connectors
Following the procedure inRequired firewall rules for connectors in service projectsresults in firewall rules that apply toall connectors, both current onesand ones created in the future. If you don't want this, but instead want tocreate rules for specific connectors only, you can scope the rules so thatthey apply only to those connectors.
To limit the scope of the rules to specific connectors, you can use one of thefollowing mechanisms:
- Network tags: Every connector has two network tags:
vpc-connectorandvpc-connector-REGION-CONNECTOR_NAME.Use the latter format to limit the scope of your firewall rules to a specificconnector. - IP ranges: Use this for the egress rules only, because it doesn't work foringress rules. You can use the IP range of the connectorsubnet to limit the scope of your firewall rules to a single VPCconnector.
Restrict connector VM access to VPC network resources
You can restrict your connector's access to resources in its targetVPC network by usingVPC firewallrules or rules infirewallpolicies. You can accomplish theserestrictions using one of the following strategies:
- Create ingress rules whose targets represent the resources that you wantto limit connector VM access to and whose sources represent the connector VMs.
- Create egress rules whose targets represent the connector VMs and whosedestinations represent the resources that you want to limit connector VMaccess to.
The following examples illustrate each strategy.
Restrict access using ingress rules
Choose eithernetwork tags orCIDR ranges to control the incoming traffic to your VPC network.
Network tags
The following steps show how to create ingress rules that restrict aconnector's access to your VPC network based on the connectornetwork tags.
Ensure that you have the required permissions to insert firewall rules.You must have one of the followingIdentity and Access Management (IAM) roles:
- Compute Security Admin role
- Custom IAM role with the
compute.firewalls.createpermission enabled
Deny connector traffic across your VPC network.
Create an ingress firewall rule with priority lower than 1000 on yourVPC network to deny ingress from the connector networktag. This overrides the implicit firewall rule thatServerless VPC Access creates on your VPCnetwork by default.
gcloudcomputefirewall-rulescreateRULE_NAME\--action=DENY\--rules=PROTOCOL\--source-tags=VPC_CONNECTOR_NETWORK_TAG\--direction=INGRESS\--network=VPC_NETWORK\--priority=PRIORITY
Replace the following:
RULE_NAME: the name of your new firewall rule. For example,
deny-vpc-connector.PROTOCOL: one or more protocols that you want to allow from yourVPC connector. Supported protocols are
tcporudp. For example,tcp:80,udpallows TCP traffic through port 80 and UDP traffic. For more information, seethe documentation for theallowflag.For security and validation purposes, you can alsoconfigure deny rules to block traffic for the following unsupportedprotocols:
ah,all,esp,icmp,ipip, andsctp.VPC_CONNECTOR_NETWORK_TAG: the universal connector networktag if you want to restrict access for all connectors (including anyconnectors made in the future), or the unique network tag if you want torestrict access for a specific connector.
- Universal network tag:
vpc-connector Unique network tag:
vpc-connector-REGION-CONNECTOR_NAMEReplace:
- REGION: the region of the connector that you wantto restrict
- CONNECTOR_NAME: the name of the connector that youwant to restrict
To learn more about connector network tags, seeNetwork tags.
- Universal network tag:
VPC_NETWORK: the name of your VPC network
PRIORITY: an integer between 0-65535. For example, 0 sets thehighest priority.
Allow connector traffic to the resource that should receive connectortraffic.
Use the
allowandtarget-tagsflags to create an ingress firewallrule targeting the resource in your VPC network that youwant the VPC connector to access. Set the priority forthis rule to be a lower value than the priority of the rule you made inthe previous step.gcloudcomputefirewall-rulescreateRULE_NAME\--allow=PROTOCOL\--source-tags=VPC_CONNECTOR_NETWORK_TAG\--direction=INGRESS\--network=VPC_NETWORK\--target-tags=RESOURCE_TAG\--priority=PRIORITY
Replace the following:
RULE_NAME: the name of your new firewall rule. For example,
allow-vpc-connector-for-select-resources.PROTOCOL: one or more protocols that you want to allow from yourVPC connector. Supported protocols are
tcporudp. For example,tcp:80,udpallows TCP traffic through port 80 and UDP traffic. For more information, seethe documentation for theallowflag.VPC_CONNECTOR_NETWORK_TAG: the universal connector networktag if you want to restrict access for all connectors (including anyconnectors made in the future), or the unique network tag if you want torestrict access for a specific connector. This must match the networktag that you specified in the previous step.
- Universal network tag:
vpc-connector Unique network tag:
vpc-connector-REGION-CONNECTOR_NAMEReplace:
- REGION: the region of the connector that you wantto restrict
- CONNECTOR_NAME: the name of the connector that youwant to restrict
To learn more about connector network tags, seeNetwork tags.
- Universal network tag:
VPC_NETWORK: the name of your VPC network
RESOURCE_TAG: the network tag for the VPCresource that you want your VPC connector to access
PRIORITY: an integer less than the priority you set inthe previous step. For example, if you set the priority for the ruleyou created in the previous step to 990, try 980.
For more information about the required and optional flags for creatingfirewall rules, refer to thedocumentation forgcloud compute firewall-rules create.
CIDR range
The following steps show how to create ingress rules that restrict aconnector's access to your VPC network based on the connector'sCIDR range.
Ensure that you have the required permissions to insert firewall rules.You must have one of the followingIdentity and Access Management (IAM) roles:
- Compute Security Admin role
- Custom IAM role with the
compute.firewalls.createpermission enabled
Deny connector traffic across your VPC network.
Create an ingress firewall rule with priority lower than 1000 on yourVPC network to deny ingress from the connector's CIDRrange. This overrides the implicit firewall rule thatServerless VPC Access creates on your VPCnetwork by default.
gcloudcomputefirewall-rulescreateRULE_NAME\--action=DENY\--rules=PROTOCOL\--source-ranges=VPC_CONNECTOR_CIDR_RANGE\--direction=INGRESS\--network=VPC_NETWORK\--priority=PRIORITY
Replace the following:
RULE_NAME: the name of your new firewall rule. For example,
deny-vpc-connector.PROTOCOL: one or more protocols that you want to allow from yourVPC connector. Supported protocols are
tcporudp. For example,tcp:80,udpallows TCP traffic through port 80 and UDP traffic. For more information, seethe documentation for theallowflag.For security and validation purposes, you can alsoconfigure deny rules to block traffic for the following unsupportedprotocols:
ah,all,esp,icmp,ipip, andsctp.VPC_CONNECTOR_CIDR_RANGE: the CIDR range for the connectorwhose access you are restricting
VPC_NETWORK: the name of your VPC network
PRIORITY: an integer between 0-65535. For example, 0 sets thehighest priority.
Allow connector traffic to the resource that should receive connectortraffic.
Use the
allowandtarget-tagsflags to create an ingress firewallrule targeting the resource in your VPC network that youwant the VPC connector to access. Set the priority forthis rule to be a lower value than the priority of the rule you made inthe previous step.gcloudcomputefirewall-rulescreateRULE_NAME\--allow=PROTOCOL\--source-ranges=VPC_CONNECTOR_CIDR_RANGE\--direction=INGRESS\--network=VPC_NETWORK\--target-tags=RESOURCE_TAG\--priority=PRIORITY
Replace the following:
RULE_NAME: the name of your new firewall rule. For example,
allow-vpc-connector-for-select-resources.PROTOCOL: one or more protocols that you want to allow from yourVPC connector. Supported protocols are
tcporudp. For example,tcp:80,udpallows TCP traffic through port 80 and UDP traffic. For more information, seethe documentation for theallowflag.VPC_CONNECTOR_CIDR_RANGE: the CIDR range for the connectoryou whose access you are restricting
VPC_NETWORK: the name of your VPC network
RESOURCE_TAG: the network tag for the VPCresource that you want your VPC connector to access
PRIORITY: an integer less than the priority you set inthe previous step. For example, if you set the priority for the ruleyou created in the previous step to 990, try 980.
For more information about the required and optional flags for creatingfirewall rules, see thedocumentation forgcloud compute firewall-rules create.
Restrict access using egress rules
The following steps show how to create egress rules to restrict connector access.
Ensure that you have the required permissions to insert firewall rules. Youmust have one of the followingIdentity and Access Management (IAM)roles:
- Compute Security Admin role
- Custom IAM role with the
compute.firewalls.createpermission enabled
Deny egress traffic from your connector.
Create an egress firewall rule on your Serverless VPC Accessconnector to prevent it from sending outgoing traffic, with the exception ofestablished responses, to any destination.
gcloudcomputefirewall-rulescreateRULE_NAME\--action=DENY\--rules=PROTOCOL\--direction=EGRESS\--target-tags=VPC_CONNECTOR_NETWORK_TAG\--network=VPC_NETWORK\--priority=PRIORITY
Replace the following:
RULE_NAME: the name of your new firewall rule. For example,
deny-vpc-connector.PROTOCOL: one or more protocols that you want to allow from yourVPC connector. Supported protocols are
tcporudp. For example,tcp:80,udpallows TCP traffic through port 80 and UDP traffic. For more information, seethe documentation for theallowflag.For security and validation purposes, you can alsoconfigure deny rules to block traffic for the following unsupportedprotocols:
ah,all,esp,icmp,ipip, andsctp.VPC_CONNECTOR_NETWORK_TAG: the universal VPCconnector network tag if you want the rule to apply to all existingVPC connectors and any VPC connectors madein the future. Or, the unique VPC connector network tagif you want to control a specific connector.
VPC_NETWORK: the name of your VPC network
PRIORITY: an integer between 0-65535. For example, 0 sets thehighest priority.
Allow egress traffic when the destination is in the CIDR range that you wantyour connector to access.
Use the
allowanddestination-rangesflags to create a firewall ruleallowing egress traffic from your connector for a specific destination range.Set the destination range to the CIDR range of the resource in yourVPC network that you want your connector to be able to access.Set the priority for this rule to be a lower value than the priority of therule you made in the previous step.gcloudcomputefirewall-rulescreateRULE_NAME\--allow=PROTOCOL\--destination-ranges=RESOURCE_CIDR_RANGE\--direction=EGRESS\--network=VPC_NETWORK\--target-tags=VPC_CONNECTOR_NETWORK_TAG\--priority=PRIORITY
Replace the following:
RULE_NAME: the name of your new firewall rule. For example,
allow-vpc-connector-for-select-resources.PROTOCOL: one or more protocols that you want to allow from yourVPC connector. Supported protocols are
tcporudp. For example,tcp:80,udpallows TCP traffic through port 80 and UDP traffic. For more information, seethe documentation for theallowflag.RESOURCE_CIDR_RANGE: the CIDR range for the connector whoseaccess you are restricting
VPC_NETWORK: the name of your VPC network
VPC_CONNECTOR_NETWORK_TAG: the universal VPCconnector network tag if you want the rule to apply to all existingVPC connectors and any VPC connectors madein the future. Or, the unique VPC connector network tagif you want to control a specific connector. If you used the uniquenetwork tag in the previous step, use the unique network tag.
PRIORITY: an integer less than the priority you set inthe previous step. For example, if you set the priority for the ruleyou created in the previous step to 990, try 980.
For more information about the required and optional flags for creating firewallrules, refer to thedocumentation forgcloud compute firewall-rules create.
Manage your connector
By default, only requests to certain internal IPv4 addresses destinations(including internal IPv4 destinations resolved by DNS responses) are routedthrough a Serverless VPC Access connector. In some cases,however, you might wantall outbound requests from your service or job to berouted to your VPC network.
Serverless VPC Access only supports routing IPv4 traffic. IPv6 trafficis not supported, even if you have IPv6 routes in your VPCnetwork.
For control over routing outbound requests from your service or job, you can setthe VPC egress to one of the following options:
Route only requests to private IPs to the VPC: Default.Traffic is routed through the VPC network only if the packetscarrying the traffic have destinations that match the following:
Packets to any other destination are routed from Cloud Run tothe internet (not through any VPC network).
Note: Don't associate any Cloud Run subnets withPublic NAT. You are charged forCloud NAT even though traffic to external IP addresses doesn't flowthrough Cloud NAT using the connector.Route all traffic to the VPC: Traffic is always routedthrough the VPC network associated with the connector, for allpacket destinations. You must use this option in these circumstances:
- If you need to send traffic to VPC subnet ranges withprivately used external IP address ranges. For more information aboutVPC subnet ranges, seeValid IPv4ranges in the Subnets overview.
- If you need to send traffic to a Private Service Connectendpoint for Google APIs whose address is a privately used external IPaddress. For more information about Private Service Connectendpoints for Google APIs, seeAccess Google APIs throughendpoints.
- If you need to send traffic to any other privately used external IPaddress destination that's routable within the connector's VPCnetwork. Examples of other destinations covering privately used externalIP address could include peering subnet ranges (and peering subnet rangescreated fromAllocated IP address ranges forservices)and those destinations that are accessible using custom routes in theVPC short.
If your VPC network includes a default route, packets can stillbe routed to the internet after being processed by the connector if youconfigure aCloud NAT gateway to provide NAT servicesto the subnet used by the connector. These packets are subject to the routesin your VPC network and the firewall rules that apply to yourVPC network. You can use route and firewall configuration tocontrol internet egress for all outbound requests sent by your functionthrough a Serverless VPC Access connector.
Note: Serverless VPC Access billing scales in proportion tothe amount of traffic that passes through the connector. ReviewServerless VPC Access pricingto understand cost implications.
Control egress service traffic
You can specify a VPC egress setting by using theGoogle Cloud console, Google Cloud CLI, or YAML file when you createa new service or deploy a new revision:
Console
In the Google Cloud console, go to Cloud Run:
SelectServices from the Cloud Run navigation menu, and clickDeploy container to configure a new service.If you are configuring an existing service, click theservice, then clickEdit and deploy new revision.
If you are configuring a new service, fill out the initial servicesettings page, then clickContainer(s), Volumes, Networking, Security to expand theservice configuration page.
Click theNetworking tab.

- After you select a VPC connector,selectRoute only requests to private IPs to the VPC orRoute all traffic to the VPC.
ClickCreate orDeploy.
gcloud
To specify an egress setting, use the--vpc-egress flag. You can specifyan egress setting duringdeployment:
gcloudrundeploySERVICE\--imageIMAGE_URL\--vpc-connectorCONNECTOR_NAME\--vpc-egressEGRESS_SETTING
Replace the following:
SERVICE: the name of your service.- IMAGE_URL: a reference to the container image, forexample,
us-docker.pkg.dev/cloudrun/container/hello:latest. If you use Artifact Registry,therepositoryREPO_NAME mustalready be created. The URL follows the format ofLOCATION-docker.pkg.dev/PROJECT_ID/REPO_NAME/PATH:TAG. CONNECTOR_NAME: the name of yourconnector.EGRESS_SETTING: anegress setting value:all-traffic: Sends all outbound traffic through the connector.private-ranges-only: Sends only traffic to internal addressesthrough the VPC connector.
You can alsoupdate an existingservice and change the egress setting:
gcloudrunservicesupdateSERVICE--vpc-egressEGRESS_SETTING
Replace the following:
SERVICE: the name of your service.EGRESS_SETTING: anegress setting valueas listed above.
YAML
If you are creating a new service, skip this step.If you are updating an existing service, download itsYAML configuration:
gcloudrunservicesdescribeSERVICE--formatexport>service.yamlAdd or update the
run.googleapis.com/vpc-access-egressattribute undertheannotationsattribute under the top-levelspecattribute:apiVersion:serving.knative.dev/v1kind:Servicemetadata:name:SERVICEspec:template:metadata:annotations:run.googleapis.com/vpc-access-connector:CONNECTOR_NAMErun.googleapis.com/vpc-access-egress:EGRESS_SETTINGname:REVISION
Replace the following:
- SERVICE: the name of your Cloud Run service.
- CONNECTOR_NAME: the name of your connector.The
run.googleapis.com/vpc-access-connectorattribute isrequired when specifying an egress setting. - EGRESS_SETTING: one of the following:
all-traffic: Sends all outbound traffic through the connector.private-ranges-only: Sends only traffic to internal addressesthrough the VPC connector.- REVISION with a new revision name or delete it (if present). If you supply a new revision name, itmust meet the following criteria:
- Starts with
SERVICE- - Contains only lowercase letters, numbers and
- - Does not end with a
- - Does not exceed 63 characters
- Starts with
Create or update the service using the following command:
gcloudrunservicesreplaceservice.yaml
run.allowedVPCEgressorganization policy.Control egress job traffic
You can specify a VPC egress setting by using theGoogle Cloud console, Google Cloud CLI, or YAML file when you create or updatea job:
Console
In the Google Cloud console, go to the Cloud RunJobs page:
ClickDeploy container to fill outthe initial job settings page. If you are configuring an existing job,select the job, then clickView and edit job configuration.
ClickContainer(s), Volumes, Connections, Security to expand the job properties page.
Click theConnections tab.
- After you select a connector, selectRoute only requests to private IPs to the VPC orRoute all traffic to the VPC.
ClickCreate orUpdate.
gcloud
To specify an egress setting, use the--vpc-egress flag. You can specifyan egress setting during the job deployment process:
gcloudrunjobscreateJOB\--imageIMAGE_URL\--vpc-connectorCONNECTOR_NAME\--vpc-egressEGRESS_SETTING
Replace the following:
JOB: the name of your job.- IMAGE_URL: a reference to the container image, forexample,
us-docker.pkg.dev/cloudrun/container/hello:latest. If you use Artifact Registry,therepositoryREPO_NAME mustalready be created. The URL follows the format ofLOCATION-docker.pkg.dev/PROJECT_ID/REPO_NAME/PATH:TAG. CONNECTOR_NAME: the name of yourconnector.EGRESS_SETTING: anegress setting value:all-traffic: Sends all outbound traffic through the connector.private-ranges-only: Sends only traffic to internal addressesthrough the VPC connector.
You can alsoupdate an existingjob and change the egress setting:
gcloudrunjobsupdateJOB--vpc-egressEGRESS_SETTINGReplace the following:
JOB: the name of your job.EGRESS_SETTING: anegress setting valueas listed above.
YAML
You can download and view an existing job configuration by using thegcloud run jobs describe --format export command, which yields cleanedresults in YAML format. You can then modify the fields described below andupload the modified YAML by using thegcloud run jobs replace command.Make sure you only modify fields as documented.
Replace the job with its new configuration by using the following command:
gcloudrunjobsreplacejob.yamlAdd or update the
run.googleapis.com/vpc-access-egressattribute undertheannotationsattribute under the top-levelspecattribute:apiVersion:serving.knative.dev/v1kind:Jobmetadata:name:JOBspec:template:metadata:annotations:run.googleapis.com/vpc-access-connector:CONNECTOR_NAMErun.googleapis.com/vpc-access-egress:EGRESS_SETTING
Replace the following:
- JOB: the name of your Cloud Run job.
- CONNECTOR_NAME: the name of your connector. The
run.googleapis.com/vpc-access-connectorattribute is required whenspecifying an egress setting. - EGRESS_SETTING: one of the following:
all-traffic: Sends all outbound traffic through the connector.private-ranges-only: Sends only traffic to internal addressesthrough the VPC connector.
Replace the job with its new configuration by using the followingcommand:
gcloudrunjobsreplacejob.yaml
run.allowedVPCEgressorganization policy.View connector settings
You can view the current Serverless VPC Access connector settingsfor your service or job by using the Google Cloud console or thegcloudcommand-linetool:
Console
Click the service or job that you are interested in to open the details page.
For a service, click theRevisions tab.
For a job, click theConfiguration tab.
The Serverless VPC Access connector setting is listed undertheNetworking tab.
gcloud
Use the following command to view settings for your service:
gcloudrunservicesdescribeSERVICE
Use the following command to view settings for your job:
gcloudrunjobsdescribeJOBLocate the Serverless VPC Access connector setting in thereturned configuration.
Disconnect from a VPC network
Disconnect a service
You can disconnect a service from your VPC network byusing the Google Cloud console or the Google Cloud CLI:
Console
In the Google Cloud console, go to Cloud Run:
SelectServices from the Cloud Run navigation menu, and clickDeploy container to configure a new service.If you are configuring an existing service, click theservice, then clickEdit and deploy new revision.
If you are configuring a new service, fill out the initial servicesettings page, then clickContainer(s), Volumes, Networking, Security to expand theservice configuration page.
Click theNetworking tab.
- In theNetworkfield, selectNone to disconnect your service from a VPCnetwork.
ClickCreate orDeploy.
gcloud
To disconnect a service, use thegcloud run services updatecommand with the following flag:
gcloudrunservicesupdateSERVICE--clear-vpc-connector
- ReplaceSERVICE with the name of your service.
Connectors continue to incur charges even if they have no traffic and aredisconnected. For details, seepricing.If you no longer need your connector, be sure todelete it to avoidcontinued billing.
Disconnect a job
You can disconnect a job from your VPC network byusing the Google Cloud console or the Google Cloud CLI:
Console
In the Google Cloud console, go to the Cloud RunJobs page:
ClickDeploy container to fill outthe initial job settings page. If you are configuring an existing job,select the job, then clickView and edit job configuration.
ClickContainer(s), Volumes, Connections, Security to expand the job properties page.
Click theConnections tab.
- In theNetwork field, selectNoneto disconnect your job from a VPC network.
ClickCreate orUpdate.
gcloud
To disconnect a job, use thegcloud run jobs updatecommand with the following flag:
gcloudrunjobsupdateJOB--clear-vpc-connectorReplaceJOB with the name of your job.
Connectors continue to incur charges even if they have no traffic and aredisconnected. For details, seepricing.If you no longer need your connector, be sure todelete it to avoidcontinued billing.
Update a connector
You can update and monitor the following attributes of your connector by usingthe Google Cloud console, Google Cloud CLI, or the API:
- Machine (instance) type
- Minimum and maximum number of instances
- Recent throughput, number of instances, and CPU utilization
Update machine type
Caution: Changing machine type can cause some long-running connections to drop.Console
Go to the Serverless VPC Access overview page.
Select the connector you want to edit and clickEdit.
In theInstance type list, select your preferred machine (instance)type. To learn about available machine types, see the documentation onThroughput and scaling.
gcloud
In the Google Cloud console, activate Cloud Shell.
At the bottom of the Google Cloud console, aCloud Shell session starts and displays a command-line prompt. Cloud Shell is a shell environment with the Google Cloud CLI already installed and with values already set for your current project. It can take a few seconds for the session to initialize.
To update the connector machine type, run the following command in yourterminal:
gcloudbetacomputenetworksvpc-accessconnectorsupdateCONNECTOR_NAME--region=REGION--machine-type=MACHINE_TYPE
CONNECTOR_NAME: the name of your connectorREGION: the name of your connector's regionMACHINE_TYPE: your preferred machine type. Tolearn about available machine types, see the documentation onThroughput and scaling.
Decrease minimum and maximum number of instances
Note: Decreasing the number of instances for existing connectors is notsupported.To decrease the number of minimum and maximum number of instances, you must dothe following:
- Create a new connector with your preferred values.
- Update your service or function to use the new connector.
- Delete the old connector when you've moved its traffic.
Increase minimum and maximum number of instances
Console
Go to the Serverless VPC Access overview page.
Select the connector you want to edit and clickEdit.
In theMinimum instances field, select your preferred minimum number ofinstances.
The smallest possible value for this field is the current value. Thelargest possible value for this field is the current value in theMaximum instances field minus 1. For example, if the value in theMaximum instances field is 8, then the largest possible value for theMinimum instances field is 7.
In theMaximum instances field, select your preferred maximum number ofinstances.
The smallest possible value for this field is the current value. Thelargest possible value for this field is 10.
gcloud
In the Google Cloud console, activate Cloud Shell.
At the bottom of the Google Cloud console, aCloud Shell session starts and displays a command-line prompt. Cloud Shell is a shell environment with the Google Cloud CLI already installed and with values already set for your current project. It can take a few seconds for the session to initialize.
To increase the minimum or maximum number of instances for the connector,run the following command in your terminal:
gcloudbetacomputenetworksvpc-accessconnectorsupdateCONNECTOR_NAME--region=REGION--min-instances=MIN_INSTANCES--max-instances=MAX_INSTANCES
CONNECTOR_NAME: the name of your connectorREGION: the name of your connector's regionMIN_INSTANCES: your preferred minimum number ofinstances.- Smallest possible value for this field is the current value of
min_instances. To find the current value, seeFind the current attribute values. - Largest possible value for this field is the current
max_instancesvalue minus 1, becausemin_instancesmust be less thanmax_instances.For example, ifmax_instancesis 8, the largest possible value for thisfield is 7. If your connector uses the defaultmax-instancesvalue of10, the largest possible value of this field is 9. To find the value ofmax-instances, seeFind the current attribute values.
- Smallest possible value for this field is the current value of
MAX_INSTANCES:- Smallest possible value for this field is the current value of
max_instances. To find the current value, seeFind the current attribute values. - Largest possible value for this field is 10.
If you only want to increase the minimum number of instances but not themaximum, you must still specify the maximum number of instances.Conversely, if you only want to update the maximum number of instances butnot the minimum, you must still specify the minimum number of instances.To keep either the minimum or maximum number of instances at their currentvalue, specify their current value. To find their current value, seeFind the current attribute values.
- Smallest possible value for this field is the current value of
Find the current attribute values
To find the current attribute values for your connector, run the following inyour terminal:
gcloudcomputenetworksvpc-accessconnectorsdescribeCONNECTOR_NAME--region=REGION--project=PROJECT
CONNECTOR_NAME: the name of your connectorREGION: the name of your connector's regionPROJECT: the name of your Google Cloud project
Monitor connector usage
Monitoring usage over time can help you determine when to adjust a connector'ssettings. For example, if CPU utilization spikes, you might try increasingthe maximum number of instances for better results. Or if you are maxing outthroughput, you might decide to switch to a larger machine type.
To display charts for the connector's throughput, number of instances, and CPUutilization metrics over time by using the Google Cloud console:
Go to the Serverless VPC Access overview page.
Click the name of the connector you want to monitor.
Select the number of days you want to display between 1 and 90 days.
In theThroughput chart, hold the pointer over the chart to view the connector'srecent throughput.
In theNumber of instances chart, hold the pointer over the chart to view thenumber of instances recently used by the connector.
In theCPU Utilization chart, hold the pointer over the chart to view theconnector's recent CPU usage. The chart displays the CPU usage distributedacross instances for the 50th, 95th, and 99th percentiles.
Delete a connector
Before you delete a connector, you must remove it from any serverless resourcesthat still use it. Deleting a connector before removing it from your serverlessresources prohibits you from deleting the VPC networklater.
For Shared VPC users who set up connectors in the Shared VPChost project, you can use the commandgcloud compute networks vpc-access connectors describeto list the projects in which there are serverless resources that use a givenconnector.
To delete a connector, use the Google Cloud console or the Google Cloud CLI:
Console
Go to the Serverless VPC Access overview page in theGoogle Cloud console:
Select the connector you want to delete.
ClickDelete.
gcloud
In the Google Cloud console, activate Cloud Shell.
At the bottom of the Google Cloud console, aCloud Shell session starts and displays a command-line prompt. Cloud Shell is a shell environment with the Google Cloud CLI already installed and with values already set for your current project. It can take a few seconds for the session to initialize.
Use the following
gcloudcommand to delete a connector:gcloud compute networks vpc-access connectors deleteCONNECTOR_NAME --region=REGION
Replace the following:
- CONNECTOR_NAME with the name of the connector you want to delete
- REGION with the region where the connector is located
Manage custom constraints for projects
This section describes how to create custom constraints for Serverless VPC Accessconnectors and enforce them at the project level. For information about customorganization policies, seeCreating and managing custom organization policies.
Google Cloud Organization Policy gives you centralized, programmaticcontrol over your organization's resources. As theorganization policy administrator, you can define an organization policy,which is a set of restrictions calledconstraints that apply toGoogle Cloud resources and descendants of those resources in theGoogle Cloud resource hierarchy. You can enforce organization policies atthe organization, folder, or project level.
Organization Policy providespredefined constraints for variousGoogle Cloud services. However, if you want more granular, customizablecontrol over the specific fields that are restricted in your organizationpolicies, you can also create custom organization policies.
Benefits
Serverless VPC Access lets you write any number of customconstraints using most user-configured fields in theServerless VPC Access API. For example, you can create a customconstraint specifying which subnets a Serverless VPC Accessconnector can use.
Once applied, requests that violate a policy that enforces a custom constraintshow an error message in the gcloud CLI and inServerless VPC Access logs. The error message contains theconstraint ID and description of the violated custom constraint.
Note: Use thepolicy simulatorto check whether existing connectors in your organization are in violationof a new custom organization policy.Policy inheritance
By default, organization policies are inherited by the descendants of theresources that you enforce the policy on. For example, if you enforce a policyon a folder, Google Cloud enforces the policy on all projects in thefolder. To learn more about this behavior and how to change it, refer toHierarchy evaluation rules.
Limitations
Specifying machine type, minimum instances, or maximum instances is notsupported.
Before you begin
Ensure that you know yourorganization ID.
Required roles
To get the permissions that you need to manage organization policies, ask your administrator to grant you theOrganization policy administrator (roles/orgpolicy.policyAdmin) IAM role on the organization resource. For more information about granting roles, seeManage access to projects, folders, and organizations.
You might also be able to get the required permissions throughcustom roles or otherpredefined roles.
Create a custom constraint
A custom constraint is defined in a YAML file by the resources, methods,conditions, and actions that are supported by the service that you areenforcing the organization policy on. Conditions for your custom constraints aredefined usingCommon Expression Language (CEL). For more information about how to buildconditions in custom constraints using CEL, see the CEL section ofCreating and managing custom constraints.
To create a YAML file for a Serverless VPC Access customconstraint, refer to the following example:
name:organizations/ORGANIZATION_ID/customConstraints/CONSTRAINT_NAMEresourceTypes:-vpcaccess.googleapis.com/ConnectormethodTypes:-CREATEcondition:"CONDITION"actionType:ACTIONdisplayName:DISPLAY_NAMEdescription:DESCRIPTIONReplace the following:
ORGANIZATION_ID: your organization ID, such as123456789.CONSTRAINT_NAME: the name you want for your newcustom constraint. A custom constraint must start withcustom., and canonly include uppercase letters, lowercase letters, or numbers, forexample, custom.defaultNetworkConstraint. The maximum length of this field is 70characters, not counting the prefix.CONDITION: aCEL condition that is written againsta representation of a supported service resource. Thisfield has a maximum length of 1000 characters. For example,"resource.network == default".ACTION: the action to take if theconditionismet. This can be eitherALLOWorDENY.DISPLAY_NAME: a human-friendly name for theconstraint. This field has a maximum length of 200 characters.DESCRIPTION: a human-friendly description of theconstraint to display as an error message when the policy is violated, forexample,"Require network to not be set to default."This field has a maximum length of 2000 characters.
For more information about how to create a custom constraint, seeDefining custom constraints.
Set up a custom constraint
Console
To create a custom constraint, do the following:
- In the Google Cloud console, go to theOrganization policies page.
- From the project picker, select the project that you want to set the organization policy for.
- ClickCustom constraint.
- In theDisplay name box, enter a human-readable name for the constraint. This name is used in error messages and can be used for identification and debugging. Don't use PII or sensitive data in display names because this name could be exposed in error messages. This field can contain up to 200 characters.
- In theConstraint ID box, enter the name that you want for your new custom constraint. A custom constraint can only contain letters (including upper and lowercase) or numbers, for example
custom.disableGkeAutoUpgrade. This field can contain up to 70 characters, not counting the prefix (custom.), for example,organizations/123456789/customConstraints/custom. Don't include PII or sensitive data in your constraint ID, because it could be exposed in error messages. - In theDescription box, enter a human-readable description of the constraint. This description is used as an error message when the policy is violated. Include details about why the policy violation occurred and how to resolve the policy violation. Don't include PII or sensitive data in your description, because it could be exposed in error messages. This field can contain up to 2000 characters.
- In theResource type box, select the name of the Google Cloud REST resource containing the object and field that you want to restrict—for example,
container.googleapis.com/NodePool. Most resource types support up to 20 custom constraints. If you attempt to create more custom constraints, the operation fails. - UnderEnforcement method, select whether to enforce the constraint on a RESTCREATE method or on bothCREATE andUPDATE methods. If you enforce the constraint with theUPDATE method on a resource that violates the constraint, changes to that resource are blocked by the organization policy unless the change resolves the violation.
- To define a condition, clickEdit condition.
- In theAdd condition panel, create a CEL condition that refers to a supported service resource, for example,
resource.management.autoUpgrade == false. This field can contain up to 1000 characters. For details about CEL usage, see Common Expression Language. For more information about the service resources you can use in your custom constraints, see Custom constraint supported services. - ClickSave.
- UnderAction, select whether to allow or deny the evaluated method if the condition is met.
- ClickCreate constraint.
Not all Google Cloud services support both methods. To see supported methods for each service, find the service in Supported services.
The deny action means that the operation to create or update the resource is blocked if the condition evaluates to true.
The allow action means that the operation to create or update the resource is permitted only if the condition evaluates to true. Every other case except ones explicitly listed in the condition is blocked.
When you have entered a value into each field, the equivalent YAML configuration for this custom constraint appears on the right.
gcloud
- To create a custom constraint, create a YAML file using the following format:
ORGANIZATION_ID: your organization ID, such as123456789.CONSTRAINT_NAME: the name that you want for your new custom constraint. A custom constraint can only contain letters (including upper and lowercase) or numbers, for example,custom.defaultNetworkConstraint. This field can contain up to 70 characters.RESOURCE_NAME: the fully qualified name of the Google Cloud resource containing the object and field that you want to restrict. For example,vpcaccess.googleapis.com/Connector.CONDITION: a CEL condition that is written against a representation of a supported service resource. This field can contain up to 1000 characters. For example,"resource.network == default".ACTION: the action to take if theconditionis met. Can only beALLOW.DISPLAY_NAME: a human-friendly name for the constraint. This field can contain up to 200 characters.DESCRIPTION: a human-friendly description of the constraint to display as an error message when the policy is violated. This field can contain up to 2000 characters.- After you have created the YAML file for a new custom constraint, you must set it up to make it available for organization policies in your organization. To set up a custom constraint, use the
gcloud org-policies set-custom-constraintcommand: - To verify that the custom constraint exists, use the
gcloud org-policies list-custom-constraintscommand:
name:organizations/ORGANIZATION_ID/customConstraints/CONSTRAINT_NAMEresourceTypes:RESOURCE_NAMEmethodTypes:-CREATEcondition:"CONDITION"actionType:ACTIONdisplayName:DISPLAY_NAMEdescription:DESCRIPTION
Replace the following:
For more information about the resources available to write conditions against, seeSupported resources.
The allow action means that if the condition evaluates to true, the operation to create or update the resource is permitted. This also means that every other case except the one explicitly listed in the condition is blocked.
gcloudorg-policiesset-custom-constraintCONSTRAINT_PATH
ReplaceCONSTRAINT_PATH with the full path to your custom constraint file. For example,/home/user/customconstraint.yaml.
After this operation is complete, your custom constraints are available as organization policies in your list of Google Cloud organization policies.
gcloudorg-policieslist-custom-constraints--organization=ORGANIZATION_ID ReplaceORGANIZATION_ID with the ID of your organization resource.
For more information, see Viewing organization policies.
Enforce a custom constraint
You can enforce a constraint by creating an organization policy that references it, and thenapplying that organization policy to a Google Cloud resource.Console
- In the Google Cloud console, go to theOrganization policies page.
- From the project picker, select the project that you want to set the organization policy for.
- From the list on theOrganization policies page, select your constraint to view thePolicy details page for that constraint.
- To configure the organization policy for this resource, clickManage policy.
- On theEdit policy page, selectOverride parent's policy.
- ClickAdd a rule.
- In theEnforcement section, select whether this organization policy is enforced or not.
- Optional: To make the organization policy conditional on a tag, clickAdd condition. Note that if you add a conditional rule to an organization policy, you must add at least one unconditional rule or the policy cannot be saved. For more information, see Setting an organization policy with tags.
- ClickTest changes to simulate the effect of the organization policy. For more information, see Test organization policy changes with Policy Simulator.
- To enforce the organization policy in dry-run mode, clickSet dry run policy. For more information, see Create an organization policy in dry-run mode.
- After you verify that the organization policy in dry-run mode works as intended, set the live policy by clickingSet policy.
gcloud
- To create an organization policy with boolean rules, create a policy YAML file that references the constraint:
PROJECT_ID: the project that you want to enforce your constraint on.CONSTRAINT_NAME: the name you defined for your custom constraint. For example,custom.defaultNetworkConstraint.- To enforce the organization policy indry-run mode, run the following command with the
dryRunSpecflag: - After you verify that the organization policy in dry-run mode works as intended, set the live policy with the
org-policies set-policycommand and thespecflag:
name:projects/PROJECT_ID/policies/CONSTRAINT_NAMEspec:rules:-enforce:truedryRunSpec:rules:-enforce:true
Replace the following:
gcloudorg-policiesset-policyPOLICY_PATH--update-mask=dryRunSpec ReplacePOLICY_PATH with the full path to your organization policy YAML file. The policy requires up to 15 minutes to take effect.
gcloudorg-policiesset-policyPOLICY_PATH--update-mask=spec ReplacePOLICY_PATH with the full path to your organization policy YAML file. The policy requires up to 15 minutes to take effect.
Test the custom constraint
To test the example that restricts ingress settings, deploy aconnector in the project with network set todefault:
gcloudcomputenetworksvpc-accessconnectorscreateorg-policy-test\--project=PROJECT_ID\--region=REGION_ID\--network=defaultThe output is the following:
Operation denied by custom org policies: ["customConstraints/custom.defaultNetworkConstraint": "Require network to not be set to default."]Example custom organization policies for common use cases
The following table provides examples of custom constraints that you might finduseful with Serverless VPC Access connectors:
| Description | Constraint syntax |
|---|---|
| Require that Serverless VPC Access connectors can only use a specific network. | name:organizations/ORGANIZATION_ID/customConstraints/custom.allowlistNetworksresourceTypes:-vpcaccess.googleapis.com/ConnectormethodTypes:-CREATEcondition:"resource.network=='allowlisted-network'"actionType:ALLOWdisplayName:allowlistNetworksdescription:Require connectors to use a specific network. |
| Description | Constraint syntax |
| Require that Serverless VPC Access connectors have access to only a specific subnet. | name:organizations/ORGANIZATION_ID/customConstraints/custom.restrictSubnetForProjectresourceTypes:-vpcaccess.googleapis.com/ConnectormethodTypes:-CREATEcondition:"resource.subnet.name=='allocated-subnet'"actionType:ALLOWdisplayName:restrictSubnetForProjectdescription:This project is only allowed to use the subnet "allocated-subnet". |
Troubleshooting
Service account permissions
To perform operations in your Google Cloud project,Serverless VPC Access uses theServerless VPC Access Service Agent service account. This serviceaccount's email address has the following form:
service-PROJECT_NUMBER@gcp-sa-vpcaccess.iam.gserviceaccount.com
By default, this service account has theServerless VPC Access Service Agent role(roles/vpcaccess.serviceAgent). Serverless VPC Accessoperations may fail if you change this account's permissions.
Poor network performance or high idle CPU utilization
Using a single connector for thousands of instances can cause performancedegradation and elevated idle CPU utilization. To fix this, shard your servicesbetween multiple connectors.
Issues with custom MTU
If you experience issues with a custom MTU, ensure that youuse the default MTU setting for Cloud Run.
Errors
Service account needs Service Agent role error
If you use theRestrict Resource Service Usageorganization policy constraintto block Cloud Deployment Manager (deploymentmanager.googleapis.com), youmight see the following error message:
Serverless VPC Access service account (service-<PROJECT_NUMBER>@gcp-sa-vpcaccess.iam.gserviceaccount.com) needs Serverless VPC Access Service Agent role in the project.
Set the organization policyto either remove Deployment Manager from the denylist or add itto the allowlist.
Connector creation error
If creating a connector results in an error, try the following:
- Specify anRFC 1918 internal IP range that does not overlap with any existing IP addressreservations in the VPC network.
- Grant your project permission to use Compute Engine VM images from theproject with ID
serverless-vpc-access-images. For more information abouthow to update your organization policy accordingly, seeSet image access constraints.
Unable to access resources
If you specified a connector but still cannot access resources in yourVPC network, make sure that there are no firewall rules on yourVPC network with a priority lower than 1000 that deny ingressfrom your connector's IP address range.
If youconfigure a connector in a Shared VPC service project,make sure that your firewall rulesallow ingress from your serverless infrastructure to the connector.
Connection refused error
If you receiveconnection refused orconnection timeout errors that degradenetwork performance, your connections could be growing without limit acrossinvocations of your serverless application. To limit the maximum number ofconnections used per instance, use a client library that supports connectionpools. For detailed examples of how to use connection pools, seeManage database connections.
Resource not found error
When deleting a VPC network or a firewall rule, you might see amessage that is similar to the following:The resource"aet-uscentral1-subnet--1-egrfw" was not found.
For information about this error and its solution, seeResource not found error in theVPC firewall rules documentation.
Next steps
- Monitor admin activity withServerless VPC Access audit logging.
- Protect resources and data bycreating a service perimeterwith VPC Service Controls.
- Use Identity and Access Management (IAM)roles associated with Serverless VPC Access. SeeServerless VPC Accessroles in theIAM documentation for a list of permissions associated witheach role.
- Connect to Memorystore.
Except as otherwise noted, the content of this page is licensed under theCreative Commons Attribution 4.0 License, and code samples are licensed under theApache 2.0 License. For details, see theGoogle Developers Site Policies. Java is a registered trademark of Oracle and/or its affiliates.
Last updated 2026-02-19 UTC.