

Store and query data in Firestore in Datastore mode
This page shows you how to store and query data in Firestore in Datastore mode using the Google Cloud console.
Before you begin
- Sign in to your Google Cloud account. If you're new to Google Cloud, create an account to evaluate how our products perform in real-world scenarios. New customers also get $300 in free credits to run, test, and deploy workloads.
In the Google Cloud console, on the project selector page, select or create a Google Cloud project.
Roles required to select or create a project
- Select a project: Selecting a project doesn't require a specific IAM role—you can select any project that you've been granted a role on.
- Create a project: To create a project, you need the Project Creator role (
roles/resourcemanager.projectCreator), which contains theresourcemanager.projects.createpermission.Learn how to grant roles.
If you arenot the project owner, your account requires the following permissions to complete this quickstart:
- Your account requires theDatastore Owner role which contains the
datastore.databases.createpermission needed to create a Datastore mode instance. - Datastore mode requires an active App Engine application. If the project doesn't have an application, this quickstart creates one for you. In that case, you require the
appengine.applications.createpermission. The project owner can assign this permission with anIAM custom role.
- Your account requires theDatastore Owner role which contains the
Create a database
To create a new database instance, open the Datastore sectionin the Google Cloud console:
Go to the Datastore pageSelect a database mode.
When you create a new Firestore database, you have the option to useFirestore in either Native Mode or Datastore mode. You can't use bothmodes in the same project.
Select from one of the database options:
Firestore in Native Mode
Recommended for mobile and web apps. To get started with Firestore, continue in theFirestore Quickstart.
Firestore in Datastore Mode
Recommended for app architectures with backend servers.
For more guidance on selecting a database mode and for a feature-by-featurecomparison, seechoosing between Native Mode and Datastore Mode.
Select a database location. Datastore mode supports multi-regionand regional locations.
A multi-region location maximizes availability and durability. Regionallocations offer lower write latency. To learn more about location types,seeDatastore mode locations.The location applies to both Datastore mode databases and App Engine apps foryour Google Cloud project.
Warning: Once you create your database, you cannot change the location.ClickCreate database. After your database finishes initializing, theGoogle Cloud console directs you to the Datastore Entities page.
Store data
Go to the Datastore Entities page in the Google Cloud console.
This page lets you store, query, update, and delete data.
ClickCreate entity.
On theCreate an entity page, use
[default]forNamespace.Type
Taskin theKind field. LeaveKey identifier set to thedefault value ofNumeric ID (auto-generated).UnderProperties, use theAdd property button to add these properties:
Your creation page should now look like this:Name Type Value Indexed description String Learn about Datastore. created Date and time (today's date) ✓ done Boolean False ✓ 
ClickCreate. The console displays the
Taskentity that you just created.
You just stored data in your database!
Run a query
Datastore mode databases support querying data by kind or byGoogle Query Language (GQL). The instructions below walk you through using bothto query your database.
Run kind queries
- ClickQuery by kind.
- Select
Taskas the kind.
The query results show theTask entity that you created.
Next, add a query clause to restrict the results to entities that meet specificcriteria:
- ClickAdd query clause.
- In the dropdown lists, select
WHERE,done,==,boolean, andfalse. - ClickRun. The results show the
Taskentity that youcreated since itsdonevalue isfalse.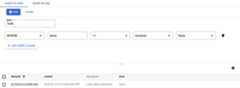
- Now change the query clause to
WHERE,done,==,boolean, andtrue. ClickRun. The results do not include theTaskentity that youcreated, because itsdonevalue is nottrue.
Run GQL queries
- ClickQuery by GQL.
- Enter
SELECT * FROM Taskas the query. Note thatTaskis case sensitive. - ClickRun query.
The query results show theTask entity that you created.
The GQL query editor supports autocompletion for kinds: When you need to type a kind name, press Ctrl+Space to see a list of the available kinds. Up to 300 alphabetically sorted kinds can appear in the list. For better matches of kinds, type one or more characters.
Add a query filter to restrict the results to entities that meetspecific criteria:
- Run a query such as
SELECT * FROM Task WHERE done=false. Note thatTaskanddoneare case sensitive.The results show theTaskentity that you created, since itsdonevalue isfalse.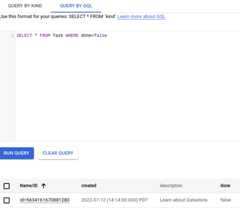
- Now run a query such as
SELECT * FROM Task WHERE done=true. The results donot include theTaskentity that you created, because itsdonevalue isnottrue.
Clean up
- ClickQuery by kind and ensure
Taskis the selected kind. - ClickClear to remove any query clauses.
- Select the
Taskentity that you created. - ClickDelete, and then confirm you want to delete the
Taskentity.Depending on the size of the browser window,Delete might be under theMore actions menu. Oncedeleted, the entity is permanently removed from your database.
That's it, you completed this quickstart!
What's next
- Learn more aboutDatastore Queries.
- Learn more aboutDatastore mode databases.
Except as otherwise noted, the content of this page is licensed under theCreative Commons Attribution 4.0 License, and code samples are licensed under theApache 2.0 License. For details, see theGoogle Developers Site Policies. Java is a registered trademark of Oracle and/or its affiliates.
Last updated 2025-12-15 UTC.