

Jump Start Solution: Dynamic web application with Python and JavaScript
This guide helps you understand, deploy, and use theDynamic web application with Python and JavaScript JumpStart Solution. This solution demonstrates how to build and run dynamic websiteson Google Cloud.
The deployment and management of this application serves as a sample real-worldimplementation of building a dynamic web application with many of the tools andproducts that you can use for serverless applications. You might deploy thissolution if you want to learn about the following:
- Django REST framework (DRF) application
- Storefront application
- Database-backed website
This solution deploys theAvocanoapp. This is a faux storefront, where users can attempt to purchase an item.However, if a user adds an item to their cart, the store reveals it is fake (Avoca—no!).Although users can't actually purchase an avocado, the app illustrates inventorymanagement, by decreasing the amount of available product by one.
Avocano showcases the combination of a Cloud Run-powered API, aCloud SQL for PostgreSQL database, and a Firebase frontend.
See theAvocano application source code.
Note: This solution helps you explore the capabilities ofGoogle Cloud. The solution is not intended to be used as is for productionenvironments. For information about designing and setting up production-gradeenvironments in Google Cloud, seeLanding zone design in Google Cloud andGoogle Cloud setup checklist.Objectives
This solution guide will help you learn how to use Google Cloud to performthe following tasks:
- Deploy a publicly accessible web application
- Connect an application to a Google Cloud database following Google Cloud's recommended security practices:
- Using Secret Manager to store passwords, keys, and certificates.
- Granting only the IAM permissions required to perform thetask. This is also known as applying the principle of least privilege.
- Deploy and operate the backend services.
- Connect an application to a Google Cloud database following Google Cloud's recommended security practices:
- Customize your application
- Make content changes or modify the application to add a feature.
- Build and redeploy securely.
Products used
The following is a summary of the Google Cloud products that this solutionuses:
- Cloud Run:A fully managed service that lets you build and deploy serverlesscontainerized apps. Google Cloud handles scaling and other infrastructuretasks so that you can focus on the business logic of your code.
- Jobs:Container-based task processing.
- Cloud Build:A service that lets you import source code from repositories or Cloud Storagespaces, execute a build, and produce artifacts such as Docker containers orJava archives.
- Cloud SQL for PostgreSQL:A cloud-based PostgreSQL database that's fully managed on the Google Cloudinfrastructure.
- Secret Manager:A service that lets you store, manage, and access secrets as binary blobs ortext strings. You can use Secret Manager to store databasepasswords, API keys, or TLS certificates that are needed by an applicationat runtime.
- Cloud Storage:An enterprise-ready service that provides low-cost, no-limit object storagefor diverse data types. Data is accessible from within and outside ofGoogle Cloud and is replicated geo-redundantly.
- Firebase:A development platform that lets you build, release, and monitor applicationsfor iOS, Android, and the web.
Architecture
The following diagram shows the architecture of the solution:

Components and configuration
The architecture includes the following components:
- The web client is hosted on Firebase Hosting.
- The web client calls an API backend written in Python that runs as aservice on Cloud Run.
- The configuration and other secrets for the Python application are stored inSecret Manager.
- Cloud SQL for PostgreSQL is used as the relational database backend forthe Python application.
- Static assets for the application and container images are storedin Cloud Storage.
Cost
For an estimate of the cost of the Google Cloud resources that thedynamic web application solution uses, see the precalculated estimate in theGoogle Cloud Pricing Calculator.
Use the estimate as a starting point to calculate the cost of your deployment.You can modify the estimate to reflect any configuration changes that you planto make for the resources that are used in the solution.
The precalculated estimate is based on assumptions for certain factors,including the following:
- The Google Cloud locations where the resources are deployed.
- The amount of time that the resources are used.
Before you begin
To deploy this solution, you first need a Google Cloud project and someIAM permissions.
Create or choose a Google Cloud project
When you deploy the solution, you choose theGoogle Cloud project where the resources are deployed. You can either create a new project or use anexisting project for the deployment.
If you want to create a new project, do sobefore you begin the deployment.Using a new project can help avoid conflicts with previously provisionedresources, such as resources that are used for production workloads.
To create a project, complete the following steps:
- Ensure that you have the Project Creator IAM role (
roles/resourcemanager.projectCreator).Learn how to grant roles. In the Google Cloud console, go to the project selector page.
ClickCreate project.
Name your project. Make a note of your generated project ID.
Edit the other fields as needed.
ClickCreate.
Get the required IAM permissions
To start the deployment process, you need the Identity and Access Management (IAM)permissions that are listed in the following table.
If you created a new project for this solution, then you have theroles/ownerbasic role in that project and have all the necessary permissions. If you don't have theroles/owner role, then ask your administrator to grant these permissions (orthe roles that include these permissions) to you.
| IAM permission required | Predefined role that includes the required permissions |
|---|---|
| Service Usage Admin ( roles/serviceusage.serviceUsageAdmin) |
| Service Account Admin ( roles/iam.serviceAccountAdmin) |
| Project IAM Admin ( roles/resourcemanager.projectIamAdmin) |
config.deployments.createconfig.deployments.list | Cloud Infrastructure Manager Admin ( roles/config.admin) |
iam.serviceAccount.actAs | Service Account User ( roles/iam.serviceAccountUser) |
About temporary service account permissions
If you start the deployment process through the console, Google creates aservice account to deploy the solution on your behalf (and to delete the deployment later if youchoose). This service account is assigned certain IAM permissionstemporarily; that is, the permissions are revoked automatically after thesolution deployment and deletion operations are completed. Google recommendsthat after you delete the deployment, you delete the service account, asdescribed later in this guide.
View the roles assigned to the serviceaccount
These roles are listed here in case an administrator of yourGoogle Cloud project or organization needs this information.
roles/cloudsql.adminroles/cloudsql.adminroles/firebasehosting.adminroles/iam.serviceAccountAdminroles/iam.serviceAccountUserroles/resourcemanager.projectIamAdminroles/run.adminroles/secretmanager.adminroles/storage.adminroles/compute.networkAdminroles/compute.admin
Deploy the solution
To help you deploy this solution with minimal effort, a Terraform configurationis provided in GitHub. The Terraform configuration defines all theGoogle Cloud resources that are required for the solution.
You can deploy the solution by using one of the following methods:
Through the console: Use this method if you wantto try the solution with the default configuration and see how it works.Cloud Build deploys all the resources that are required for thesolution. When you no longer need the deployed solution, you can delete itthrough the console. Any resources that you create afteryou deploy the solution might need to be deleted separately.
To use this deployment method, follow the instructions inDeploy through the console.
Using the Terraform CLI: Use this method if you want to customize thesolution or if you want to automate the provisioning and management of theresources by using the infrastructure as code (IaC) approach. Download theTerraform configuration from GitHub, optionally customize the code asnecessary, and then deploy the solution by using the Terraform CLI. Afteryou deploy the solution, you can continue to use Terraform to manage thesolution.
To use this deployment method, follow the instructions inDeploy using the Terraform CLI.
Deploy through the console
Complete the following steps to deploy the preconfigured solution.
Note: If you want to customize the solution or automate theprovisioning and management of the solution by using the infrastructure as code(IaC) approach, then seeDeploy using the Terraform CLI.In the Google Cloud Jump Start Solutions catalog, go to theDynamic web application with Python and JavaScript solution.
Go to the Dynamic web application with Python and JavaScript solution
Review the information that's provided on the page, such as the estimatedcost of the solution and the estimated deployment time.
When you're ready to start deploying the solution, clickDeploy.
A step-by-step configuration pane is displayed.
Complete the steps in the configuration pane.
Note the name that you enter for the deployment. This name is requiredlater when you delete the deployment.
When you clickDeploy, theSolution deployments page is displayed.TheStatus field on this page showsDeploying.
Wait for the solution to be deployed.
If the deployment fails, theStatus field showsFailed. You canuse the Cloud Build log to diagnose the errors. For moreinformation, seeErrors when deploying through the console.
After the deployment is completed, theStatus field changes toDeployed.
To view and use the solution, click themore_vertActionsmenu and selectExplore this solution.
For more information on how to explore your solution deployment,seeExplore your deployment.
When you no longer need the solution, you can delete the deployment to avoidcontinued billing for the Google Cloud resources. For more information,seeDelete the deployment.
Deploy using the Terraform CLI
This section describes how you can customize the solution or automate theprovisioning and management of the solution by using the Terraform CLI.Solutions that you deploy by using the Terraform CLI are not displayed in theSolution deployments page in the Google Cloud console.
Note: If you want to deploy the solution with the default configuration to seehow it works, then follow the instructions inDeploy through the console.Set up the Terraform client
You can run Terraform either in Cloud Shell or on your local host. Thisguide describes how to run Terraform in Cloud Shell, which hasTerraform preinstalled and configured to authenticate with Google Cloud.
The Terraform code for this solution is available in a GitHub repository.
Clone the GitHub repository to Cloud Shell.

A prompt is displayed to confirm downloading the GitHub repository toCloud Shell.
ClickConfirm.
Cloud Shell is launched in a separate browser tab, and theTerraform code is downloaded to the
$HOME/cloudshell_opendirectory ofyour Cloud Shell environment.In Cloud Shell, check whether the current working directory is
$HOME/cloudshell_open/terraform-dynamic-python-webapp/infra. This is thedirectory that contains the Terraform configuration files for the solution.If you need to change to that directory, run the following command:cd$HOME/cloudshell_open/terraform-dynamic-python-webapp/infraInitialize Terraform by running the following command:
terraforminitWait until you see the following message:
Terraform has been successfully initialized!
Configure the Terraform variables
The Terraform code that you downloaded includes variables that you can use tocustomize the deployment based on your requirements. For example, you canspecify the Google Cloud project and theregion where you want the solution to bedeployed.
Make sure that the current working directory is
$HOME/cloudshell_open/terraform-dynamic-python-webapp/infra. If itisn't, go to that directory.In the same directory, create a text file named
terraform.tfvars.In the
terraform.tfvarsfile, copy the following code snippet, and setvalues for the required variables.- Follow the instructions that are provided as comments in the codesnippet.
- This code snippet includes only the variables for which youmust setvalues. The Terraform configuration includes other variables that havedefault values. To review all the variables and the default values, seethe
variables.tffile that's available in the$HOME/cloudshell_open/terraform-dynamic-python-webapp/infradirectory. - Make sure that each value that you set in the
terraform.tfvarsfilematches the variabletype as declared in thevariables.tffile. For example, if the type that'sdefined for a variable in thevariables.tffile isbool, then youmust specifytrueorfalseas the value of that variable in theterraform.tfvarsfile.
# ID of the project in which you want to deploy the solution.project_id = "PROJECT_ID"# Google Cloud region where you want to deploy the solution.# Example: us-central1region = "REGION"# Whether or not to enable underlying APIs in this solution.# Example: trueenable_apis = "ENABLE_APIS"# Initial image to deploy to Cloud Run service.# Example: gcr.io/hsa-public/developer-journey/appinitial_run_image = "INITIAL_RUN_IMAGE"# Identifier for the deployment. Used in some resource names.# Example: dev-journeydeployment_name = "DEPLOYMENT_NAME"# Whether or not to initialize a Firestore instance.# Example: trueinit_firestore = "INIT_FIRESTORE"
For information about the values that you can assign to the required variables, see the following:
project_id:Identifying projects.regions:Available regions.enable_apis: Set totrueto enable underlying APIs in this solution.initial_run_image: The URL for the initial image to deploy to Cloud Run service.deployment_name: Identifier for the deployment.init_firestore: Set totrueto enable the initialization of a Firestore instance.
Validate and review the Terraform configuration
Make sure that the current working directory is
$HOME/cloudshell_open/terraform-dynamic-python-webapp/infra. If itisn't, go to that directory.Verify that the Terraform configuration has no errors:
terraformvalidateIf the command returns any errors, make the required corrections in theconfiguration and then run the
terraform validatecommand again. Repeatthis step until the command returns the following message:Success! The configuration is valid.Review the resources that are defined in the configuration:
terraformplanTerraform prompts you to enter values for the variables that don't havedefault values.Enter the required values.
The output of the
terraform plancommand is a list of the resources thatTerraform provisions when you apply the configuration.If you want to make any changes, edit the configuration and then run the
terraform validateandterraform plancommands again.
Provision the resources
When no further changes are necessary in the Terraform configuration, deploythe resources.
Make sure that the current working directory is
$HOME/cloudshell_open/terraform-dynamic-python-webapp/infra. If itisn't, go to that directory.Apply the Terraform configuration:
terraformapplyTerraform prompts you to enter values for the variables that don't havedefault values.Enter the required values.
Terraform displays a list of the resources that will be created.
When you're prompted to perform the actions, enter
yes.Terraform displays messages showing the progress of the deployment.
If the deployment can't be completed, Terraform displays the errors thatcaused the failure. Review the error messages and update the configurationto fix the errors. Then run the
terraform applycommand again. For helpwith troubleshooting Terraform errors, seeErrors when deploying the solution using the Terraform CLI.After all the resources are created, Terraform displays the followingmessage:
Apply complete!
When you no longer need the solution, you can delete the deployment to avoidcontinued billing for the Google Cloud resources. For more information,seeDelete the deployment.
Explore your deployment
You've deployed your sample dynamic web application application.Your solution deployment consists of multiple primary services that have beenintegrated into a single Google Cloud project, including the following:
- A Firebase Hosting client frontend, writtenusing theLit framework.
- A Cloud Run API server, written inDjango using theDjango REST Framework.
- A Cloud SQL database, usingPostgreSQL.
To view the Google Cloud resources that are deployed and theirconfiguration, take an interactive tour.
Optional: customize your application
To customize the Dynamic web application with Python and JavaScript solution, you can make changes to theapplication frontend and backend, and then redeploy. To follow step-by-stepguidance for this task directly in Cloud Shell Editor, click Guide me.
This task takes about 15 minutes to complete.
Delete the deployment
When you no longer need the solution deployment, to avoid continued billing forthe resources that you created, delete the deployment.
Delete the deployment through the console
Use this procedure if you deployed the solution throughthe console.
In the Google Cloud console, go to theSolution deployments page.
Select the project that contains the deployment that you want to delete.
Locate the deployment that you want to delete.
In the row for the deployment, clickActionsand then selectDelete.
You might need to scroll to seeActions in the row.
Enter the name of the deployment and then clickConfirm.
TheStatus field showsDeleting.
If the deletion fails, see the troubleshooting guidance inError when deleting a deployment.
When you no longer need the Google Cloud project that you used for the solution, youcan delete the project. For more information, seeOptional: Delete the project.
Delete the deployment using the Terraform CLI
Use this procedure if you deployed the solution by using the Terraform CLI.
In Cloud Shell, make sure that the current working directory is
$HOME/cloudshell_open/terraform-dynamic-python-webapp/infra. If itisn't, go to that directory.Remove the resources that were provisioned by Terraform:
terraformdestroyTerraform displays a list of the resources that will be destroyed.
When you're prompted to perform the actions, enter
yes.Terraform displays messages showing the progress. After all the resourcesare deleted, Terraform displays the following message:
Destroy complete!If the deletion fails, see the troubleshooting guidance inError when deleting a deployment.
When you no longer need the Google Cloud project that you used for the solution, youcan delete the project. For more information, seeOptional: Delete the project.
Optional: Delete the project
If you deployed the solution in a new Google Cloud project, and if you no longerneed the project, then delete it by completing the following steps:
Caution: If you delete a project, all the resources in the project arepermanently deleted.- In the Google Cloud console, go to theManage resources page.
- In the project list, select the project that you want to delete, and then clickDelete.
- At the prompt, type the project ID, and then clickShut down.
If you decide to retain the project, then delete the service account that wascreated for this solution, as described in the next section.
Optional: Delete the service account
If you deleted the project that you used for the solution, then skip thissection.
As mentioned earlier in this guide, when you deployed the solution, a serviceaccount was created on your behalf. The service account was assigned certainIAM permissionstemporarily; that is, the permissions wererevoked automatically after the solution deployment and deletion operations werecompleted, but the service account isn't deleted. Google recommends thatyou delete this service account.
If you deployed the solution through the Google Cloud console, go to theSolution deployments page. (If you're already on that page, refresh the browser.) A process istriggered in the background to delete the service account. No further actionis necessary.
If you deployed the solution by using the Terraform CLI, complete thefollowing steps:
In the Google Cloud console, go to theService accounts page.
Select the project that you used for the solution.
Select the service account that you want to delete.
The email ID of the service account that was created for the solution isin the following format:
goog-sc-DEPLOYMENT_NAME-NNN@PROJECT_ID.iam.gserviceaccount.comThe email ID contains the following values:
- DEPLOYMENT_NAME: the name of the deployment.
- NNN: a random 3-digit number.
- PROJECT_ID: the ID of the project in which youdeployed the solution.
ClickDelete.
Troubleshoot errors
The actions that you can take to diagnose and resolve errors depend on thedeployment method and the complexity of the error.
Errors when deploying through the console
If the deployment fails when you use the console, do thefollowing:
Go to theSolution deployments page.
If the deployment failed, theStatus field showsFailed.
View the details of the errors that caused the failure:
In the row for the deployment, clickActions.
You might need to scroll to seeActions in the row.
SelectView Cloud Build logs.
Review the Cloud Build log and take appropriate action to resolvethe issue that caused the failure.
Errors when deploying using the Terraform CLI
If the deployment fails when you use Terraform, the output of theterraformapply command includes error messages that you can review to diagnose theproblem.
The examples in the following sections show deployment errors that you mightencounter when you use Terraform.
API not enabled error
If you create a project and then immediately attempt to deploy the solution inthe new project, the deployment might fail with an error like the following:
Error: Error creating Network: googleapi: Error 403: Compute Engine API has notbeen used in projectPROJECT_ID before or it is disabled. Enable it by visitinghttps://console.developers.google.com/apis/api/compute.googleapis.com/overview?project=PROJECT_IDthen retry. If you enabled this API recently, wait a few minutes for the actionto propagate to our systems and retry.If this error occurs, wait a few minutes and then run theterraform applycommand again.
Error when deleting a deployment
In certain cases, attempts to delete a deployment might fail:
- After deploying a solution through the console, if youchange any resource that was provisioned by the solution, and if you then tryto delete the deployment, the deletion might fail. TheStatus field on theSolution deployments page showsFailed, and theCloud Build log shows the cause of the error.
- After deploying a solution by using the Terraform CLI, if you change anyresource by using a non-Terraform interface (for example,the console), and if you then try to delete the deployment,the deletion might fail. The messages in the output of the
terraform destroycommand show the cause of the error.
Review the error logs and messages, identify and delete the resources thatcaused the error, and then try deleting the deployment again.
If a console-based deployment doesn't get deleted and if you can'tdiagnose the error by using the Cloud Build log, then you can deletethe deployment by using the Terraform CLI, as described in the next section.
Delete a console-based deployment by using the Terraform CLI
This section describes how to delete a console-based deployment iferrors occur when you try to delete it through the console. Inthis approach, you download the Terraform configuration for the deployment thatyou want to delete and then use the Terraform CLI to delete the deployment.
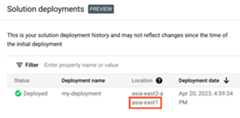
Identify the region where the deployment's Terraform code, logs, and otherdata are stored. This region might be different from the region thatyou selected while deploying the solution.
In the Google Cloud console, go to theSolution deploymentspage.
Select the project that contains the deployment that you want to delete.
In the list of deployments, identify the row for the deployment that youwant to delete.
ClickView all rowcontent.
In theLocation column, note thesecond location, as highlightedin the following example:
In the Google Cloud console, activate Cloud Shell.
At the bottom of the Google Cloud console, aCloud Shell session starts and displays a command-line prompt. Cloud Shell is a shell environment with the Google Cloud CLI already installed and with values already set for your current project. It can take a few seconds for the session to initialize.
Create environment variables for the project ID, region, and name ofthe deployment that you want to delete:
exportREGION="REGION"exportPROJECT_ID="PROJECT_ID"exportDEPLOYMENT_NAME="DEPLOYMENT_NAME"In these commands, replace the following:
- REGION: the location that you noted earlier inthis procedure.
- PROJECT_ID: the ID of the project where youdeployed the solution.
- DEPLOYMENT_NAME: the name of the deploymentthat you want to delete.
Get the ID of the latest revision of the deployment that you wantto delete:
exportREVISION_ID=$(curl \-H"Authorization: Bearer $(gcloud auth print-access-token)" \-H"Content-Type: application/json" \"https://config.googleapis.com/v1alpha2/projects/${PROJECT_ID}/locations/${REGION}/deployments/${DEPLOYMENT_NAME}" \|jq.latestRevision-r)echo$REVISION_IDThe output is similar to the following:
projects/PROJECT_ID/locations/REGION/deployments/DEPLOYMENT_NAME/revisions/r-0Get the Cloud Storage location of the Terraform configuration forthe deployment:
exportCONTENT_PATH=$(curl \-H"Authorization: Bearer $(gcloud auth print-access-token)" \-H"Content-Type: application/json" \"https://config.googleapis.com/v1alpha2/${REVISION_ID}" \|jq.applyResults.content-r)echo$CONTENT_PATHThe following is an example of the output of this command:
gs://PROJECT_ID-REGION-blueprint-config/DEPLOYMENT_NAME/r-0/apply_results/contentDownload the Terraform configuration from Cloud Storage toCloud Shell:
gcloudstoragecp$CONTENT_PATH$HOME--recursivecd$HOME/content/infraWait until the
Operation completedmessage is displayed, as shown inthe following example:Operation completed over 45 objects/268.5 KiBInitialize Terraform:
terraforminitWait until you see the following message:
Terraform has been successfully initialized!Remove the deployed resources:
terraformdestroyTerraform displays a list of the resources that will be destroyed.
If any warnings about undeclared variables are displayed, ignore thewarnings.
When you're prompted to perform the actions, enter
yes.Terraform displays messages showing the progress. After all theresources are deleted, Terraform displays the following message:
Destroy complete!Delete the deployment artifact:
curl-XDELETE \-H"Authorization: Bearer $(gcloud auth print-access-token)" \-H"Content-Type: application/json" \"https://config.googleapis.com/v1alpha2/projects/${PROJECT_ID}/locations/${REGION}/deployments/${DEPLOYMENT_NAME}?force=true&delete_policy=abandon"Wait a few seconds and then verify that the deployment artifact wasdeleted:
curl-H"Authorization: Bearer $(gcloud auth print-access-token)" \-H"Content-Type: application/json" \"https://config.googleapis.com/v1alpha2/projects/${PROJECT_ID}/locations/${REGION}/deployments/${DEPLOYMENT_NAME}" \|jq.error.messageIf the output shows
null, wait a few seconds and then run the commandagain.After the deployment artifact is deleted, a message as shown in thefollowing example is displayed:
Resource 'projects/PROJECT_ID/locations/REGION/deployments/DEPLOYMENT_NAME' was not found
Cannot assign requested address error
When you run theterraform apply command, acannot assign requested addresserror might occur, with a message like the following:
Error: Error creating service account: Post "https://iam.googleapis.com/v1/projects/PROJECT_ID/serviceAccounts: dial tcp [2001:db8:ffff:ffff::5f]:443: connect: cannot assign requested addressIf this error occurs, run theterraform apply command again.
Submit feedback
Jump Start Solutions are for informational purposes only and are not officiallysupported products. Google may change or remove solutions without notice.
To troubleshoot errors, review the Cloud Build logs and the Terraformoutput.
To submit feedback, do the following:
- For documentation, in-console tutorials, or the solution, usetheSend Feedback button on the page.
For unmodified code, create issues in the appropriate GitHub repository:
GitHub issues are reviewed on a best-effort basis and are not intended forgeneral usage questions.
- For issues with the products that are used in the solution, contactCloud Customer Care.
What's next
To continue learning more about Google Cloud products and capabilities,see:
Except as otherwise noted, the content of this page is licensed under theCreative Commons Attribution 4.0 License, and code samples are licensed under theApache 2.0 License. For details, see theGoogle Developers Site Policies. Java is a registered trademark of Oracle and/or its affiliates.
Last updated 2024-05-10 UTC.