

Configure active health check for regional failover with PSC
This page applies toApigee, but not toApigee hybrid.
View Apigee Edge documentation.
This document explains how to use Apigee to configureactive health check when you use Private Service Connect (PSC) for northbound network routing (traffic from clients to Apigee). Active health check is useful for preventing loss of network traffic in case of a regional failure.
Overview
If you plan to use PSC for Apigee northbound network routing, follow the instructions in this document to configure active health check. At this time PSC does not support active health check monitoring, but you can modify the Apigee configuration to use a managed instance group (MIG), which does provide active health check capability.
You could useoutlier detection for health monitoring; however during regional failures, you may lose some amount of traffic periodically as outlier detection uses real-time traffic as indicators. Outlier detection re-routes part of the live traffic periodically to check the health of the failed region.
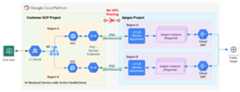
Figure 1 shows the proposed architecture. A service endpoint connects to the service attachment in the Apigee instance, and a MIG proxies traffic to the service endpoint. You enable health check monitoring on the MIG.
MIG-based health check approach
Prerequisites
You can apply the technique described in this document to Apigee installations that use VPC peering or do not use VPC peering. But in the case of a VPC peered installation, the active health check technique described here only applies if you are using PSC for your routing configuration.
Before performing the steps in this section:
- Fornon-VPC peering installations:
- Complete Apigee provisioning Steps 1 through 6 forsubscription-based orPay-as-you-go installations. At this time, the only option is to perform these steps using the command-line interface.
- Skip Step 7: Configure routing, and do the following steps instead.
- ForVPC peering installations that use PSC for routing:
- Complete Apigee provisioning Steps 1 through 7 forsubscription-based orPay-as-you-go installations. At this time, the only option is to perform these steps using the command-line interface.
- Skip Step 8: Configure routing, and do the following steps instead.
1. Configure a PSC service endpoint for the Apigee service attachment
In this step, you create a PSC Service Endpoint that points to the service attachment in the Apigee instance:
- Get the service attachment from the Apigee instance you created previously:
curl -i -X GET -H "Authorization: Bearer$AUTH" \ "https://apigee.googleapis.com/v1/organizations/$PROJECT_ID/instances"
In the following sample output, the
serviceAttachmentvalue is shown in bold type:{"instances":[{"name":"us-west1","location":"us-west1","host":"10.82.192.2","port":"443","createdAt":"1645731488019","lastModifiedAt":"1646504754219","diskEncryptionKeyName":"projects/my-project/locations/us-west1/keyRings/us-west1/cryptoKeys/dek","state":"ACTIVE","peeringCidrRange":"SLASH_22","runtimeVersion":"1-7-0-20220228-190814","ipRange":"10.82.192.0/22,10.82.196.0/28","consumerAcceptList":["875609189304"],"serviceAttachment":"projects/bfac74a67a320c43a12p-tp/regions/us-west1/serviceAttachments/apigee-us-west1-crw1"}]}
consumerAcceptListlist. In the example output shown above, it is the only project in the list. - Create a PSC Service Endpoint that points to the service attachment that you obtained from the instance response body in the previous step, as explained inCreate a Private Service Connect endpoint.
2. Configure a MIG that points to the service endpoint
In this step, you create a MIG that proxies traffic to the service endpoint. You can then enable active health check on the MIG. You can give the Apigee provisioner a predefined role that includes the permissions needed to complete this task, or give more fine-grained permissions to provide the least privilege necessary.SeePredefined rolesandAccess routing permissions. To enablePrivate Google Access for asubnet of your VPC network, follow the steps listed inEnabling Private GoogleAccess. The instructions in this section use environment variables to refer to repeatedly usedstrings. We recommend that you set these before continuing: You'll use these variables several times during the remaining processes. If youwish to configure multiple regions, then create variables with values specific foreach region. In this step, you create and configure a managed instance group (MIG). As you can see from this command, machines are of type In the following steps you configure a load balancer with health check monitoring. You only need to create the credentials once, whether you areinstalling in single or multi regions. In a later step, you will associate these credentials with the load balancer's target HTTPS proxy. You can create the credentials with: For more information on creating and using SSL certificates for Google Cloud load balancer, seeSSLcertificates andSSL certificate overview. In the following example, we create a Google-managed SSL certificate: Set The certificate can take up to an hour to be provisioned. To check the status of the provisioning, execute this command: You'll use this health check to ensure that the backend service is running. For configuring more advanced health checks against a specific proxy, seePerforming health checks. Try updating You must assign an IP address to the load balancer and then create rules that allowthe load balancer to access the MIG. You only need to do this step once, whether you areinstalling in single or multi regions. Note that the IP address ranges Apigee provisioning is complete. Go toDeploy a sample proxy.Permissions required for this task
2A. Enable Private Google Access for a subnet of your VPC network
2B. Set environment variables
Multi-region: A multi-region setup requires aseparate MIG for each region..MIG_NAME=YOUR_MIG_NAME # A name you provide for the MIG
VPC_NAME=default # If you are using ashared VPC, use the shared VPC nameVPC_SUBNET=default # Private Google Access must be enabled for this subnetREGION=RUNTIME_REGION # The same region as your Apigee runtime instanceSERVICE_ENDPOINT_IP=YOUR_SERVICE_ENDPOINT_IP. ## The endpoint IP of the service endpoint you just created2C. Create a managed instance group
Multi-region: A multi-region setup requires aseparate MIG for each region. If you are configuring multiple regions, repeatSteps 2b and 2c for each region, substituting the appropriate variables for each region.gcloud compute instance-templates create$MIG_NAME \--project$PROJECT_ID \--region$REGION \--network$VPC_NAME \--subnet$VPC_SUBNET \--tags=https-server,apigee-mig-proxy,gke-apigee-proxy \--machine-type e2-medium --image-family debian-12 \--image-project debian-cloud --boot-disk-size 20GB \--no-address \--metadata ENDPOINT=$SERVICE_ENDPOINT_IP,startup-script-url=gs://apigee-5g-saas/apigee-envoy-proxy-release/latest/conf/startup-script.sh
e2-medium. They run Debian 12 and have 20GB of disk. Thestartup-script.sh script configures the MIG to route inbound traffic from the load balancer to the Apigee instance.gcloud compute instance-groups managed create$MIG_NAME \--project$PROJECT_ID --base-instance-name apigee-mig \--size 2 --template$MIG_NAME --region$REGION
gcloud compute instance-groups managed set-autoscaling$MIG_NAME \--project$PROJECT_ID --region$REGION --max-num-replicas 3 \--target-cpu-utilization 0.75 --cool-down-period 90
gcloud compute instance-groups managed set-named-ports$MIG_NAME \--project$PROJECT_ID --region$REGION --named-ports https:443
3. Configure the load balancer with health check monitoring
3A. Create an SSL certificate and key for the load balancer
CERTIFICATE_NAME=YOUR_CERT_NAME
DOMAIN_HOSTNAME=YOUR_DOMAIN_HOSTNAMEDOMAIN_HOSTNAME to a valid domain hostname that you have registered. In a later step, you will obtain the load balancer's IP address and update the domain A record to point to that address. For example, a domain hostname might look like this:foo.example.com.gcloud compute ssl-certificates create$CERTIFICATE_NAME \--domains=$DOMAIN_HOSTNAME \--project$PROJECT_ID \--global
gcloud compute ssl-certificates describe $CERTIFICATE_NAME \--global \--format="get(name,managed.status, managed.Status)"
3B. Create a health check
gcloud compute health-checks create httpsHEALTH_CHECK_NAME \--project$PROJECT_ID --port 443 --global \--request-path /healthz/ingressERROR: unrecognized arguments: --global,
gcloud using thegcloud components update command.gcloud compute backend-services createPROXY_BACKEND_NAME \--project$PROJECT_ID \--protocol HTTPS \--health-checksHEALTH_CHECK_NAME \--port-name https \--timeout 302s \--connection-draining-timeout 300s \--globalREGION andMIG_NAME variables for each region.gcloud compute backend-services add-backendPROXY_BACKEND_NAME \--project$PROJECT_ID --instance-group$MIG_NAME \--instance-group-region$REGION \--balancing-mode UTILIZATION --max-utilization 0.8 --global
gcloud compute url-maps createMIG_PROXY_MAP_NAME \--project$PROJECT_ID --default-servicePROXY_BACKEND_NAMEgcloud compute target-https-proxies createMIG_HTTPS_PROXY_NAME \--project$PROJECT_ID --url-mapMIG_PROXY_MAP_NAME \--ssl-certificates$CERTIFICATE_NAME3C. Get a reserved IP address and create firewall rules
gcloud compute addresses createADDRESSES_NAME \--project$PROJECT_ID \--ip-version=IPV4 \--globalgcloud compute forwarding-rules createFORWARDING_RULE_NAME \--project$PROJECT_ID --addressADDRESSES_NAME --global \--target-https-proxyMIG_HTTPS_PROXY_NAME --ports 443gcloud compute addresses describeADDRESSES_NAME \--project$PROJECT_ID --format="get(address)" --globalgcloud compute firewall-rules createFIREWALL_RULE_NAME \--description "Allow incoming from GLB on TCP port 443 to Apigee Proxy" \--project$PROJECT_ID --network$VPC_NAME --allow=tcp:443 \--source-ranges=130.211.0.0/22,35.191.0.0/16 --target-tags=gke-apigee-proxy
130.211.0.0/22 and35.191.0.0/16 are the source IP address ranges for Google Load Balancing. This firewall rule allows Google Cloud Load Balancing to make health check requests to the MIG.
Except as otherwise noted, the content of this page is licensed under theCreative Commons Attribution 4.0 License, and code samples are licensed under theApache 2.0 License. For details, see theGoogle Developers Site Policies. Java is a registered trademark of Oracle and/or its affiliates.
Last updated 2026-02-19 UTC.