

Verifying access tokens
This pageapplies toApigee andApigee hybrid.
View Apigee Edge documentation.
When you call an API proxy on Apigee that has OAuth security, Apigee is responsible for verifying access tokens. Think of Apigee as the gatekeeper -- no API call can pass through that does not have an access token that can be verified.
Tip: When verifying an access token, if you happen to see this error: "Invalid API call as no apiproduct match found", go to this Apigee Community article for details on the cause of this error and steps to correct it.Adding a VerifyAccessToken policy
To configure token verification, place anOAuthV2 policy with theVerifyAccessToken operation at the very beginning of the API proxy flow (the beginning of the ProxyEndpoint Preflow). If placed there, access tokens will be verified before any other processing takes place, and if a token is rejected, Apigee stops processing and returns an error back to the client.
To access the API proxies page using the Apigee UI:
Apigee in Cloud console
In the Google Cloud console, go to theProxy development>API proxies page.
- From the list, select the proxy you wish to protect.
- In the proxy details page, click theDevelop tab.
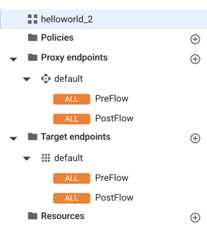
- In the navigation menu, underProxy endpoints,default, clickPreFlow. Typically, the endpoint you want is calleddefault, although it is possible to create multiple proxy endpoints. If you do have multiple endpoints, you will probably want to follow these steps to perform token verification on each one.
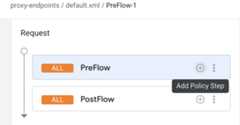
In the proxy flow editor, clickAdd policy step.
- In theAdd policy step dialog, selectCreate new policy.
- From the policy list, underSecurity, selectOAuth v2.0.
- Optionally, change the policy name and display name. For example, for better readability, you might change theDisplay name andName both toVerifyAccessToken.
- ClickAdd.
Classic UI
- Open theApigee UI.
- SelectDevelop > API Proxies in the left navigation bar.
- From the list, select the proxy you wish to protect.
- In the overview page, click theDevelop tab.
- In the Navigator, selectPreFlow for an endpoint listed under Proxy Endpoints. Typically, the endpoint you want is called "default", although it is possible to create multiple proxy endpoints. If you do have multiple endpoints, you will probably want to follow these steps to perform token verification on each one.

- In the proxy flow editor, click+ Step.

- SelectPolicy Instance New.
- From the policy list, selectOAuth v2.0.
- Optionally, change the policy name and display name. For example, for better readability, you might change the display name and name both to "VerifyAccessToken".
- ClickAdd.
The default policy is already configured with the VerifyAccessToken operation, so you do not have to do anything further:
<?xml version="1.0" encoding="UTF-8" standalone="yes"?><OAuthV2 async="false" continueOnError="false" enabled="true" name="OAuth-v20-1"> <DisplayName>OAuth v2.0 1</DisplayName> <FaultRules/> <Properties/> <Attributes/> <ExternalAuthorization>false</ExternalAuthorization> <Operation>VerifyAccessToken</Operation> <SupportedGrantTypes/> <GenerateResponse enabled="true"/> <Tokens/></OAuthV2>
-H "Authorization: Bearer Rft3dqrs56Blirls56a"
You can change this default in the<AccessToken> element in the OAuthV2 policy, as explained in theOAuthV2 policy documentation.
Except as otherwise noted, the content of this page is licensed under theCreative Commons Attribution 4.0 License, and code samples are licensed under theApache 2.0 License. For details, see theGoogle Developers Site Policies. Java is a registered trademark of Oracle and/or its affiliates.
Last updated 2025-12-15 UTC.