

Manage the Apigee workspace
This pageapplies toApigee andApigee hybrid.
View Apigee Edge documentation.
Before you can develop your Apigee APIs locally using Cloud Code, you must create a new or open an existingApigee workspace in Cloud Code. An Apigee workspace contains the directory structure required for local development.
The following sections describe how to create, open, and manage an Apigee workspace.
Create an Apigee workspace
To create an Apigee workspace:
Perform one of the following actions:
ClickCreate Apigee workspace in theApigee section if no Apigee workspace is open.

SelectView > Command Palette to open the Command palette and selectCloud Code: Create Apigee workspace.
Select the workspace type that matches your preferred development style. You can choose between asingle-repository workspace or amulti-repository workspace.
Enter a name for the Apigee workspace.
Navigate to the directory where you want to save the Apigee workspace.If you are using source control management, select a location in your source control repository.
ClickSelect workspace folder.The Apigee workspace is created, stored in the specified local directory, and opened in the VS Code Explorer.
Click the
 Cloud Code icon in the Activity Bar.
The Apigee workspace displays in theApigee section:

Based on the type of workspace selected, the following content is created:
- For a single-repository workspace, a set of folders is created under
your-workspace-location. For more information, seeUnderstanding the structure of an Apigee single-repository workspace. - For a multi-repository workspace, a file named
your-workspace-location.code-workspaceis created with the required JSON content. For more information, seeUnderstanding the structure of an Apigee multi-repository workspace.
Open an Apigee workspace
Note: When you open an Apigee workspace the structure will be validated. For more information, seeUnderstanding the structure of an Apigee workspace.To open an existing Apigee workspace:
Perform one of the following actions:
ClickOpen Apigee workspace on the Apigee ExplorerLocal development node if no Apigee workspace is open.

SelectView > Command Palette to open the Command palette and selectCloud Code: Open Apigee Workspace.
Navigate to the Apigee workspace in your local environment.
- If you are opening a single-repository workspace, select the top level folder of your Apigee workspace thatcontains the
src/main/apigeefolder. - If you are opening a multi-repository workspace, select the workspace file with the extension
.code-workspace.
- If you are opening a single-repository workspace, select the top level folder of your Apigee workspace thatcontains the
ClickSelect workspace folder or multi-repository workspace file.The Apigee workspace is opened in Cloud Code where you are able to explore the workspace contents.
Click the
Cloud Code icon in the Activity Bar.
The Apigee workspace displays in the Apigee Explorer:
Understand the structure of an Apigee single-repository workspace
When youcreate a single-repository Apigee workspace in Apigee in Google Cloud, a set of folders is created to enable you to develop API proxies and shared flows, configure and deploy environments, and build and export test resources. The Apigee workspace is stored atyour-workspace-folder/src/main/apigee in your local environment.
The following table summarizes the structure of an Apigee workspace at a high level.
Note: When managing an Apigee workspace outside of Apigee in Cloud Code, ensure you maintain the following structure to avoid validation errors.| Folder | Description |
|---|---|
apiproxies | Contains a separateapiproxy-name/apiproxy folder for each API proxy configuration, structured as described inAPI proxy configuration directory structure.For example: For more information, seeDeveloping API proxies. |
environments | Defines the runtime execution contexts for the API proxies and shared flows that you want to deploy, including:
For more information, seeConfiguring and deploying environments. |
sharedflows | Contains a separatesharedflow-name/sharedflowbundle folder for each shared flow configuration, structured as described inShared flow bundle configuration reference. For example: For more information, seeDeveloping shared flows. |
tests | Provides a set of test resources, such as API products or developers, required for testing your APIs locally. For more information, seeBuilding and exporting test resources. |
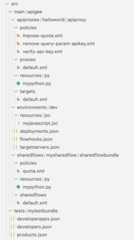
See this example of the structure of an Apigee workspace in your local environment, wheresrc/main/apigee is the root:
Understand the structure of an Apigee multi-repository workspace
A multi-repository workspace works similarly to amulti-root workspace in Cloud Code. It provides users with flexibility to choose individual storage locations for their artifacts yet develop them together using a single workspace. For example when user prefers one source code management repository per proxy.
A multi-repository workspace is JSON text file with a.code-workspace extension.
This is an example content of a multi-repository workspace which contains two API proxies (authentication-proxy, products-proxy), one shared flow (SF-threat-protection), two environments (dev, test) and one test bundle (test-products):
{ "folders": [ { "name": "authentication-proxy", "type": "proxy", "path": "/work/quickdemo/multi/authentication-proxy" }, { "name": "products-proxy", "type": "proxy", "path": "/work/quickdemo/multi/products-proxy" }, { "name": "SF-threat-protection", "type": "sharedflow", "path": "/work/quickdemo/multi/SF-threat-protection" }, { "name": "dev", "type": "environment", "path": "/work/quickdemo/multi/dev" }, { "name": "test", "type": "environment", "path": "/work/quickdemo/multi/test" }, { "name": "test-products", "type": "test", "path": "/work/quickdemo/multi/test-products" } ]}These requirements are for each type of folder that can be added to a multi-repository workspace:
| Folder type | Required folder structure |
|---|---|
environment | Defines the environment configuration, as described inConfigure an environment. The name of the folder is used as the name of the environment. |
proxy | Defines the API proxy structure, as described inAPI proxy configuration directory structure. The name of the folder is used as the name of the API proxy. |
sharedflow | Defines the Shared flow with structure, as described inShared flow bundle configuration reference. The name of the folder is used as the name of the shared flow. |
test | Defines a set of test resources, as described inBuild test resources.The name of the folder is used as the name of the test resource. |
Edit an Apigee multi-repository workspace
Edit a multi-repository workspace by opening theyour-workspace.code-workspace file in Cloud Code or your preferred editor.
To open the file from the Apigee extension in Cloud Code:
ClickEdit workspace on the Apigee ExplorerLocal development node.

SelectView > Command Palette to open the Command palette and selectCloud Code: Edit Workspace.
Manage folders and files in an Apigee workspace
The following sections describe how to manage folders and files in an Apigee workspace.
Edit files in an Apigee workspace
To edit a file in an Apigee workspace:
Click the name of the file that you want to edit in the Apigee Explorer.The contents display in the editor.
Edit the file, as required.
SelectFile > Save or ⌘S to save your edits.
Copy folders and files in an Apigee workspace
To copy a folder or file in an Apigee workspace:
Right-click the folder or file that you want to copy in the Apigee Explorer and selectCopy.
Enter a unique name for the folder or file and pressEnter.
The copied folder or file appears in the Apigee workspace.
Rename folders and files in an Apigee workspace
To rename a folder or file in an Apigee workspace:
Right-click the folder or file that you want to copy in the Apigee Explorer and selectRename.
Enter a unique name for the folder or file and pressEnter.
The folder or file is renamed in the Apigee Explorer.
Delete folders and files from an Apigee workspace
To delete a folder or file from an Apigee workspace, right-click the folder or file that you want to copy in the Apigee Explorer and selectDelete.The folder or file is removed from the Apigee workspace.
Refresh the Apigee workspace view
To refresh the Apigee workspace view and synchronize any recent changes made (possibly outside of Cloud Code), perform one of the following actions:
Position your cursor over theApigee Explorer title bar and click
 .
.SelectView > Command Palette to open the Command palette and selectCloud Code: Refresh Apigee Explorer view.
Except as otherwise noted, the content of this page is licensed under theCreative Commons Attribution 4.0 License, and code samples are licensed under theApache 2.0 License. For details, see theGoogle Developers Site Policies. Java is a registered trademark of Oracle and/or its affiliates.
Last updated 2025-12-15 UTC.