

Step 2: Deploy an API proxy
This page applies toApigee, but not toApigee hybrid.
View Apigee Edge documentation.
An API proxy must be deployed before developers can access and use it.
Apigee in Cloud console
- In the Google Cloud console, go to theApigee> Proxy development> API proxies page.
- Make sure the same Google Cloud project where you created the API proxy is selected from the dropdown at the top of the page.
- Selectmyproxy in the proxies list.
- ClickDeploy to display theDeploy dialog, and enter the following information:
- Revision: Select the revision number of the proxy you want to deploy. If you're doing this tutorial from scratch, there's only one revision to choose from.
- Environment: Select the environment where you want to deploy the proxy. An environment is a runtime execution context for the API proxies in an Apigee organization. You must deploy an API proxy to an environment before it can be accessed.
- Service account (optional): Aservice account for the proxy. The service account represents the identity of the deployed proxy, and determines what permissions it has. This is an advanced feature, and for the purpose of this tutorial, you can ignore it.
- ClickDeploy.
When the proxy is deployed, theStatus column in theDeployments section displaysa green icon to show that the API proxy revision is deployed. You can hover the cursor over the status iconto see more information about the deployment.
Classic Apigee IU
- Open theApigee UI in a browser.
- In the Apigee UI, selectDevelop > API Proxies.
Be sure the "test" environment is selected.
The UI displays your new proxy in the proxies list:

Click on the "myproxy" proxy.
The UI displays theAPI Proxies Overview tab for that proxy in the Proxy Editor.
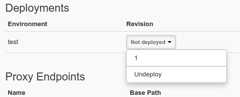
Notice that underDeployments, theRevision column shows "Not deployed".
- In theRevision column, expand the drop-down selector to choose the revision to deploy.
The drop down list displays only "1" and "Undeploy":
Select "1"—the revision that you want to deploy—from the drop down list.
The UI prompts you to confirm the deployment:

- ClickDeploy.
Apigee begins the process of deploying revision 1 of your new proxy.
The next step explains how to call the API proxy you just deployed.
12(NEXT) Step 3: Test the API proxy45Except as otherwise noted, the content of this page is licensed under theCreative Commons Attribution 4.0 License, and code samples are licensed under theApache 2.0 License. For details, see theGoogle Developers Site Policies. Java is a registered trademark of Oracle and/or its affiliates.
Last updated 2025-12-15 UTC.