

Step 1: Create an API proxy
This pageapplies toApigee andApigee hybrid.
View Apigee Edge documentation.
In this step, you will create a simple API proxy that calls a mock target service.
Apigee in Cloud console
In the Google Cloud console, go to theProxy development> API proxies page.
- Be sure that your organization name is selected from the project picker in theGoogle Cloud pane. The organization name is the same as your Google Cloud project name.
- Click+ Create.
- In theCreate a proxy pane, underProxy template, selectReverse proxy (Most common). A reverse proxy simply routes incoming traffic to a backend service.
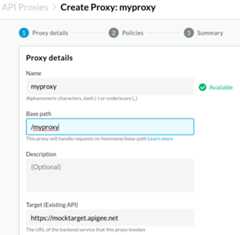
- UnderProxy details, enter the following:
- Proxy name: Enter
myproxy. The remaining steps in this section assume that this is your proxy's name. - Base Path: Automatically set to the value you enter for
Proxy name. TheBase Path is part of the URL used to make requests to your API. Apigee uses the URL to match and route incoming requests to the proper API proxy. - Description (Optional): Enter a description for your new API proxy, such as "Testing Apigee with a simple proxy."
- Target (Existing API): Enter
https://mocktarget.apigee.net. This defines the target URL that Apigee invokes on a request to the API proxy. The mocktarget service is hosted at Apigee and returns simple data. It requires no API key or access token. - Space (Optional): If your organization has Apigee Spaces enabled, you can associate the API proxy with a Space selected from the list of available options. For more information, seeApigee Spaces overview.
- ClickNext.
- Proxy name: Enter
- UnderDeploy (optional) leave theDeployment environments field unchanged. In this example, you just create the proxy without deploying it at this stage. You can also ignore theService Account field. Leave it blank.
- ClickCreate.
Apigee creates the new proxy and displays a summary of the proxy details in theProxy summary pane.

TheDeployments section is empty because the proxy has not yet been deployed.
- In theRevisions section underEndpoint summary, clickView.
The endpoints view pane displays:
- Proxy endpoints: The basepath you set for the proxy, which in this example is
/myproxy. - Target endpoints: The basepath you set for the target, which in this example is
https://mocktarget.apigee.net.
- Proxy endpoints: The basepath you set for the proxy, which in this example is
- ClickClose to return to the Proxy summary page.
Classic Apigee
To create a simple API proxy in the classic Apigee UI:
- Open theApigee UI in a browser.
- ClickDevelop > API Proxies in the main view of the UI.

From theSelect Environment drop-down list, select the environment in which you want to create a new API proxy.
The Apigee UI displays a list of API proxies for that environment. If you haven't created any proxies yet, the list is empty.
- ClickCreate New.

TheCreate Proxy wizard starts:

- SelectReverse proxy (most common).
TheProxy details view is displayed.
- Configure your proxy with the following settings:
- Proxy Name: Enter
myproxy. The remaining steps in this section assume that this is your proxy's ID. - Proxy Base Path: Automatically set to
/myproxy. TheProxy Base Path is part of the URL used to make requests to your API. Apigee uses the URL to match and route incoming requests to the proper API proxy. - Description (Optional): Enter a description for your new API proxy, such asTesting Apigee with a simple proxy.
- Target (Existing API): Enter
https://mocktarget.apigee.net. This defines the target URL that Apigee invokes on a request to the API proxy. The mocktarget service is hosted at Apigee and returns simple data. It requires no API key or access token.
Your API proxy's details should look like the following:
- Proxy Name: Enter
- ClickNext.
- On theCommon policies screen, selectPass through (no authorization) as the security option.
- ClickNext.
- On theSummary screen, clickCreate. (Leave theOptional Deployment unselected.)
Apigee generates the proxy (sometimes referred to asthe proxy bundle):

- ClickGo to proxy list.
Apigee displays theProxies view, which displays a list of API proxies. The new proxy has a gray status indicator, meaning that it has not yet been deployed.
Next you'll deploy the API proxy. A proxy must be deployed before it can be used by a client.
1(NEXT) Step 2: Deploy the API proxy345Except as otherwise noted, the content of this page is licensed under theCreative Commons Attribution 4.0 License, and code samples are licensed under theApache 2.0 License. For details, see theGoogle Developers Site Policies. Java is a registered trademark of Oracle and/or its affiliates.
Last updated 2025-12-15 UTC.