
Photographing your JewelryHow to bring out the sparkle in your more precious product photography
There are a multitude of reasons as to why jewelry can be so hard to photograph well. Professional product photographers can easily spend 6 hours staging, lighting, and photographing one piece, and just as much time editing the image. Here are some ways to get quality images of your jewelry in a fraction of the time.
Preparation and staging jewelry
Step 0 for starting your jewelry photography is a given that still seems to be forgotten: keeping the jewelry clean. Most jewelry materials take on smudges like it’s their job, so it’s best to keep a microfiber or cotton cloth with you at all times. To keep things super sterile, you might consider a pair of cotton gloves.
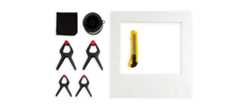
Some objects that can be super helpful to have on hand while photographing are white foam core, a microfiber cloth, fishing wire, and clamps.
Like many online products, size is not always apparent in photography. When you know your product intimately, it may be difficult to spot when the scale is abstract to a buyer. It is wise to take a hard look at all your products to ensure ultimate transparency in everything you’re selling. This may include a shot of a model wearing the piece or another object to be placed in the frame for direct comparison.
Lenses to use when photographing jewelry
You can get away with using a regular kit lens (the starter lens that comes with most DSLRs) when shooting images only intended for small web display. However, if you want to produce more detailed and higher resolution images, you should consider investing in a macro lens.
The difference between your regular lens and a macro lens is that it allows you to zoom in close to a subject without losing focus. This is especially important for shooting detail shots and small pieces of jewelry. Make sure when you’re looking for a macro lens that you look for at least a 1:1 magnification ratio, which is considered the true threshold for macro photography. This means that objects will be projected on the sensor at the same size as they appear in real life; whereas a 2:1 magnification ratio will project images at twice their size and a 1:2 ratio will project objects at half their size. A word of caution: some lenses are marketed as macro, but only have a 1:2. We found that using a “macro” lens with a 1:2 magnification ratio didn’t give us significantly better images than using our 18-55mm kit lens.
Lenses for photographing jewelry on a phone
When shooting on a phone camera, a macro lens attachment can help you get closer more detailed images of your smaller jewelry. There are a lot of options out there for external phone macro lenses, but many of them don’t work well for jewelry. Many of the options require you to shoot the object extremely close (ex.10mm), which isn’t great when you’re trying to display the entire piece.
When looking for a phone lens, we wish we could say look for this magnification number or focal length but most of the values on listings for photo macro lenses seem to be either arbitrary or inaccurate. Our best advice is to make sure you’re able to find examples images that were actually taken with the lens, either in reviews or customer photos. This will give you the most accurate view of what the lens is capable of.

Taken on an iPhone 7 with and without a macro clip-on lens at the same distance away from the ring (about an inch). As you can see, the naked lens can’t focus on an object that close which means you can’t get as detailed and high resolution of a photo.
We had good luck with theAukey 10x Macro clip on lens, which is compatible with most phones and is fairly inexpensive. This model’s macro lens is combined with a fisheye lens that you screw off to use the macro lens.
Display ideas for photographing different types of jewelry
Using flat lays
The flat lay for jewelry is perfectly acceptable for many styles. Get creative with chain placement for long necklaces to dazzle your customer into a sale. Have fun with the pairing of complementary items to maximize the overall look.

One way to get a perfect neck shape in a flat lay is to use a small plate (or another round object, we used a tape roll). Drape your chain around its perimeter, remove it, then take the photo.
Pendant style necklaces
A way to display a pendant style necklace is to create a frame out of white foam core and dangle the pendant in the middle. This an area where the clamps can really come in handy for propping and staging.

Using fishing wire
You may already be aware of the use of fishing or clear crafting wire for the display of jewelry. What may be new to you are the various ways it can be utilized to best suit your needs. Starting with a singular string, hung vertically and looped around the end of your product: this works great for a static bracelet or ring.
Use the wire horizontally, secured at each end tightly, to support earrings. If your earrings won’t stay on the one wire by themselves, add a second wire a pinch below the bottom of the pieces to hook onto their bottom half; thus creating a taut and unmoving shape to photograph.

This is another great use for a foam core frame. We angled it this way so we could take the photo head on and the fishing wire would be hidden behind the large gemstone. This makes editing it less of a hassle.
Post back earrings
When staging post back earrings for photographing, white foam core is, again, very useful. You’ll simply punch the back of the earring post into the foam core and photograph it.

Sticky tack and rings
When staging a ring, sticky tack is quite handy. Place some of it on a flat white foam core and place your ring on top.

When doing this make sure the ring is positioned on the tack in a fashion where the tack isn’t obscuring any of the ring from the camera. This can make clipping and editing a photo more complicated.
Final thoughts on staging
Finally, make sure at least one or two of your images for each listing is a close-up shot. Details are one of the most important aspects of jewelry. Materials and design must be adequately highlighted for the full picture.
How to light jewelry for product photography
Your lighting setup will ultimately depend on the jewelry you’re photographing and the look you’re going for.
Lighting setup we used
Either natural or artificial light can be used to great effect to light jewelry. We had great luck usingtwo softboxes with5500K LED bulbs.

The nice thing about these is they are fairly inexpensive, and they can produce a lot of really nice soft white light. Most of the kits available come with fluorescent bulbs included — they work but give off a purple hue. We’ve found that we get better results when using LED bulbs instead. Plus they’re significantly more energy efficient, don’t get as hot, and last longer.
Benefits of using a lightbox with reflective jewelry
Reflections are especially difficult when photographing jewelry. Our best advice is to use a lightbox. This will eliminate a great majority of unwanted reflections and give you greater control on the ones you do want.

Here’s an example of different amounts of white foam core used in a lightbox to control what reflections are displayed on the earring. Left is just the earring in the lightbox, the middle has a foam board positioned to cover the dark top of the lightbox, and the right has another added to cover the opening of the lightbox. Much of this is just a stylistic choice for what you think will look best for your jewelry.
There are several different lightboxes you can purchase. Our model has white diffuser panels on 3 sides and a drapable backdrop. Others can be set up to have all four sides covered in white with a slit opening that you’re able to take pictures through. This eliminates the need for stacking foam core to remove every unwanted dark reflection.
Technique to get gemstones to sparkle
A solid technique for lighting gemstones is to flank the piece on both sides with two sources of soft lighting and another direct light straight on.

When choosing the direct light, make sure to never mix different color source temperatures, this can make editing a real pain. As you can see in the figure below, this method better illuminates the cut and clarity of the gemstone.

Gemstone jewelry with (left) and without (right) a straight-on direct light
Working with natural light from a window
If you’re using natural light from a window (or only have one light source) white foam core is also very useful in getting more light on your piece of jewelry. This will help in counteracting unwanted shadows in a flat lay or making sure each side is more evenly lit. Angle the foam core (or a professional reflector) on the opposite side of your light source to cast more light on your subject. This will make any unwanted shadows much less apparent and give you a more even lighting on both sides.
Clip Tip:
If you still have an unwanted shadow in your photo you can just clip it out while you’re editing in Clipping Magic!
tl;dr
Two softboxes with LED bulbs, a lightbox, white foam core and a bunch of clamps can help you easily produce some nice photos of your jewelry.
These may interest you as well.

Using a Scanner for Product Photography
A method of taking product photos you might not have considered
Read more »
Perfect your Product Photography
Helpful tips to create better shots for your e-commerce business
Read more »
Quickly Edit and List Your Items Using Bulk Clipping
A crash course in how to efficiently clip your inventory in no time
Read more »
