

Tutorial: Getting Started With Webpack Applications in WebStorm

Note: This blog post was updated in October 2022.
Webpack is a module bundler. Its main purpose is to bundle JavaScript files for usage in browsers. It’s also capable of transforming, bundling, and packaging most assets and resources.
In this tutorial, we’ll go over how to get started with webpack in WebStorm. We’ll do the following:
- Create a new WebStorm project and add some code to it
- Try to run the application and see how webpack may help us
- Install webpack in your project
- Create a webpack configuration file
- Build the application with webpack
- Automate webpack build in WebStorm
- Try to debug the application and see why we need source maps
- Debug the application with source maps
Create a new WebStorm project
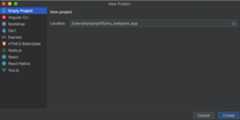
We’ll start by opening WebStorm and clickingNew Project on theWelcome screen.

In theNew Project dialog, selectEmpty Project and specify the name of the project. Let’s usemy_webpack_app. Once you clickCreate, an empty project will be generated and opened in WebStorm.
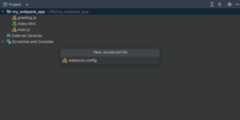
Now let’s create the JavaScript filesmain.js andgreetings.js, and anindex.html file that referencesmain.js.
To create a file, select the project root foldermy_webpack_app, right-click on it and selectNew | HTML File orNew | JavaScript File from the context menu.

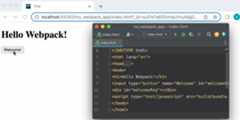
We’ll start with theindex.html page. On this page, we’ll add aWelcome! button using the following code:
<body><h1>Hello Webpack!</h1><input type="button" name="Welcome" id="welcomeBtn" value="Welcome!"><div id="welcomeMsg"></div><script src="main.js" type="text/javascript" ></script></body>
Clicking theWelcome! button callsmain.js:
const greeting = require("./greeting.js");(function () {const welcomeBtn = document.getElementById("welcomeBtn");const welcomeMsg = document.getElementById("welcomeMsg");welcomeBtn.addEventListener('click', function(){ greeting(welcomeMsg)});})();Main.js then callsgreeting.js, which displays aWelcome to WebStorm message:
function addGreeting (a) { a.innerHTML = "Welcome to WebStorm";}module.exports = addGreeting;You may notice that WebStorm hasn’t resolvedmodule andrequire. To fix this, hover over the unresolved code and clickEnable coding assistance for Node.js.

Run the application: first attempt
Now let’s run our application. Openindex.html and selectRun ‘index.html’ from its context menu.

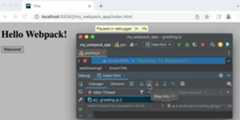
The browser will open showing the home page with aHello Webpack! message and aWelcome! button. But if we click on the button, nothing happens.

That’s because the browser cannot do module binding. In our case it cannot bind the module fromgreeting.js with the calling module frommain.js.
This is where the webpack module bundler comes in useful.
Install and configure webpack
Let’s add webpack to our project. To do that, we need to install thewebpack andwebpack-cli packages, create a configuration file, and write a script to launch webpack.
Install webpack
Open theTerminal tool window and type:npm install webpack webpack-cli --save-dev
This also adds apackage.json file to the project.
Create a webpack configuration file
Let’s createwebpack.config.js. Select the project folder, then go toNew | JavaScript File from its context menu and specifywebpack.config as the name of the configuration file. WebStorm will add the.js extension automatically.
Openwebpack.config.jsin the editor and type in the following code:
module.exports = { entry: "./main.js", output: { path: __dirname + "/build", filename: "bundle.js" },};Webpack.config.js tells webpack to pack everything that is referenced frommain.js into one file,bundle.js, and storebundle.js in abuild folder under the project root. That’s exactly what we want – one single file that implements all the application functionality and that can be executed in the browser.
You might be thinking that there’s nobuild folder in our project. Don’t worry, it’ll be created automatically.
Write a script to run webpack
Openpackage.json and add ascripts section to it:
“scripts”: {“build": “webpack"}This script lets you build and rebuild the application without writing commands in the terminal.
Build the application
All we need to do now is click theRun Script icon in the gutter next to thescript we created and selectRun ‘build’ from the context menu. This will create abuild/bundle.js file.

Run the application: second attempt
We’re almost ready to try re-running our application. However,index.html still referencesmain.js. We want it to referencebundle.js instead, as this is where we have added all the functionality that needs to be executed in the browser. So, let’s replace this:
<script src="main.js" type="text/javascript" ></script>
with this:
<script src="build/bundle.js" type="text/javascript" ></script>
Openindex.html and selectRun ‘index.html’ from its context menu. The browser opens showing the starting page with aHello Webpack! message and aWelcome! button. Let’s click the button and see what happens. The expected greeting message appears!
Automate the build procedure
When we ran our application fromindex.html, WebStorm created anindex.htmltemporary run configuration. Let’s keep this configuration but update it slightly.
Save the temporary run configuration
From theEdit Configuration list, selectSave ‘index.html’ Configuration.

Add the build script as aBefore Launch task
From theEdit Configuration list, selectEdit Configurations.

Now let’s selectindex.html underJavaScript Debug.

Then we need to click on the “+” icon in theBefore launch section and chooseRun npm script.

In theNPM Script dialog, thepackage.json field already shows the path to the projectpackage.json where wedefined the build script. Selectbuild from theScripts list and clickOK.

The build script is now added to theindex.html run configuration as aBefore launch task!

Debug the application
Now let’s debug our application. Our example is quite simple and doesn’t need much debugging, but we’ll use it to illustrate some important steps.
- Let’s set a breakpoint on line 2 of thegreetings.js file so that, when theWelcome! button is clicked, the application suspends before showing the message.
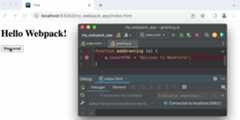
Select theindex.html configuration from the list and clickDebug ‘index.html’ or press^D / Shift+F9. The browser will open showing the home page with aHello Webpac! message and aWelcome! button. TheDebug tool window will open without frames available.
- Let’s click on theWelcome! button. TheWelcome to WebStorm message appears, and theDebug tool window still doesn’t show any frames. It looks like our breakpoint was ignored.
This happens because WebStorm cannot match the code that is being executed (the code from the generatedbundle.js file) to the code that we want to debug (the code in themain.js andgreeting.js files). The good news: Source maps can help us with that.
Generate source maps
Let’s add the following option to thewebpack.config.file:devtool: “source-map”
With this option, webpack will generate source maps that set correspondence between the lines in themain.js andgreeting.js files and the code in thebundle.js file, which the browser runs.
To see if it works, let’s run the build script manually. In thepackage.json file, click theRun Script gutter icon next to the build script and selectRun ‘build’ from the context menu. Webpack has generated two files –bundle.js andbundle.js.map – in thebuild folder.

We won’t need to run the build script manually anymore because WebStorm will execute it automatically as aBefore launch task every time you start theindex.html run configuration.
Debug the application with source maps
Back to debugging: Select theindex.html run configuration from the list and clickDebug ‘index.html’ next to it, or press^D / Shift+F9. Two things happen:
- The browser opens showing theindex.html page with aHello Webpack! message and aWelcome! button.
- TheDebug tool window opens, but no frames are available.
Let’s click on theWelcome! button. The focus automatically switches to WebStorm, where theDebug tool window shows the frames and variables. It lets you step through the code and do everything you usually do while debugging.
That’s it for this tutorial. If you’re looking for more information on webpack and using it in WebStorm, be sure to check out theWebStorm help. There are also a lot ofgreat tutorials available in the webpack documentation.
Feel free to contact ourtech support if you need help.
The WebStorm team
Subscribe to WebStorm Blog updates
Thanks, we've got you!


